background image

C-Series Display

Installation Manual

Document Number: 87020-3
Date: March 2006

87020-3.book  Page i  Tuesday, March 7, 2006  11:02 AM

Summary of Contents for C120

Page 1: ...C Series Display Installation Manual Document Number 87020 3 Date March 2006...

Page 2: ...red in all major marketing territories AST Autoadapt Auto GST Autoseastate Autotrim Bidata Marine Intelligence Maxiview OnBoard Raychart Raynav Raypilot Raystar ST40 ST60 Seaclutter SmartRoute Tridata...

Page 3: ...ce should not be relied upon as a substitute for such prudence and judgement WARNING Product installation This equipment must be installed in accordance with the instructions in this handbook Failure...

Page 4: ...ving any cables into the rear of the display Failure to do so can cause irreparable damage CAUTION CompactFlash Card Installation When installing CompactFlash cards ensure that the card is being fitte...

Page 5: ...nd the handbook Disposal Waste Electrical and Electronic Equipment WEEE Directive The WEEE Directive requires the recycling of waste electrical and electronic equipment Whilst the WEEE Directive does...

Page 6: ...iv C Series Displays Installation Manual...

Page 7: ...nce 9 Chapter 2 System Integration 11 2 1 Introduction 11 2 2 What is System Integration 11 What is SeaTalk 11 SeaTalk 11 SeaTalk2 11 What is NMEA 12 NMEA 0183 12 NMEA 2000 12 2 3 Compatibility 12 Rad...

Page 8: ...ishfinder cable 30 DSM 250 30 DSM 300 30 Radar cable not supplied 30 Connecting a radome 30 Connecting to an open array 31 Chapter 4 Commissioning the system 35 4 1 Introduction 35 4 2 Pre start check...

Page 9: ...ttings 43 Display timing 44 Chapter 5 Troubleshooting 45 5 1 How can I troubleshoot my Display 45 5 2 Technical Support 46 World wide web 46 Help us to help you 46 Contacting Raymarine in the US 47 Ac...

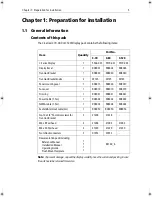
Page 10: ...4 C Series Displays Installation Manual...

Page 11: ...1 R08002 R08046 Trunnion Bracket 1 R08020 R08020 R08020 Trunnion Bracket knobs 2 W145 W145 W145 Panel mounting seal 1 R08015 R08026 R08037 Sun cover 1 R08019 R08019 R08019 Trim ring 1 R08021 R08021 R0...

Page 12: ...NU DATA CANCEL OK RANGE IN OUT 253 mm 10 in 282 mm 11 1 in 9 5 mm 0 375 in 89 4 mm 3 5 in 220 mm 8 66 in plug clearance 177 mm 6 96 in 189 mm 7 44 in D6612 1 RANGE CANCEL OK IN OUT PAGE ACTIVE WPTS MO...

Page 13: ...of an item not available from the retailer or you are uncertain what item to choose for your Display please contact Raymarine direct see page 46 Alternatively please refer to our website www raymarine...

Page 14: ...n alwaysensurethemaximumseparationpossible between different items of electrical equipment For optimum EMC performance it is recommended that wherever possible Raymarine equipment and cables connected...

Page 15: ...There must be sufficient space behind the display to allow cable connec tions to the rear panel connectors avoiding tight bends in the cables Interference Theselectedlocationshouldbefarenoughawayfromd...

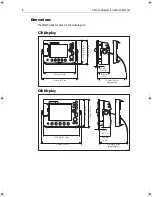
Page 16: ...10 C Series Displays Installation Manual...

Page 17: ...ments is fast and accurate Fast and accurate data transfer is achieved by using a combination of the following data protocols SeaTalk SeaTalk2 National Marine Electronics Association NMEA 0183 NMEA 20...

Page 18: ...LL carries latitude and longitude DBT carries water depth MWV carries relative wind angle and wind speed data NMEA 2000 NMEA 2000 offers significant improvements over NMEA 0183 most notably in speed a...

Page 19: ...mation for the area you wish to navigate are required The charts are available on Navionics Chart cards A chart card provides an appropriate level of detail and scale for a given geographic area To ob...

Page 20: ...e applications require a dedicated transducer to provide specific data The table on below summarizes the data required by each application and the major functions of your C Series Display Data or equi...

Page 21: ...heading data derived from a suitable compass for the radartooperateinNorthUporCourseUpmodeandthecharttooperateinCourse Up and Head Up modes Man Overboard MOB requires heading and speed data Alternati...

Page 22: ...tions SeaTalk system In this system C Series powers SeaTalk for an alpha numeric keypad and RS120 TheDSM hasa dedicated cablesuppliedwiththeunitanddoesnotrequirea termi nator at the C Series end RANGE...

Page 23: ...0183 cable AIS receiver or Navtex receiver RANGE CANCEL OK PAGE ACTIVE WPTS MOB MENU DATA IN OUT MENU CH OK 16 9 HI LO SCAN WATCH SQ RAY240 WX Power IN Power IN D6622 3 Wind Transducer Open Array Wind...

Page 24: ...MENU DATA IN OUT MENU CH OK 16 9 HI LO SCAN WATCH SQ RAY240 WX Power IN Power IN Fast Heading Sensor Compass D6623 3 Wind Transducer Wind display Speed display Depth display DSM 250 or 300 C120 SeaTa...

Page 25: ...TS MOB MENU DATA IN OUT MENU CH OK 16 9 HI LO SCAN WATCH SQ RAY240 WX Power IN Power IN D6622 3 Wind Transducer Open Array Wind display Speed display Depth display DSM 250 or 300 C120 Depth Transducer...

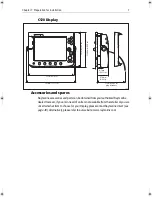
Page 26: ...20 C Series Displays Installation Manual...

Page 27: ...ent rear access for both mounting and cabling The display is waterproof to CFR 46 and can be installed either above or below deck using either the trunnion bracket or by flush mounting it in a suitabl...

Page 28: ...nger in a circular motion to do this 8 Adjust the unit to the required angle for clear vision and tighten the trunnion knobs Flush mount Your display can be flush mounted on the console as follows 1 C...

Page 29: ...ounting bracket from the display unit 7 Drill four 4 5 mm holes as indicated on the template to accept the securing bolts 8 Place trim ring into the cut out ready for securing the unit 9 Place the gas...

Page 30: ...ependant upon bulkhead thickness Attaching the front bezel AfteryouhaveinstalledtheC SeriesDisplayintherequiredposition youshouldattach the front bezel as follows 1 Carefully lift one edge of the scre...

Page 31: ...sition Inner edges particularly along the chart card door edge to ensure that the bezel sits flat 5 Check that all control buttons are free to operate It is suggested that you use your thumb or forefi...

Page 32: ...it proves necessary to pull cables through a bulkhead or deckhead using a cord this should be attached several inches behind the connector Do not attach a tie immediately behind or around the connect...

Page 33: ...ut removing insulation from cable tails Note Do not use cablesplicers on anycables other than SeaTalk Alarmout and NMEA 0183 To use these connectors POWER SEATALK 2 SEATALK RADAR NMEA DSM R G Y IN OUT...

Page 34: ...its own dedicated cable system and MUST be protected by a thermal circuit breaker or fuse installed close to the power connection ThiscableissuppliedpreparedforconnectingtoyourboatsDCpowersupply witht...

Page 35: ...These should be connected to your existing NMEA instruments using suitable connector blocks as follows SeaTalk2 not supplied Use this cable to connect to third party equipment or SeaTalk2 instruments...

Page 36: ...cessory Radar cable not supplied Having ensured that the radar scanner you are using is compatible with the C Series Display see page page 13 the cable should be connected as follows Connecting a rado...

Page 37: ...065 15m Heavy 2Kw or 4 Kw E55066 25m Heavy 2Kw or 4 Kw E55067 10m Light 2kw E55068 15m Light 2kw Radome inter unit cable for use with the C Series display To display or extension power supplied via di...

Page 38: ...lit pedestal cable D6620 2 Connect to open array scanner cable Cable splitter Connect to C Series display Connect to boat s DC power supply Red 12 24V Black 0V Green ground Pedestal adaptor cable 2 5...

Page 39: ...er 3 Installation 33 Split pedestal cable To display To power To Open Array Scanner D7209 1 Note You should ensure that the distance cable route from the power supply to the open array is kept to a mi...

Page 40: ...34 C Series Displays Installation Manual...

Page 41: ...king arrangements as specified are in place Ensure scanner and power connections have been made If an open array is fitted ensure that power is connected through a split cable to a suitable circuit br...

Page 42: ...e ready to start the display 1 Press the POWER button until the introductory logo is displayed The keys light up and after a few seconds a navigation warning is displayed At this time the radar scanne...

Page 43: ...Note Ifyourscannerisincompatible amessageisdisplayed Ifthisisthecase youwillbe unable to proceed further withtesting and aligningthe radar Refer to Important Informa tion Radar Scanners at the front o...

Page 44: ...w using the hand bearing compass To do this subtract your boat head bearing from the target visual bearing these examples may help 3 From the primary radar soft keys press VRM EBL 4 ToggletheVRM EBLso...

Page 45: ...ontrol to place the selected target under the EBL If the boat is under way usetherotarycontrol toplacetheselectedtarget under the SHM 7 Press OK The picture updates as the bearing alignment is adjuste...

Page 46: ...be switched on or off using the appropriate soft key Checking heading data If your display is connected to a compass autopilot or fast heading sensor your boat s heading will be displayed in the data...

Page 47: ...ayed Testing the Fishfinder application For the fishfinder application to function it must be connected to a DSM 250 or 300 ThestatusofyourDSMisindicatedbytheboat fishiconinthedatabar topright hand co...

Page 48: ...ssels to see you A full transponder transmits and receives AIS data and therefore allows you to receive data about other vessels and for other AIS equipped vessels to see and receive information about...

Page 49: ...he set up soft keys will be displayed 5 Press the corresponding soft key for the parameter you wish to adjust Thesoft key label is highlighted 6 Use the rotary control to adjust the parameter value in...

Page 50: ...to be bowed i e To check the display timing 1 Use the RANGE button to select the 1 8 nm scale 2 On the radar picture locate a straight dock seawall or bridge that is facing your boat If the image is b...

Page 51: ...elevant fuses Check power source is of the correct voltage and sufficient current My display switches off Check power input connection is secure at the rear of the Display s Check power cable for dama...

Page 52: ...servicing information e mail access to the Raymarine Technical Support Department and details of the locations of Raymarine agents worldwide If you don t have access to the world wide web contact Tech...

Page 53: ...gs Time If you are not sure which item is appropriate for your unit you should first contact the Technical Support Department at 1 800 539 5539 extension 2444 or 603 881 5200 to verify your requiremen...

Page 54: ...48 C Series Displays Installation Manual...

Reviews: