background image

Summary of Contents for 27F501TDVB

Page 1: ...TV VCR DVD User s Guide Changing Entertainment ...

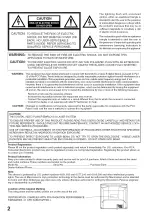
Page 2: ... equipment into an outlet on a circuit different from that to which the receiver is connected Consult the dealer or an experienced radio TV technician for help Changes or modifications not expressly approved by the partly responsible for compliance with the FCC Rules could void the user s authority to operate this equipment CAUTION THIS DIGITAL VIDEO PLAYER EMPLOYS A LASER SYSTEM TO ENSURE PROPER ...

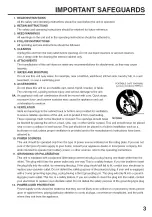
Page 3: ... bed sofa rug or other similar surface This unit should never be placed near or over a radiator or heat source This unit should not be placed in a built in installation such as a bookcase or rack unless proper ventilation is provided and or the manufacturer s instructions have been adhered to 10 POWER SOURCES This unit should be operated only from the type of power source indicated on the rating p...

Page 4: ...er hazards Refer all servicing to qualified service personnel 19 DAMAGE REQUiRiNG SERVICE Unplug this unit from the wall outlet and refer servicing to qualified service personnel under the following conditions a When the power supply cord or plug is damaged b If liquid has been spilled or objects have fallen into the unit c If the unit has been exposed to rain or water d If the unit does not opera...

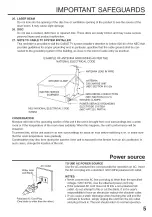
Page 5: ...if the unit is brought from cool surroundings into a warm room or if the temperature of the room rises suddenly When this happens the unit s performance will be impaired To prevent this let the unit stand in its new surroundings for about an hour before switching it on or make sure that the room temperature rises gradually Condensation may also form during the summer if the unit is exposed to the ...

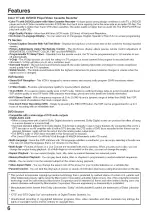
Page 6: ...ediate start DVD Section Compatible with a wide range of DVD audio outputs Digital Audio Jack When a component with a built in Dolby Digital decoder is connected Dolby Digital sound can produce the effect of being in a movie theater or a concert hall Surround standard different from Dolby Digital This format is already in use in many theaters By connecting this unit to a DTS decoder or an AV ampli...

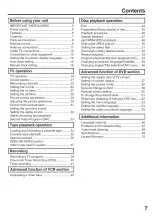
Page 7: ...Recording a TV program 38 One touch Timer Recording OTR 40 Timer recording 41 Advanced function Of VCR section Duplicating a video tape 43 Disc playback operation Disc 44 Preparation Status display of disc 45 Playback procedure 46 Special playback 47 mp3 WMA JPEG playback 48 Setting the JPEG interval 50 Setting the select files 51 Zooming Locating desired scene 52 Repeat playback 53 Program playba...

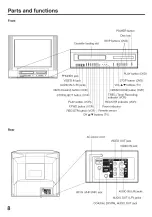
Page 8: ...ns TV REW Rewind button VCR STOP EJECT button VCF PLAY button VCF RFWD button VCR REC OTR button VCR OPEN CLOSE button DVD T REC Timer Recording indicator VCR REC OTR indicator VCR Power indicator Remote sensor CH A V buttons TV Rear J 8 AC power cord VIDEO OUT jack VIDEO IN jack RF IN VHF UHF jack AUDIO IN L R jacks AUDIO OUT L R jacks COAXIAL DIGITAL AUDIO OUT jack ...

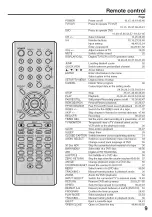
Page 9: ... OTR Recording 38 40 43 TIMER REC Set the unit to start recording at a preset time 41 42 TV MONITOR Temporarily view a TV channel select on the VCR while in the playback mode 36 SLOW Slow motion playback 36 47 SLEEP Sleep timer 20 CLOSED CAPTION Switch between closed captioning options 21 AUDIO SELECT Switches sound between mono and stereo 33 Change sound track language of DVD 55 30 Sec ADV Skip t...

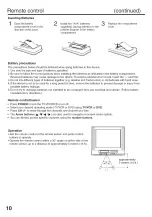
Page 10: ...c or old batteries with fresh ones 4 If the device is not to be used for a long period of time remove the batteries to prevent damage or injury from possible battery leakage 5 Do not try to recharge batteries not intended to be recharged they can overheat and rupture Follow battery manufacturer s directions Remote control basics Press POWER to turn the TVNCR DVD on or off Select your desired opera...

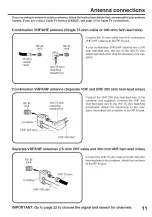
Page 11: ...of the 300 75 ohm matching transformer may be necessary not sup plied Combination VHF UHF antenna Separate VHF and UHF 300 ohm twin lead wires RF IN 300 75 ohm jack matching transformer c VHF 300 ohm J Connect the UHF 300 ohm twin lead wire to the combiner not supplied Connect the VHF 300 ohm twin lead wire to the 300 75 ohm matching transformer Attach the transformer to the com biner then attach ...

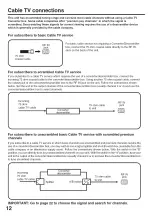
Page 12: ...below Set the unit to the output channel of the converter descrambler box usually channel 3 or 4 and use the cenverter descrambler box to select channels Incoming RF IN 75 ohm 75 ohm cable jack cable TV cable _ descrambler Converter i to unit For subscribers to unscrambled basic Cable TV service with scrambled premium channels If yeu subscribe to a cable TV service in which basic channels are unsc...

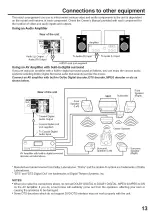
Page 13: ... lifter l _ _ _ I ooo 0 ooo To Audio R Input _1 _ To Audio L Input r Rear of the unit Digital Front _ Speaker Left _ _ Audio Output I _ I_ Coaxial digital cord I n t supplied I I To Coaxial Digital I V Audio Input AV Amplifier with built in digital surround I decoder as listed above Unit Subwoofer 1 _Center Speaker Front Speaker Right _ Surround Speaker Left _ Sp eaker j Right Manufactured under l...

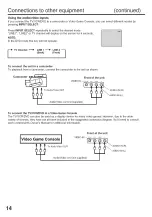
Page 14: ...it to a camcorder To playback from a camcorder connect the camcorder to the unit as shown Camcorder _ Front of the unit t t t To AodioNidoo OUT 00_ AUD N R _ Audio Video cord not supplied T I I I AUDIO IN L To connect the TV VCR DVD to a Video Game Console The TV VCR DVD can also be used as a display device for many video games However due to the wide variety of formats they have not all been incl...

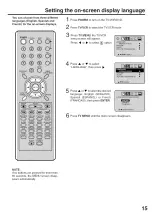
Page 15: ...lect the TV VCR mode Press TV MENU the TV VCR menu screen will appear Press _ or _ to select _ option Press or to select LANGUAGE then press I_ Press toselectthedesired or language English ENGLISH Spanish ESPANOL or French FRANCAIS then press ENTER Press TV MENU until the menu screen disappears NOTE If no buttons are pressed for more than 60 seconds the MENU screen disap pears automatically 15 ...

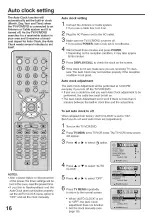
Page 16: ...tion is not good Auto clock adjustment The Auto Clock Adjustment will be performed at 12 00 PM everyday if you turn off the TV VCR DVD If you use a cable box and you want Auto Clock adjustment to be performed the cable box must be left on The Auto Clock Adjustment won t work if there is more than 5 minutes between the built in clock time and the actual time To set auto clock to off When shipped fr...

Page 17: ...o set the Daylight Saving Time manually on the first Sunday in April you set to ON and on the last Sunday in October you set to OFF When the clock is not set Daylight Saving Time setting is not available When there is no Daylight Saving Time in your area always select OFF in step 3 Press TV MENU repeatedly to return to the normal screen NOTE To be able to select the standard time the clock must fi...

Page 18: ... _ or _ to select the _ option Press or to select the CLOCK SET option then press Press _ or I_ to set the month then press To make corrections any time during the process Press repeatedly until the item you want to change blinks then press _ or 1_ Set the day and time as in year step 4 then press ENTER NOTE After a power failure or disconnection of the power the timer settings will be lost In thi...

Page 19: ...ss 0 then 2 If you press only 2 channel selection will be delayed for a few seconds For channels 10 and above press the 2 digits in order For example to select channel 36 press 36 You can also press 0 then the remaining 2 digits For example to select channel 12 press 012 For 3 digit numbers press the 3 digits in order For example to select channel 120 just press 120 NOTES If a channel with no broa...

Page 20: ... switch off the sound The unit s sound will be silenced and MUTE will briefly appear on the screen The sound can be switched back on by pressing this button again or the VOL or NOTE To listen through the headphones insert the headphones not supplied with a 1 8 mini plug into PHONES jack on the front The sound from the TV VCR DVD speaker is muted SLEEP To set the TV VCR DVD to turn off after a pres...

Page 21: ...s placed near the character who is speaking so the viewer can follow the dialogue Titles foreign languages and words requiring empha sis are underlined or in italics Words that are sung usually ap pear enclosed by musical notes For television programs broadcasting with closed captions look in your TV guide for the closed captions symbol CC To view closed captions Press CLOSED CAPTION to switch bet...

Page 22: ... to normal VHF and UHF channels this TV VCB DVD can receive up to 113 Cable TV channels To use this TV VCR DVD with an antenna set the TV CABLE menu option to the TV mode When shipped from the factory this menu option is in the CABLE mode TV CABLE selection Press TV MENU in the TV VCR mode The TV VCR menu screen will appear 2 Press _ or _ to select _ option Press or to select TV CABLE Press _ or I...

Page 23: ... area This will take a few seconds Press rv MENU until the menu screen disappears To ADD DELETE channels Press TV MENU in theTV VCR mode TheTV VCR menu screen will appear 2 Press or I_ to select _ option Press to select ADD or DELETE then press II Select the desired channel to be memorized or deleted using the number buttons 0 9 or or Press or I_ to select ADD or DELETE whichever function you want...

Page 24: ... the password 4 digits using the number buttons 0 9 then press ENTER If you put in a wrong number press CANCEL k appears instead of the number Enter the same password again then press ENTER The password is now registered and the V Chip menu will appear on the screen NOTES To avoid forgetting the password write it down and keep it in a safe place If you forget the password 1 Disconnect the AC cord ...

Page 25: ... Press or to select MOVIE RATING 4 5 Press or to select desired rating then press ENTER OFF MOVIE RATING is not set G All ages PG Parental guidance PG 13 Parental guidance less than 13 years old R Under 17 years old Parental guidance suggested NC 17 17 years old and above X Adult only Press or to select V CHIP To use theTV after V Chip is activated When the program applied to the V Chip setting is...

Page 26: ...ress or to select the PASSWORD Enter the password using the number buttons 0 9 then press ENTER If you put a wrong number press CANCEL Press or to select CHANGE PASSWORD then press _ Enter the new password using the number buttons 0 9 then press ENTER Enter the same password again to confirm then press ENTER 26 Press TV MENU repeatedly to return to normal screen ...

Page 27: ...to select ON TIMER then press Press 4 or to set the desired hour then press NOTES o The TV VCR DVD will automatically turn off approximately 1 hour later after the ON TIMER turns on if no OFF TIMER has been set To continue watching the TV press any button to cancel the one hour automatic shut off To cancel ON TIMER follow above steps 1 6 then press _ or to select CANCEL Press TV MENU repeatedly to...

Page 28: ...V MENU in the TV VCR mode The TV VCR menu screen will appear 2 Press or I_ to select option Press or to select ON OFFTIMER then press I_ Press or to select OFF TIMER then press _ Press or _ to set the desired hour then press Press or _ to set the desired minute then press Press or _ to select SET then press ENTER Press TV MENU repeatedly to return to the normal screen To cancel OFF TIM ER follow a...

Page 29: ...n screen display will disap pear 60 seconds after finishing an adjustment or by pressing TV MENU three times The setting can only be adjusted when they are displayed on theTV screen BRIGHTNESS adjusts brightness level CONTRAST adjusts brightness between light and dark areas COLOR adjusts color intensity TINT adjusts the balance between the red and green levels SHARPNESS produces softer or more def...

Page 30: ...to select PICTURE PREFERENCE then press _ Press or to select the item you want to adjust Press ENTER to adjust the setting Mode Picture Quamity STANDARD Standard picture quality factory set SPORTS Bright and dynamic picture factory set MOVIE Movie like picture setting factory set Your personal preferences set by you see MEMORY Picture control adjustment on the page 29 After your desired setting pr...

Page 31: ...the adjust the low pitched sound TREBLE Press or to adjust the adjust the high pitched sound BALANCE Press or to obtain an equal sound level from both speakers After your desired setting press TV MENU until the menu screen disappears CANCEL Pressing CANCEL while making sound adjustments will return all adjustments to the factory preset levels NOTE The On screen display will disappear 60 seconds af...

Page 32: ...surround sound mode Follow the above step 2 then press or to select OFF position Press TV MENU until the menu screen disappears Setting the stable sound The stable sound feature limits the highest volume level to prevent extreme changes in volume when the signal source is changed Press TV MENU in the TV VCR mode Press or to select I_q option Press or to select AUDIO then press Press or to select S...

Page 33: ...n viewing a MONO video tape or TV program Each time when you press the button output selection display appears on the screen for several seconds Refer to the chart below OUTPUT SOUND HEARD ON BOTH SELECTION SPEAKERS STEREO STEREO Lch LEFT CHANNELAUDIO R ch RIGHT CHANNELAUDIO MONO MONO NOTES o When playing back a tape that is not recorded in Hi Fi stereo mode the audio will automatically be monaura...

Page 34: ...y Unloading Press EJECT on the TV VCR DVD or the Re mote Remove the cassette tape Automatic tape eject This TV VCR DVD will automatically rewind the tape when the tape has ended And when the tape is rewinded to its beginning the cassette tape will be ejected automatically To prevent accidental erasure Remove the erase prevention tab with a screwdriver Screwdriver Erase_ _ To record again Cover the...

Page 35: ...pe To forward the tape Press REW Press F FWD NOTES This TV VCR DVD selects the playback tape speed SP LP or SLP automatically If you play a prerecorded tape after the DVD playback you must set the TV VCR DVD to TV VCR mode using TV VCR When you select the TV VCR mode during DVD playback DVD playback will change to the still mode and after 5 minutes it will change to the stop mode automatically To ...

Page 36: ... adjustment Press ATR to reactivate automatic tracking again AUTO TR will appear NOTES The audio output is muted during Picture Search Still Picture Frame by Frame Picture and Slow Motion During picture search mode there will be noise bars which are caused by the system The Special Playback will automatically change to playback after approx 5 minutes to protect the video tape against excessive wea...

Page 37: ...ions the counter stops NOTES for Video index search system When you record an INDEX mark at the very beginning of the tape the mark may not be found During INDEX search the tape may stop and begin to play at a slightly different location INDEX may not function properly with old or worn out video tapes INDEX marks may not be found if it is extremely close to the point where the search began In reco...

Page 38: ...rding If you record the TV program after the DVD playback you must set the TV VCR DVD to TV VCR mode using TV VCR You can not record disc material in DVD Audio CD etc onto a video tape with this TV VCR DVD 38 Press the number buttons 0 9 or CH to select the channel to be recorded 1 9 Press 0 twice and then 1 9 as required Example To select 2 Press 002 10 12 Press 0 first and then the remaining 2 d...

Page 39: ...tape or the TV VCR DVD The TV VCR DVD will change to the STOP mode You can select a recording channel in the recording pause mode To display VCR operation status Press DISPLAY CALL The clock day of the week and more information will be indicated While watching TV DAY OF THE WEEK CHANNEL While operating a tape HI FISTEREO AUTO REPEAT Auto Rewind feature This VCR will automatically rewind the tape w...

Page 40: ...ns 0 9 or CH to select the channel to be recorded 5 Press REC OTR Press the button again to stop recording after 30 minutes Each additional press of REC OTR will increase recording time as shown in the chart below up to a maximum of 6 hours The OTR and recording time will appear on the screen for about 4 seconds Press qecording time Press Recording tim_ once NORMALREC 6 times 3 00 twice 0 30 7 tim...

Page 41: ...r After you usetheVCR pressTIMER RECagain to put the VCR into timer recording standby mode If you press TIMER REC during timer recording the recording operation will be interrupted If you press TIMER REC again within the prog rammed time the recording operation will start again After a power failure ordisconnection of the power plug all programmed record ing settings and time display will be lost ...

Page 42: ...8 00 9 00 10 00 11 OO Program 1 Program 2 Deleted Parts Program 3 Non Recorded Po_Jo_Pa_ Recording Prog 1 Prog 2 Prog 3 Control Settings NOTES o The daily weekly recording can be made continu ously until the recording is canceled or the tape reaches the end During timer recording the automatic rewinding mechanism does not function continued To confirm the settings Press PROGRAM once The TV screen ...

Page 43: ...the screen LINE1 on the rear panel LINE2 on the front panel Press on recording unit press REC OTR the then PAUSE STILL Press the PLAY button on the playback VCR or CAMCORDER then press the pause button Release the recording pause and the playback still simultaneously to begin the duplicating process Connection with second Video recorder PlaybackVCR f To VIDEOOUT_ _ To AUDIO R OUT t To AUDIO L OUT ...

Page 44: ...tions Each section is called a CHAPTER Track An Audio CD can contain several items Each item is called a TRACK DVD DISC i TITLE 1 L I TITLE 2 _ q IC AOTER C APTER I C A TEO O A TEO C APT O3 ITRACK AUDIO CD TRACK S_ 1 TRACK 2 TRACK 3 TRACK 4 Removing disc from case Be sure to hold the edge of disc Do not touch the surface of the disc Pick up the disc gently from the case Do not scratch the disc Do ...

Page 45: ...n amplifier switch on the amplifier Press DVD to select DVD mode The DVD startup screen will ap pear on the screen Status display of disc Press DISPLAY CALL once Only the title elapsed playing time and the title total time appear in the upper right of the screen Press DISPLAY CALL again The full information will appear DVD Disc Chapter number Title number Title elapsed playing time Title total tim...

Page 46: ... OPEN CLOSE on the TV VCR DVD Reading will appear on the display for about 30 seconds and then No Disc or Incorrect Disc will be displayed Some playback operations of DVDs may be intentionally fixed by software produc ers Since this TV VCR DVD plays DVDs according to the disc content recorded some playback features may not be avail able Also refer to the instructions supplied with the DVDs 46 3 4 ...

Page 47: ...ack Press SLOW during normal playback or still playback Each press of SLOW will change the speed of the slow xl 2 xl 4 xl 6 xl 7 To resume normal playback press PLAY To resume the still playback press PAUSE STILL WARNING The TV VCR DVD is capable of holding a still video image or on screen display im age on your television screen indefinitely If you leave the still video image or on screen display...

Page 48: ...rs are condensed Available letters for display are the following capital or small letters A through Z numbers 0 through 9 and _ under score Letters other than those above are replaced with a hyphen Press ENTER The selected file starts playing back Press STOP to end playback CAUTION Some mp3 WMA JPEG files cannot be played back depending on the recording conditions The CD R RW that has no music dat...

Page 49: ...ed To display the file menu press MAIN MENU mp3 or WMA file on the KODAK Picture CD is not recognized on this TV VCR DVD To display a picture menu press MENU To return to a file menu _ _ press MAIN MENU Press or toselect _ _ the desired file _ _ _ To display next list press SKIP I_l I I _141 When PLAY has been pressed after displaying the file menu or when the disc tray has been closed after press...

Page 50: ...elect JPEG Interval Press _ or to select your de sired time Off Plays back one file at a time 5 Seconds Displays images in the form of a slide show Every 5 seconds the image changes 10 Seconds Displays images in the form of a slide show Every 10 seconds the image changes 15 Seconds Displays images in the form of a slide show Every 15 seconds the image changes Press SETUP or RETURN to remove the me...

Page 51: ...enu Setting the select files Press SETUP in tile stop mode Press to select _ option Press or ENTER then press or to select Select Files Press or to select your desired file type AIh Displays all files Music Only Displays only mp3 WMA files Pictures Only Displays only JPEG files Press SETUP or RETURN to remove the menu screen 51 ...

Page 52: ...n the zoom mode press ZOOM repeatedly to return to a 1 1 view 0 Off Locating desired scene Use the title chapter and time recorded on the disc to locate the desired point to play back Press JUMP during play back NOTES You can select the Pause Slow or Search playback in the zoom mode Some discs may not respond to zoom feature Press or to select the Time Title or Chapte Press the number buttons 0 9 ...

Page 53: ...d points PressREPEATA B during play back The start point is selected NOTES Some discs may not work with the repeat operation In A B repeat mode subtitles near point A or B may not appear Du ring the A B Repeat Playback the ANGLE feature will not operate You may not be able to set A B Re peat depending on the scenes of the DVD A B Repeat does not work with an interactive DVD mp3 MPEG WMA JPEG CD Pr...

Page 54: ...ll appear on the screen The program you selected will begin to playback in the order set To return to normal playback se lect Play Mode Off at step 2 above Random playback Press PLAY MODE during playback or stop mode NOTES o To cancel program play select Clea at step 4 and press ENTER The program is cancelled when you open the disctrayor turn the power off Random playback can not be com bined with...

Page 55: ...recorded on the disc Changing soundtrack language is can celled when you open the disc tray The initial default language or available lan guage will be heard if the disc is played back again Changing subtitle language is cancelled when you open the disc tray Some functions may not work on some DVDs You may not be able to turn sub titles on or off or change subtitles While playing the DVD the subti...

Page 56: ... PLAY The playback of the selected title will start NOTES Depending on the DVD you may not be able to change the angles even if multi angles are recorded on the DVD Depending on the DVD you may not be able to select the title Depending on the DVD a _title menu may simply be called a menu or _title in the instructions supplied with the disc 56 DVD menu Some DVDa allow you to select the disc content...

Page 57: ...ff Press or remove menu screen SETUP RETURN to the Setting on screen display On screen display can be switched on or off when you press the DISPLAY button Press DVD to select DVD mode Press SETUP in the stop mode or No Disc Press or to select option or ENTER press Press then or to select Display NOTE It is not always possible for the DVD disc to display the picture as per your preferred picture se...

Page 58: ... this position normally The DVD player automatically detects source content film or video of playback source and converts that signal in the progressive output format in an appropri ate method Film The DVD player converts film content pictures in the progressive output format appropriately Suitable for playback of film content pictures The progressive output feature will be most effective under th...

Page 59: ...o lect DRC Press to select or On or Off then press ENTER On Loud sound such as explosion or similar is toned down slightly when played back This makes it suitable for when it is connected to a stereo Off It plays back at the recording level on the disc Press SETUP or RETURN to remove the menu screen NOTES This function works only during play back of Dolby Digital recorded discs The level of Dynami...

Page 60: ... will be more se vere as the level number decreases Press to select Password Press the number buttons 0 9 to input a 4 digit password Be sure to remember this number If you input a wrong number press CANCEL NOTES If each setup P 50 51 57 61 63 65 has been completed the TV VCR DVD will work under the same con ditions especially with DVD discs Each setup will be retained in the memory when you turn ...

Page 61: ...SE to open the disc tray 2 Remove the disc 3 Press OPEN CLOSE again to close the disc tray No Disc appears on the screen 4 While holding STOP down on the front panel press 2 on the remote control PASSWORD CLEAR appears on the screen 5 Enter a new password again PressVto select Parental then press or I_to change the parentallevel Press to select Password then press the number buttons 0 9 to enter t...

Page 62: ...l the set rating level temporarily select Parental Control Level with or Y then press ENTER If the 4 digits password at step 3 on page 60 has been set the pass word entering screen will appear as shown in step 4 below Alternatively if the password has not been set playback will commence If you don t know or have forgotten the password select Cancel Picture The setting screen will disappear Press O...

Page 63: ... the stop mode Press or to select option or ENTER press Press then or to select Menu Press or to select your desired language e g English English Francais Espanoh The selected language will be heard or seen Other Other language can be selected see the Language code list on page 66 Press SETUP or RETURN to remove the menu screen 63 ...

Page 64: ...Subtitle Press _ or to select your desired language e g English 4 English Francais Espanoh The subtitle is displayed with the selected language if it is re corded on the disc Other If you want to select another language enter the language code See the Language code list on page 66 Off Subtitles do not appear Press SETUP or RETURN to remove the menu screen NOTE If the selected language is not recor...

Page 65: ...udio Press to select or your desired Audio Language e g English 4 English Francais Espanoh The language you have selected will play if it is recorded on the disc Other If you want to select another language enter the language code See the Language code list on page 66 Original The TV VCR DVD will select the first priority language of each disc Press SETUP or RETURN to remove the menu screen NOTE I...

Page 66: ...030 Bengali Bangla 1224 Hebrew 1933 Nepali 2415 Telugu 3015 Bhutani 1436 Hindi 1819 Norwegian 2425 Thai 3018 Bihari 1218 Hungarian 1831 Oriya 2528 Tibetan 1225 Breton 1228 Icelandic 1929 Panjabi 2611 Tigrinya 3019 Bulgarian 1217 Indonesian 1924 Pashto Pushto 2629 Tonga 3025 Burmese 2335 Interlingua 1911 Persian 1611 Turkish 3028 Byelorussian 1215 Irish 1711 Polish 2622 Turkmen 3021 Cambodian 2123 ...

Page 67: ...eck for source of reception distur bance Check CABLE connection or VHF UHF antenna reposition or rotate antenna 11 12 Try another channel 19 Check picture control adjustments 29 Check fer source of reception disturbance Check CABLE connection or VHF UHF antenna reposition or rotate antenna 11 12 Try another channel 19 Check CABLE connection or VHF UHF 11 12 antenna reposition or rotate antenna Try...

Page 68: ...n is prohibited with the TV VCR DVD or the disc _t appears on the screen 46 i i ii The remote control is not aimed at the Aim the remote control at the remote Remote control does not operate sensor sensor Distance is too far or too much light in Operate within 5 m or reduce the light the room of the room There is an obstacle in the path of the Clear the path of the beam beam The batteries are weak...

Page 69: ... In 1 Vp p 75 ohm Out 1 Vp p 75 ohm In 8 dBm 50K ohm Out 8 dBm 1 K ohm 20Hz to 20 000Hz More than 90 dB 20 inches 508 mm diagonal Quartz PLL Frequency Synthesized VHF 2 13 UHF 14 69 CABLE 14 36 A W 37 59 AA WW 60 85 AAA ZZZ 86 94 86 94 95 99 A 5 A 1 100 125 100 125 0t 5A VHF UHF In 75 ohm coaxial 1 13 16 46 ram x 3 7 8 99 ram 8 ohm x 2 1 5W 1 5W 4 Rotary Heads Hi Fi Sound 2 Tracks MONO Sound 1 Tra...

Page 70: ...itory covered by an Authorized RCA Television Service Center If not you must take your unit to the Service Center location at your own expense or pay for the cost the Service Center may charge to transport your unit to and from your home To identify your nearest Authorized RCA Service Center ask your dealer look in the Yellow Pages visit www rca com or call 1 800 336 1900 Proof of purchase in the ...

Page 71: ...ES RESULTING FROM THE USE OF THIS PRODUCT OR ARISING OUT OF ANY BREACH OF ANY EXPRESS OR IMPLIED WARRANTY ON THIS PRODUCT THIS DISCLAIMER OF WARRANTIES AND LIMITED WARRANTY ARE GOVERNED BY THE LAWS OF THE STATE OF INDIANA EXCEPT TO THE EXTENT PROHIBITED BY APPLI CABLE LAW ANY IMPUED WARRANTY OF MERCHANTABILITY OR FITNESS FOR A PARTICU LAR PURPOSE ON THIS PRODUCT IS LIMITED TO THE APPLICABLE WARRAN...

Page 72: ... the carton This will only add delays in service for your product TTE Technology Inc 10330 North Meridian Street Indianapolis IN 46290 02005 rE Technology Inc RCA and associated marks are trademarks of THOMSON S A used under license to TTE Corporation Printed in Thailand TOCOM 16530880 III Hill MMIIIIIIIII J5T40101A SH 05 05 ...

Reviews: