background image

DRC6389t

8" Dual Screen Mobile DVD

OWNER'S MANUAL

Summary of Contents for DRC6389T

Page 1: ...DRC6389t 8 Dual Screen Mobile DVD OWNER S MANUAL ...

Page 2: ......

Page 3: ...t not expressly approved by the party responsible for compliance could void the user authority to operate the equipment NOTE This equipment has been tested and found to comply with the limits for a Class B digital device pursuant to Part 15 of the FCC Rules These limits are designed to provide reasonable protection against harmful interference in a residential installation This equipment used in a...

Page 4: ...paratus 11 Only use attachments accessories by the manufacturer 12 Use only with a cart stand tripod bracket or table specified by the manufacturer or sold with the apparatus When a cart is used use caution when moving the cart apparatus combination to avoid injury from tip over 13 Unplug this apparatus during lightning storms or when unused for long periods of time 14 Refer all servicing to quali...

Page 5: ...ng the Stand for Desktop Use 16 Sound System 16 Unit Operation 16 Playing a Disc 17 18 Playing a Disc 17 Pausing Playback Still Mode 17 Stopping Playback 17 Fast Forward Fast Reverse 17 Skip Forward Reverse 17 Audio Selection 17 Subtitle Selection 18 Angle Selection 18 Display Function 18 Adjust the LCD Screen 18 Locating a Desired Section 19 Locating a Specific Title 19 Locating a Specific Chapte...

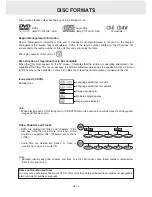
Page 6: ...d Tracks DVDs are divided into titles and chapters If the disc has more than one movie on it each movie would be a separate title Chapters are sections of titles Audio CDs are divided into tracks A track is usually one song on an Audio CD Note Numbers identify each title chapter and track on a disc Most discs have these numbers recorded on them but some do not Icons Used on DVDs Sample lcons Note ...

Page 7: ...nting Strap x 2 Please check and identify the supplied accessories BATTERY REPLACEMENT When battery becomes weak the operating distance of the remote control will be greatly reduced and you will need to replace the battery Note If the remote control is not going to be used for a long time remove the battery to avoid damage caused by battery leakage corrosion When discarding batteries environmental...

Page 8: ...layback on a DVD or CD REPEAT DISC Button Repeats a DVD chapter or title Repeats a CD track or the entire disc SETUP Button In stop mode it brings up the unit s SETUP menu 9 SUBTITLE Button Selects one of the subtitle languages programmed on a DVD if available RETURN Button Returns to normal operation after using the SETUP menu of a DVD 10 AUDIO Button Selects one of the audio sound tracks on a DV...

Page 9: ...ayback and frame advance 9 PLAY Button Starts or resumes playback of a disc 10 Right Speaker 11 ON Indicator When the CHARGE STANDBY ON switch is in the ON position the green light will illuminate Indicator When the CHARGE STANDBY ON switch is in the CHARGE position the red light will illuminate Remote Sensor Receives the remote control signal 12 Headphone Jack 13 VOLUME Control Adjusts the volume...

Page 10: ...V Jack 7 POWER ON Indicator When the STANDBY ON switch is in the ON position the green light will illuminate 8 Stand 9 BRIGHTNESS Control Adjusts the relative lightness or darkness of the screen 10 COLOR Control Adjusts the color intensity 11 Screen Switch WIDE Wide Screen NORMAL Pan Screen 12 ON OFF Switch 13 DC IN 9 12V Jack 1 2 4 3 9 10 11 12 13 7 8 5 6 ...

Page 11: ...ug section may become hot due to poor contact Be sure to clean the 12V car socket before use After use disconnect the 12V car power adapter from both the unit and cigarette lighter socket If the unit is not properly attached to a vehicle it may become airborne in the event of an accident and cause damage injury or death Check your local traffic laws for rules governing the use of video devices in ...

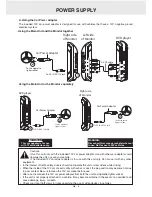
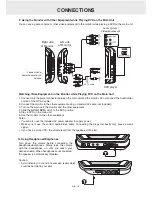
Page 12: ...in the apparatus is not completely disconnected from the main power source even when the unit is turned off B Using the AC Power Adapter The included AC power adapter operates on AC between 100V and 240V The supplied AC adapter is suitable for use on AC mains supplies of 100 240 Volts AC and should only be connected to a mains supply within these parameters Using the Main Unit and the Monitor toge...

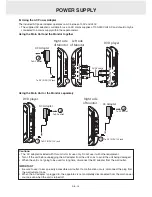
Page 13: ...ispose the unit with built in battery properly Environmental problems must be considered and local rules or laws governing the disposal must be strictly followed CAUTION The built in battery can only be recharged when the unit is in CHARGE mode while using the AC adapter The built in battery cannot be recharged when the unit is in power ON mode Do not recharge the battery in the vehicle by using t...

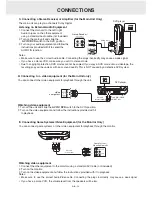
Page 14: ... with it to connect the unit to your TV B Connecting a TV for the Main Unit Only If your TV has Audio Video inputs you can connect the main unit to your TV using a standard A V cable not included A Watching a DVD on the Main Unit and the Monitor You can watch the same DVD on the main unit and the monitor Watching a DVD on the Main Unit and the Monitor 1 Connect the main unit and the monitor using ...

Page 15: ...rn on the main unit and slide the AV IN DVD switch to the DVD position 3 Turn on your audio equipment and follow the instructions provided with it to select the AUDIO IN function Notes Make sure to use the correct Audio cable Connecting the plugs incorrectly may cause a weak signal If you have a stereo VCR make sure you set it to stereo mode Due to copyright protection DVD movies cannot be copied ...

Page 16: ...sition 5 Play a DVD on the main unit 6 Use the monitor for the other equipment Notes You can also use the included AC power adapter to supply power Make sure to use the correct Audio Video cable Connecting the plugs incorrectly may cause a weak signal If you have a mono VCR the volume level from the speakers will be low G Using Headphones Earphones Turn down the volume before connecting the headph...

Page 17: ... the vehicle s driver or left unsecured in the vehicle while driving If this unit is being used in your vehicle be sure that it is secured or held safely and does not obstruct any safety device including air bags or seat belts All passengers should wear seat belts when using this unit in a moving vehicle If in doubt please contact your vehicle manufacturer for further advice mounting IN the VEHICL...

Page 18: ...eloped by Dolby Laboratories Soundtracks encoded in Dolby Digital can reproduce from one to 5 1 discrete channels of excellent quality audio The unit automatically recognizes the Dolby Digital bitstream and provides a downmix suitable for two channel listening An additional Dolby Digital decoder is required for reproduction of the discrete multi channel soundtracks available on many DVDs Manufactu...

Page 19: ...VD player mutes sound and subtitles during reverse and forward scan of DVDs The fast playback speed may differ depending on the disc Skip Forward Reverse Press the PREV button to go back to current or previous chapters tracks Press the NEXT button to advance chapters tracks For audio CDs use the number buttons on the remote control to jump immediately to the desired track number Audio Selection On...

Page 20: ...ach of these different angles 1 While you are playing a DVD with different angles recorded press the ANGLE button to view the number of current angles available 2 Press the ANGLE button repeatedly to change the scene to the next recorded angle After approx two seconds playback will continue from the new angle you selected If no button is pressed within 10 seconds playback continues without changin...

Page 21: ...s the ENTER button to confirm Playback starts from the selected section Note If the chapter numbers you entered is not permitted by the DVD after you press the ENTER button it will restore to You should re enter correct numbers Some discs may not respond to this process This method of locating a chapter is available only on a DVD that contains chapter numbers Locating a Specific Time You can move ...

Page 22: ...ter 1 While the DVD is playing press the REPEAT DISC button until the indicator displays on the screen The current chapter is played repeatedly Repeating a Title 2 While the DVD is playing press the REPEAT DISC button until the indicator displays on the screen The current title is played repeatedly To Resume Normal Playback 3 While the DVD is playing press the REPEAT DISC button until the indicato...

Page 23: ...NTER button to the selected will appear in front of the selected 3 Select Add to program then press the ENTER button will disappear from the screen It means that the you have selected are added into the Program view 4 Select Program view to view programmed files To add more files by Browser view follow above steps 5 Press the PLAY button to start the program playback The Toolkit has the following ...

Page 24: ...isc menu only If this is the case press the MENU button and choose the appropriate subtitle language from the selection on the disc menu Audio 1 Press the SETUP button in stop mode 2 Press the button then the button to select Audio 3 Press the ENTER button then the button until your preferred Audio is displayed 4 Press the ENTER button 5 Press the SETUP button or RETURN button to exit the menu Not...

Page 25: ...rm to the LCD screen on the unit Always be sure that your Aspect Ratio conforms to the actual TV in use if you connect the unit to a TV View Mode 1 Press the SETUP button in stop mode 2 Press the button to select Video 3 Press the button then the button to select View Mode 4 Press the ENTER button then the button to shift and change the View Mode 5 Press the ENTER button 6 Press the SETUP button o...

Page 26: ...ted into the unit can cause sound to drop out during playback Handle the disc by holding its inner and outer edges Do NOT touch the surface of the unlabeled side of the disc Do NOT stick paper or tape on the surface Do NOT expose the disc to direct sunlight or excessive heat Clean the disc before playback Wipe the disc from the center outward with a cleaning cloth NEVER use solvents such as benzin...

Page 27: ...n number of this unit The DVD is dirty Gently clean the disc The disc is scratched Please adjust the LCD s brightness contrast and color using the VIDEO MODE button on the remote control The plugs and jacks are dirty Wipe them with a cloth slightly moistened with alcohol Clean the disc There is no disc inside the unit No Disc appears on the screen Insert the disc correctly with the graphics facing...

Page 28: ......

Reviews: