background image

USER'S

GUIDE

ProV950HB

CAMCO

RDER

Summary of Contents for ProV950HB

Page 1: ...USER S GUIDE ProV950HB CAMCORDER ...

Page 2: ...L WARNING TO REDUCE THE RISK OF FIRE OR ELECTRIC SHOCK DO NOT EXPOSE THIS CAMCORDER OR AC ADAPTER CHARGER TO RAIN OR MOISTURE IMPORTANT SAFETY INFORMATION Be sure to read all safety information before you begin to use this product This symbol warns the user of uninsulated voltage within the unit that can cause dangerous electric shocks This symbol alerts the user that there are important operating...

Page 3: ...be walked on or pinched by items placed upon or against them paying particular attention to cords at plugs convenience receptacles and the point where they exit from the video product 8 Ventilation Slots and openings in the case are provided for ventilation to ensure reliable operation of the video product and to protect it from overheat ing These openings must not be blocked or covered The openin...

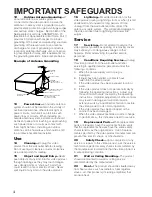
Page 4: ...ideo product has been dropped or the cabinet has been damaged F When the video product exhibits a distinct change in performance this indicates a need for service 19 Replacement Parts When replacement parts are required have the service technician verify that the replacements he uses have the same safety characteristics as the original parts Use of replace ments specified by the video product manu...

Page 5: ...oving a Cassette 12 Controlling the Monitor Display 13 Using the On Screen Menu 14 15 Warning Indicators 16 Setting the Area Date and Time 17 World Clock 18 20 Picture Backlight Adjustments 21 Using the Hand Strap 22 Attaching the Shoulder Strap 22 Easy Camera Recording with Full Auto 23 Zooming 24 Setting the Digital Zoom 24 Digital Quick Zoom Extend Zoom 25 Auto Focus 25 Backlight Compensation B...

Page 6: ...ording 49 Stopwatch 49 50 Lighting 51 Connection to TV Using the Docking Station 52 Connection to TV Using a VCR 52 Connections for Playback on a TV Using Audio Video Jacks 53 Use the Camcorder to Play Back Tapes on a TV 53 Using the Optional SAV103 A V Pack 54 Editing 55 Recording from an External Source 56 Fluorescent Lamp Backlight 57 Optional Accessories 58 Accessory Order Form 59 61 Use and C...

Page 7: ...hium cells must be disposed of properly Never handle punctured or leaking cells May cause burns or personal injury Keep out of the hands of children Can cause death or injury if swallowed If swallowed consult a physician immediately for emergency treatment The lithium cells used in these devices may explode resulting in a fire or chemical burn if mistreated Do not recharge disassemble heat above 2...

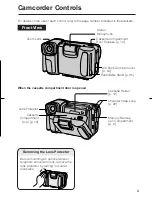
Page 8: ...ide or telephoto conversion lens remove the lens protector by turning it counter clockwise When the cassette compartment door is opened Cassette Holder p 12 Cassette Compartment Door Release p 12 Stereo Microphone A V Pack Terminal Cover p 54 Retractable Stand p 35 Zoom Lens Memory Backup Cell Compartment p 6 Shoulder Strap Loop p 22 Cassette Compartment Door p 12 Lens Protector ...

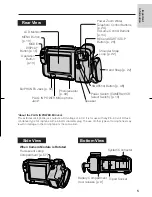
Page 9: ...amage to the microphone or the camcorder Tripod Socket Battery Compartment door release p 9 LCD Monitor MENU Button p 13 MODE DISPLAY Button p 15 Operation Button p 13 EarPHONES Jack p 34 Photoreceptor p 39 PLUG IN POWER MICrophone Jack SNAPshot Button p 48 Power Switch CAMERA VCR Select Switch p 13 Speaker Power Zoom Wide Telephoto Control Buttons p 24 VOLume Control Buttons p 34 RECord START STO...

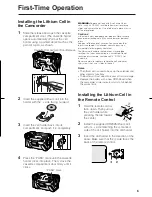
Page 10: ...wn Then pull out the cell holder while pressing the tab toward the center 2 Install the supplied CR2025 lithium cell with its side matching the j marked side of the cell holder into the cell holder 3 Insert the cell holder in the direction of the arrow Make sure that the j side faces the back of the remote control Cassette Compartment Door Release WARNING Replace cell only with 3 volt micro lithiu...

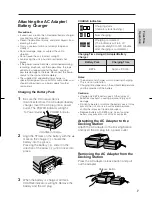
Page 11: ...W slide it in the direction of the arrow E until it locks into place 3 When the battery is charged all three CHARGE indicators will light Remove the battery and the AC plug CHARGE Indicators Charging starts Indicator starts flashing Now charging Charging completed The indicators will turn off approximately 90 to 120 minutes after charging is completed Battery Pack BB75 Charging Time Approx 90 min ...

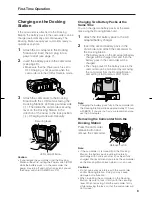
Page 12: ... 1 Attach the first battery pack to the AC adapter battery charger 2 Insert the second battery pack in the camcorder and attach the camcorder to the Docking Station The battery pack on the AC adapter battery charger will be charged first and then the battery pack in the camcorder will be charged The charge level of the battery pack in the camcorder can be monitored by removing the camcorder from t...

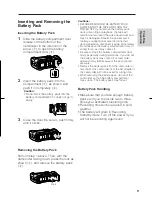
Page 13: ...m and may be damaged Should the power source battery or adapter become disconnected during operation reconnect it again immediately Do not expose the battery compartment door to strong force as it may come off Be sure to close the battery compartment door firmly especially during operations If you do not the battery pack may come off or camcorder operation may fail because of the poor contact pres...

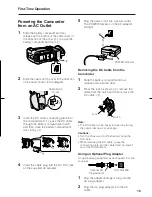
Page 14: ... POWER indicator on the AC adapter will light Removing the DC Cable from the Camcorder 1 Slide the battery compartment door release and open the door 2 Press the lock as shown Q remove the cable from the notch and then remove the DC cable W Note The DC cable can be easily removed by facing the camcorder down at an angle Cautions Turn the Power switch off before removing the DC cable When removing ...

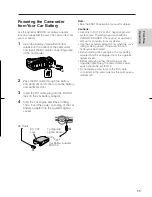
Page 15: ...te lighter socket Note See the SDC100 operation manual for details Cautions Use only in DC 12 V or 24 V negative ground system cars Positive ground car batteries CANNOT BE USED Check your car operation manual or consult a local car dealer Use the car battery adapter only when the car is idling or being driven Otherwise the car s battery will be drained Before starting the car engine the car batter...

Page 16: ...tte It may damage the tape Remove the cassette if you will not use the camcorder for a long time If you do not press the cassette holder closed correctly in step 3 the camcorder s cassette protection mechanism might eject the cassette If this happens repeat the insertion procedure Do not attempt to pick up the camcorder by the cassette compartment door If the compartment door does not close when g...

Page 17: ...ys Camera Mode Lock Button Hold down the Lock button when setting the Power switch to CAMERA or VCR BLC FADE AUTO D I S E X T E N D AUTO AUTO STOP WATCH COUNTER AUTO M E N U ITEM ITEM S E T S E T PAGE DATE TIME DISPLAY SELF REC PREV PAGE ON DATE DATE TIME AUTO AUTO AUTO NO OFF CORRECT 1 2 3 4 OFF 1 2 3 4 16 9 REMOTE CAM DISP DGTL ZOOM PREV PAGE ITEM ITEM S E T S E T PAGE ON OFF OFF ON OFF ON ON OF...

Page 18: ...ere is only one menu page in VCR mode Skip step 4 STOP WATCH COUNTER AUTO M E N U First Time Operation STOP WATCH M E N U ITEM ITEM S E T S E T PAGE DATE TIME DISPLAY SELF REC PREV PAGE ON DATE DATE TIME AUTO AUTO AUTO NO OFF CORRECT 1 2 3 4 OFF Operation Button ITEM ITEM S E T S E T PAGE DATE TIME DISPLAY SELF REC PREV PAGE ON DATE DATE TIME AUTO AUTO OFF 1 2 3 4 OFF 1 2 3 4 16 9 REMOTE CAM DISP ...

Page 19: ...ET to return to the previous screen ITEM ITEM S E T S E T PAGE DATE TIME DISPLAY SELF REC PREV PAGE PRESS SET ON DATE DATE TIME AUTO AUTO OFF 1 2 3 4 OFF AUTO NO CORRECT STOP WATCH M E N U COUNTER AUTO Operation Button 1 2 3 4 16 9 REMOTE CAM DISP DGTL ZOOM PREV PAGE ITEM ITEM S E T S E T PAGE ON OFF OFF ON OFF ON ON OFF 1 2 3 4 PREV PAGE ITEM ITEM S E T S E T PAGE PHOTO SNAP EXTEND ZOOM SNAP STIL...

Page 20: ...pe is about to end Get ready to load a new cassette The tape has reached its end Load a new cassette The fluorescent lamp behind the LCD monitor is close to the end of its service life Replace it with a new one see page 57 The LCD monitor turns off about one minute after this warning is displayed During Self Recording mode every warning indi cator is replaced by a indicator displayed in the center...

Page 21: ...teps 4 10 again Setting the Area Date and Time Example Setting the date to June 2 1997 JUN 2 1997 and the time to 10 30 am 10 30 AM in New York Note Check that the memory backup lithium cell has been installed before setting the date and time 1 Set the Power switch to CAMERA Press the MENU button until appears on the monitor Camera mode 2 Press B on the operation button to select MENU The MENU PAG...

Page 22: ...n you use the camcorder while traveling anywhere in the world outside your own time zone Set the area date and time if they are not already set See page 17 Changing the Area of the Time Zone Example Changing the area from New York to Los Angeles 1 Hold down the Lock button and slide the Power switch to CAMERA 2 Press the MENU button until appears on the monitor 3 Press B on the operation button to...

Page 23: ...selected the date time is displayed for 10 seconds at the beginning of the first recording of each day When ON is selected the date time is continuously displayed along with the subject During recording and playback the position of the date time displayed on the LCD may differ however this does not indicate a malfunction First Time Operation Time Zone Chart HAWAII CHICAGO DENVER NEWYORK L A CARACA...

Page 24: ...ed Arab Emirates Maldives Pakistan Bangladesh India Myanmar Cambodia Indonesia Jakarta Thailand Vietnam Australia Perth China Hong Kong Indonesia Borneo Bali Malaysia Philippines Singapore Taiwan Japan Korea Australia Sydney New Caledonia Fiji New Zealand Western Samoa Hawaii Is Tahiti HST Hawaii Standard Time U S A Alaska AST Alaska Standard Time U S A Los Angeles San Francisco PST Pacific Standa...

Page 25: ...Notes In bright daylight the monitor picture will be easier to see if you set the backlight BACKLIGHT to BRIGHT The picture adjustments have been factory preset to neutral settings and the backlight mode BACKLIGHT has been factory preset to normal NORM When the color or tint is adjusted the picture on the screen may differ from the picture actually recorded Do not change the color and tint setting...

Page 26: ...of the strap Using the Hand Strap Fitting the Strap to Your Hand Hold the camcorder against your chest and pull the strap down until the velcro patches open Then put your thumb close to the Power Zoom buttons pull the strap tight until it fits snugly and seal the velcro closures Caution Do not swing the camcorder by its hand strap Power Zoom Buttons Short slider Long slider Loop First Time Operati...

Page 27: ...If the camcorder is kept in Recording Standby mode for more than approximately 5 minutes the power will automatically turn off to save battery power and to protect the tape from being damaged To continue recording after this set the Power switch to OFF and then back to CAMERA again If you will not be recording again for a while turn off the power by sliding the Power switch to OFF This will make t...

Page 28: ... pressure placed on the Power Zoom buttons The on screen display will show you the current zoom setting Notes The camcorder is unable to focus when zooming in on subjects within 5 feet 1 5 m The camcorder will automatically zoom out until it focuses on the subject Frequent zooming produces unattractive pictures It also increases battery power consumption Setting the Digital Zoom You can select bet...

Page 29: ... subject in the situations shown in the chart In such situations set the camcorder to Manual Focus mode and focus manually see page 43 Basic Operations Camera Recording Operation Button Digital Quick Zoom Extend Zoom Use the digital quick zoom function extend zoom to instantly zoom in on a subject This is useful when you want to instantly capture a particular subject Setting Digital Quick Zoom Ran...

Page 30: ...nated location LIGHT warning of too little ambient illumination is displayed on the monitor Use the gain up feature to record a brighter picture 1 Press the MENU button until appears on the monitor Camera mode GAIN UP D I S E X T E N D Note At locations where lighting is adequate the LIGHT indicator will not appear BLC instead of GAIN UP appears indicating the gain up function cannot be used 2 Pre...

Page 31: ...unction cannot compensate for excessive image shake or for the subjects or situations described below Subject with low contrast Subject with a plain background Dark or dimly lit subject Subject with vertical or horizontal stripes Many moving subjects in a single frame A shutter speed other than 1 100 sec is used under the light of fluorescent lamps The indicator blinks during these conditions Macr...

Page 32: ...e Out 1 Press the MENU button until appears on the monitor Camera mode 2 Press the REC START STOP button to start recording 3 PressAon the operation button to select FADE 4 Press the REC START STOP button at the point where you wish to stop recording FADE changes to FADE OUT and the picture and sound fade out as the screen gradually turns white The camcorder then returns to Recording Standby mode ...

Page 33: ...ra Recording Normal Screen Mode Wide Screen Mode ITEM S E T S E T PAGE DATE TIME DISPLAY SELF REC ON DATE DATE TIME AUTO AUTO AUTO NO OFF CORRECT 1 2 3 4 OFF Operation Button 1 2 3 4 16 9 REMOTE ITEM S S PAGE ON OFF ON OFF 1 2 3 4 16 9 REMOTE ITEM S S PAGE ON OFF ON OFF 1 2 3 4 16 9 REMOTE ITEM S S PAGE ON OFF ON OFF 1 2 3 4 16 9 REMOTE CAM DISP DGTL ZOOM ITEM S E T S E T PAGE ON OFF OFF ON OFF ON...

Page 34: ...faintly displayed and the quick return function will not operate Edit Search The edit search feature lets you search without switching from Camera Recording mode to VCR mode for the point on the tape where you wish to start recording next 1 In Recording Standby mode make sure that no operation indicators are displayed on the monitor If they are displayed on the monitor turn them off by pressing th...

Page 35: ...adied to prevent image shake Use a tripod for very stable recording Basic Recording Positions Put the fingers of your right hand through the hand strap and place your right thumb close to the REC START STOP and Power Zoom buttons Place your left thumb in the indentation on the left side of the LCD monitor Position the subject in the center Focus manually when you need to position the subject off c...

Page 36: ...er to Full Auto mode lets you record high quality pictures easily When AUTO is not displayed on the monitor the camcorder is not in Full Auto mode Perform the procedure below to set the camcorder to Full Auto mode 1 While the camcorder is in Camera mode press the MENU button until appears 2 Press on the operation button to select MANUAL Note If the camcorder is in manual focus mode FOCUS selected ...

Page 37: ...vel if you set the Power switch to OFF and then back to CAMERA or VCR again Use of the zoom functions when the warning message BATTERY IS TOO LOW is displayed may cause the camcorder to suddenly lose power Replace the battery pack Remaining battery power display will not be displayed when using a DC cable or Docking station Approx Remaining Recording Time Monitor Display This icon will appear when...

Page 38: ...to normal fast forward or reverse mode Playback The LCD monitor makes it possible to play back and see what you have just recorded Nothing needs to be connected allowing instant on screen playback You can hear the sound through the built in speaker or via your own stereo earphones You can also watch prerecorded 8 mm video tapes on this camcorder 1 Hold down the Lock button and slide the Power swit...

Page 39: ...n VCR mode To return to normal playback press on the button to select STILL once again Still image playback can also be operated with the remote control See page 39 Slow This function makes it possible to play back in slow motion During playback press the SLOW button E on the remote control To return to normal playback press PLAY button on the remote control to select PLAY Notes The sound is off d...

Page 40: ... beginning of five different scenes Video Tape Oldest Recording Most Recent Recording When you are at this position Press C on the button to select REW to rewind the tape to E and begin playback Press B on the button to select FF to forward the tape to R and begin playback Beginnings of Scenes Current Tape Position Monitor Display SEARCH SEARCH F F R E W Operation Button Notes Use this feature whe...

Page 41: ...an check the recording or playback time on the monitor To Turn Off the Counter Display Press A on the button again to select COUNTER in step 2 To Reset the Counter to Zero During playback or recording perform steps 1 and 2 and then press B on the button to select RESET Basic Operations Playback STOP WATCH COUNTER M E N U Tape Counter Operation Button PLAY STILL F F R E W 0 3 1 0 8 Tape Counter PRE...

Page 42: ...ppear The Counter Memory mode is now canceled Notes In Step 5 Bon the button can be used to select FF in the same way This function does not work during video searches In step 5 the tape may stop slightly ahead or behind the point where you reset the counter to M 0 00 00 Turning Off the LCD Monitor Backlight This camcorder s LCD monitor uses a fluorescent lamp for backlighting see page 57 In order...

Page 43: ...s photoreceptor as this may prevent the remote control from operating properly Be sure that there are no obstacles between the remote control and the camcorder s photoreceptor When the REMOTE item setting is changed in either Camera or VCR mode the setting for the other mode is automatically set to the same The lithium cell normally lasts about one year It can be shorter under some operating condi...

Page 44: ...ing in Self Recording Mode Cautions Do not rotate the monitor to the self recording position while the camcorder is recording or playing back For recording in Self Recording mode be sure to rotate the monitor NOT the lens If you hold the camcorder upside down with its lens at the bottom the subject will be recorded upside down Normal Self Recording 1 Rotate the camcorder s monitor section 180 vert...

Page 45: ...set for 20 seconds The remaining number of seconds is displayed in the upper right hand corner REC STOP W I T E 20 REC START PRESS REC START FOR LEAVING YOUR MESSAGE W I D E T E L E 20 15 10 5 4 3 2 1 3 When the remaining recording time reaches 5 seconds EXTEND will flash When you want to extend the recording time press on the button to select EXTEND within 5 seconds After pressing the button you ...

Page 46: ...nge picture adjustments display menus record the date and time or use the quick return and some of the other features You can begin playback by setting the Power switch to VCR even while the monitor is rotated 180 The functions displayed on the monitor during normal playback still operate even though not displayed For example the on the operation button works as the Play button After recording in ...

Page 47: ...R F A R Operation Button MANUAL FOCUS AUTO AUTO 2 Press C or B on the button to select NEAR or FAR MANUAL FOCUS N E A R F A R Notes When recording in the Manual Focus mode you may not be able to focus correctly if the subject is within approximately 5 feet 1 5 m of the camcorder In such a case shift the zoom control toward wide angle and then try focusing again If you focus on a subject in wide an...

Page 48: ...dles are too bright 1 Press the MENU button until appears on the monitor Camera mode Press on the operation button to select MANUAL 2 Select CAMERA MODE and then press B on the button to select MANUAL 3 PressAon the button to select SCENE MENU 4 Press C or B on the button to select the scene setting that best fits the recording situation Each time you press C or B on the button the scene indicator...

Page 49: ... NORMAL To reset the camcorder to Full Auto mode press on the button to select CAMERA MODE and then press C on the button to select AUTO in step 2 Recommended Shutter Speeds The faster the shutter speed the darker the pic ture becomes Select the most appropriate shutter speed for the ambient light Operation Button MENU Button CAMERA MODE SHUT SPEED WHITE BALANCE IRIS ITEM S E T S E T MANUAL AUTO S...

Page 50: ... CAMERA MODE and then press C on the button to select AUTO in step 2 Notes When recording with the white balance locked if the light source changes or if you move from indoor to outdoor or vice versa the white balance may shift Reset the white balance Even after the white balance has been locked white balance shifts may occur due to slight changes in illumination or depending on the subject Do not...

Page 51: ...l Iris The camcorder is normally set to Auto Iris mode which automatically chooses the optimal aperture When there is too much contrast in brightness between the subject and background you may not be able to record a clear image Correct the iris to adjust the aperture 1 Press the MENU button until appears on the monitor Camera mode Press on the operation button to select MANUAL 2 Select CAMERA MOD...

Page 52: ...ic high speed shutter is used with the snapshot function you can record a complete still image without any blurring The picture quality of the snapshot is slightly lower than normal picture quality Still Recording You can record still images of subjects with normal sound You will find it useful when you want to record a shot of a tourist information board during sightseeing 1 Refer to page 14 to d...

Page 53: ...n using the stopwatch during recording the stopwatch display is not recorded Strobe Recording You can record strobe images still pictures that capture continuous motion at 1 5 sec intervals of subjects with normal sound You will find it useful when you want to produce a special effect while recording moving subjects such as your friends waving at you 1 Press on the operation button to select STROB...

Page 54: ...u select LAP TIME the stopwatch display indicates the time elapsed from the moment the stopwatch was started to the moment you pressed C on the button to select LAP TIME The stopwatch cannot measure lap time for any intermediate period 3 Press on the button to select STOP The stopwatch stops measuring and shows the time elapsed between the start and the moment you pressed stop e g from the start t...

Page 55: ...mera flashbulb Blue photolamp White fluorescent light Off white fluorescent light Tungsten photolamp Halogen lamp Tungsten lamp Iodine lamp Acetylene lamp Kerosene lamp Candlelight Color Blue White Yellow Red White Balance Range A U T O Notes The figures in the charts are approximations The auto white balance operates automatically within the range of AUTO shown in the chart However it will satisf...

Page 56: ... connections with any of the components left turned on may cause picture noise or malfunction Note When the camcorder is connected to a TV for playback the picture on the TV screen may flicker if the volume on the camcorder is set to maximum Should this occur turn the volume down see page 34 Yellow To VIDEO IN Jack Red To AUDIO IN R Jack White To AUDIO IN L Jack Yellow To VIDEO Jack Red To AUDIO R...

Page 57: ...d other equipment to be connected have been turned off before you make connections Making connections with any of the components left turned on may cause picture noise or malfunction Note When the camcorder is connected to a TV for playback the picture on the TV screen may flicker if the volume on the camcorder is set to maximum Should this occur turn the volume down see page 34 2 Press on the ope...

Page 58: ... release in the direction of the arrow and then pull the A V pack straight out Attaching the A V Pack 1 Pull the A V pack terminal cover of the camcorder in the direction of the arrow as shown below Note Be careful not to lose the A V pack terminal cover once it is removed 2 Align the projections on the A V pack with the openings on the camcorder s mounting panel and insert the A V pack as shown T...

Page 59: ...wn the tape counter readings at the beginning and end of that sequence see page 37 Then rewind the tape to the beginning of the portion that you wish to keep 2 Load a blank tape cassette into the recording VCR 3 Set the Power switch to VCR Press on the operation button to select PLAY and press the VCR s REC Record button at the same time 4 Press the VCR s Pause Still button to pause recording when...

Page 60: ... jack use the white plugs for the audio connection on the source equipment and Docking Station Automatic Switching of the Audio Video Jack s Input Output Mode The AUDIO VIDEO jack s mode is normally set to input It automatically switches to output when the camcorder is playing back Source Equipment Operation Button To Record from an External Source 1 Set the Power switch to VCR 2 Start sending aud...

Page 61: ...lly hold the end white knob of the lamp unit with tweezers and pull it out 5 Insert the replacement lamp unit into the compartment See note below 6 Replace the fluorescent lamp compartment cover Notes Be sure to insert the replacement fluorescent lamp straight in in the direction of the arrow into the compartment Do not press diagonally as it may cause contact failure The fluorescent light may fli...

Page 62: ...g or by using the order form on the next page This A V pack lets you connect your camcorder to other audio video equipment Small and lightweight it comes in handy when traveling SAV103 A V Pack Mounting the camcorder on a tripod such as AC088 will keep the camcorder steady and produce excellent video results This tripod s fluid effect head provides smooth camera pan and tilt The quick release moun...

Page 63: ...3580 9 95 Remote Control 233581 13 95 Audio Video Cable 233582 9 95 Docking Station 233665 119 95 Replacement Lamp Unit 235179 Prices are subject to change without notice Total Merchandise Sales Tax We are required by law to collect the appropri ate sales tax for each individual state county and locality to which the merchandise is being sent Shipping and Handling 5 00 Total Amount Enclosed Use VI...

Page 64: ...on MasterCard AUTHORIZED SIGNATURE Prices are subject to change without notice Name Street Apt City State Zip Print or type your name and address clearly This will be your mailing label Please make sure that both sides of this form have been filled out completely Allow 4 weeks for delivery All accessories are subject to availability A complete and correct order will save you days of waiting IMPORT...

Page 65: ...he toll free number listed below between 8AM and 8PM EST Monday through Friday or between 9AM and 5PM EST Saturday Use this number only to place an order for accessory items listed on this order form 1 800 338 0376 To place your order by mail detach and mail the completed order form with credit card information money order or check in U S currency made payable to Thomson Consumer Electronics Inc t...

Page 66: ...bitions or restrictions on the use of electronic equipment on commercial flights or in other sensitive areas The camcorder generates electrical interference that can disable vital equipment leading to the risk of a serious accident Watch the temperature and humidity You can use your camcorder at 07C to 407C 327F to 1047F and at 30 to 80 relative humidity Do not store the unit in an unventilated ca...

Page 67: ...rd DEW flashes on the LCD monitor remove the cassette leave the cassette compartment open and wait several hours to allow the camcorder to acclimate to the surrounding temperature W To use the camcorder again turn on the power after waiting for several hours Be sure that the word DEW has disappeared from the monitor screen E Do not insert a cassette while the word DEW is flashing this may result i...

Page 68: ...e Use only the BB75 battery pack It is designed specifically for use with this camcorder Use and Care How to use the marker on the battery pack The marker is provided to indicate the battery s charge condition Slide the switch to indicate the charge condition as shown below Temperature during charging Store the battery pack in a dry cool place Charge the battery pack at temperature of 10 C to 30 C...

Page 69: ...n it for high quality recording and playback or use one with the mark to enjoy ordinary 8 mm recording and playback When you load a Hi8 tape recording is in Hi8 format The Hi8 indicator on the view screen lights up When you load a normal 8 mm tape recording is in ordinary 8 mm format The Hi8 indicator on the view screen is off During playback the format recorded is automatically detected Video equ...

Page 70: ...ing Station properly p 8 Power Recording Possible cause Power source is not properly connected Battery pack is not charged Dew in camcorder Safety function is in effect Erasure protect tab on video cassette is closed Camcorder left in Recording Standby mode for five minutes Inappropriate picture adjustments Manual Focus mode is engaged Zoom used on close subject Subject has little contrast in brig...

Page 71: ...8 Stop tape and try again Wait until dew dries p 63 Press MODE DISPLAY button or set Power switch to OFF and then back to CAMERA or VCR p 38 Replace with new fluorescent lamp unit p 57 Connect A V or S video cable properly p 52 Connect Docking Station properly p 8 Set REMOTE menu item to ON p 39 Replace remote control lithium cell with a new one p 6 Use remote control within operating range p 39 P...

Page 72: ...ge without notice This equipment has been tested and found to comply with the limits for a Class B digital device and RF lighting device pursuant to Part 15 and Part 18 of the FCC Rules These limits are designed to provide reasonable protection against harmful interference in a residential installation This equipment generates uses and can radiate radio frequency energy and if not installed and us...

Page 73: ...esponsibilities Returning equipment to Thomson for repair or exchange Important information to customers who ship defective equipment to Thomson Consumer Electronics The Thomson representative who authorized the return of your equipment will give you an RA number over the phone They will also provide you with instructions on where and how to return your camcorder Write the number in large clear ch...

Page 74: ...e location will notify you of its arrival 3 Take your unit including all accessories and your evidence of purchase date such as a bill of sale to the exchange location and you will be provided the new or refurbished unit 4 If the repairs were covered by your warranty you will not be billed If you are not located near an exchange point 1 Provide your Discover MasterCard or Visa account number and e...

Page 75: ... purchased your camcorder outside the USA This warranty does not apply Contact your dealer for warranty information Include with the shipment Evidence of purchase date such as a bill of sale to verify your unit s warranty eligibility A brief note describing your camcorder s problem Your name address and phone number Return transportation storage handling and insurance costs are your sole responsib...

Page 76: ...erations 23 33 Camera Recording Useful Features 40 51 Canceling Automatic Screen Display 29 Car Battery Adapter Using 11 Care and Use 62 65 Cassette Compartment 4 6 12 CASSETTE NOT RECORDABLE Indicator 16 Cassettes Care 65 Cassettes Hi8 65 Cassettes Inserting and Removing 12 Cat s Eye Gain Up 26 Cautions i Cell Installing in Camcorder 6 Cell Installing in Remote Control 6 CHANGE THE CASSETTE Indic...

Page 77: ...formation Important i 5 INSERT A CASSETTE Indicator 16 Inserting and Removing Cassettes 12 Iris Manual 47 L LAMP OFF Indicator 38 Lamp Fluorescent 57 Lap Times 50 LCD Monitor 5 LCD Monitor Backlight Turning Off 38 LCD Monitor Handling 22 LCD Monitor Replacing Lamp 57 Lens Protector 4 LIGHT Indicator 51 Lighting 51 Limited Warranty 70 71 M Macro Shots 27 Manual Focus 43 Memory Counter 38 MENU Butto...

Page 78: ...tration i Program AE 44 Program Search 36 PUSH Mark 12 Q Quick Return 30 R RECord START STOP Button 5 23 28 39 Recording Date and Time 32 Recording on the Camcorder 56 Recording Pause 23 Recording Positions 31 Recording Tips 31 References 57 75 Registration Card i Registration Product i Remaining Battery Power Display 33 Remaining Recording Time Display 33 Remote Cell Installing 6 Remote Control B...

Page 79: ...rea and Date Displaying 19 Time Area and Date Setting 17 Times Zones Table 20 Tips on Traveling Abroad 65 Tips Recording 31 Traveling Abroad Tips 65 Tripod 27 58 Tripod Socket 5 58 Trouble Checks 66 67 Twilight Mode 44 U Use and Care 62 65 Useful Features Camera Recording 40 51 Using Remote 39 V VCR Mode 13 15 21 34 35 Video Heads Clogged Indicator 16 Video Search 35 VOLume Buttons 5 34 39 W Warni...

Page 80: ...sh 800 522 0338 French 800 522 0445 Please do not send any products to the Indianapolis address listed in this manual or on the carton This will only add delays in service for your product 10330 N Meridian Street Indianapolis IN 46290 1996 Thomson Consumer Electronics Inc Trademark s Registered Marca s Registrada s Printed in Japan Part Number 96 ProV950HB 1 TINSE0206TAZZ ...

Reviews: