background image

1

Copyright © 2020 RCA Communications Systems   

www.RCACommunicationsSystems.com

Communications Systems

RDR43x0 Series Intrinsically
Safe Professional Digital
Two-Way Radios

INSTRUCTION MANUAL

Congratulations and Thank You for selecting 

the PRODIGI RDR43x0 Series portable two-way 

radio from RCA Communications Systems

The most trusted name in radio!

Our newest digital series professional communications products 
based on DMR technology establishes a benchmark in premium 
digital two-way radio equipment, made to perform flawlessly under the 
most demanding commercial conditions.  Cutting edge design, high-
end professional grade materials and components, simple operation 
and superior assembly quality: RCA Communications Systems has 
it all, including our exclusive no-nonsense, three-year “Warranty 
Protection Program,” one of the most comprehensive warranties in the 
communications industry.

To ensure you achieve maximum performance from your RDR4320

TM

RDR4350

TM

, or RDR4380

TM

 radio, please be sure to carefully read this 

manual.

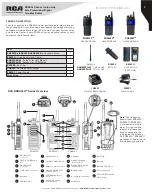
MODELS COVERED IN THIS MANUAL:

•  RDR4320

TM

 VHF Two-Way Radio

•  RDR4320

TM 

UHF Two-Way Radio

•  RDR4350

TM

 VHF Two-Way Radio

•  RDR4350

TM

 UHF Two-Way Radio

•  RDR4380

TM

 VHF Two-Way Radio

•  RDR4380

TM 

UHF Two-Way Radio

YEAR

WARRANTY

PROTECTION PROGRAM

CONTENTS:

Product Inspection

..........2

RCA RDR43x0

TM

 Series Overview

..........2

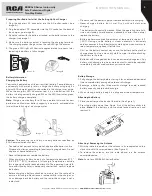
Preparing Radio For Initial Use Setting Up the Charger

..........3

Battery Information
Charging the Battery

..........3

Battery Storage

..........3

Attaching the Battery

..........3

Attaching / Removing the Antenna

..........3

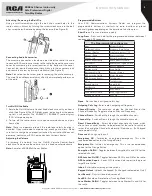
Attaching / Removing the Belt Clip

..........4

Connecting Audio Accessories

..........4

Turn On/Off the Radio

..........4

Adjusting the Volume

..........4

Programmable Buttons

..........4

Function Keypad

..........5

Accessing the Programmed Functions

..........5

Radio Keypad

..........5

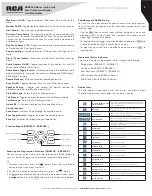
Operational Status Indicators

..........5

Display Icons

..........5

LED Indicator

..........6

Audio Tones

..........6

Conventional Mode
Making and Receiving Calls
Selecting a Zone

..........6

Selecting a Channel, Subscriber ID or Group ID

..........6

Receiving and Responding to a Group Call

..........6

Receiving and responding to an Individual Call

..........6

Receiving and All Call

..........6

Making a Radio Call

..........6

Making Call with Channel Selector Knob
Making a Group Call

..........6

Making an Individual Call

..........7

Making an All Call

..........7

Making Group / Individual Call with One Touch Access Button

..........7

Emergency Operation

..........7

Advanced Features

..........7

Sending a Call Alert

..........7

Receiving and responding to a Call Alert

..........8

Sending a Radio Check

..........8

Remote Monitor

..........8

Initiating Remote Monitor

..........8

Radio Enable

..........8

Radio Disable

..........8

Contacts Setting

..........9

Making a Group Call from Contacts

..........9

Making an Individual Call from Contacts

..........9

Call Log Feature
Accessing the Call Log

..........9

Storing an Alias or ID from the Missed Call List

..........9

Deleting a Call from a Call List

..........9

Text Message Features
Navigate to Messages

..........9

Write a new message

..........10

Quick Message

..........10

Status Message

..........10

Managing Sent Text Message

..........10

Viewing Sent Text Message  in Outbox

..........10

Deleting All Sent Text Messages from the Sent Items

..........10

Receiving a Text Message

..........10

Managing Received Text Message

..........11

Viewing a Text Message from the Inbox

..........11

Replying to a Text Message from the Inbox

..........11

Forwarding a Text Message from the Inbox

..........11

Deleting a Text Message from the Inbox

..........11

Scan
Viewing an Entry in the Scan List

..........11

Scan Instructions and Methods

..........11

Starting and Stopping Scan

..........12

Responding to a Scan

..........12

Deleting a Nuisance Channel

..........12

Keypad Locked and Keypad Unlocked

..........12

Setting Alerts/Tones

..........12

Setting Date and Time

..........12

Setting Screen Saver

..........12

Display Settings

..........13

Backlight Timeout

..........13

Brightness

..........13

Reversing the Display

..........13

Setting Channel Report

..........13

Setting Channel Display

..........13

Setting the Power Level

..........13

Speech Enhancement

..........13

Speaker Auto Gain Control (SPK. AGC)

..........13

Wireless Program

..........13

Setting Emergency Service
Man Down

..........14

Lone Worker

..........14

Encryption

..........14

GPS Settings

..........14

Accessory Link

..........14

Voice Recording

..........14

Accessing General Radio Information

..........14

Care and Cleaning

..........15

Troubleshooting

..........15

CONTENTS: 

(continued)

Summary of Contents for RDR4320

Page 1: ...ng Calls Selecting a Zone 6 Selecting a Channel Subscriber ID or Group ID 6 Receiving and Responding to a Group Call 6 Receiving and responding to an Individual Call 6 Receiving and All Call 6 Making a Radio Call 6 Making Call with Channel Selector Knob Making a Group Call 6 Making an Individual Call 7 Making an All Call 7 Making Group Individual Call with One Touch Access Button 7 Emergency Opera...

Page 2: ...Belt Clip Antenna ANH4300U W UHF models ANH4300V W VHF models RDR4320TM Handheld Radio RDR4380TM Handheld Radio RDR4350TM Handheld Radio 5 1 2 3 4 16 17 18 19 20 21 22 23 6 7 8 9 10 11 12 13 13 14 15 RCA RDR43x0TM Series Overview 1 Side Button 1 Programmable 7 Channel Knob 13 Speaker 19 Belt Clip 2 Push To Talk Button PTT 8 On Off Volume Knob 14 Numeric Keypad RDR4350 RDR4380 20 Battery 3 Side But...

Page 3: ...the charger s LED illuminates red it is an indication that the battery is being correctly charged When the LED illuminates green the battery charge is complete Note Charge a new battery 12 to 14 hours before initial use for best performance Maximum battery capacity is normally achieved after two or three full charge discharge cycles Caution To reduce the risk of injury use only batteries specified...

Page 4: ...ncy Off Terminates an outgoing emergency This is the recommended option for the Orange Button Emergency On Initiates an emergency This is the recommended option for the Orange Button Encryption On Off Toggles between Encryption On and Off for the selected channel GPS Location On Off Toggles between GPS On and Off for the radio GPS Location Report Sends GPS location data report to the preset target...

Page 5: ...press the button Press the Up or Down button to access the menu functions 2 To select a function or enter a sub menu press the button 3 To go back one menu level or to return to the previous screen press the button Press the button to return to the Home Screen Radio Keypad RDR4380 only You can use the alphanumeric keypad to access the radio features You can also use the keypad to enter subscriber ...

Page 6: ...splays the subscriber alias or ID RDR4350 RDR4380 only 3 Press the PTT button to respond to the call and the LED indicator lights up red Note If Talk Permit Function is enabled wait for the Talk Permit Tone to finish and then speak clearly into the microphone 4 Release the PTT button to listen again 5 If there is no voice activity for a set period of time the call ends Receiving and responding to ...

Page 7: ...ss of any activity on the current channel Note This function is available only in digital mode Your radio supports 7 Emergency Alarms Emergency Alarm Emergency Alarm with Emergency Call Emergency Alarm with Voice to Follow Emergency Call Pre Status Message Pre Status Message with Emergency Call Pre Status Message with Voice to Follow Each alarm has the following default setting Disabled Radio cann...

Page 8: ...ps twice and the display briefly shows Target Radio Available If the target radio is not active in the system the radio beeps twice and the display briefly shows Target Radio Unavailable Remote Monitor Allows the radio to send Remote Monitor command to another radio This command activates the receiving radio s microphone and transmitter for the duration specified for the receiving radio in the Rem...

Page 9: ...The Call Log lists are Outgoing Incoming and Missed Note When you select a Call List and it contains no entries the display shows List Empty Accessing the Call Log 1 Using the programmed Call Log button 2 Using the radio menu 2 1 Press button to access the menu 2 2 Press or button to Call Logs and press button to select 2 3 Press or button to navigate to the desired list and press button to select...

Page 10: ...r button to select Status Messages press button to enter the Status Messages menu 4 Press or button to select the preset Status Message and press button to enter 5 Press or button to select the target radio you wish to send the Status Message to 6 If the message is sent the radio beeps twice and the display shows Sent If the message is not sent the radio beeps once and display shows Failed Managin...

Page 11: ... radio beeps twice and the display shows Sent If the message is not sent the radio beeps once and the display shows Failed Deleting a Text Message from the Inbox RDR4350 RDR4380 only 1 Press button to access the menu 2 Press or button navigate to the Message and press to select 3 Press or button to navigate to Inbox and press to select 4 Press or button to select the message and press to access th...

Page 12: ...e programmed Scan button Keypad Locked and Keypad Unlocked You can lock your radio s keypad to avoid an inadvertent key press You have two options to lock your keypad Shortcut key press the programmed keypad lock button to lock or unlock the keypad Use keypad to activate the setting 1 Press to access the menu 2 Press or to navigate to Settings and press to select 3 Press or to navigate to Keypad L...

Page 13: ...eport setting Setting Channel Display Defines if the radio displays the caller ID or the Alias during a call 1 Press to access the menu 2 Press or to navigate to Settings and press to select 3 Press or to navigate to Channel Display and press to select 4 Press or to select Alias or Frequency Setting the Power Level Sets the radio s transmission power level for this channel This feature can be togg...

Page 14: ...ame Key Value and Key ID for ARC4 Encryption as the transmitting radio in order to decode the encrypted transmission Channels may have their encryption enabled or disabled usingaprogrammableshortcutkey EncryptionOn Off ortheEncryption Menu Display Radios Only A radio must have the Encryption enabled on the channel to transmit with encrypted transmission A visual indicationappearsonalldisplayradios...

Page 15: ... solvent or spirits Symptom Solution Radio will not power on a The battery needs charging Recharge the battery or replace it with a fresh one b The battery is not properly installed Remove the battery and reattach it The operating time is notice ably shorter than normal even though the battery is properly charged a The battery has worn out it is time to buy a new battery b The battery is not fully...

Reviews: