background image

USER’S

GUIDE

VR678HF

VIDEO CASSETTE

RECORDER

Summary of Contents for VR678HF

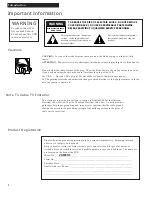
Page 1: ...USER S GUIDE VR678HF VIDEO CASSETTE RECORDER ...

Page 2: ...______________________________________ Serial No _____________________________________________________________________ Purchase Date ________________________________________________________________ Dealer Address Phone ________________________________________________________ _______________________________________________________________________________ ____________________________________________...

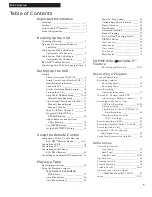
Page 3: ...rs About COMMERCIALAADVANCE _____52 Index _____________________________ 52 53 1 Introduction Table of Contents Important Information Warnings______________________________ i Cautions ______________________________ i Note to Cable TV Installer _______________ i Product Registration ____________________ i Hooking Up the VCR Choosing a Hookup ____________________ 2 Antenna or Cable System Without a C...

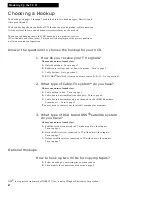
Page 4: ...em and another source A B C Go to question 3 2 What type of Cable TV system do you have Choose one answer from below A Cable without a box Turn to page 3 B Cable box to unscramble all the channels Turn to page 4 C Cable box to unscramble only pay channels such as HBO Showtime Cinemax etc Turn to page 5 You may need to contact your local cable company for assistance 3 What type of RCA brand DSS sat...

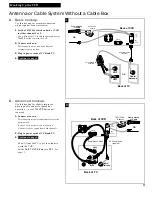
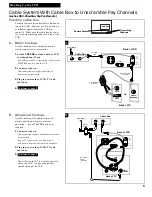
Page 5: ...ries not provided 3 Plug in power cords of VCR and TV 4 B Advanced hookup Use this hookup for slightly improved picture quality and more convenient operation use of TV VCR button not required 1 Connect as shown This connection requires additional accessories not provided If your TV is not stereo you may need a Y adapter to hear sound from both channels 2 Plug in power cords of VCR and TV 3 You wil...

Page 6: ...this hookup for a simple connection which requires fewer accessories 1 Set the CH3 CH4 switch on back of VCR to either channel 3 or 4 You will tune the TV to this channel and use the TV VCR button to watch the VCR 2 Connect as shown This connection may require additional accessories not provided 3 Plug in power cords of VCR TV and cable box 4 B Advanced hookup Use this hookup for slightly improved...

Page 7: ...improved picture quality and more convenient operation use of TV VCR button not required 1 Connect as shown This connection requires additional accessories not provided If your TV is not stereo you may need a Y adapter to hear sound from both channels 2 Plug in power cords of VCR TV and cable box 3 You will tune the TV to its video input to watch the VCR All pay channels are viewed through the VCR...

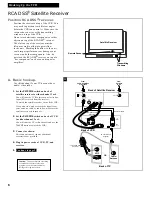
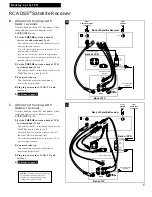
Page 8: ...impair performance or damage your receiver and other components Also do not stack the RCA DSS receiver on top of a hot component such as an audio power amplifier A Basic hookup Use this hookup if your TV does not have audio video jacks 1 Set the CH3 CH4 switch on back of satellite receiver to either channel 3 or 4 You will tune the VCR to this channel or its line input L1 to record from the receiv...

Page 9: ... use the TV VCR button to watch the VCR To record from the satellite receiver you will tune the VCR to its line input L1 To watch the satellite receiver tune your TV to its video input channel 2 Connect as shown This connection may require additional accessories not provided 3 Plug in power cords of VCR TV and receiver 4 Continue to page 9 Continue to page 9 CH 3 4 AUDIO VIDEO R R L IN OUT IN OUT ...

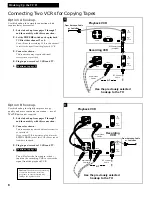
Page 10: ...and then modify with this connection 2 Set the CH3 CH4 switch on the playback VCR to either channel 3 or 4 You will tune the recording VCR to this channel to receive the signal from the playback VCR 3 Connect as shown This connection may require additional accessories not provided 4 Plug in power cords of VCRs and TV 5 Option B hookup Use this hookup for slightly improved copy quality and more con...

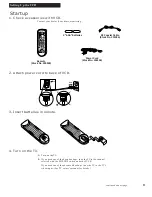
Page 11: ...nel selected with the CH3 CH4 switch on back of VCR If you used one of the advanced hookups tune the TV to the TV s video input See TV owner s manual for details Remote Stock No 225529 EDIT SEARCH VOL VOL MUTE PREV CH DISPLAY INPUT 1 4 7 TV VCR 3 6 9 2 5 8 0 CLEAR SPEED REW PLAY FF STOP PAUSE REC M E N U P R O G POWER VCR1 DSS CABLE TV VCR2 LD AUX CHAN CHAN TRACKING 3 4 SLOW F ADV MOVE RF Coaxial ...

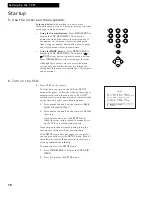
Page 12: ...VCR A Press VCR1 on the remote The first time you turn on the VCR the SETUP menu will appear Follow the steps on the screen to automatically set up the cable box or RCA DSS satellite receiver auto channel search automatically set the time and select some feature options 1 Press number button 1 on the remote to Begin setup Proceed to Step 7 2 Press number button 2 on the remote to Cancel the setup ...

Page 13: ...wo numbers on the remote to enter the output channel of your cable box or satellite receiver Press 0 before a single digit number Valid numbers are 01 99 If you connected your cable box or satellite receiver to the VCR using the box s AUDIO VIDEO OUT jacks press INPUT to select the VIDEO1 or VIDEO2 option Press CLEAR on the remote to correct an entry C Press MENU PROG to proceed The VCR now automa...

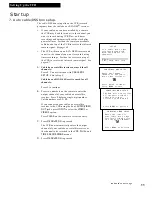
Page 14: ...TV screen B Press 4 to select CHANNELS menu C Press 4 to select Cable DSS Setup D Perform steps A E as shown in step 7 VCR MAIN MENU 1 VCR Plus 2 Timer Recordings 3 Time 4 Channels E Manually Controlled Cable Box You are finished with cable box setup Press MENU PROG to exit Proceed to Step 8 RCA DSS Receiver or Remote Controlled Cable Box RCA DSS Receiver Enter 00 for the code The receiver should ...

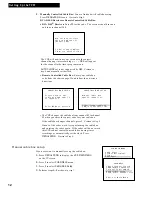
Page 15: ...lock manually The clock must be set before you can use the timer recording feature If you receive all channels through a cable box the VCR will not reset the clock after a power outage unless the cable box is set to the channel carrying the broadcast signal Call your local cable operator to find out what channel carries the broadcast signal Signal might not be available in some areas Manual channe...

Page 16: ...een F Add or remove more channels by entering channel numbers or using CHANNEL up or down VCR MAIN MENU 1 VCR Plus 2 Timer Recordings 3 Time 4 Channels ADD REMOVE CHANNELS CH 03 is presently ADDED Press CLEAR to remove Press MENU to exit Manual clock set If the AUTO CLOCK SET was unsuccessful or you want to manually set the clock If you set the clock manually during setup Auto Clock Set will be se...

Page 17: ... leave the Auto TV VCR feature set to ON If you have connected your VCR using the audio video input of your TV you can prevent the VCR indicator from turning on automatically and interrupting the cable or antenna signal to your TV A Press MENU PROG on remote to see VCR MAIN MENU on the TV screen B Press 6 to display PREFERENCES C Press 3 to select Auto TV VCR ON or OFF Select ON if you used one of...

Page 18: ... selected features See page 10 CHAN Up or Down Selects next higher or lower channel in the VCR s channel memory CLEAR Resets time counter to 0 00 00 Allows you to change entries when setting the clock or VCR for a VCR Plus or timer recording DISPLAY Shows VCR operating displays on the TV screen Displays the time counter EDIT Signals two properly connected compatible VCRs to begin copying a tape Se...

Page 19: ...umber buttons to select another Press PREV CH to switch between the two channels REC Starts VCR recording Used for express recording XPR See page 41 REW Rewind Rewinds the tape when the VCR is stopped Searches the picture in reverse motion during playback SEARCH Displays INDEX TIME ZERO and BLANK SEARCH menus on TV Used during playback with the COMMERCIALAADVANCE feature See pages 32 33 SLOW Used ...

Page 20: ...sition The remote then controls the VCR with either the VCR1 or VCR2 LD button whichever position you select in the menu 1 Press MENU PROG to display the VCR MAIN MENU 2 Press 6 to display PREFERENCES 3 Press 1 to activate the Remote Control feature 4 Press VCR1 or VCR2 LD to change the setting and program this VCR to respond to the VCR1 or VCR2 LD button whichever you select VCR MAIN MENU 1 VCR P...

Page 21: ...VCR s remote is preprogrammed to control the basic functions of a compatible RCA ProScan or GE TV The remote can also be setup to control other manufacturer s brands To program the remote use the remote buttons that correspond to your brand Program the Remote for a TV Operate the TV After you have set up your remote to control your TV test the TV buttons to see which ones operate your TV 1 Point t...

Page 22: ...ceiver 1 Point the remote at the cable box or satellite receiver and press DSS CABLE 2 If the cable box does not turn on in step 1 press DSS CABLE and then POWER If the RCA DSS satellite receiver does not turn on in step 1 reprogram the remote using 00 3 Use the Cable Box or RCA Receiver Function Buttons for the cable box and test the TV Function Buttons to see which ones operate the satellite rec...

Page 23: ...n the component 2 Point the VCR s remote at the component 3 Hold the AUX button and press two number buttons to enter the code for your component 4 Release the buttons 5 Press POWER on the remote If the component turns off setup is complete Operate the Auxiliary Component After you have setup your remote to control your component test the buttons to see which ones operate the component 1 Point the...

Page 24: ...d and the auto play feature is turned on 3 Press PLAY if necessary PLAY appears in the VCR s display panel 4 Press TRACKING up or down to remove any streaks from the picture if necessary Details are on page 27 5 Press STOP 6 Press REW on the remote or turn the shuttle ring toward REW on the VCR The VCR will automatically rewind the tape if it reaches the end of the tape during playback While rewin...

Page 25: ...MENU P R O G POWER VCR1 DSS CABLE TV VCR2 LD AUX CHAN CHAN TRACKING 3 4 SLOW F ADV MOVE AUDIO 1 Reception STEREO 2 Tape Playback HI FI 0 Exit To Select Playback Sound 1 Press MENU PROG to see the VCR MAIN MENU on the TV screen 2 Press 7 to see the AUDIO menu on the TV screen 3 Press 2 to switch between HI FI LINEAR or MIX sound Select HI FI to play back sound recorded on the Hi Fi track and for no...

Page 26: ... of time of the segment you want the VCR to repeat 7 Press MENU PROG to remove the menu from the screen The VCR will play the tape until the specified counter reading is reached rewind the tape and replay the segment over and over 8 To stop auto repeat display the AUTO REPEAT menu and press CLEAR EDIT SEARCH VO L VO L MUTE PREV CH DISPLAY INPUT 1 4 7 TV VCR 3 6 9 2 5 8 0 CLEAR SPEED REW PLAY FF ST...

Page 27: ...of the VCR either direction The speed of the search increases with the amount the shuttle ring is turned 3 Release the shuttle to return to pause 4 Press PAUSE or PLAY to return to playback The VCR will automatically switch from stop action playback to stop after a few minutes Fast Forward Search 1 Press FF on the remote or turn the shuttle ring clockwise toward FWD on the VCR to search forward at...

Page 28: ...layback Slow motion works best in the SP or SLP speed 1 During playback Press SLOW or to start slow motion playback SLOW appears in the VCR s display panel 2 Press SLOW to increase the speed or to decrease the speed 3 Use TRACKING up or down to remove any streaks from the picture 4 Press PLAY to return to playback The VCR will automatically switch from slow motion playback to stop after a few minu...

Page 29: ...laying a tape They have no effect during recording When streaks or snow appear press TRACKING up or down for the best possible picture Press TRACKING up or down during stop action pause to reduce picture jitter Press both TRACKING buttons at the same time to turn automatic tracking back on Pro Tect Plus Locking Feature To protect your timer recordings from any unwanted changes lock the VCR The but...

Page 30: ...ded tape It helps locate the beginning or end of programs you taped The time counter resets to 0 00 00 whenever the tape is ejected from the VCR For example if a 30 minute program was recorded at the beginning of the tape you would 1 Insert the prerecorded tape Press STOP Make sure the tape is rewound 2 Press DISPLAY twice to display only the time counter on the TV screen 3 Press CLEAR to reset th...

Page 31: ... ADV MOVE INDEX SEARCH Enter Index number 01 Press FWD or REW Press SEARCH to exit 0 30 00 3 Press two number buttons to enter the number of index marks you want the VCR to search Press CLEAR to correct an entry 4 Press FF on remote or turn the shuttle ring clockwise toward FWD on the VCR to search forward Press REW on remote or turn the shuttle ring counterclockwise toward REW on the VCR to searc...

Page 32: ... number buttons to enter the hour s and minute s of the time counter reading you want the VCR to search Press CLEAR to correct an entry 4 Press FF on remote or turn the shuttle ring clockwise toward FWD on the VCR to search forward Press REW on remote or turn the shuttle ring counterclockwise toward REW on the VCR to search in reverse 5 Press STOP to stop time searching 1 Insert the prerecorded ta...

Page 33: ... Search The VCR searches for blank portions of the tape that are more than six seconds in length 1 Insert the tape and press STOP 2 Press SEARCH on the remote four times to display the BLANK SEARCH menu on the TV screen 3 Press FF or REW to begin search for six seconds of blank tape A message appears on the screen if a blank area is not found 4 Press STOP to stop blank searching BLANK SEARCH Searc...

Page 34: ... COMMERCIALAADVANCE Feature Recording and Playback COMMERCIALAADVANCE is a patented technology that detects and marks most commercials on your tape for any recording that is more than 15 minutes long During playback the VCR automatically skips the detected commercial segments or you can choose to manually skip them This feature reduces three minutes of commercials into approximately 8 12 seconds o...

Page 35: ...ast two minutes of a recording will not be automatically skipped A commercial will not be skipped if the recording starts in the middle of a commercial segment one isolated commercial is shown without others or a commercial is longer than one minute Press FF to scan through the commercial It is possible that part of a recorded program might be skipped if the program segment is between commercials ...

Page 36: ...t is why most prerecorded rental tapes are recorded in SP Fewer programs can be recorded on the tape Special effects such as pause slow motion picture search and frame advance work well LP Long Play gives twice the recording time of tapes recorded in SP Special effects in playback are not recommended in LP SLP Super Long Play gives three times the recording time of tapes recorded in SP Special eff...

Page 37: ...speed indicator appears in the VCR s display panel and on the TV screen 5 Select the channel to be recorded The channel number appears in the VCR s display panel and on the TV screen 6 Press RECORD on the VCR or REC on the remote to begin recording REC appears in the VCR s display panel while the VCR is recording Watch a TV Channel While VCR is Recording a Different Channel 1 Follow steps 1 throug...

Page 38: ...wer s Choice 1 94 Viewer s Choice 2 55 WGN Chicago 43 WTBS Atlanta 60 WWOR New York Canadian List 67 AllarcomPayTelevision Superchannel 44 Arts Entertainment 72 CableNewsNetwork HeadlineNews 61 Cable News Network 70 Canadian HomeShopping Network 56 Canal Famille 69 Cathay International Television Inc 68 Chinavision Canada Corp 60 Country Music Television 63 Family Channel 62 First Choice 96 First ...

Page 39: ...ble TV Station Name Such as ABC NBC CBS etc Channel Number You Receive This Station On VCR Plus Channel Number See Standardized VCR Plus Channel Chart Recording a Program Check your local listing for VCR Plus channel numbers assigned to network stations Check your local or cable listing for the channel numbers to enter in this column ...

Page 40: ... program recorded at same time every day 3 Weekdays program recorded at same time Monday through Friday 4 Weekly program recorded at same time once a week 6 Select recording speed using SPEED on the remote 7 Press CLEAR if you want to change the program end time This feature allows you to extend the recording time on VCR Plus programs This option may be useful when recording programs such as sport...

Page 41: ...r cable box or satellite receiver will automatically appear on the menu Channels with numbers less than 100 will record from the DSS antenna connection Channels with numbers 100 and over will record from the corresponding DSS channel 6 Select recording speed using SPEED on the remote 7 Press MENU PROG to enter your program A reminder appears which will time out or you can press MENU PROG to return...

Page 42: ...nel number when you program the timer Enter VIDEO1 to record from the jacks on the back of the VCR or VIDEO2 to record from the jacks on the front of the VCR Program 1 One Time Channel VIDEO1 Start Time End Time Start Date Tape Speed SLP Press CLEAR to correct Press MENU to save Recording While You re Away VCR MAIN MENU 1 VCR Plus 2 Timer Recordings TIMER RECORDINGS 1 Create a New Program 2 Review...

Page 43: ... a few seconds Each press increases the time 30 minutes up to four hours The amount of time the VCR will record and X REC will appear in the VCR s display panel You can increase the amount of recording time by pressing REC on the remote or RECORD on the VCR RECORD LENGTH 0 00 CH 04 Press REC to set length Express Display on TV Screen Press Recording RECORD Time 0 30 30 Min 1 00 1 Hr 1 30 1 Hr 30 M...

Page 44: ... broadcast stereo TV The STEREO indicator lights in the VCR s display panel when the station you are tuned to is broadcasting stereo Set to MONO if the stereo signal is weak and the sound is too noisy Set to SAP to record SAP second audio program instead of the normal audio on both the hi fi and linear tracks The SAP indicator lights in the VCR s display panel Set the Tape Playback HI FI LINEAR MI...

Page 45: ...io equipment connected to the AUDIO IN jacks 2 Use SPEED on the remote to select the recording speed The tape speed indicator appears in the VCR s display panel and on the TV screen 3 Make sure the Reception STEREO MONO SAP feature is set to STEREO A Press MENU PROG to display the VCR MAIN MENU on the TV screen B Press 7 to display the AUDIO menu C Press 1 to select Reception STEREO 4 Start audio ...

Page 46: ...AUSE buttons on both VCRs at the same time to begin copying the tape 8 Edit out segments that you do not want to copy by pressing PAUSE on recording VCR to stop copying the tape Then locate the next segment you want to copy on the playback VCR by using FWD REW and PLAY Press PAUSE on the playback VCR Press PAUSE at the same time on both VCRs to resume copying 9 Press STOP on both VCRs when you are...

Page 47: ...mponent connected to the audio video input jacks on the back L1 or front of the VCR L2 PAUSE Pauses action for viewing during playback Pauses recording to prevent recording of unwanted scenes PLAY Plays a tape POWER Turns the VCR on or off RECORD Starts VCR recording Used for express recording XPR Remote Sensor Receives signals from the remote control Aim the remote at this sensor with no objects ...

Page 48: ...nds signals from VCR to another component like a TV monitor or VCR when it is connected to these jacks IN CH 3 4 AUDIO VIDEO MONO FROM ANTENNA L L R R IN OUT IN OUT OUT TO TELEVISION Display Panel This VCR has a feature where you can change the brightness level of the fluorescent display panel 1 Press MENU PROG on the remote to see the VCR MAIN MENU on the TV screen 2 Press 6 to display the PREFER...

Page 49: ... on MARK 30 Marking process countdown PLAY Playback REC Record REC P Record pause REW Rewind SRCH Forward search SRCH Reverse search SLOW Slow motion SLOW Slow motion STILL Frame advance STILL Play pause STOP VCR stopped TAPE flashes Set for timer no tape TIMER Timer recording set X REC Express recording in progress STEREO Indicator Lights when the station you are tuned to is broadcasting stereo T...

Page 50: ... deep 318 mm Weight 9 3 pounds 4 2 kg Other Automatic Head Cleaner Storage Temperature Range 22 F to 149 F Operating Temperature Range 41 F to 104 F Check your cable company s compatibility requirements Cleaning the VCR Use a soft cloth or dusting attachment of your vacuum cleaner to dust your VCR Remove dust from the ventilation holes on the top back sides and bottom of the cabinet Plastic surfac...

Page 51: ... Manual clearly describes how to install adjust and operate your VCR Any additional information should be obtained from your Dealer Installation and related adjustments Signal reception problems not caused by your VCR Damage from misuse or neglect Cleaning of video audio heads Remote control batteries A VCR that has been modified or incorporated into other products or is used for institutional or ...

Page 52: ...mote at TV with no objects between them Change batteries Press TV AUX or DSS CABLE to set remote to control a compatible component See pages 18 21 Aim remote at component with no objects between them Reprogram remote after batteries have been changed Reprogram remote to 00 to operate RCA DSS satellite receiver Change batteries Check setting of Remote Control VCR1 VCR2 feature See page 18 Press TV ...

Page 53: ...ing stereo or SAP Tape Playback HI FI LINEAR MIX feature must be set to HI FI to hear stereo sound during playback See page 23 Stereo signal is weak Set Reception STEREO MONO SAP feature to MONO Press one of the TRACKING up or down buttons to minimize the noise COMMERCIALAADVANCE CF Playback feature set to AUTO See page 33 CF Marking ON OFF feature set to OFF See page 32 Recording is less than 15 ...

Page 54: ...ank Search Feature 31 Questions and Answers About COMMERCIALA AADVANCE Question Answer Will commercials be scanned through only on playback of recordings How fast does the COMMERCIALA AADVANCE VCR scan through the commercial breaks Are commercials still recorded if I want to watch them What if the VCR scans forward through part of my program Once a recording has been marked does COMMERCIALA AADVAN...

Page 55: ...d Editing Tapes 44 Express 41 SAP 42 Timer 39 Types of 35 VCR Plus 36 38 Registration Card i Remote Control 16 21 Remote Control VCR1 VCR2 Feature 18 Remote Function Buttons 16 17 Remote Sensor 45 Remove or Add Channels from Memory 14 REMOVE ADD CHANNELS Menu 14 REW Rewind Button 17 22 25 29 30 31 44 Safety Precautions i SAP Indicator 42 47 SAP Recording 42 Satellite Receiver 2 6 7 20 SEARCH Butto...

Page 56: ...your dealer or the nearest Servicenter from the yellow pages Please do not send any products to the Indianapolis address listed in this manual or on the carton This will only add delays in service for your product 10330 North Meridian Street Indianapolis IN 46290 1024 1995 Thomson Consumer Electronics Inc Trademark s Registered Marca s Registrada s Printed in Singapore Part Number 95 VR678HF 1R1 1...

Reviews: