background image

Summary of Contents for Apache

Page 1: ...allation manual is to be used as a guide to assist you during the process of installation This guide does not cover every installation possibility vehicle or every aspect of the installation process Retro Manufacturing LLC RetroSound or its subsidiaries assume no responsibility for any installation This manual may be updated from time to time Please check our website for the latest updates retroso...

Page 2: ...anufacturing LLC No text illustrations or format of this manual in printed or electronic form may be copied without written permission from Retro Manufacturing LLC or any of its subsidiaries All Rights Reserved Copyright 2015 Retro Man ufactu ring LLC ...

Page 3: ...tions 10 Wiring Instructions 14 Using Your Radio Basic Operation 16 Adjusting Sound Properties 23 Sub Menu System 27 Adjusting USB Playback Properties 32 USB Device Instructions 33 Bluetooth Instructions 35 Troubleshooting 37 Frequently Asked Questions 38 Specifications 40 Limited Warranty 41 Replacement Parts 42 ICopyright 2015 Retro Manufacturing LLC ...

Page 4: ...d or other countries The Bl uetooth word mark and logos are owned by the Bl uetooth SIG Inc and any use of such marks by Retro Manufacturing LLC is under license Other trademarks and trade names are those of their respective owners Made for iPod Correct function ofearlier versions cannot be guaranteed iPod touch 4th generation Ver 5 1 1 iPod touch 2nd generation Ver 4 2 1 iPod touch 3rd generation...

Page 5: ...0 presets and RDS Selectable USA EU Japan AUS RUS tuner frequencies Built in amplifier 25 watts RMS 45 watts peak x 4 channels 3 EQ presets plus user controlled bass treble fader mid range and balance adjustment lnfiniMount shaft bracket system for maximum installation flexibility Compatible with all RetroSound vehicle specific bezel plate and knob kits Inputs 2 rear mounted standard USB ports and...

Page 6: ...ontact us directly if you have any questions support retrosound com Main Wire Harness Plug into Back of Radio 00 000000 Plastic Washer Kit Bluetooth Microphone lnfinimount Brackets _ I Power Speaker Wire Harnesses Plug Both into Main Wire Harness 8 0 Mounting Backstrap and Hardware Shaft Covers 2 Removable lnfiniMount Shafts 2 Shaft Bracket Mounting Hardware Copyright 2015 Retro Manufacturing LLC ...

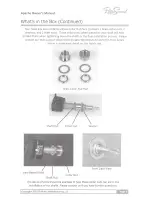
Page 7: ...n tighten ing down the shafts in the final installation process Please contact ou r tech support department support retrosound com for more detail below is some basic detail on this item s use Shaft Nut Shaft Nut 0 Brass Collar Nut Pack Collar Nut Collar Nut Washer Front Dash View The above photos show one example of how these collar nuts can aid in the installation of our shafts Please contact us...

Page 8: ...er any problems that are not covered in this manual please consult the dealer from which you purchased the unit or the dealer nearest you You may also email us at support retrosound com Do not turn the unit on if the temperature inside the car is very high Always allow the unit to cool down before usage The driver should neither watch the display nor operate the system while driving Watching the d...

Page 9: ...Retro Manufacturing is not liable for any problems resulting from your installation of the unit Please be sure to follow our instructions carefully before attempting installation Follow the instructions to install and wire the product Not following the instructions to properly install and wire the product could damage the unit or cause an accident or fire Disconnect the lead from the negative batt...

Page 10: ...e installing the product If you need to open a hole in the vehicle chassis to attach or wire the product first check where the wire harness gasoline tank and electric wiring are located Then open the hole from outside if possible Never instaII the product in a location where it interferes with your field of vision Never splice into the power cord to supply other equipment with power After installa...

Page 11: ...ive battery cable before beginning installa tion Verify the battery ground by checking that one wire is connect ed to the starter mounting bolt or engine block and another to the vehicle chassis using at least 8 gauge wire Make sure the alterna tor connections are secure and free from corrosion rust or dirt WARNING To prevent damage to the unit do not connect the power connector until you have com...

Page 12: ...n page 4 For more advanced installations please visit our website Retrosound com or email support retrosound com STEP 1 lnstalllnfiniMount Brackets Attach each lnfiniMount bracket using the supplied screws Before tightening adjust the brackets forward or backward or rotate to achieve the perfect fit Complete the assembly with 2 or 4 screws tightened on either side Figure 1 Attach InfiniMount Brack...

Page 13: ...to brackets Important DO NOT overtighten Figure 2 Mount Shaft to Bracket 4 Once sure of the proper width tighten prior to final installation DO NOT OVERTIGHTEN Be sure to plug the shafts into each side of the main unit to activate the shaft control functions see Figure 3 NOTE Each of the shafts can operate on either side of the radio and are not left right dependant Figure 3 Insert Shaft Plugs NOT...

Page 14: ...cate the appropriate bezel and perform the following steps to mount the radio behind the dash opening BEZEL Place the bezel on the face of the radio and install through the rear opening of your dash Below is a photo showing the Apache radio installed in a 1955 59 range Chevy truck dash notice the half moon shaped chrome bezel that fills the remainder of the dash opening Radio face ihl Optional veh...

Page 15: ...and make the install look more professional See Figure 5 for an example 2 Slide the rear knob over the shaft rotating it into the correct position and push it into place See Figure 6 3 Mount the front knob See figure 7 and 8 Figure 5 Rubber Shaft Cover Installed Note this is an optiona I item to install Figure 6 Install Rear Knob Figure 8 Final Installation Figure 7 Install Front Knob Optional 55 ...

Page 16: ...t the power connector until you have completed the wiring process This is a 12 volt negative ground ONLY radio If you have a positive ground or a 6 volt system you need to either convert to 12 volts or purchase a separate inverter that would step up the voltage to 12 volts Please note that the inverter must be rated at 8 amps or higher in order for the radio to operate properly Rear AUX Inputs Two...

Page 17: ...E AMP TURN ON LEAD Blue White Wire White Black Stripe 0 Left Speaker Front Right Speaker Front 40HM NOTE Yellow and Red wires must be connected to 12V for radio to operate NOTE This radio is designed for use in vehicles with a 12 volt negative ground system 0 Left Speaker Rear ANTENNA BLUETOOTH MICROPHONE INPUT REAR RCA LINE OUT Grey Wire FRONT RCA LINE OUT Black Wire Purple Black Stripe 0 Right S...

Page 18: ...ned for a front and rear knob which have push func tionality The photo on the left shows the left shaft 1 and 2 in Figure 10 with knobs installed Use the Operation Table on page 17 to determine how to use the knobs to achieve the desired response from your Apache radio Figure 11 Shaft with Knobs Copyright 2015 Retro Manufacturing L QJ ...

Page 19: ...n SUB ON is selected Turn the left front knob to select a value See Adjusting Sound Properties on page 23 for detailed instructions Mode 2 Turn the left rear knob clockwise to select from an avail able listening source RADIO USB 1 USB 2 AUX 1 AUX 2 BT AUDIO Two sets of AUX inputs are located at the rear of the radio To utilize these inputs AUX cables must be routed to an accessible area during ins...

Page 20: ...Adjusting USB Playback Properties on page 32 for more infor mation in USB 1 Press and release the front Mode knob twice to select and SHUFF randomly play all digital OFF tracks on your flash drive regardless of the folder selected Turn front knob clockwise or counter clockwise to select ALL or OFF shuffle functions SHUFF ALL appears on the screen during random mode See Adjusting USB Playback Prope...

Page 21: ...djusting USB Playback Properties on page 32 for more informa tion Next 3 Turn the right front knob to Turn the right front knob to Previous tune to the next or previous change to the next previ AM FM frequency Note ous track when using a flash When the radio is tuned drive or Apple product into a strong station in FM This function also applies to only the FM indicator Bluetooth audio mode two oval...

Page 22: ...ise to select the 1 6 counter clockwise once I Folder preset radio presets for the to select FOLDER search selection currently selected band mode turn the front right Turn and hold the right rear knob clockwise or counter knob clockwise to store clockwise to select folders any selected preset into directories on the USB memory Turn the right drive Press and release the front knob clockwise to fron...

Page 23: ...b clockwise or counter tion a stereo indicator clockwise to select folders two ovals will show in directories on the USB the upper right side of the drive Press and release the radio s LCD screen If there front right knob to select is no stereo icon seen the the folder the first song in station is in mono that directory will be heard See 11 8 uetooth Instructions on page 35 for specific instructio...

Page 24: ...o select the PL R L ST Turn the front right knob clockwise to choose from PLR IL ST RRT ST RLBUrl GENRE SONGS COrlPOSER RUD O BOO or PODCRST Press and release the front right knob to access one of the selected items then turn clockwise to select items within the Iist Press and reI ease the front right knob again to Iisten to the selected item LCD 5 Backlit LCD Display Display Copyright 2015 Retro ...

Page 25: ...next func tion desired or do nothing and the menu will revert to the current source display r11 r1 Ll 1rr 1 1 i t Jlnl Ill I 111111 Ill Ill Ill w lll w nllll 1 1111 111111 Ill opyright 2015 Retro Manufacturing LLC DSP OFF When you first access the left front knob menu DSP is set to OFF When selecting the function to the ON set ting turn the left front knob clock wise to view and select the 3 prese...

Page 26: ...adjustment function allows you to boost or cut the low frequen cies from 7 to 7 MID The mid range adjustment function allows you to adjust the middle fre quencies 7 to 7 TREBLE The treble adjustment function allows you to boost or cut the high frequencies from 7 to 7 BALANCE The balance adjustment function allows you to adjust or pan the stereo sound from the left or right This is helpful to compe...

Page 27: ...t low listening volume and should be turned off at higher volumes You will know this function is active when you see XBAS on your display Adjusting your Bass Mid or Treble settings will override the XBAS function SUB ON OFF Turn the subwoofer RCA output ON to activate this feature SUB VOL When SUB ON is selected and a subwoofer is attached to the unit use this function to increase or decrease the ...

Page 28: ...quencies as follows 0 5K 1 0K 1 5K 2 5KHz Default setting is l OKHz This is a very useful mode for making very specific tonal adjustments When selecting one of these 0 5K 1 0K 1 5K 2 5KHz points any changes to the prior MID menu set tings on page 21 7 to 7 will boost or cut at the selected frequency set ting chosen in this menu TRE Use this function to make a de tailed boost or cut adjustment of t...

Page 29: ...ight 2015 Retro Manufacturing LLC AUTO SEEK This function allows you to select auto seek tuning or manual tuning when you turn the right front knob to the right or left when listening to the radio The factory default setting is RUTO SEE Turn the right front knob clockwise or counter clockwise to select manuaI or auto A STORE This function will automatically fill FM presets on all 3 banks of 6 FM p...

Page 30: ...ont knob then turn the right front knob clockwise or counter clockwise to select from the Program Type list 2 Press and release the right front knob to select the desired Program Type 3 Once the desired Program Type is selected you will see PT SEE show on screen this indicates that the radio is searching the entire FM band for radio stations with the selected Program Type After making the selectio...

Page 31: ...tion With the beep func tion displayed turn the right front knob to select BEEP ON or BEEP OFF SCAN SeIect the desired color preset By default the LCD lighting will alter nate between all colors Preset color options include WHITE GREEN 1 GREEN 2 GREEN 3 ORANGE RED PINK PURPLE 1 PURPLE 2 BLUE 1 BLUE 2 USER and AMBER To customize your awn display color select USEFr in the preset color menu then pres...

Page 32: ...er clockwise to select DISCON and disconnect a Bluetooth device RDSON OFF RDS stands for Radio Data System This function allows you to turn off the RDS function if you do not want to see the RDS information The fac tory default setting is RDS ON RDS tuners can automatically tune in stations according to the style of music or talk they broadcast Some RDS tuners can even break in with traffic alerts...

Page 33: ... stations to broadcast traffic announcements that scroll across the screen and will also broadcast audible traffic alerts to your radio TA will blink on screen when activated CTON OFF If supported by the station adjust to turn the CT Clock Time function on off This feature can synchronize the clock with the radio station s clock AREA USA EUR AUS JAP RUS The Apache radio has the capability to recei...

Page 34: ... through the avail able menu options 3 Turn the left front knob right or left to select a value for the chosen menu option 4 Press and release the left front knob repeatedly to move to the next func tion desired or do nothing and the menu will revert to the current source display Ill ll w ll a llll 111111 111111 Ill 111111 11 111 111111 111111 Ill REPEAT ALL When you first access the left front kn...

Page 35: ...e Apache radio is in USB mode you can play MP3 and unprotected no DRM WMA files off the flash drive Common facts about these compressed sound formats High bit rate and high sampling frequencies are recommended for high sound quality Selecting VBR Variable Bit Rate is not recommended because playing time is not displayed properly and there may be some audible skipping artifacts The playback sound q...

Page 36: ...ohibited by the Copyright Act and international treaty Viewing MP3 WMA Song Information When playing MP3 WMA files from the USB source the Apache allows you to view the track name album artist info ID 3 information automatically from these files Once the USB drive is inserted the following info will scroll across the screen in the following order F DIR folder directory MP3 FILE file name of song A...

Page 37: ... Menu See Sub Menu System on page 27 2 Change the BT DISCON function to BT CONNEC 3 Ensure Bluetooth is enabled on the phone to be connected to the unit 4 Search for a new Bluetooth device from the phone this may take up to 30 seconds 5 Select RetroSound from the Bluetooth device list 6 Some devices may require you to enter a PIN If prompted enter 0000 for the PIN 7 PAIRING OK will be displayed on...

Page 38: ...uggest mounting the microphone on the sun visa A pillar or steering column inside the vehicle1 closest to the driver The microphone is very sensitive and you may speak at a normal volume when using hands free operation Streaming music from your device The Apache radio is capable of wireless music playback using the built in Bluetooth technology Once your device is paired with the radio you may str...

Page 39: ... up Internal amp in protection Check speaker leads for any mode grounded or shorted wires Make sure the unit is in Check to make sure that unit the desired source mode is in desired source mode AUX BT Audio etc Unit blows fuses Possible short in wiring Incorrect fuse used make sure only fuses with correct 15 amp ratings are used I Check aII wiring connections for possible short Battery hooked up b...

Page 40: ...n we recommend using 16 gauge only Ihave a 14 speakers connected to your radio and the display is lit up like it is working1 but there1 S no sound coming out This usually indicates one of two things 1 Speaker wires touching each other or the vehicle chassis at some point Check each speaker lead from radio to speaker 2 Speaker impedance below 4 Ohms Older speakers are usually not compat ible with m...

Page 41: ...CA noise filter known as a ground loop isolator is often effective at removing engine or alternator noise 5 Try a filter on the amplifier s 12 volt power lead Make sure to use a filter that includes a ground wire 6 On rare occasions noise can be introduced through the antenna lead If disconnecting the antenna makes the noise go away you need to replace or repair the antenna plug where it goes into...

Page 42: ...na Connector General Dimensions Radio Face Only 3 85 W x 1 0 H x 1 0 D Dimensions Radio Body 3 96 W x 1 98 H x 4 30 0 Power Requirements 10 5 14 4V Current Consumption during operation Max 15A Current Consumption car off 3 5 mA Output Power 14 4V 4 ohm 1 THO 25x4w RMS 45x4 Max Power Output Impedance 4 8ohm Low Level Output 4 Channels 2 85V AUX llnput Aux cable length 8 2 300 mV I 6 kO AUX 21nput A...

Page 43: ...mage The warranty ALSO DOES NOT COVER damages which occurred during shipment failures which are caused by products not supplied by the warrantor failures which re sult from accident misuse abuse neglect bug infestation mishandling misapplication alteration faulty installation set up adjustment maladjustment of consumer control improper maintenance improper antenna inadequate signal reception or pi...

Page 44: ...current retrosound com website pricing Please email support retrosound com for more information ITEM PRICING MAIN WIRE HARNESS 10 00 POWER WIRE HARNESS 5 00 SPEAKER WIRE HARNESS 5 00 PLASTIC WASHER KIT 16 KIT 7 00 METAL HARDWARE PACK 5 00 METAL BACKSTRAP 2 50 INFINIMOUNT BRACKET PAIR 12 50 RUBBER SHAFT BOOTS PAIR 2 50 INFINIMOUNT SHAFT EACH 11 50 Bluetooth MICROPHONE EACH 25 00 Purchase Notes Reco...

Page 45: ...Modern Sound for your Classic Retro Manufacturing 7390 Eastgate Road Suite 140 Henderson Nevada 89011 Phone 702 483 2222 Fax 702 483 2229 Retrosound com ...

Page 46: ......

Page 47: ... _______ l c o_ o p r p N p c _ o o p oo c o c o c o o a n Package contains 3 radio screen protectors and application instructions retrosoundusa com ...

Page 48: ... o N C L o o c o c o o 1 1 1 1 _ 374 ...

Page 49: ...ide of the protector Carefully apply the application side of the protector to your radio screen s surface Step 3 After applying the screen protector remove bubbles that have formed using a credit card or using a lint free cloth If there is dust trapped under the film please see the reverse side of this guide for troubleshooting instructions Step 4 Remove any remaining bubbles and wipe with a soft ...

Page 50: ...redit card or lint free cloth to remove any air bubbles Step 4 Lastly remove any remaining adhesive tape Re aligning your screen protector Step 1 Place a piece of adhesive tape on the corner of the protector and use this as a tab to lift off of the radio s screen DO NOT touch the screen or application side of the protector during this process Step 2 Carefully Align the edge of the protector to you...

Page 51: ......

Reviews: