background image


Solar Swing Gate Opener 

User’s Manual 


For Gate Kits: 


GTR062 Single Solar Swing Gate Kit 

GTR078 Double Solar Swing Gate Kit 


Please read and follow all warnings and instructions before installation and use. 


The gate opener must be powered by 2 PCS 12VDC/12Ah batteries (connected in 

series) 


Never connect solar panel to the control board directly to charge the battery. 


Periodic checks of the opener are required to ensure safe operation. 


Please save this manual for future reference.  

Summary of Contents for GTR062

Page 1: ...follow all warnings and instructions before installation and use The gate opener must be powered by 2 PCS 12VDC 12Ah batteries connected in series Never connect solar panel to the control board direct...

Page 2: ...hould never cross the pathway of a moving gate The gate opener is not acceptable for use on any pedestrian gate Pedestrians must be supplied with a separate pedestrian access 9 For an installation uti...

Page 3: ...ons Features Specifications Input 120V 60Hz or 230V 50Hz Motor voltage 24VDC Power 2 80W Current 3A Actuator speed 16mm s Max actuator travel 385mm Ambient Temperature 20 50 4 F to 122 F Protection cl...

Page 4: ...obstruction during gate opening Reverse in case of obstruction during gate closing Built in adjustable auto close 0 100 seconds Built in max Motor running time MRT for multiple safety protection 40 s...

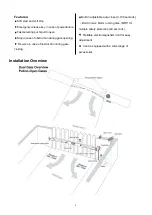
Page 5: ...e anchors are not provided When mounting the Post Brackets to wooden posts a larger size washer or metal plate should be used between the bolts and the wooden post to ensure the stability of the faste...

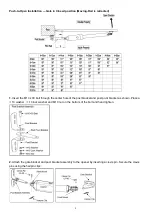
Page 6: ...through the center hole of the post bracket and post pivot bracket as shown Place a 10 washer 10 lock washer and M10 nut on the bottom of the bolt and hand tighten 2 Attach the gate bracket and post b...

Page 7: ...nterclockwise 4 With the opener fully retracted and with the gate in the fully open position for Pull to Open installation or fully closed position for Push to Open installation place the gate opener...

Page 8: ...f there is not at least 2 5cm of clearance or if the opener and the Post Pivot Bracket are binding rotate the Post Pivot Bracket and or move the Post Bracket Assembly to obtain the minimum clearance a...

Page 9: ...ach bolt with one 10 washer one 10 lock washer and one 10 nut 9 Attach the gate brackets to each gate by inserting two M10 x 75 bolts through the gate brackets and the drilled holes in the gates Faste...

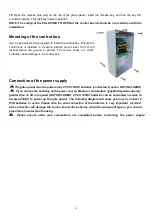
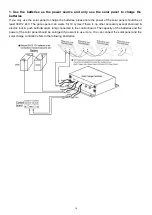
Page 10: ...x Connection of the power supply The gate opener must be powered by 2 PCS 12VDC batteries connected in series NOT INCLUDED If you choose the batteries as the power source Marine or Automotive Type Bat...

Page 11: ...should be at least 30W x 24V The gate opener can works for 10 cycles if there is no other accessory except photocell electric lock push button alarm lamp connected to the control board The capacity o...

Page 12: ...15 Connection of the control board...

Page 13: ...tocell Beam System PBS optional Use a 2 core cable to connect the terminal of the photocell s emitter to the 24 1 terminal the terminal to the GND 3 terminal Also the and terminals of the photocell s...

Page 14: ...rd The GND terminal of the receiver should be wired to the 12 terminal of the control board 11 Wired Keypad optional The RED wire of the wired keypad should be connected into the 11 terminal The BLACK...

Page 15: ...nds the CODE LED will flash for 3 seconds and then to OFF Now the remote has been programmed successfully NOTE The button of the remote control should be pressed and hold for more than 2 seconds while...

Page 16: ...ON and then release the button Then press OK button on keypad and CODE LED will flash for 3 seconds and then be OFF which indicates the keypad has been programmed successfully You can use the default...

Page 17: ...unction disabled Set the switch 2 to ON to enable the auto close function Factory default setting is OFF DIP Switch 3 Enable disable open interval between the master and slave gate opener ON Open inte...

Page 18: ...time of the gate opener Turn the potentiometer clockwise to increase the auto close time and turn it counter clockwise to decrease the auto close time The auto close time can be adjusted steplessly fr...

Page 19: ...power supply of the gate opener is connected or not The batteries or a 24Vdc AC DC power supply must be used to power the gate opener 2 Check the fuse 3 Check if the wire connection of the power suppl...

Page 20: ...to OFF Check if the jumper wire between the EDGE and GND terminal is loosening or not The gate stop when on the way of opening or closing Flash quickly for 10 seconds and then back to OFF Flash quickl...

Page 21: ......

Reviews: