background image


Operator 


112104_C 

© 2006, Rimage Corporation 

Rimage 360i™ Replace the Recorder 

Use this procedure to replace a recorder in a Rimage 

360i

.  

Rimage approved parts must be used for this process. The product warranty may become void if parts not approved 
by Rimage are used; equipment or parts are tampered with, misused, neglected, or modified in any respect without 
the written consent of Rimage.


Before you begin  

#


Required tools: 


Torx T10 Screwdriver 


Scissors or Side Cutters 

1.  Stop or pause all jobs. 

2. Press 

the 

power switch

 to power off the Rimage 360i. 

3. Disconnect 

the 

power cord

Remove the recorder 

1. Access 

the 

recorder

n


Caution!

 Some cables in this system are 

latched. Equipment damage may occur if 
cables are not disconnected appropriately. 

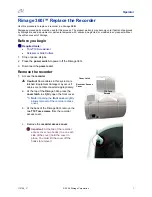
a.  At the top of the Rimage 360i, press the 

cover latch

 to slightly open the front cover. 


Note:

 Opening the 

front cover

 slightly 

allows removal of the recorder access 
cover. 

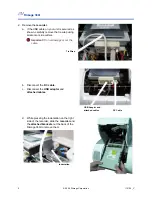
b.  At the back of the Rimage 360i, remove the 

two

 T10 Torx


screws 

from the recorder 

access cover. 


c. Remove 

the 

recorder access cover

-


Important

: At the top of the recorder 

access cover, two hooks (one on each 
side of the cover) hold the cover in 
place. You must lift the cover off the 
hooks to remove it.  


Cover Latch 

T10 Torx 
Screws 

Recorder Access 
Cover 

Summary of Contents for Desktop 360i

Page 1: ...off the Rimage 360i 3 Disconnect the power cord Remove the recorder 1 Access the recorder n Caution Some cables in this system are latched Equipment damage may occur if cables are not disconnected appropriately a At the top of the Rimage 360i press the cover latch to slightly open the front cover Note Opening the front cover slightly allows removal of the recorder access cover b At the back of the...

Page 2: ...cissors or side cutters Important Do not damage or cut the cable Tie Wrap b Disconnect the DC cable c Disconnect the USB adaptor and attached cables USB Adaptor and attached cables DC Cable d While pressing the indentation on the right side of the recorder slide the recorder and the attached brackets out the back of the Rimage 360i to remove them Indentation ...

Page 3: ... Install the recorder a Slide the recorder and the attached brackets into the recorder bay b Connect the USB adaptor and attached cables c Connect the DC cable DC Cable USB Adaptor and Attached Cables 112104_C 2006 Rimage Corporation 3 ...

Page 4: ...USB cable with the tie wrap v Trim the tie wrap with scissors or side cutters 2 Reassemble the Rimage 360i a Install the recorder access cover Important When you install the recorder access cover place the top of the cover over the hooks as shown Tie Wrap b Use the T10 Torx screws to secure the recorder access cover c Close the front cover to secure the latch Cover Latch Recorder Access Cover T10 ...

Page 5: ...ion The indication marks below help protect you and other persons from injury and equipment from damage n Warning According to ANSI American National Standards Institute standards a warning is used to indicate situations that could result in bodily injury to personnel operating or maintaining the equipment n n Indicates that failure to observe this guideline could result in loss or damage to the e...

Reviews: