background image

BOILER INST

ALLA

TION, OPERA

TION

INSTRUCTIONS

Riva 

FP

WALL HUNG GAS BOILER FOR

CENTRAL HEATING SUPPLY

Please Read Instructions Carefully

Save for Future Reference


— Do not store or use gasoline or other fl ammable vapors and liquids 

in the vicinity of this or any other appliance.


— WHAT TO DO IF YOU SMELL GAS

•  Do not try to light any appliance.
•  Do not touch any electric switch; do not use any phone in your 

building.

•  Immediately call your gas supplier from a neighbor’s phone. Fol-

low the gas supplier’s instructions.

•  If you can not reach your gas supplier call the fi re department.


— Installation and service must be performed by a qualifi ed installer, 

service agency or the gas supplier.

WARNING: If the information in this manual is not followed 
exactly, a fi re or explosion may result causing property dam-
age, personal injury or loss of life.

RIVA FP MANUAL

Summary of Contents for FP

Page 1: ...t any appliance Do not touch any electric switch do not use any phone in your building Immediately call your gas supplier from a neighbor s phone Fol low the gas supplier s instructions If you can not reach your gas supplier call the fire department Installation and service must be performed by a qualified installer service agency or the gas supplier WARNING If the information in this manual is no...

Page 2: ...successfully as those we specify The installing contractor is the best judge of a system s specific requirements as well as the local availability of certain makes and models of controls and accessories The preceding does not apply however to the equipment that comes with every boiler such as the overheat control and pressure relief valves The installation of the specific devices supplied with eve...

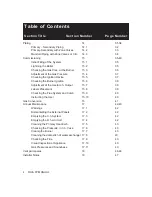
Page 3: ...pe Location 7 15 Mounting Bracket 8 16 Venting 9 17 24 Restrictor Sizing 9 1 18 Fitting the Flue System 9 2 18 Choice of Flue 9 3 19 24 Pipe Connections 10 25 Gas Pipe Connections 11 26 Electrical Connections Wiring 12 27 29 Power Connection 12 1 27 Connection to the Electricity Supply 12 2 27 Room Thermostat Connection 12 3 28 Relay Panel Control Connection 12 4 28 Zone Valve Microswitch Connecti...

Page 4: ...er Ignition 15 6 38 Adjustment of the Useful c h Output 15 7 38 Labels Placement 15 8 39 Checking the Flue System and Comb 15 9 40 Instructing the User 15 10 40 Gas Conversion 16 41 Annual Maintenance 17 42 43 Warnings 17 1 42 Dismantelling the External Panels 17 2 42 Emptying the C h System 17 3 42 Emptying the D h w Circuit 17 4 42 Cleaning the Primary Heat Exch 17 5 43 Checking the Pressuris in...

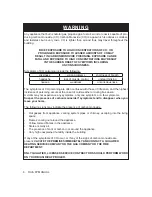
Page 5: ...d service technician to inspect the boiler and to replace any part of the control system and any gas control which has been under water Do not store or use gasoline or other flammable vapors and liquids in the vicinity of this or any other appliance WHAT TO DO IF YOU SMELL GAS Do not try to light any appliance Do not touch any electric switch do not use any phone in your build ing Immediately call...

Page 6: ... confused with those of influenza and the highest incidence of poisoning occurs at the onset of cold weather or during flu season A victim may not experience any symptoms only one symptom or a few symptoms Suspect the presence of carbon monoxide if symptoms tend to disappear when you leave your home The following signs may indicate the presence of carbon monoxide Hot gasses from appliance venting ...

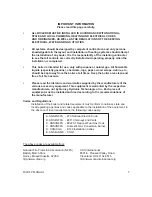
Page 7: ...n and free of all fire hazards Please read the literature and warranties supplied by the manufacturers of the various accessory equipment This equipment is warranted by the respective manufacturers not by Quincy Hydronic Technologies Inc Each piece of equipment must be installed and used according to the recommendations of the manufacturer Codes and Regulations Installation of the boiler and relat...

Page 8: ...t protection system to prevent frost dam age which can occur in areas susceptible to very cold weather conditions Boiler operation recognition system should the boiler not be used for longer than 24 hours it then performs a control led system test to ensuring the motorized components within the boiler do not be come inoperable due to lack of use Gas valve modulation the gas input modulates based o...

Page 9: ...nwc 0 66 Flue pipe diameter Coaxial in 2 25 4 3 25 5 Twin split pipes in 3 25 3 25 Nominal heat flow rate 0 2000ft MBH 122 8 Nominal heat flow rate 2000 4500ft MBH 116 7 Min Exhaust temperature F 262 Max Exhaust temperature F 324 GAS FLOW RATE Gas Min Max Natural ft h 48 7 121 1 Propane lb h 2 2 5 6 CLEARANCE TO COMBUSTIBLES Front in 18 Back in 0 Top in 8 Sides in 2 Bottom in 8 Flue pipe enclosed ...

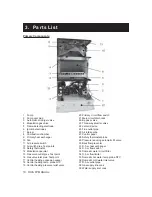
Page 10: ...ral heating expansion vessel 18 Central heating temp probe NTC 19 Central heating pressure relief valve 20 Primary circuit flow switch 21 Main circuit drain cock 22 By pass valve 23 Three way diverter valve 24 Venturi device 25 Flue outlet pipe 26 Air intake pipe 27 Control panel 28 Safety thermostat probe 29 Pressure reducing automatic fill valve 30 Backflow preventer 31 D h w heat exchanger 32 D...

Page 11: ...RIVA FP MANUAL 11 4 Internal Piping Parts List Note Pressure Relief Valve 19 should be piped to a drain or to the floor as lose as pos sible to a drain ...

Page 12: ...RIVA FP MANUAL 5 Electric Diagrams Caution Label all wires prior to disconnection when servic ing controls Wiring errors can cause improper and danger ous operation Verify proper operation after servicing ...

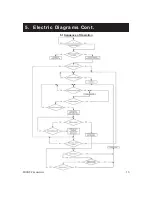
Page 13: ...RIVA FP MANUAL 13 5 Electric Diagrams Cont 5 1 Sequence of Operation ...

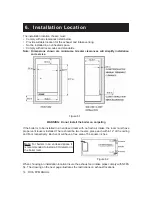
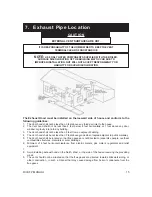
Page 14: ...install the boiler on carpeting If the boiler is to be installed in an enclosed room with no fresh air intake the room must have proper vent louvers installed There should be two louvers place each within 12 of the ceiling and floor respectively Each vent will have a free area of 54 square inches Figure 6 2 When choosing an installation location insure the exhaust and intake pipes comply with NFPA...

Page 15: ...ve grade when located adjacent to public walkway 5 The Vent hood shall be located so that flue gasses are not directed to jeopardize people overheat combustible structures materials or enter buildings 6 Minimum of 6 feet horizontal clearance from electric meters gas meters regulators and relief equipment 7 8 Avoid installing exhaust hood on the North West or the side of the house receiving the pre...

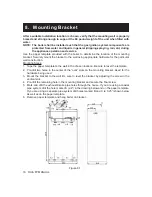
Page 16: ...articular wall construction Mounting Steps 1 Tape the paper template to the wall in the chosen location Be sure to level the template 2 Pre drill two holes in the center of the oval slots on the mounting bracket sized for the hardware being used 3 Mount the bracket to the wall Be sure to level the bracket by adjusting the screw in the vertical slot 4 Pre drill the remaining hole in the mounting br...

Page 17: ...ere is no blockage or restriction leakage corrosion and other deficiencies which could cause an unsafe condition c Insofar as is practical close all building doors and windows and all doors between the space in which the appliances remaining connected to the common venting system are located and other spaces of the building Turn on clothes dryers and any appliance not connected to the common venti...

Page 18: ...crements Depending on the final flue pipe length an alternative restrictor may be required Refer to the tables 9 1 for proper restrictor ring sizing Figure 9 1 Coaxial 2 5 4 0 Restrictor Size From 1 65 to 3 30 ft 41 From 3 30 to 8 86 ft 44 Separate 3 25 3 25 Restrictor Size For 1 65 in and 1 65 out 38 From 3 30 to 39 40 in out 41 Table 9 1 9 2 Fitting the flue system In general it has to be taken ...

Page 19: ...ing extensions This flue system can only be used to discharge horizontally it is not designed to enable termination in the vertical plane Installation Drill hole A on the wall template through the outside wall that is less than 18 thick Cut the pipe as necessary so that a no more than 6 protrudes from the house Slide the intake and exhaust pipes through the hole Slide one rubber wall trim piece on...

Page 20: ...maximum permis sible lenght of either pipe must be reduced by 3 0 ft or 5 4 ft respectively The sum of the lenghts of the two horizontal part must be less than 131 ft Installation Drill holes B C on the wall template through the outside wall that is less than 18 thick Cut the pipes as necessary so that no more than 6 of intake pipe protrudes from the house and the exhaust pipe is a minimum of 4 in...

Page 21: ...ermissible lenght of either pipe must be reduced by 3 0 ft or 5 4 ft respectively Note When utilizing this option see page 14 for room ventilation details Installation Drill hole C on the wall template through the outside wall that is less than 18 thick Cut the pipe as necessary so that no more than 6 protrudes from the house Slide the exhaust pipe through the hole Slide one rubber wall trim piece...

Page 22: ...ipe must be reduced by 3 0 ft or 5 4 ft respectively Note When utilizing this option see page 14 for room ventilation details Installation Drill hole C on the wall template through the outside wall Drill hole C on the wall template through the outside wall that is less than 18 thick Cut the pipe as necessary so that no more than 6 protrudes from the house Slide the exhaust pipe through the hole Sl...

Page 23: ...izontal part must be less than 49 ft Installation Drill holes B C on the wall template through the outside wall Drill hole C on the wall template through the outside wall that is less than 18 thick Cut the pipes as necessary so that no more than 6 of intake pipe protrudes from the house and the exhaust pipe is a minimum of 4 inches longer than the intake pipe Slide the Intake and exhaust pipes thr...

Page 24: ...ws can be used to offset the flue route Each additional elbow reduces the overall acceptable length of the flue system as follows 45 reduce length by 1 6 ft 90 reduce length by 3 2 ft Installation Drill hole through the outside roof Cut the pipe as necessary Slide the intake and exhaust pipes through the hole Slide one rubber wall trim piece on the pipe from inside and one from outside Connect exh...

Page 25: ...caps off boiler connections Figure 10 1 Thoroughly clean the connections Attach the supplied components to the boiler connections see Figures 10 1 Be sure to use the proper gaskets for the pipe connections Before connecting the boiler to the heating system piping review the suggested piping dia grams in Section 4 page 11 If the c h system is above the boiler level it is advisable to install c h co...

Page 26: ...al codes if any Massa chusetts statecode requires gas shut off to be a tee handled gas cock Locate a drop pipe adjacent to but not in front of the boiler Locate a tee F in the drop pipe at the same elevation as the gas inlet connection to the boiler Extend the drop line with a nipple towards the floor and cap to form a sediment trap E Install a shut off valve A before the tee with sediment trap an...

Page 27: ...ce with the requirements of the author ity having jurisdiction or in the absence of such requirements with the National Electrical Code ANSI NFPA 70 and or Canadian Electrical Code Part I CSA C22 1 Electrical Code In the USA maintain a clearance of at least 4ft horizontally from the vent terminal to gas meters electric meters regulators and relief equipment In Canada maintain a 6ft clearance betwe...

Page 28: ...necting any type of external control the jumper J in Fig 12 6 must be removed The room thermostat must be connected to the Control Terminal Block Fig 12 7 Figure 12 7 Connect the room thermostat between terminals 1 and 3 as shown in Fig 12 7 The relay control must be connected to the terminal block situated next to the control panel Figure 12 8 When connecting any type of relay con trol the jumper...

Page 29: ...witch the jumper J in Fig 12 10 must be re moved Connect the micro switch of the zone valve to terminals 1 and 3 as shown in fig ure 12 11 Connect the zone valve switch to the room thermostat as shown in figure 12 11 12 6 Finishing Route the electrical supply cord and the external control cord as illustrated in Fig 12 12 Figure 12 12 Lock the cords in place with the flexible cord clamps Replace th...

Page 30: ...flow rate using the graph above If the internal circulator is adequate direct system piping can be utilized See section 4 page 11 for suggested direct supply return piping If the internal circulator is inadequate a secondary circulator must be utilized See sections 14 for suggested primary secondary piping 13 2 Expansion vessel The height difference between the C h PRV 19 on page 10 and the highes...

Page 31: ... pipe tail so the flow restrictor seats into the pipe tail Then install the pipe tail onto the boiler There are two methods for accomplishing a Primary Secondary piping system The first is to use two closely spaced tees for the boiler supply and return An example is shown below in Figure 14 1 The run legs should be sized so that there is no excessive head loss on the exter nal circulator that is i...

Page 32: ...IVA FP MANUAL 14 Piping Cont 14 1 Primary Secondary Piping All external piping components are to be supplied by the installer It is very important to use an hydraulic separator before secondary circulators ...

Page 33: ...AL 33 14 Piping Cont 14 2 Primary Secondary Piping with Zone Valves All external piping components are to be supplied by the installer It is very important to use an hydraulic separator before secondary circulators ...

Page 34: ...34 RIVA FP MANUAL 14 Piping Cont 14 3 Manifold Piping with Zone Valves or Circulators shown conn to radiators All external piping components are to be supplied by the installer ...

Page 35: ...m for wa ter soundness and remedy any leaks dis covered Cold flush the system to remove any loose particles and any system debris before starting the boiler for the first time Reassemble the front panel of the case Return fill valve to automatic position 15 2 Lighting the boiler Note If external controls are fitted e g room thermostat ensure they call for heat WARNING the boiler and its gas connec...

Page 36: ... for heat Switch on the boiler Check the maximum gas pressure and com pare the value on the gauge with the value indicated in the Section 2 on page 9 gas pressures at the burner Check the maximum gas flow at the gas meter and compare the value indicated in the section 2 on page 9 gas flow rate Switch off the boiler Disconnect the gas modulator coil by remov ing the electrical connector E Figure 15...

Page 37: ...g 15 5 until you obtain the required pressure by rotating clockwise the pressure increases Turn the boiler off and disconnect one of the two connectors E in Fig 15 5 Start the boiler and rotate the minimum gas pressure adjustment G in Fig 15 5 until you obtain the required pressure by rotating clockwise the pressure increases Turn the boiler off and re connect the wire to the modulating operator S...

Page 38: ...re 15 9 Adjust the gas pressure at the injectors to the value indicated in the tables of section 2 By rotating the device clockwise the pressure in creases After the adjustment operations bring the se lector 3 of figure 15 9 back to the normal posi tion ON Reassemble the service panel Close the gas valve outlet pressure test point 15 figure 15 5 Reassemble the front pannel of the case Important af...

Page 39: ...upplied are placed on the boil er as shown in Figure 15 10 All the labels supplied with the boiler are numbered for reference According to Figure 15 10 place all the labels on the boiler Use label numbered as 1 already installed in the front panel to begin the placement in the correct way 15 Commissioning Cont ...

Page 40: ...per use and adjustment of all system controls this will ensure the greatest possible safety and fuel economy Explain the function and use of the function switch Explain how to turn off the appliance for both short and long periods and advise on the pre cautions necessary to prevent damage should the appliance be inoperative when freezing conditions may occur Fill in the details required on the Boi...

Page 41: ...acing the burner injectors cor rectly Re assemble the burner the front panel of the combustion chamber and the lid of the sealed chamber Extract the control panel as explained in the section 12 1 of this manual Loosen the screws D and remove the ser vice panel figure 16 2 Figure 16 2 Set correctly the dip switch 2 to the cor rect position Fig 16 3 in accordance with the following table Gas supply ...

Page 42: ...at soever for cleaning maintenance opening or dismantling boiler panels 17 2 Dismanteling the external panels Front Panel Loosen the three screws A Fig 17 1 Lift and remove the panel Side Panels Loosen the screws B Figure 17 2 Bring the bottom of the panels away from the boiler and lift them freeing them from the top hooks Figure 17 1 Figure 17 2 17 3 Emptying the Central Heating System Close the ...

Page 43: ... removing the external panels from 17 2 Remove the nine screws labelled Now you will have complete access to the combustion chamber The sloping and multi gas type burner 7 on page 10 does not need special maintenance but it is sufficient to dust it with a bristle paintbrush 17 9 Checking the flue Have the integrity of the flue outlet pipe 24 on page 10 air intake pipe 25 on page 10 checked periodi...

Page 44: ...44 RIVA FP MANUAL 18 Vent Part Spares Description Order Number Twin pipe kit 10999 0393 0 For any spare parts please contact QHT Inc at 800 501 7697 ...

Page 45: ...RIVA FP MANUAL 45 18 Vent Part Spares Cont Description Order Number Coaxial flue kit 10999 0387 0 For any spare parts please contact QHT Inc at 800 501 7697 ...

Page 46: ...46 RIVA FP MANUAL 18 Vent Part Spares Cont Part Description Order Number A Roof flue kit 10999 0392 0 For any spare parts please contact QHT Inc at 800 501 7697 ...

Page 47: ...___________________________________________________ Performance Tests GROSS STACK TEMPERATURE __________________ ROOM TEMPERATURE AMBIENT ________________ NET STACK TEMPERATURE _____________________ CO2 __________________ O2 ___________________ SMOKE READING ___________________ COMBUSTION EFFICIENCY _________________ COMMENTS ___________________________________________________________ ____________...

Page 48: ...17962 1477 0 3808 48A4 USA ...

Reviews: