STEP A
CONNECT THE DIGITAL BOX TO YOUR TV
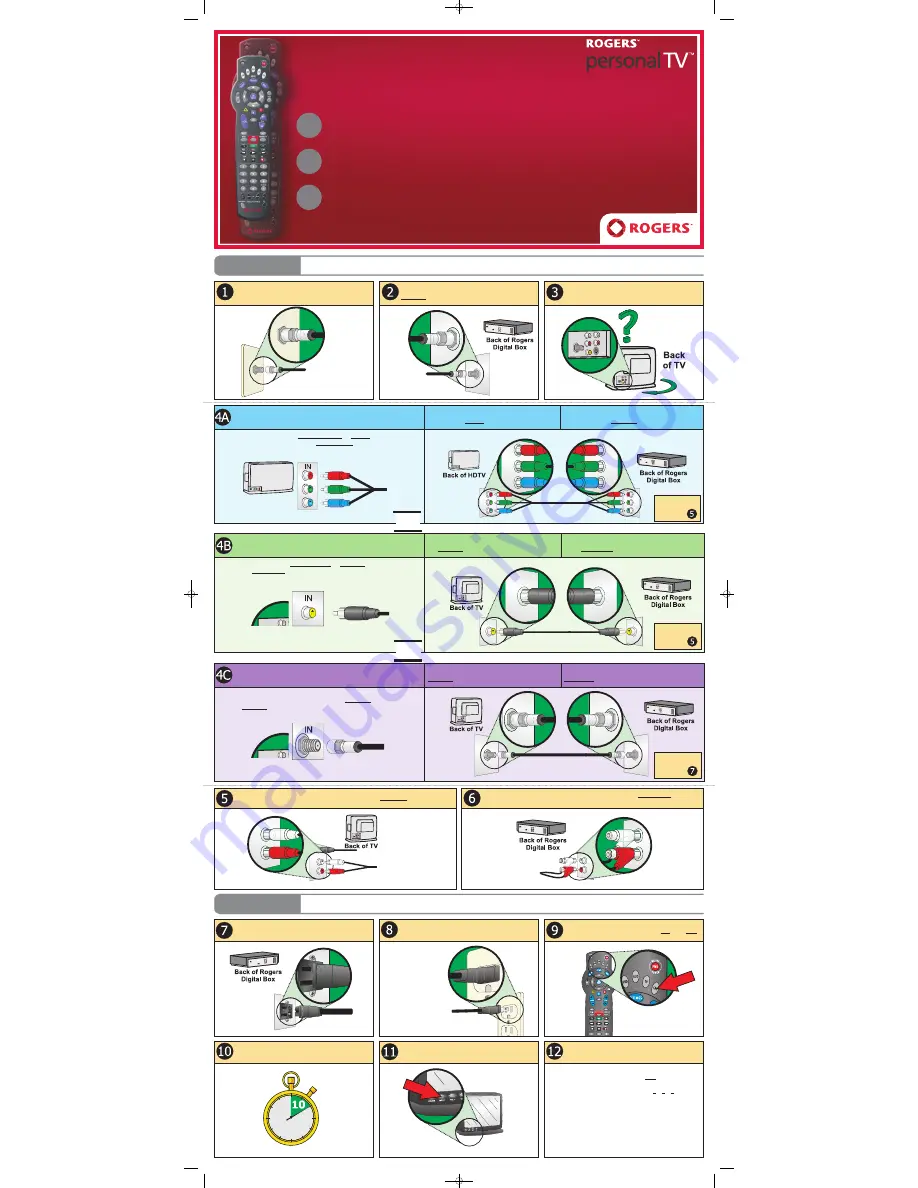
Connect one end of the Coaxial cable to the wall
outlet.
Connect the other end of the Coaxial cable to the
CABLE IN
port on the Digital Box.
Note
:
Be sure to
connect the
Coaxial cable
directly
to the
Digital Box and not through
another device such as a VCR.
Look at the back of your TV, and based on the input
ports that are available, select the connection
method below that best matches your TV.
Connect the piggy-back end of the RCA Audio cable to the
AUDIO OUT
port on the
Digital Box.
Connect the straight end of the RCA Audio cable to the
AUDIO IN
port on your TV.
Be sure to use the same
input as the video cable
used in Step 4.
STEP B
AUTHORIZE THE DIGITAL BOX
Wait 10 minutes for the Digital Box to become active
and to be updated.
Connect the other end of the power cable to the
wall outlet.
With your TV turned off and your Rogers remote
pointing at the Digital Box, press the CBL then PWR
buttons on the remote.
Turn on your TV and set it to the proper input based
on the connection method you chose in Step 4.
Note
:
Examples of common
input names are CH 3,
Video 1, HD 1, Comp 1, etc.
Note
:
You should keep
the Digital Box
plugged in and con-
nected at all times so
it remains authorized
and receives all
service updates.
Connect one end of the power cable to the back of
the Digital Box.
PTV Easy Installation Guide - Ontario Instastaging v1.0 07/08 ©2008 Rogers Cable Communications Inc.
Confirm the Digital Box is authorized by viewing
Channel 03.
1. Wait for any onscreen messages to clear.
2. Turn on the Digital Box by pressing PWR on the Rogers
remote.
3. Change the channel to 03 by pressing 0 - 0 - 3 on your
Rogers remote. Can you view Channel 03?
Yes
: I can view Channel 03.
Continue to Step C on the reverse.
No
: Channel 03 is “Not Authorized”.
Call
1 866 894 9962
to have the Digital Box
authorized. You will be prompted for the
phone number associated with your account.
CONNECT THE DIGITAL BOX TO YOUR TV
This step shows you how to connect the Digital Box using the best
method for your particular TV.
AUTHORIZE THE DIGITAL BOX
This step programs the Digital Box to authorize all of the channels
included in the cable package to which you subscribe.
PROGRAM YOUR REMOTE CONTROL & ADDITIONAL OPTIONS
This optional step will show you how to program the Rogers remote to
control your TV and other components.
Easy Installation Guide
Overview: Installing your Rogers Digital Box is as easy as A - B - C
C
B
A
Note
:
Be sure to properly
finger-tighten all
cable connections.
Best Picture Quality
Component connection for
High Definition TVs ONLY
Connect one end of the Component cable to the
corresponding
RGB IN
port on your HDTV.
Connect the other end of the Component cable to
the corresponding
RGB OUT
port on the Digital Box.
If the back of your HDTV has a
COMPONENT IN
or
RGB IN
port, you should
use this input along with the provided
COMPONENT
cable.
Better Picture Quality
Composite video connection for Standard Definition TVs
Connect one end of the Composite Video cable to
the
VIDEO IN
port on your TV.
Connect the other end of the Composite Video cable
to the
VIDEO OUT
port on the Digital Box.
If the back of your TV has a
COMPOSITE IN
or
VIDEO IN
port, this input uses
the provided
COMPOSITE
cable to give you the best picture quality for a non-
HDTV.
Found on the back
of your HDTV
Component Cable
Composite Video Cable
Found on the back of your TV
Next, go
to Step
OR
OR
Next, go
to Step
Good Picture Quality
Coaxial connection for Standard Definition TVs
Connect one end of the Coaxial cable to the
CABLE IN
port on your TV.
Connect the other end of the Coaxial cable to the
TO TV/VCR
port on the Digital Box.
If the back of your TV doesn’t have the ports required for the other connec-
tions, use this method. This connection requires a
CABLE IN
port and uses the
provided
COAXIAL
cable.
Found on the back of your TV
Coaxial Cable
Next, go
to Step
43888 instastage.qxp:Layout 1 7/8/08 10:40 AM Page 1


