background image

User 

Manual

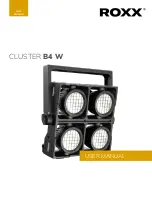
CLUSTER 

B4 W


USER MANUAL

Summary of Contents for CLUSTER B4 W

Page 1: ...User Manual CLUSTER B4 W USER MANUAL ...

Page 2: ...f delivery 8 3 2 Control Functions 8 3 3 Features 8 4 Installation Setup 4 1 Physical Installation and Rigging 9 4 2 Connections 14 4 2 1 AC Power 15 4 2 2 DMX Connection 15 4 2 2 1 Cable Connection 15 5 Operation 5 1 Start up 16 5 2 Control Display 16 5 3 Display Short Cuts 16 5 4 Configuration 18 5 4 1 Set DMX Start Address Direct Access 18 5 4 2 Selecting DMX Mode 18 5 4 3 Stand Alone 19 5 4 4 ...

Page 3: ...l User Manual 7 Technical Data Diagrams 7 1 Technical drawings and measurements 27 7 2 IP Rating 28 7 3 Technical Data 29 7 4 DMX Charts 31 7 5 RDM Templates 39 8 Troubleshooting 41 9 Manufacturer s Declaration 42 ...

Page 4: ...ays guarantee that ventilation and cooling slots are clean and not blocked 1 1 9 Item must be away minimum 20cm from anything around and above it 1 1 10 Do not use this device close to water 1 1 11 Do not expose this equipment to flammable materials 1 1 12 Make sure that no objects can fall into the device 1 1 13 Only use this device with the accessories recommended by the manufacturer 1 1 14 Alwa...

Page 5: ...n t fit in your mains outlet contact your electrician 1 2 5 Make sure your power cord adapter connector does not show signs of kinks warps or is being stepped on 1 2 6 Allwas disconnect the unit when not in use or being cleaned Don t pull on the cord to disconnect Only touch power connections with dry hands 1 2 7 Don t switch the unit on off rapidly This may cause damage 1 2 8 If a fuse needs to b...

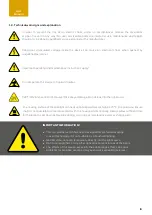
Page 6: ... damage Do not look into the light source The housing surface of the spotlight can heat up to temperatures as high as 70 C in regular use Ensure that it is not possible to come into contact with the housing unintentionally Always allow sufficient time for the lamp to cool down before dismantling carrying out maintenance work or charging etc IMPORTANT IMFORMATION This is a product which has been de...

Page 7: ...or theme park applications even fixed installations in coastal or offshore areas with high salt expo sure can be reliably implemented over long periods of time 2 2 CLUSTER B4 W All CLUSTER products can be easily connected both horizontal and vertically by using the integrated C Lok system The series is made to enable toolless multiple array confi gurations scalable from a single vertical line to m...

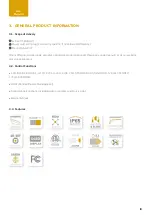
Page 8: ...UK We re offering a wide range of professional accessories optional Please see under menu 6 or at our website www roxxlight com 3 2 Control Functions 1CH DWE 2CH DWE 4 1CH DWE 4 2CH DWE 7CH STROBE 9CH STANDARD 12CH EXTENDED 17CH EXTENDED RDM Remote Device Management Stand Alone Functions including auto programs and Quick Light Master Slave 3 3 Features User Manual ...

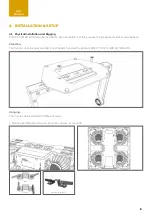
Page 9: ... any orientation For this purpose the product provides several options Standing The fixtures Yoke includes two M8 inner threads to install the optional ROXX YOKE FLOOR EXTENSION Hanging The fixture can be installed in different ways 1 Directly by integrated 1 4 turn Camlocks on top or rear side User Manual Omega Bracket ST ...

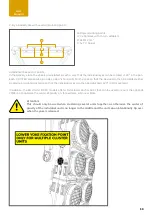
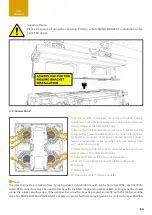
Page 10: ...e device can then be rotated either clockwise or counterclockwise so that the individual eyes can then be adjusted 20 in tilt movement In addition the B4 W and B4 FC models offer a third lower anchor point that can be used to mount the optional YOKE 4 3 to optimize the center of gravity on for example a 6 lite or 8 lite Attention This should only be used when clustering several units together as o...

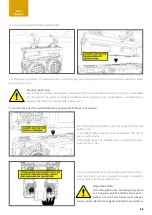
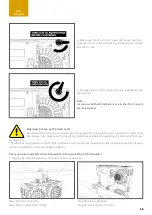
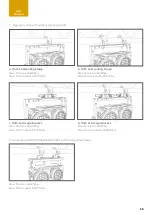
Page 11: ...e arrays To connect the devices with each other proceed as follows in sequence 1 Bring the devices together with the respective top and bottom side A so called centering puk is pre installed on the top of every cluster device This should always be installed when connecting the de vices to each other 2 Pre Link Magnets on top and side help to allign the fix tures due cluster process and giving supp...

Page 12: ...e of the maximum tensile and torsion load listed here below Also make sure the mounting clamps are capable of supporting the total weight of your configuration The different rigging options of all Cluster products result in different maximum tensile and torsion loads that must not be exceeded for a safe overhead installation The maximum loads listed here below take into account the 10 fold safety ...

Page 13: ...With 1x Mounting Clamp Max Tension Load 62kg Max Torsion Load 4 280 Nmm c With 1x Omega Bracket Max Tension Load 49kg Max Torsion Load 5 041 Nmm Max Tension Load 72kg Max Torsion Load 6 326 Nmm b With 2x Mounting Clamp Max Tension Load 90kg Max Torsion Load 9 096 Nmm b With 2x Omega Bracket Max Tension Load 90kg Max Torsion Load 10 808 Nmm ...

Page 14: ...ays close with rubber sealing cap C DMX IN Male IP65 5 pin XLR connector when not in use always close with rubber sealing cap D DMX OUT Female IP65 5 pin XLR connector when not in use always close with rubber sealing cap E GoreTex F Safety Eyelet G IP65 USB port for firmware updates Note In order to provide protection from spraying water in accordance with protection class IP65 special IP65 rated ...

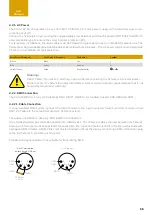
Page 15: ...tion The CLUSTER B4 W is fully controllable by DMX USITT DMX512 A standard based on RS 485 and RDM 4 2 2 1 Cable Connection If using a cabled DMX system connect the DMX IN cable to the input connector male 5 pin XLR connector and DMX OUT cable to the output female 5 pin XLR connectors For outdoor installations use only IP65 rated XLR connectors Use shielded twisted pair cable designed for RS 485 d...

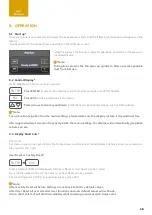
Page 16: ...vigation thru the menu settings please make sure the display surface is dry and dust free After approximately 1 minute of inactivity inside the menu settings the display will automatically jump back to home screen 5 3 Display Short Cuts Short Cuts For some always recurring functions the fixture allows quick and user friendly access at home screen over some dis play control short cuts User Reset or...

Page 17: ...l display flip function by pressing arrow up arrow down simultaneously The display will rotate 180 By pressing both arrows simultaneously again the display will flip back Note Once the display is flipped both Up Down controls will work according to the display rotation Quick Light function hold 3 seconds For easy and fast operation during setting the lights the fixture includes a user friendly Qui...

Page 18: ...sing ENTER it stops blinking If the DMX address will not be confirmed by ENTER within 10 seconds the display will jump back and show the DMX address from before and stops blinking 5 4 2 Selecting DMX Mode At home screen please press ENTER to access to the main menu level 1 While using UP DOWN arrows please select the menu item DMX Mode and confirm by pressing ENTER In the following sub menu level ...

Page 19: ...oose between 5 different Auto Effects Effect 1 5 and Stop Program Using the Up Down arrows you can select one of the 5 Effects and confirm by pressing ENTER or step back by ESC After confirming your preferred Effect you can now adjust speed and brightness at level 4 To adjust speed please use the UP DOWN arrows to select the menu item Speed and confirm with ENTER After use UP DOWN arrows to adjust...

Page 20: ... arrows and press ENTER again Using UP and DOWN controls select your desired color and confirm with ENTER After you can adjust the brightness for each eye between 000 255 and confirm by ENTER Besides the individual color mix also a master dimmer can be adjusted between 000 100 For strobe effects please adjust the Shutter value between 000 255 Note Please see detailed explanation for strobe effects...

Page 21: ... ENTER Now this unit is set to Slave Please connect the slave and the master devices same model with a DMX cable and enable one of your preferred standalone mode on the master device Once the Stand Alone mode is activated all slave devices will follow the master device Note All devices should use same software version Once Stand Alone mode is disabled at Master unit the display of Slave unit start...

Page 22: ...r Light intensity increases linear with DMX value Exponential Exponential Light intensity can be set more smooth at lower DMX values and broadly at higher DMX values Logarithmic Light intensity can be broadly adjusted at lower DMX values and more smooth at higher DMX values S Curve Light intensity can be adjusted smoothly at lower and higher DMX values and broadly at medium DMX values Dimmer Respo...

Page 23: ...hain same model either with DMX address or without After power off and on again the transfered settings should stay the same Without DMX Address LED Mode Illumination Normal output for constant illumination Boost Boost for temporarily highest output for blinder and strobe effects USB Update Yes Run firmware update via USB port No Do not run firmware update via USB port Factory User Reset Factory R...

Page 24: ...n off Backlight on off Auto Lock on off Startup Mode DMX Auto Quick Light DMX Fail Hold Blackout Emergency Light Dimmer Curve Linear Exponential Logarithmic S Curve Dimmer Response LED Medium Halogen Redshift on off LED Frequency 800Hz 1200Hz 2000Hz 3600Hz 12000Hz 25000Hz RAW Balance RAW User Calibration Fan Auto Silent Studio Fan Off Max Power Invert Mapping off CW CCW Transfer Configuration incl...

Page 25: ... Celsius Fahrenheit XXX C XXX F LED 3 Celsius Fahrenheit XXX C XXX F LED 4 Celsius Fahrenheit XXX C XXX F Display LED 1 4 temperature by celsius and fahrenheit Power on Time Total LED 1 xxxxxhours LED 2 xxxxxhours LED 3 xxxxxhours LED 4 xxxxxhours Display fixture total power on time LED on Time Total xxxxxhours Display LED 1 4 total power on time Errors Errors information Display error codes Dimme...

Page 26: ...ser Manual Omega Bracket ST Art 90900002 Rigging Bracket Art 13907411 Floor Extension Art 13907201 Yoke 4 3 Art 13907101 Case 4 pcs 8 pcs Art 13907411 Case 2 pcs 4 pcs Art 13907511 User Manual 6 ACCESSORIES ...

Page 27: ...27 User Manual User Manual 7 TECHNICAL DATA DIAGRAMS 7 1 Technical drawings and measurements ...

Page 28: ...rotected against strong water jets Limited infiltration is permitted Dustproof No infiltration of dust Protected against water jets Limited infiltration is permitted Dust protected Limited ingress of dust allowed Does not affect the operation of the device Protected against a solid object exceeding 1mm for example a wire Protected against splashes of water from all directions Limited infiltration ...

Page 29: ...7fcd Thermal Characteristics Cooling Active Forced Air Temperature regulated Humidity max 95 Temperature range Operating 40 C to 45 C Temperature range Start up 20 C to 45 C Temperature range Storage 40 C to 80 C Thermal Protection Automatic overtemperature protection Electrical Data AC Power max 90 285V 50 60Hz AC Power nominal 100 240V 50 60Hz Electrical protection Overload protection with autom...

Page 30: ...65 IK class IK08 Body material Aluminum Nylon Lens material Tempered glass front Net dimensions w x h x d 400 x 400 x 191mm Net dimensions inches 15 75 x 15 75 x 7 52 inches Net weight incl Yoke 16 2 kg 35 71lbs Tilt 360 Tilt Locking System Locking system with toothing and angle indicator Included Optional Included items Yoke 4 2 2m Power Cable Puk Optional Accessories Yoke 4 3 Yoke Floor Extensio...

Page 31: ...ter Dimmer Master Dimmer Master Dimmer Master Dimmer 2 Shutter Shutter Shutter Master Dimmer Fine 3 Duration Dimmer 1 Duration Shutter 4 Dimmer 1 Dimmer 2 Dimmer 1 Duration 5 Dimmer 2 Dimmer 3 Dimmer 2 Dimmer 1 6 Dimmer 3 Dimmer 4 Dimmer 3 Dimmer 1 Fine 7 Dimmer 4 Dimmer Curve Dimmer 4 Dimmer 2 8 Dimmer Response Dimmer Curve Dimmer 2 Fine 9 Redshift Dimmer Response Dimmer 3 10 Redshift Dimmer 3 Fi...

Page 32: ...mmer 000 255 0 100 0 2 Dimmer Curve 000 51 No Function Current Preset from Menu Settings 0 052 101 Linear Dimmer Curve 102 152 Exponential Dimmer Curve 153 203 Logarithmic Dimmer Curve 204 255 S Curve Dimmer Curve 3 Dimmer Response 000 063 No Function Current Preset from Menu Settings 0 064 127 LED fast 128 191 Medium 192 255 Halogen slow 4 Redshift 000 84 No Function Current Preset from Menu Sett...

Page 33: ...slow 225 229 Shutter open 230 244 Strobe 10 burst fast slow 245 255 Shutter open 3 Duration 000 255 0 100 0ms 510ms only affects to channel 2 Strobe 1 025 064 0 4 Dimmer 1 000 255 0 100 255 5 Dimmer 2 000 255 0 100 255 6 Dimmer 3 000 255 0 100 255 7 Dimmer 4 000 255 0 100 255 9CH STANDARD 8bit default CH Function Value Setting Remark Default 1 Master Dimmer 000 255 0 100 0 2 Shutter 000 019 Shutte...

Page 34: ...ction Current Preset from Menu Settings 0 052 101 Linear Dimmer Curve 102 152 Exponential Dimmer Curve 153 203 Logarithmic Dimmer Curve 204 255 S Curve Dimmer Curve 8 Dimmer Response 000 063 No Function Current Preset from Menu Settings 0 064 127 LED fast 128 191 Medium 192 255 Halogen slow 9 Redshift 000 84 No Function Current Preset from Menu Settings 0 085 170 Redshift Off 171 255 Redshift On 1...

Page 35: ...trobe 1 025 064 0 4 Dimmer 1 000 255 0 100 255 5 Dimmer 2 000 255 0 100 255 6 Dimmer 3 000 255 0 100 255 7 Dimmer 4 000 255 0 100 255 8 Dimmer Curve 000 51 No Function Current Preset from Menu Settings 0 052 101 Linear Dimmer Curve 102 152 Exponential Dimmer Curve 153 203 Logarithmic Dimmer Curve 204 255 S Curve Dimmer Curve 9 Dimmer Response 000 063 No Function Current Preset from Menu Settings 0...

Page 36: ... LED Frequency 3600Hz hold 3s 100 104 LED Frequency 12kHz hold 3s 105 109 LED Frequency 25kHz hold 3s 110 114 No function 115 119 Fan Auto hold 3s 120 124 Fan Silent hold 3s 125 129 Fan Off hold 3s 130 134 Fan High Power hold 3s 135 139 No function 140 144 Invert Mapping Off hold 3s 145 149 Invert Mapping CW hold 3s 150 154 Invert Mapping CCW hold 3s 155 159 No function 160 164 LED Mode Illuminati...

Page 37: ... open 210 224 Strobe 9 sine wave fast slow 225 229 Shutter open 230 244 Strobe 10 burst fast slow 245 255 Shutter open 4 Duration 000 255 0 100 0ms 510ms only affects to channel 2 Strobe 1 025 064 0 5 Dimmer 1 000 255 0 100 255 6 Dimmer 1 Fine 000 255 0 100 255 7 Dimmer 2 000 255 0 100 255 8 Dimmer 2 Fine 000 255 0 100 255 9 Dimmer 3 000 255 0 100 255 10 Dimmer 3 Fine 000 255 0 100 255 11 Dimmer 4...

Page 38: ...on 65 069 RAW hold 3s 070 074 User Calibrated hold 3s 075 079 No function 080 084 LED Frequency 800Hz hold 3s 085 089 LED Frequency 1200Hz hold 3s 090 094 LED Frequency 2000Hz hold 3s 095 099 LED Frequency 3600Hz hold 3s 100 104 LED Frequency 12kHz hold 3s 105 109 LED Frequency 25kHz hold 3s 110 114 No function 115 119 Fan Auto hold 3s 120 124 Fan Silent hold 3s 125 129 Fan Off hold 3s 130 134 Fan...

Page 39: ...rithmic 4 S Curve 0x8056 Dimmer Response Set 1 LED 2 Medium 3 Halogen 0x8057 Redshift Set 0 Off 1 On 0x8058 RAW Balance Set 0 RAW 1 User Calibrated 0x8024 User Calibration White 1 Set 0x8023 User Calibration Amber 1 Set 0x8020 User Calibration Red 1 Set 0x8029 User Calibration White 2 Set 0x8028 User Calibration Amber 2 Set 0x8025 User Calibration Red 2 Set 0x802E User Calibration White 3 Set 0x80...

Page 40: ... 0x805C LED Mode Set 0 Illumination 1 Boost 0x805D USB Update Yes No 0 No 1 Yes 0x805E Factory Reset Yes No 0 No 1 Yes 0x805F User Reset Yes No 0 No 1 Yes 0x00C0 Firmware Version read n a 0x8700 Serial Number Read n a 0x0400 Device Power on Time Read n a 0x8701 Temperature LED 1 Read n a 0x8702 Temperature LED 2 Read n a 0x8703 Temperature LED 3 Read n a 0x8704 Temperature LED 4 Read n a 0x8705 LE...

Page 41: ...ing DMX cable correct Check cables Device operates strangely DMX cable inverted pins correct Use a phase inverter or different cables DMX cable terminated If not install DMX termination at the end of the cable Stand Alone program running Stop internal Stand Alone Sensors RDM enables various readouts for remote device monitoring See the table below for sensors and sensor types Please note The RDM c...

Page 42: ...t Make sure not to mix this product with other commercial waste FCC Statement This device complies with Part 15 of the FCC Rules Operation is subject to the following two conditions 1 This device may not cause harmful interference and 2 This device must accept any interference received including interference that may cause undesired operation NOTE This equipment has been tested and found to comply...

Page 43: ...marketed by ROXX GmbH complies where applicable with the essential requirements and other specifications of the following Directives 2014 30 EU EMC 2014 35 EU LVD 2011 65 EU RoHS The complete EU and UK Declaration of Conformity can be found at www roxxlight com support or you can also request it at info roxxlight com User Manual REV 01 ...

Reviews: