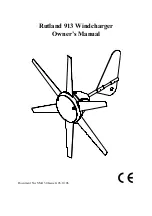
background image


Rutland 913 Windcharger 

Owner’s Manual 


Document No: SM-130 Issue G 26.10.06


Summary of Contents for 913

Page 1: ...Rutland 913 Windcharger Owner s Manual Document No SM 130 Issue G 26 10 06 ...

Page 2: ...WILL NEED 4 SITING THE WINDCHARGER 5 General Considerations 5 On Board Systems 6 Land based Systems 7 ASSEMBLY INSTALLATION 8 Blade Assembly 8 Tower Preparation 9 BATTERIES 10 CABLE SPECIFICATION 10 ELECTRICAL CONNECTION FITTTING TO THE TOWER 11 FINAL MECHANICAL CHECK 11 BASIC WIRING DIAGRAMS 12 UP AND RUNNING 13 SPECIFICATION AND PERFORMANCE 13 INSPECTION AND MAINTENANCE 14 TROUBLESHOOTING 15 ...

Page 3: ...ng the blade to come into contact with the mounting pole A broken blade will cause turbine imbalance with consequent damage When turning the Windcharger is capable of generating voltages in excess of the nominal voltage The turbine must never be allowed to rotate unless it is electrically connected to a regulator or batteries Connecting an open circuit running turbine to the electrical system can ...

Page 4: ...erate to prevent the generator overheating In this mode the output will cease and the turbine will temporarily speed up until such time as the lower level temperature is reached and the generator is once again connected and charging This may be seen to cycle in prolonged high winds particularly in high ambient temperatures If safely accessible you may prefer to temporarily secure the turbine The R...

Page 5: ...ube USA Mariner s Package only In the event of loss or damage consult your dealer or the manufacturer WHAT YOU WILL NEED Tools Suitable wire stripper Small terminal screwdriver Large flat blade screwdriver Crosshead screwdriver Other Items You Will Need Mounting pole Cable Batteries Battery terminals Connector blocks as determined by your total system Other Items You May Have Selected HRS913 Regul...

Page 6: ...r close to the ground and the resulting decrease in average wind speed as one gets closer to the ground Turbulence is caused by the wind passing over obstructions such as moored boats trees and buildings Both wind sheer and turbulence diminish with height and can be overcome simply by putting the turbine sufficiently high above them as shown in Fig 1 Windspeed decreases and turbulence increases wh...

Page 7: ...inside an aluminium or stainless steel tube with an internal diameter of 41mm 1 IMPORTANT The external diameter MUST NOT exceed 48 5mm 1 see Warning in Introduction Suitable tubes Stainless Steel 13 4 16 SWG Aluminium 17 8 10 SWG We suggest the following mountings according to preference and site conditions Push pit Fig 3 A suitable pole mounted to the deck with deck plates and guy ropes is the mo...

Page 8: ...ed by a minimum of four guy lines The attachment points for the guy lines to the tower should be securely fixed to the tower The guy wires should be a minimum of 4mm 0 16 in diameter The shackles should be a minimum of 5mm 0 20 in diameter Rigging screws should be a minimum of 5mm 0 20 in diameter All items should be galvanised or stainless steel for protection against corrosion Where guy lines ar...

Page 9: ...n Gentle assistance with a soft faced mallet may be required 3 Four screws are required for each blade Secure each blade with two special self tapping screws provided by inserting each in turn through the cutout in the nacelle rotating the generator each time until the holes align Caution It is essential that all 4 screws are fitted 4 Fit the remaining blade screws from the front of the generator ...

Page 10: ...ameter tube The adapter is provided with a flat on one side to clear the weld seam on seamed pipe 2 Mark and centre punch two positions diametrically opposite at 90 to the pipe seam if necessary 20mm NOTE Use metric measurements for this operation from top of the tube 3 Drill two holes 10 5mm NOTE Use metric measurements for this operation in diameter on centre punch positions Note When using the ...

Page 11: ...lar We strongly recommend that one of the voltage regulators available from Marlec is fitted to prevent batteries becoming overcharged in strong winds and is essential with gel sealed batteries Batteries may be linked as shown in the figures 10 and 11 It is essential to observe polarity as follows Red is Positive Black is Negative CABLE SPECIFICATION The cable used for connection of the Windcharge...

Page 12: ...uit 4 Connect the wind generator flying leads to the cable protruding from the tower using the connector block supplied taking care to observe polarity Connect the windcharger to cable and windcharger to cable Red is Positive Black is Negative 5 Wrap the connection with insulation tape to secure protect from environment Alternatively join the cables using a latching type plug and socket 6 Locate t...

Page 13: ...6 12 Marlec Engineering Co Ltd Rutland 913 with HRS913 Regulator Wiring Diagram Rutland 913 with HRDX Controller HRS913 Regulator Solar Panel Maximum 100 Watts Rutland 913 Battery Battery Black Red Rutland 913 Red Black Brown Black Red Charge Fuse Battery HRDX Controller ...

Page 14: ...void all moving parts when raising and lowering the wind generator When raised secure the structure firmly in an upright position The performance of your Windcharger can be impaired if the pole is not vertical SPECIFICATION AND PERFORMANCE The curve shown below is for ideal non turbulent wind conditions this may not be achieved in some installations 0 2 4 6 8 10 12 14 16 18 20 0 5 10 15 20 25 30 3...

Page 15: ...ow down 2 Tie a blade to the mounting pole to prevent it from rotating Whilst the generator is stationary the following routine checks should be performed 1 Check the blades for damage eg chips or nicks Replace any damaged blades The turbine should not be operated with damaged blades as this may cause imbalance resulting in premature wear and possible failure Check the blade screws for tightness 2...

Page 16: ... Amps scale of between 5 and 10 if possible Connect the meter positive probe to the wind generator output positive cable and the meter negative to the regulator input positive Provided there is sufficient wind there should be a current reading This establishes that power is being delivered B Using the same multimeter setting as above measure between the regulator to battery and the battery Provide...

Page 17: ...ve any black deposits from slipring with emery paper Heavy deposits and reduced power indicate a possible reverse connection to the battery see Page 10 Check hub for free rotation with generator disconnected from battery If the hub does not rotate freely check for a possible short circuit in the wiring If no wiring fault is found refer to your dealer or manufacturer If the above checks have identi...

Page 18: ...dcharger Owner s Manual Document SM 130 Issue G 26 10 06 17 Marlec Engineering Co Ltd For your future reference we recommend you note the following Serial Number Date of Purchase Date of Installation Type of Regulator ...

Page 19: ...t of improper installation owner neglect misuse damage caused by flying debris or natural disasters including lightning and hurricane force winds This warranty does not extend to support posts inverters batteries or ancillary equipment not supplied by the manufacturer No responsibility is assumed for incidental damage No responsibility is assumed for consequential damage No responsibility is assum...

Reviews: