
Congratulations on the purchase of your new Samson CT20 clip-on tuner! Combining
precision tuning with a vivid color display, the CT20 makes tuning your instrument easier
than ever. The integral clip and dual 360° ball-joints allow for maximum visibility at any
angle, and make the tuner perfect for use with guitars and basses, as well as stringed,
woodwind and brass instruments. The CT20 has a built-in microphone for tuning acoustic
instruments, in addition to a piezo sensor, which uses the vibrations of your instrument to
tune. This makes the CT20 ideal for tuning in noisy environments. The CT20 is the ultimate
accessory for every instrument case, gig bag, or back pocket. We suggest that you take
some time to go through these instructions to fully understand how we’ve implemented
a number of unique features, and to get the most out of your Samson CT20 tuner.
Owner’s Manual
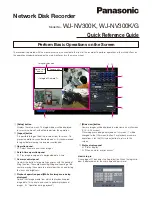
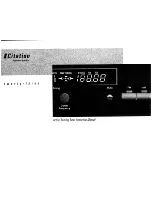
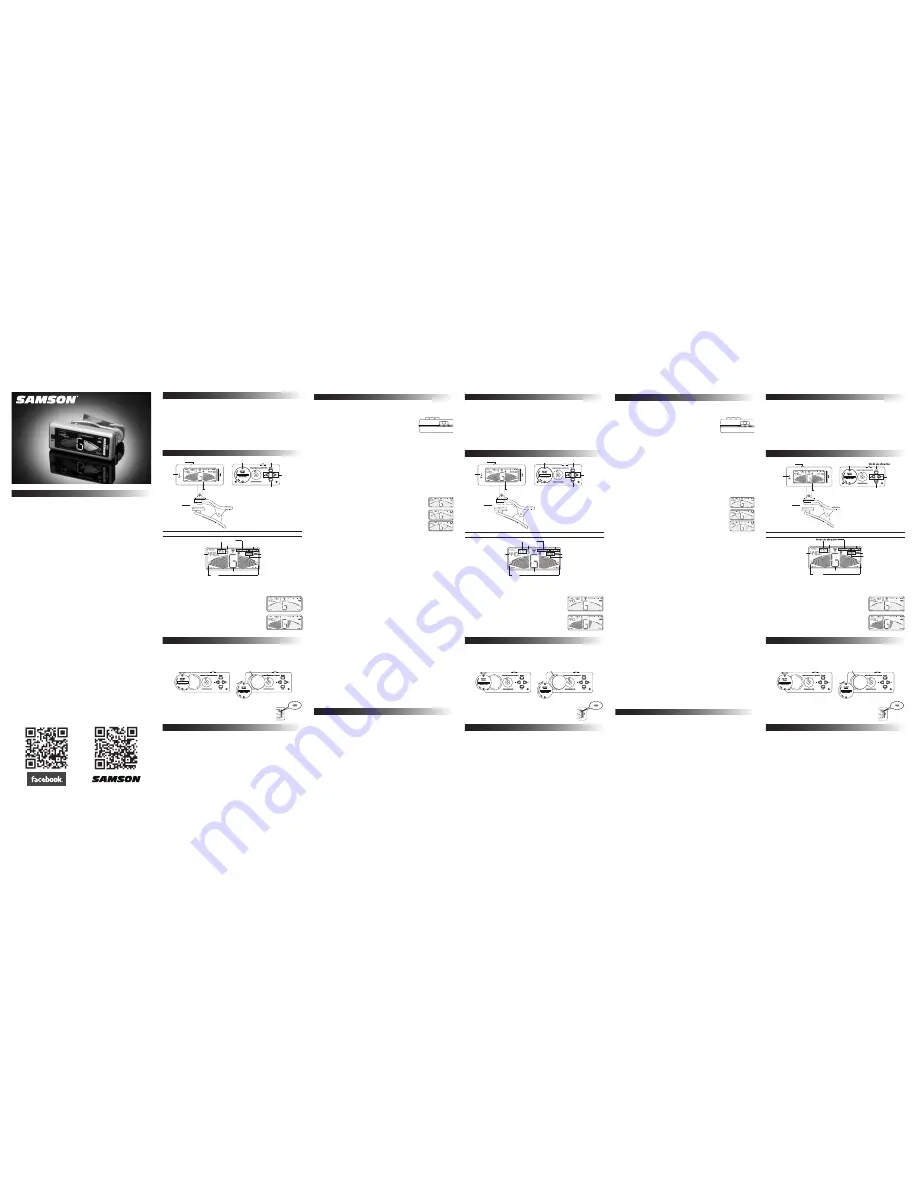
CT20 Controls and Functions
Precautions
Power
Mic
Clip
LCD Display
Battery Door
Tuning Mode
Calibration
Buttons
Transpose
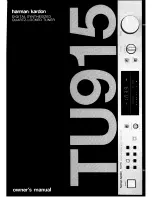
LCD Display
Input
Tuning Mode
String number
Note Name
Meter
Reference
Pitch
Battery Level
Transpose
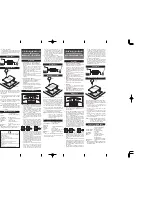
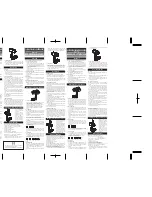
The CT20 uses one CR2032, 3-volt, lithium battery. To install or replace the battery, rotate
the battery door located on the back of the tuner in a counterclockwise direction until the
compartment opens. Place the battery in the compartment, ensuring that the positive (+)
terminal is facing up (towards you). Replace the battery cover, rotating it clockwise until it
clicks into place.
For optimal,trouble-free performance, please observe the following precautions.
•
Do not leave the tuner attached to the instrument for long periods of time, as it may
damage or mar the finish of the instrument.
•
Do not use the tuner in direct sunlight, extreme temperature, or high humidity.
•
Do not use the tuner in excessively dusty conditions, dirty locations, or areas subject
to high levels of vibration or magnetic fields.
•
Power off when the unit is not in use.
•
To prevent leakage, remove the battery when the unit is not in use for extended
periods of time.
•
Do not apply excessive force to the switches or controls.
•
To clean, wipe with a clean dry cloth. Do not use liquid cleaners, cleaning com-
pounds, or flammable polishes.
•
To avoid damage or electrical shock, do not place liquids on or near the tuner.
•
There are no user-serviceable parts, do not open or perform any internal modifica-
tions to the unit.
•
Do not attempt to repair the unit or to replace any internal parts. Refer all servicing to
your retailer, Samson service center, or authorized Samson distributor.
Installing the Battery
Attaching the CT20
The tuner display has a convenient battery icon, which shows the rela-
tive charge of the battery. As the battery loses its charge, the level of the
bars in the icon will decrease. When all of the bars disappear, the display
will become dim. At this point, the battery is depleted and should be
replaced as soon as possible.
+
LITHIUM BATTERY
CR 2032
3V
Specifications
Tuning Scale . . . . . . . . . . . . . . . . . . . . . Chromatic, Guitar, Bass
Tuning Range . . . . . . . . . . . . . . . . . . . . . A
0
(27.50 Hz) - C
8
(4186 Hz)
Calibration. . . . . . . . . . . . . . . . . . . . . . . 410 - 490 Hz (1 Hz Steps)
Display . . . . . . . . . . . . . . . . . . . . . . . . . 4 color LCD
Input . . . . . . . . . . . . . . . . . . . . . . . . . . Microphone, Piezo Sensor
Precision . . . . . . . . . . . . . . . . . . . . . . . . ±1 cent
Response Time . . . . . . . . . . . . . . . . . . . . 20 ms
Power . . . . . . . . . . . . . . . . . . . . . . . . . 3V (CR2032 lithium battery)
Power Consumption
Tuning Mode . . . . . . . . . . . . . . . . . . <10mA (battery life is more than 20 hours)
Energy Saving Mode. . . . . . . . . . . . . . <5mA (battery life is more than 40 hours)
Power Off. . . . . . . . . . . . . . . . . . . . . 1uA
Dims . . . . . . . . . . . . . . . . . . . . . . . . . . 3.1” x 2.6” x 1.45”
Weight . . . . . . . . . . . . . . . . . . . . . . . . . 1.7 oz
Included items . . . . . . . . . . . . . . . . . . . . CR2032 lithium battery (3V)
Specifications subject to change without notice
Adjusting the Display
The CT20 allows you to choose between two meter display modes. Press and hold the
MODE button for three seconds to switch between the two modes:
1.
Needle - The display will act like an analog needle, and will
only show the relative position of the note played. When
the note is in tune, only the note name and center green
arrow will be displayed.
2.
Fuel Gauge - The segments of the display will stay lit from
left to right as the note is tuned. When the note is in tune,
all the segments on the left side of the note name will be lit,
along with the center green arrow.
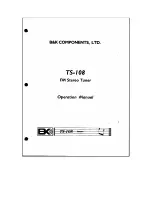
Tuning Your Instrument
1. Attach the CT20 to your instrument or music stand.
2. Turn on the tuner by sliding the three-position switch to either the MIC or CLIP posi-
tion.
• MIC - utilizes the internal microphone and is ideal for
acoustic instruments.
• CLIP - activates the piezo sensor, using the vibrations of the
instrument to tune.
3. When the tuner is powered on, the display will light for one second.
4. Select the tuning mode by pressing the MODE button on the back of the tuner. The
current mode will be displayed:
• Chromatic - For tuning any of the 12 notes of the chromatic scale.
• Guitar - Displays the guitar string number and note closest to the note played.
• Bass - Displays the bass string number and note closest to the note played.
5. If necessary, adjust the calibration by pressing the “+” or “–” calibration buttons. The
CT20 comes from the factory set to 440 Hz (A440). See Adjusting the reference
pitch below for more information on changing the calibration.
6. Play a single note on your instrument. The display will show the name of the note. If
in Guitar or Bass mode, the display will also show the string number closest to the
pitch detected by the tuner. Tune your instrument to the correct pitch so that the
desired note name appears.
7. While the note is being played, tune your instrument so that the
meter points to the center position and the green arrow lights.
If the note is flat, the meter will point to the left (red) side of the
display.
If the note is sharp, the meter will point to the right (yellow) side of
the display.
8. Tune your instrument to the correct pitch so that the desired note
name appears. Repeat this step for each note or string to be tuned.
Adjusting the reference pitch
The Samson CT20 comes from the factory with the reference pitch set to 440 Hz (A440),
which is the general tuning standard for musical instruments. If necessary, the reference
pitch can be adjusted to any frequency between 410–490 Hz. To adjust, press the “+” or “–”
calibration buttons; the reference pitch will change in 1 Hz increments.
Note:
The reference pitch will be stored even when the power is turned off. If the battery is
removed, the reference pitch will reset to the factory default (440 Hz).
Flat tuning
The CT20 comes from the factory set to concert pitch, which means that the tuner
displays the note “A” when A440 is played on an instrument. The CT20 can also transpose
1–5 semi-tones below concert pitch. This is perfect for drop tuning guitars, or to use with
non-transposing instruments like a B
♭
clarinet. Press the FLAT button on the back of the
tuner to lower the relative pitch. The tuner will lower a half step each time the button is
pressed, and the display will indicate one flat (
♭
), up to five flats (
♭♭♭♭♭
). To return the
tuner to concert pitch, press the FLAT button until no flats (
♭
) are visible.
Note:
The transpose setting will be stored even when the power is turned off. If the bat-
tery is removed, the setting will reset to the factory default.
Energy-saving mode
To conserve battery power, the CT20 will switch to energy-saving mode if there is no
signal detected after ten seconds, and the LCD display will become dim.
If no signal is detected for five minutes, the tuner will automatically turn off.
Tips for tuning stringed instruments
For best results when tuning a stringed instrument, use a light to medium plucking
volume. Strings will usually go sharp after the initial attack. Plucking the strings too hard
will emphasize this effect.
Pluck the string with the flesh of your thumb. This will produce a note with fewer over-
tones for the tuner to process than when using your fingernail or a pick.
If the note is not registering, or the display jumps between notes, try muting the other
stings to eliminate any sympathetic vibrations.
It is recommended that you tune up from a flatter pitch. This reduces any slack in the
instrument’s tuning pegs. If you go too far, loosen the string tension and tune up again.
Attach the CT20 tuner to your instrument or music stand using the integral clip. Use care
when attaching the tuner to your instrument. Leaving the CT20 attached to your instru-
ment for a long period of time may hurt or mar the finish. It is recommended that you
remove the tuner when finished playing, or when storing your instrument. If the rubber
pads are missing or broken, do not attach the tuner to your instrument. For guitars and
basses, clip the tuner onto the headstock of the instrument. The tuner can be positioned
on either the front or back of the headstock. For other instruments, you may want to
experiment to determine optimal positioning. The position of the tuner will depend on
the type of instrument. Refer to the CT20 Placement section for some recommended
locations where you may attach the tuner. In noisy environments, select the CLIP position
to use the internal piezo sensor.
FCC REGULATION WARNING
Note: This equipment has been tested and found to comply with the limits for a class B
digital device, pursuant to Part 15 of the FCC rules. These limits are designed to provide
reasonable protection against harmful interference in a residential installation. This
equipment generates, uses and can radiate radio frequency energy and, if not installed
and used in accordance with the instructions, may cause harmful interference to radio
communications. However, there is no guarantee that interference will not occur in a
particular installation. If this equipment does cause harmful interference to radio or tele-
vision reception, which can be determined by turning the equipment off and on, the user
is encouraged to try to correct the interference by one or more of the following measures:
•
Reorient or relocate the receiving antenna.
•
Increase the separation between the equipment and receiver.
•
Connect the equipment to an outlet on a circuit different from that to which the
receiver is connected.
•
Consult the dealer or an experienced radio/TV technician for help.
Please note that changes or modifications not expressly approved by the party respon-
sible for compliance could void the user’s authority to operate the equipment.
This device complies with part 15 of the FCC Rules. Operation is subject to the following
two conditions:
(1) This device may not cause harmful interference, and
(2) this device must accept any interference received, including interference that may
cause undesired operation.
Merci d’avoir choisi le nouvel accordeur à pince Samson CT20 ! Avec sa précision excep-
tionnelle et son écran aux couleure vives, le CT20 facilite grandement l’accordage de
votre instrument. La pince intégrée et l’embase rotative sur 360° vous offrent une visibilité
optimale, quel que soit l’angle d’utilisation, ce qui est parfait pour l’accordage des
guitares et des basses, mais également des instruments à cordes, à vent et des cuivres.
Le CT20 est équipé d’un micro intégré pour les instruments acoustiques, et d’un capteur
piezo, qui utilise les vibrations de l’instrument pour l’accorder. Le CT20 est pour vous
accorder lorsqu’il y a beaucoup de bruit autour de vous. Le CT20 est l’accessoire idéal de
toute valise, sacoche ou Gig Bag. Prenez le temps de lire ces consignes d’utilisation et
comprendre parfaitement le fonctionnement de l’accordeur Samson CT20.
Mode d’emploi
CT20 — Réglages et fonctions
Power
Mic
Clip
LCD Display
Battery Door
Tuning Mode
Calibration
Buttons
Transpose
Écran LCD
Input
Tuning Mode
String number
Note Name
Meter
Reference
Pitch
Battery Level
Transpose
Le CT20 utilise une pile CR2032, de 3 Volts, au lithium. Pour installer ou remplacer la pile,
tournez la porte du compartiment à l’arrière vers la gauche jusqu’à ouvrir le comparti-
ment. Placez la pile dans le compartiment, en veillant à placer le positif (+) vers le haut
(vers vous). Placez à nouveau le compartiment de la pile, en tournant vers la droite,
jusqu’au clic.
Installation de la pile
Fixation du CT20
L’accordeur affiche une icône représentant l’état de charge de la pile.
Le niveau de charge de la pile est indiqué par la longueur de l’icône.
Lorsque l’icône disparaît avec l’usure de la pile, l’intensité de l’écran
diminue. Remplacez alors la pile aussi vite que possible.
+
LITHIUM BATTERY
CR 2032
3V
Caractéristiques techniques
Gammes . . . . . . . . . . . . . . . . . . . . . . . . Chromatique, guitare, basse
Plage d’accordage . . . . . . . . . . . . . . . . . . A
0
(27,50 Hz) - C
8
(4186 Hz)
Référence . . . . . . . . . . . . . . . . . . . . . . . 410 à 490 Hz (pas de 1 Hz)
Écran . . . . . . . . . . . . . . . . . . . . . . . . . . LCD 4 couleurs
Entrée. . . . . . . . . . . . . . . . . . . . . . . . . . Micro, capteur Piezo
Précision . . . . . . . . . . . . . . . . . . . . . . . . ±1 centième
Temps de réponse . . . . . . . . . . . . . . . . . . 20 ms
Alimentation . . . . . . . . . . . . . . . . . . . . . 3V (CR2032 lithium battery)
Consommation électrique
Mode d’accordage . . . . . . . . . . . . . . . <10mA (autonomie supérieure à 20 heures)
Mode économie de la pile . . . . . . . . . . <5mA (autonomie supérieure à 40 heures)
Hors tension . . . . . . . . . . . . . . . . . . . 1 uA
Dimensions . . . . . . . . . . . . . . . . . . . . . . 79 mm x 66 mm x 37 mm
Poids . . . . . . . . . . . . . . . . . . . . . . . . . . 48 g
Éléments fournis . . . . . . . . . . . . . . . . . . . Pile au lithium CR2032 (3 V)
Caractéristques sujettes à modifications sans préavis
Réglage de l’affichage
Le CT20 vous offre deux modes d’affichage commutables. Maintenez la touche MODE
enfoncée pendant 3 secondes pour sélectionner l’un des deux modes :
1.
Aiguille - Ce mode simule une aiguille analogique et n’in-
dique que la position relative de la note. Lorsque la note est
juste, seul le nom et la flèche verte sont affichés.
2.
Affichage par remplissage - Les segments de l’affichage
restent allumés de gauche à droite en fonction de la jus-
tesse de la note. Lorsque la note est juste, tous les segments
à gauche du nom de la note s’allument, ainsi que la flèche
verte au centre.
Accordage de l’instrument
1. Fixez le CT20 à l’instrument ou sur votre pupitre.
2. Placez l’accordeur sous tension en plaçant le sélecteur à 3 positions en position MIC
ou CLIP.
• MIC - Utilise le micro interne — parfait pour les instruments
acoustiques.
• CLIP - Active le capteur piezo, utilisant les vibrations de
l’instrument pour l’accordage.
3. Une fois l’accordeur sous tension, l’écran s’allume pendant une seconde.
4. Sélectionne le mode d’accordage en appuyant sur la touche MODE à l’arrière. Le
mode s’affiche :
• Chromatic - Pour accorder l’une des 12 notes de la gamme chromatique.
• Guitar - Affiche le numéro de cordes de la guitare et la note jouée la plus proche.
• Bass - Affiche le numéro de cordes de la basse et la note jouée la plus proche.
5. Si nécessaire, modifiez le réglage de référence avec les touches “+” ou “–”. Le CT20 est
livré avec le La 440 Hz (A440) comme référence. Consultez la section réglage de la
fréquence de référence ci-dessous pour de plus amples informations.
6. Jouez une seule note sur l’instrument. L’écran affiche le nom de la note. Si vous êtes
en mode Guitar ou Bass, l’écran indique également le n° de la corde la plus proche
de la note jouée. Accordez l’instrument sur la note souhaitée.
7. Pendant que vous jouez la note, accordez-vous de sorte que l’aiguille soit au centre,
avec la flèche verte allumée.
Si la note est trop basse, l’aiguille est dans la moitié gauche (rouge).
Si la note est trop haute, l’aiguille est dans la moitié droite (jaune) .
8. Accordez l’instrument sur la hauteur juste jusqu’à ce que le nom
correct de la note s’affiche. Répétez cette opération pour chaque note
ou chaque corde.
Réglage de la fréquence de référence
L’accordeur Samson CT20 est livré avec le La de référence réglé sur 440 Hz (A440), ce qui
est la valeur standard des instruments de musique. Si nécessaire, vous pouvez régler la
fréquence de référence sur une autre valeur comprise entre 410 et 490 Hz. Dans ce but,
appuyez sur les touches “+” ou “–” ; pour modifier la fréquence de référence par pas de
1 Hz.
Remarque :
La fréquence de référence reste en mémoire même après la mise hors tension.
Si vous remplacez la pile, la fréquence de référence passe sur 440 Hz.
Accordage bémolisé
Le CT20 est livré avec comme référence la valeur standard de concert, avec le “La” à
440 Hz. Le CT20 peut également être transposé vers le bas de 1 à 5 demi-tons. Ces valeurs
sont parfaites pour les accordages de guitare en Drop Tuning, ou pour l’utilisation avec
des instruments non transposables comme la clarinette en Si
♭
. Appuyez sur la touche
FLAT à l’arrière pour baisser la référence d’accordage. L’accordeur descend d’un demi-ton
à chaque pression et affiche un bémol (
♭
) à chaque fois, avec un maximum de 5 bémols
(
♭♭♭♭♭
). Pour revenir en mode de concert, appuyez sur la touche FLAT jusqu’à ce que
tous les bémols (
♭
) disparaissent.
Remarque :
La fréquence de référence reste en mémoire même après la mise hors tension.
Si vous remplacez la pile, la fréquence de référence passe sur 440 Hz.
Mode d’économie d’énergie
Pour économiser la pile, le CT20 passe en veille lorsqu’aucun signal n’est détecté après
10 secondes, et l’écran LCD se met en veille.
Après 5 minutes de non utilisation, l’accordeur se place hors tension.
Astuces d’accordage des instruments à cordes
Pour obtenir les meilleurs résultats avec les instruments à cordes, attaquez la corde de
façon douce ou intermédiaire. La hauteur des cordes monte en général, juste après
l’attaque initiale. N’attaquez pas les cordes trop durement — vous ne faites qu’accentuer
ce phénomène.
Jouez la note avec vore pouce. Ceci produit une note avec moins d’harmoniques et plus
facile à détecter de cette façon qu’en utilisant un médiator.
Si la note n’est pas détectée, ou si l’affichage saute entre les notes, essayez d’étouffer les
autres cordes pour éliminer les vibrations parasites.
Il est conseillé d’accorder l’instrument en partant d’une note basse que vous remontez
à la hauteur souhaitée. Ceci compense les jeux dans les mécaniques du manche. Si vous
allez trop loin, désaccordez et remontez progressivement.
Fixez le CT20 à votre instrument ou pupitre avec la pince. Faites attention lors de la
fixation. Veillez à ne pas laisser le CT20 sur l’instrument pendant trop longtemps : vous
risque zd’endommager la finition de l’instrument. Il est conseillé de retirer l’accordeur
lorsque vous avez fini de vous accorder ou lorsque vous rangez l’instrument. Si les élé-
ments de protection en caoutchouc sont manquants ou usés, ne fixez pas l’accordeur à
l’instrument. Pour les guitares et les basses, fixez l’accordeur sur la tête de l’instrument.
L’accordeur peut être placé à l’avant ou à l’arrière de la tête. Pour les autres instruments,
essayez de trouver la position optimale. La position optimale de l’accordeur varie avec
le type d’instrument. Consultez la section sur la Position du CT20. En présence de bruit
ambiant, sélectionnez la position CLIP pour activer le piezo interne.
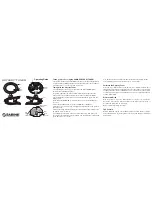
CT20 Clip-On Tuner
Owner’s Manual
¡Felicidades y gracias por la compra de su nuevo afinador de clip Samson CT20!
Combinando una afinación de máxima precisión y una brillante pantalla a color, el CT20
hace que la afinación de su instrumento se convierta en un juego de niños. El clip integral
y la doble junta de giro loco permiten la máxima visibilidad en cualquier posición y ángulo,
y convierten a esta unidad en el afinador perfecto para su uso con guitarras y bajos, así
como con otros instrumentos de cuerda, viento o metal. El CT20 dispone de un micrófono
interno para la afinación de instrumentos acústicos, así como un sensor piezo, que usa las
vibraciones de sus instrumentos para la afinación. Esto hace que el CT20 resulte perfecto
para la afinación en entornos con mucho ruido. El CT20 es el accesorio definitivo para su
bolsa de instrumento, maleta de gira o bolsillo trasero. Le recomendamos que dedique
unos minutos a leer estas instrucciones de cara a comprender todas las exclusivas funciones
de esta unidad y así poder sacarle el máximo partido a su afinador Samson CT20.
Manual de instrucciones
CT20 - Controles y funciones
Encendido
Micrófono
Pinza
Pantalla LCD
Tapa del compartimento
de la pila
Botones de
calibración
Transposición
Pantalla LCD
Entrada
Número cuerda
Nombre de la nota
Medidor
Tono de
referencia
Carga de pila
Transposición
El CT20 usa una pila de litio de 3 voltios de tipo CR2032. Para colocar o sustituir esa pila,
gire hacia la izquierda la tapa del compartimento de la pila situada en la parte trasera
del afinador, hasta que dicha tapa se abra. Coloque la nueva pila en el compartimento,
asegurándose de que el terminal positivo (+) quede encarado hacia usted (hacia fuera).
Vuelva a colocar la tapa y gírela a la derecha hasta que haga clic.
Instalación de la pila
Sujeción del CT20
La pantalla del afinador también le ofrece un sencillo icono de la pila,
que le muestra la carga relativa de la misma. Conforme la pila se vaya
descargando, el número de barras de ese icono se reducirá. Cuando no
aparezca ninguna barra, la pantalla comenzará a apagarse. En ese punto,
la pila estará gastada y deberá sustituirla en cuanto le sea posible.
+
LITHIUM BATTERY
CR 2032
3V
Ajuste de la pantalla
El CT20 le permite elegir entre dos modos de indicación del medidor. Mantenga pulsado
el botón MODE durante tres segundos para cambiar entre estos dos modos:
1.
Aguja - La indicación actuará como una aguja analógica,
y solo le mostrará la posición relativa de la nota tocada.
Cuando la nota esté afinada, solo aparecerá el nombre de la
nota y la flecha verde central.
2.
Indicador de gasolina - Los segmentos de la pantalla
seguirán iluminados de izquierda a derecha durante la
afinación. Cuando la nota esté afinada, todos los segmentos
del lado izquierdo del nombre de la nota estarán
encendidos, junto con la flecha verde central.
Sujete el afinador CT20 a su instrumento o atril por medio del clip integral. Tenga cuidado
cuando sujete el afinador a su instrumento. El dejar el CT20 fijado a su instrumento
durante demasiado tiempo puede llegar a dañar el acabado. Le recomendamos que
desenganche el afinador cuando ya no toque o cuando vaya a guardar el instrumento.
Si los topes de goma se pierden o se dañan, no fije el afinador a su instrumento. En
el caso de guitarras o bajos, fije el instrumento en la pala (clavijero) del instrumento.
Puede colocar el afinador tanto en la parte frontal como en la posterior de la pala. En
otros instrumentos, haga pruebas para determinar la posición mejor. La forma de fijar el
afinador dependerá de cada tipo de instrumento. Consulte en la sección Colocación del
CT20 algunas recomendaciones relativas a dónde puede fijar el afinador. En entornos con
mucho ruido, elija la posición CLIP para usar el sensor piezo interno.