background image

Summary of Contents for 4010 Series

Page 1: ...ossibilities Thank you for purchasing this Samsung product To receive more complete service please register your product at www samsung com register Model Serial No _ If you have any questions please call us at 1 800 SAMSUNG 1 800 726 7864 for assistance ...

Page 2: ...chased in the United States for the warranty period originally specified and to the Original Purchaser only The above described warranty repairs must be performed by aSAMSUNG Authorized Service Center Along with this Statement the Original Limited Warranty Statement and a dated Bill of Sale as Proof of Purchase must be presented to the Service Center Transportation to and from the Service Center i...

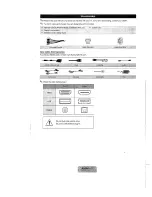
Page 3: ... any items are missing contact your dealer The item s colors and shapes may vary depending on the models Input Cables Sold Separately To purchase RS232 cable contact www SamsungParts com Check the cable before plug in Do not plug cable upside down Be sure to check before plug in ...

Page 4: ...nu the OSD on screen display of your TV s features Adjusts the volume In the OSD use the VOL buttons as you would use the and buttons on the remote control Changes the channels In the OSD use the V CH A buttons as you would use the l and buttons on the remote control rijiMe l Tl l l D Turns the TV on or off Standby mode Your TV enters Standby mode when you turn it off and continues to consume a sm...

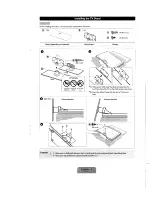
Page 5: ...Guide Stand x4 M4XL12 x4 M4XL8 Screws o e Side View o Front _ I I I ATTENTION I I I 1 DO NOT USE DO NOT USE DO NOTUSE CHEMICAlS GREASE OIL Correct assembly Place a soft cloth over the table to protect the TV and then place the TV on the cloth screen side down Insert the Stand Guide into the slot of TV bottom side Incorrect assembly ...

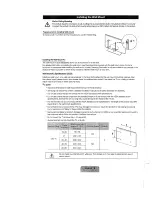
Page 6: ... it may fall and result in severe personal injury NOTE o Standard dimensions for wall mount kits are shown in the table below o Samsung wall mount kits contain a detailed installation manual and all parts necessary for assembly o Do not use screws that do not comply with the VESA standard screw specifications o Do not use screws that are longer than the standard length or do not comply with the VE...

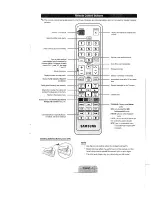
Page 7: ...ch TV and Source Turns the TV on and off Selects the HDMI mode directly Selects the on screen menu items and changes the values seen on the menu Returns to the previous menu Use these buttons In a specific feature For details refer to the e Manual OJ J IJ 1 00m mOOC J th e i i E 1 IW E11I channel 54 3 press 54 01 J lIffig rm U JJ Il IJ I t If QUickly select frequently used functions This remote co...

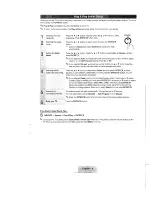
Page 8: ... appear on the screen c L c Picture Sound Channel System Support Select an icon or option with the A or button Press ENTER 3l to access the sub menu Select the desired submenu with the or button Adjust the value of an item with the or button The adjustment in the OSD may differ depending on the selected menu Press ENTER 3l to confirm the selection Press EXIT For best cable connection to this produ...

Page 9: ...d time Use the ll or button to move between entry fields Press the orT button to select Air or Cable and then press ENTER 131 A check appears on your selection Select Next and then press the ENTER C3 button You can check both if you have both connected If you selected Cable you ll go to the Cable System screen Use the or f button to select Digital or Analog and then press ENTER G Use the or f butt...

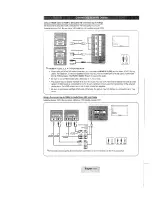
Page 10: ...able with athickness of 14 mm or less The picture may not display normally if at all or the audio may not work if an external device that uses an older version of HOMI mode is connected to the TV If such a problem occurs ask the manufacturer of the external device about the HDMI version and jf out of date request an upgrade Be sure to purchase a certified HOMi cable Otherwise the picture may not d...

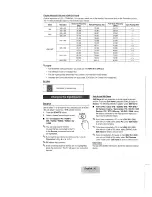
Page 11: ...ceiver When the source is a digital component such as a DVD Blu ray player cable box STS Set Top Box satellite receiver and is connected to the TV via HOM only 2 CH audio will be heard from the Home Theater receiver If you want to hear 5 1 CH audio connect the digital audio out jack from your DVD Blu ray player cable box STS satellite receiver directly to an amplifier or Home Theater AUDIO OUT Con...

Page 12: ... press the TOOLS button In Source The following selections appear under Edit Name VCR I DVO Cable STB I Satellite STS I PVR STB AV Receiver I Game CamcorderI PC I OVI PC I OVI Devices TV IPTV I Blu ray I HO OVO OMA Name the device connected to the input jacks to make your input source selection easier if you have connected a PC to the HDMIIN 1 DVI port with an HOM cable select PC under Edit Name t...

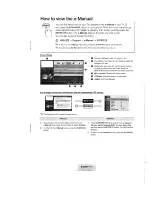
Page 13: ...ess or button to select the category you want e Displays the sub menu list Use the arrow buttons on your remote to move the cursor Press the ENTER 3l button to select the sub menu you want e mBlue Index Displays the index screen e G Enter Selects a category or sub menu o J Exit Exit the e Manual How to toggle between an e Manual topic and the corresponding eSD menu s JMjusl l1llpiolUlO OItIngo S I...

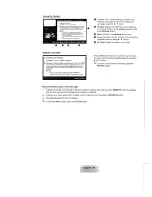
Page 14: ... ENTERG NOTE When you make changes to Backlight Contrast Brightness Sharpness Color or Tint G R the OSD will be adjusted accordingly o Contents Area Contains the topic contents if you selected a sub menu To move to the previous or next page press the I button e Try Now Displays the OSD menu that corresponds to the topic To return to the e Manual screen press the E MANUAL button e Home Moves to the...

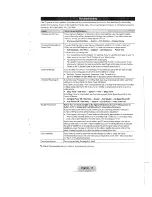
Page 15: ... be an issue with either your Timer settings or your Eco friendly No Signal Power Off feature First make sure you Sleep Timer is not accidentally set The sleep timer allows you the comfort of falling asleep with the TV still on but turns it off after a certain period of time so as not to waste energy Sleep Timer User Menu System Time Sleep Timer If the Sleep Timer is not activated you may have eng...

Page 16: ...ple if an external device s output is HDMI it should be connected to an HDMI input on the TV Make sure your connected devices are powered on Be sure to select the TV s correct input source by pressing the SOURCE button on the remote control Reboot the connected device by unplugging and then reconnecting the device s power cable Replace the remote control batteries Make sure the batteries are insta...

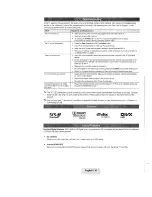
Page 17: ...e only the appropriate supplied screw If you use a different screw you can damage your TV 2 Firmly fasten the screw you provided size M4xL20 or similar to the wall or cabinet where the N is to be installed If you fasten the screw to the wall we recommend you drive the screw into astUd If that is not possible use a molly to anchor the screw 3 Tie the N Holder cord to the screw fastened to the wall ...

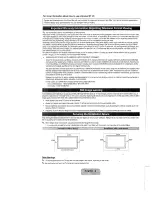
Page 18: ...and specifications are subject to change without prior notice This device is a Class B digital apparatus For information about power supply and more about power consumption refer to the label attached to the product Dispose unwanted electronics through an approved recycler To find the nearest recycling location go to our website www samsung com recyclingdirect or call 877 278 0799 ...

Page 19: ...nit inches NOTE All drawings are not necessarily to scale Some dimensions are subject to change without prior notice Refer to the dimensions prior to performing installation of your Tv Not responsible for typographical or printed errors 2011 Samsung Electronics America Inc ...

Page 20: ...SAMSUNG 726 7864 www samsung com Samsung Electronics Canada Inc Customer Service 66 Standish Court Mississauga Ontario L5R 4B2 Canada U S A 1 800 SAMSUNG 726 7864 www samsung com Samsung Electronics America Inc 86 Challenger Road Ridgefield Park NJ 07660 2011 Samsung Electronics Co Ltd All rights reserved 11I11 lllIllIIJIIIIIIIIIIIIIIIIIIIIIII 1 1 BN68 03419A 02 ...

Reviews: