background image

imagine the possibilities

Thank you for purchasing this Samsung product. 

To receive more complete service, please register 

your product at

www.samsung.com/register

Model _____________ Serial No. _____________
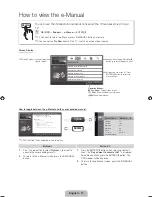
E-MANUAL

Contact SAMSUNG WORLDWIDE

If you have any questions or comments relating to Samsung products, please contact the SAMSUNG customer care center.

Comuníquese con SAMSUNG WORLD WIDE

Si desea formular alguna pregunta o comentario en relación con los productos de Samsung, comuníquese con el centro de
atención al cliente de SAMSUNG.

Country

Customer Care Center 

Web Site

ARGENTINA

0800-333-3733

www.samsung.com

BRAZIL

0800-124-421
4004-0000

www.samsung.com

CHILE

800-SAMSUNG(726-7864)

www.samsung.com

NICARAGUA

00-1800-5077267

www.samsung.com

HONDURAS

800-7919267

www.samsung.com

COSTA RICA

0-800-507-7267

www.samsung.com

ECUADOR

1-800-10-7267

www.samsung.com

EL SALVADOR

800-6225

www.samsung.com

GUATEMALA

1-800-299-0013

www.samsung.com

JAMAICA

1-800-234-7267

www.samsung.com

PANAMA

800-7267

www.samsung.com

PUERTO RICO

1-800-682-3180

www.samsung.com

REP. DOMINICA

1-800-751-2676

www.samsung.com

TRINIDAD & TOBAGO

1-800-SAMSUNG(726-7864)

www.samsung.com

VENEZUELA

0-800-100-5303

www.samsung.com

COLOMBIA

01-8000112112

www.samsung.com

Plasma TV

user manual

© 2011 Samsung Electronics Co., Ltd. All rights reserved.

BN68-03456C-01

[PD550-ZL]BN68-03456C-01L02.indb   1

2011-02-25   오전 9:33:19

Summary of Contents for 490 Series

Page 1: ...800 333 3733 www samsung com BRAZIL 0800 124 421 4004 0000 www samsung com CHILE 800 SAMSUNG 726 7864 www samsung com NICARAGUA 00 1800 5077267 www samsung com HONDURAS 800 7919267 www samsung com COSTA RICA 0 800 507 7267 www samsung com ECUADOR 1 800 10 7267 www samsung com EL SALVADOR 800 6225 www samsung com GUATEMALA 1 800 299 0013 www samsung com JAMAICA 1 800 234 7267 www samsung com PANAMA...

Page 2: ...ll have no impact on the performance of the product Avoid operating the TV at temperatures below 41 F 5 C A still image displayed too long may cause permanent damage to the PDP Panel Watching the Plasma TV in 4 3 format for a long period of time may leave traces of borders displayed on the left right and center of the screen caused by the difference of light emission on the screen Playing a DVD or...

Page 3: ... when you open the box y y Remote Control Batteries AAA x 2 y y Owner s Instructions y y Warranty Card Safety Guide Not available in some locations y y Cleaning Cloth y y Power Cord AV Component Adapter Ferrite Core 1 EA Ferrite Core The ferrite cores are used to shield the cables from interference When connecting a cable open the ferrite core and clip it around the cable near the plug as shown in...

Page 4: ...emote control MENU Displays an on screen menu the OSD on screen display of your TV s features y Adjusts the volume In the OSD use the y buttons as you would use the and buttons on the remote control z Changes the channels In the OSD use the z buttons as you would use the and buttons on the remote control P Power Turns the TV on or off Standby mode Do not leave your TV in standby mode for long peri...

Page 5: ... Changes channels Displays channel lists on the screen Displays the EPG Electronic Program Guide Displays information on the TV screen Exits the menu Have direct access to channels Adjusts the volume Not available Opens the OSD Displays the Content Home which include Watch TV My Contents and Source Quickly select frequently used functions Returns to the previous menu Selects the on screen menu ite...

Page 6: ... Channel Network System Support 2 Select an icon with the or button 3 ENTERE Press ENTERE to access the sub menu 4 Select the desired submenu with the or button 5 Adjust the value of an item with the or button The adjustment in the OSD may differ depending on the selected menu 6 ENTERE Press ENTERE to confirm the selection 7 EXITe Press EXIT GUIDE Connecting to an Antenna When the TV is initially ...

Page 7: ...f you selected Auto you ll go to the Time Zone and DST screen Select Time Zone or DST and then press ENTERE On the Time Zone screen use the or button to select your zone and then press ENTERE On the DST screen press ENTERE then select whether to turn DST Daylight Savings Time on or off When done press ENTERE If you selected Manual you ll go to the Date and Time screen Select Date or Time and then ...

Page 8: ...HDMI mode is connected to the TV If such a problem occurs ask the manufacturer of the external device about the HDMI version and if out of date request an upgrade x x Be sure to purchase a certified HDMI cable Otherwise the picture may not display or a connection error may occur x x A basic high speed HDMI cable or one with ethernet is recommended This product does not support the ethernet functio...

Page 9: ... DVD Blu ray player cable box STB Set Top Box satellite receiver and is connected to the TV via HDMI only 2 CH audio will be heard from the home theater receiver If you want to hear 5 1 CH audio connect the digital audio out jack from your DVD Blu ray player cable box STB satellite receiver directly to an amplifier or home theater AUDIO OUT Connects to the audio input jacks on your amplifier DVD h...

Page 10: ... selected x x Separate and Composite modes are supported SOG Sync On Green is not supported Changing the Input Source Source Use to select TV or an external input sources such as a DVD Blu ray player cable box STB satellite receiver TV PC AV Component1 Component2 HDMI1 DVI HDMI2 HDMI3 HDMI4 AllShare USB You can only choose external devices that are connected to the TV In the Source connected input...

Page 11: ...ection in compliance with new Wi Fi certification specifications Configuring the Network Connection Wireless The instructions below are for networks that use the Dynamic Host Configuration Protocol DHCP to configure network connections automatically If your have a Static IP network see your user s manual for configuration instructions To configure your network connection for a network that uses DH...

Page 12: ...nnection for a network that uses DHCP follow these steps 1 Connect your TV to your network as shown in one of the illustrations above 2 Turn on your TV press the MENU button on your remote and then select Network Network Settings The Network Settings screen will appear 3 Select the Wired General Some networks are Static IP networks If your network is a Static IP network you can not use DHCP to con...

Page 13: ... Preset Picture Mode Adjusting Picture Settings Changing the Picture Size Changing the Picture Options Using the TV with Your PC Index E Enter e Exit TV Screen Displays the current input source screen Change the category Press l or r button to select category you want Displays the sub menu list Press ENTERE button to select sub menu you want Operation Buttons Blue Index Displays index screen E Ent...

Page 14: ...ew the corresponding contents if you selected a sub menu To move previous or next page press the l or r button Operation Buttons a Red Try Now Displays the corresponding menu s b Green Home Moves to the e Manual home screen Yellow Zoom Magnifies a screen Blue Index Displays index screen L Page Moves to previous or next page R Return Changing the Preset Picture Mode O O MENUm Picture Picture Mode E...

Page 15: ...l Reboot the connected device by reconnecting the device s power cable The remote control does not work Replace the remote control batteries with the poles in the right direction Clean the sensor s transmission window on the remote Try pointing the remote directly at the TV from 5 6 feet away The cable set top box remote control doesn t turn the TV on or off or adjust the volume Program the Cable ...

Page 16: ... x Do not use screws that are longer than the standard dimension or do not comply with the VESA standard screw specifications Screws that are too long may cause damage to the inside of the TV set x x For wall mounts that do not comply with the VESA standard screw specifications the length of the screws may differ depending on the wall mount specifications x x Do not fasten the screws too strongly ...

Page 17: ...e TV again Screws may not be supplied with the product In this case please purchase the screws of the following specifications 3 Connect the clamps fixed onto the TV and the clamps fixed onto the wall with a strong cable and then tie the string tightly NOTE Install the TV near to the wall so that it does not fall backwards It is safe to connect the string so that the clamps fixed on the wall are e...

Page 18: ...ly Sound Output 10 W X 2 15W x 2 Dimensions WxDxH Body With stand 47 1 X 2 2 X 28 2 inches 1196 8 X 57 0 X 715 6 mm 47 1 X 12 0 X 31 0 inches 1196 8 X 305 0 X 787 3 mm 58 6 x 2 2 x 34 8 inches 1488 8 X 57 0 X 885 8 mm 58 6 x 13 2 x 37 8 inches 1488 8 x 335 0 x 960 2 mm Weight Without Stand With Stand 48 1 Ibs 21 8 kg 57 5 Ibs 26 1 kg 76 1 Ibs 34 5 kg 89 5 Ibs 40 6 kg Display Resolution 1920 x 1080...

Page 19: ...This page is intentionally left blank ...

Page 20: ...a su producción No obstante puede que existan algunos píxeles brillantes u oscuros en la pantalla Estos píxeles no influirán en el rendimiento del aparato Evite que el televisor funcione a temperaturas por debajo de 41 F 5 C La imagen fija visualizada durante demasiado tiempo puede causar daños permanentes en el panel de la PDP Ver el TV de plasma en formato 4 3 durante un tiempo prolongado puede ...

Page 21: ... y y Mando a distancia y 2 pilas AAA y y Manual del usuario y y Tarjeta de garantía Guía de seguridad no disponible en algunos lugares y y Paño de limpieza y y Cable de alimentación Adaptador de AV componentes Núcleo de ferrita 1 unid Núcleo de ferrita El núcleo de ferrita se utiliza para proteger los cables de las interferencias Cuando conecte un cable abra el núcleo de ferrita y sujételo al cabl...

Page 22: ...tra un menú en pantalla la OSD visualización en pantalla con los controles de las funciones del televisor y Ajusta el volumen En la OSD utilice los botones y de igual modo que los botones y del mando a distancia z Cambian los canales En la OSD utilice los botones z de igual modo que los botones y del mando a distancia P Encendido Enciende o apaga el televisor Modo de espera El televisor se pone en...

Page 23: ...a las listas de canales en la pantalla Muestra la Guía electrónica de programas EPG Muestra información en la pantalla del televisor Sale del menú Acceso directo a los canales Ajustar el volumen No disponible Abre la pantalla OSD Muestra el Inicio del contenido que incluye Ver TV Mis contenidos y Origen Seleccionar rápidamente las funciones que se usan con mayor frecuencia Vuelve al menú anterior ...

Page 24: ... icono o una opción con los botones o 3 ENTER E Pulse ENTER E para acceder a los menús secundarios 4 Seleccione un menú secundario con los botones o 5 Ajuste el valor de un elemento con los botones o El ajuste de la visualización en pantalla puede variar según el menú seleccionado 6 ENTER E Pulse el botón ENTER E para confirmar la selección 7 EXIT e Pulse EXIT Conexión a una antena o cable Cuando ...

Page 25: ... Si ha seleccionado Automático irá a las pantallas Zona Tiempo y Horario de Verano Seleccione Zona Tiempo o DST y pulse ENTERE En la pantalla Zona Tiempo utilice los botones o para seleccionar la zona y pulse ENTERE En la pantalla Horario de Verano pulse ENTERE y elija si desea activar o desactivar DST horario de verano Una vez haya terminado pulse ENTER E Si ha seleccionado Manual irá a las panta...

Page 26: ... utiliza una versión más antigua del modo HDMI En tales casos consulte al fabricante del dispositivo externo acerca de la versión HDMI y si ésta es antigua solicite una actualización x x Debe adquirir un cable certificado HDMI De lo contrario la imagen puede no mostrarse o producirse un error de conexión x x Recomendamos utilizar un cable HDMI de alta velocidad o un cable HDMI que admita Ethernet ...

Page 27: ... como un reproductor DVD Blu ray receptor de cable o satélite decodificador y está conectada al televisor a través de HDMI sólo se oye el sonido de 2 canales del receptor del sistema Home Theater Si desea oír el audio de 5 1 canales conecte el terminal de la salida de audio digital del reproductor DVD Blu ray decodificador receptor por satélite STB directamente al amplificador o al sistema Home Th...

Page 28: ...ronización en verde no se admite Cambio de la fuente de entrada Origen Se utiliza para seleccionar TV u otras fuentes de entrada externas como reproductores de DVD Blu ray receptores de televisión por cable satélite decodificador TV PC AV Componente1 Componente2 HDMI1 DVI HDMI2 HDMI3 HDMI4 USB USB Puede elegir solamente dispositivos externos que estén conectados al televisor En Origen se resaltan ...

Page 29: ...nstrucciones que puede ver a continuación se refieren a las redes que utilizan el protocolo de configuración dinámica de host DHCP para configurar automáticamente las conexiones de red Si dispone de una red de IP estática consulte en el manual del usuario las instrucciones de configuración Siga estos pasos para configurar la conexión de una red que utiliza DHCP 1 Conecte el televisor a la red tal ...

Page 30: ...tos pasos para configurar la conexión de una red que utiliza DHCP 1 Conecte el televisor a la red tal como se indica en una de las ilustraciones anteriores 2 Encienda el televisor pulse el botón MENU del mando a distancia y seleccione Red Configuración de red Se muestra la pantalla Configuración de red 3 Seleccione Cable General Algunas redes son de IP estática Si su red es de IP estática no puede...

Page 31: ...MANUAL del mando a distancia No podrá utilizar Int Ahora directamente si TV está configurada como una fuente de entrada externa Pantalla del televisor Muestra la pantalla de la fuente de entrada actual La lista de categorías Pulse los botones l o r para seleccionar la categoría que desee Muestra la lista de menús secundarios Pulse el botón ENTERE para seleccionar el menú secundario que desee Funci...

Page 32: ...n menú secundario Para ir a la página anterior o siguiente pulse los botones l o r Funcionamiento de los botones a Rojo Int Ahora Muestra el menú de la OSD que corresponda al tema b Verde Inicio Va a la pantalla de inicio del manual electrónico Amarillo Zoom Agranda una pantalla Azul Índice Muestra la pantalla del índice L Página Ir a la página anterior o siguiente U Mover R Regresar Cambio del mo...

Page 33: ...ción del dispositivo El mando a distancia no funciona Sustituya las pilas del mando a distancia Instale las pilas con las polaridades en la dirección correcta Limpie la ventana de transmisión del sensor del mando a distancia Apunte con el mando a distancia directamente al televisor desde una distancia de 5 6 pies 1 5 2 metros El mando a distancia del cable decodificador no enciende ni apaga el tel...

Page 34: ...SA x x No use tornillos con una longitud superior a la medida estándar o que no cumplan con las especificaciones de tornillos estándar VESA Los tornillos que sean demasiado largos pueden causar daños en el interior del televisor x x Para montajes murales que no cumplen las especificaciones de tornillos estándar VESA la longitud de éstos puede variar dependiendo de las especificaciones del montaje ...

Page 35: ...r Quizás con el televisor no vayan incluidos los tornillos En tal caso debe adquirirlos por separado con estas especificaciones 3 Monte una cadena fuerte entre las grapas del televisor y de la pared de manera que quede bien tensada NOTA x x Instale el televisor cerca de la pared para evitar que caiga hacia atrás x x Las grapas de la pared han de estar a la misma o a menor altura que las grapas del...

Page 36: ... diagonalmente Sonido salida 10 W x 2 15 W x 2 Dimensiones An x Pr x Al Cuerpo principal Con el soporte 47 1 x 2 2 x 28 2 pulgadas 1196 8 x 57 0 x 715 6 mm 47 1 x 12 x 31 pulgadas 1196 8 x 305 0 x 787 4 mm 58 6 x 2 2 x 34 8 pulgadas 1488 8 X 57 0 X 885 8 mm 58 6 x 13 2 x 37 8 pulgadas 1488 8 x 335 0 x 960 2 mm Peso Sin el soporte Con el soporte 48 1 Ibs 21 8 kg 57 5 Ibs 26 1 kg 76 1 Ibs 34 5 kg 89...

Reviews: