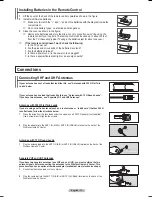
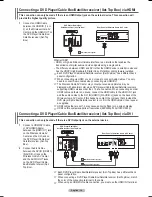
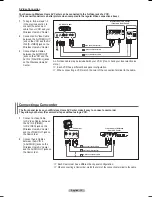
background image

PLASMA DISPLAY

FP-T5094W 

FP-T5894W

Owner’s 

Instructions

Register your product at www.samsung.com/global/register

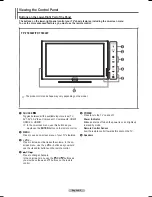
Record your Model and Serial number here for future reference.
▪ Model _______________  ▪ Serial No. _______________

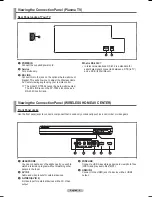
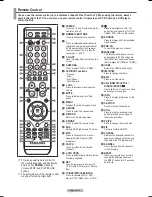
with Wireless Home AV Center

BN68-01094W-01Eng.indb   1

2007-10-08   ¿ÀÈÄ 6:03:03

Summary of Contents for FP-T5094W

Page 1: ...P T5894W Owner s Instructions Register your product at www samsung com global register Record your Model and Serial number here for future reference Model _______________ Serial No _______________ wit...

Page 2: ...permanent burned in ghost images in the Plasma TV picture To avoid this vary the programming and images and primarily display full screen moving images not stationary patterns or dark bars On Plasma...

Page 3: ...icture on the screen may be distorted by interference from wireless communications Avoid installation near metal framework furniture or any other metal objects Do not use other wireless devices near t...

Page 4: ...stalling the Wireless Home AV Center on a table underneath the PDP TV Example of installing at 26 feet 8m distance 2 Installing the Wireless Home AV Center on a table next to you Avoid installing in t...

Page 5: ...TV uses a panel consisting of 1 230 000 SD level to 3 150 000 HD level pixels which require sophisticated technology to produce However there may be a few bright or dark pixels on the screen These pi...

Page 6: ...zing the Current Picture 36 Sound Control Using Automatic Sound Settings 37 Customizing the Sound 37 Setting the TruSurround XT 38 Choosing a Multi Channel Sound MTS Track Digital 38 Choosing a Multi...

Page 7: ...ccessories Please make sure the following items are included with your TV and Wireless Home AV Center If any items are missing contact your dealer RET URN FAV CH Remote Control BN59 00655A AAA Batteri...

Page 8: ...he remote control 2 MENU Press to see an on screen menu of your TV s features 3 VOL Press to increase or decrease the volume In the on screen menu use the VOL buttons as you would use the and buttons...

Page 9: ...d for serial data signals connected between a DTE ie TV and a DCE ie Wall Mount Viewing the Connection Panel WIRELESS HOME AV CENTER Front Panel Jacks Use the front panel jacks to connect a component...

Page 10: ...audio inputs An optional HDMI DVI cable will be necessary to make this connection When using an optional HDMI DVI adapter the DVI analog audio inputs on your TV allow you to receive left and right au...

Page 11: ...DVD player or Set Top Box TV DVD STB CABLE VCR Press to operate your TV DVD player STB CABLE box or VCR Press to backlight the VOL CH and active source button TV DVD CABLE STB VCR on the remote SOURCE...

Page 12: ...ntennas to the Wireless Home AV Center This procedure requires an optional combiner adaptor available at most electronics shops 1 Connect both antenna leads to the combiner 2 Plug the combiner into th...

Page 13: ...sconnect the cable that is connected to the ANT IN terminal on your cable box This terminal might be labeled ANT IN VHF IN or simply IN 2 Connect this cable to a two way splitter 3 Connect an Antenna...

Page 14: ...ss Home AV Center and the HDMI OUT on the DVD Player Cable Box Satellite receiver Set Top Box What is HDMI HDMI or high definition multimedia interface is an interface that enables the transmission of...

Page 15: ...Home AV Center Component Cable Not supplied 1 Audio Cable Not supplied 2 Connecting a VCR Video Connection These instructions assume that you have already connected your Wireless Home AV Center to an...

Page 16: ...or S Video Connection Your Samsung Wireless Home AV Center can be connected to the S Video jack of a VCR This connection delivers a better picture when compared to the regular Video connection above...

Page 17: ...Optical Cable between the DIGITAL AUDIO OUT OPTICAL jacks on the Wireless Home AV Center and the Digital Audio Input OPTICAL jacks on the Digital Audio System When a Digital Audio System is connected...

Page 18: ...nments If the unit is accidentally set to Shop mode and you want to return to Dynamic Home mode press any Volume button and then hold down the MENU button for five seconds on the TV panel 4 Press the...

Page 19: ...atically disappear after several seconds Setting the Clock Automatically 9 Press the or button to select On or Off then press the ENTER button Select the time zone in which you live menu is automatica...

Page 20: ...e channels when you press the second number Using the Button The button is used to select stations that broadcast a digital signal 1 For example for Channel 7 1 press 7 then then 1 HD indicates the TV...

Page 21: ...and the status of certain picture and sound settings Press the INFO button once more or wait approximately 10 seconds and it disappears automatically Viewing the Menus 1 With the power on press the ME...

Page 22: ...among STD HRC and IRC then press the ENTER button If you have Digital cable TV select the cable system signal source for both Analog and Digital STD HRC and IRC identify various types of cable TV syst...

Page 23: ...mber buttons on your remote control enter three digits of the cable box code listed on page 26 of this manual for your brand of cable box Make sure you enter three digits of the code even if the first...

Page 24: ...s still control your TV s volume Setting Up the Remote to Operate Your Set Top Box 1 Turn off your STB 2 Press the STB button on your TV s remote control 3 Press the SET button on your TV s remote con...

Page 25: ...018 026 037 070 025 038 025 081 082 083 021 056 059 007 008 018 021 026 037 062 006 036 073 074 075 076 021 006 021 024 025 034 005 019 041 075 Brand MITSUBISHI MONTGOMERY WARD MTC MULTITECH NEC OPTIM...

Page 26: ...ISM JANEIL JERROID JVC Code 023 043 018 034 019 035 015 016 017 019 022 045 060 061 062 065 066 067 068 074 069 070 069 018 024 032 027 025 069 070 071 069 069 065 046 047 048 063 064 069 056 022 015...

Page 27: ...4 122 123 027 065 077 078 079 082 080 125 081 095 066 146 067 068 090 060 061 089 133 135 069 074 074 064 113 071 073 091 110 089 092 091 022 033 115 116 073 051 108 109 073 059 100 106 107 074 075 02...

Page 28: ...name the device connected to the input jacks to make your input source selection easier 1 Press the MENU button to display the menu Press the or button to select Input then press the ENTER button Pres...

Page 29: ...rease the clarity and sharpness of the picture Choose Standard for general TV watching mode Choose Movie when watching movies Press the P MODE button on the remote control to select one of the standar...

Page 30: ...menu Press the ENTER button to select Picture 2 Press the or button to select Digital NR then press the ENTER button 3 Press the or button to select Off Low Medium High or Auto then press the ENTER bu...

Page 31: ...the ones above In TV VIDEO S VIDEO and COMPONENT 480i 480p modes all screen modes can be selected 16 9 Zoom1 Zoom2 4 3 In COMPONENT 720p 1080i or HDMI 720p 1080i mode 16 9 4 3 and Wide Fit can be sel...

Page 32: ...pressing the or button then press the ENTER button Press the or button until you reach the optimal setting R offset Adjusts the red color darkness G offset Adjusts the green color darkness B offset Ad...

Page 33: ...Demo The screen before applying DNIe appears on the right and the screen after applying DNIe appears on the left On Switches on the DNIe mode The DNle function is not supported in the Movie mode More...

Page 34: ...ce regardless of the Blue Screen Setting Setting the HDMI Black Level Use this function to adjust the Black Level of the picture while in HDMI mode 1 Press the MENU button to display the menu Press th...

Page 35: ...rn it on again the PIP window will disappear Press the PIP button on the remote control to activate or deactivate the PIP Analog TV signals can be viewed on the PIP screen while viewing the picture fr...

Page 36: ...the bottom of the remote to select the desired channel in the PIP window then press the ENTER button MAIN HDMI 1 2 3 Component 1 2 PIP TV Analog Press the EXIT button to exit Press the PIP CH and CH...

Page 37: ...tively you can use one of the automatic settings 1 Press the MENU button to display the menu Press the or button to select Sound then press the ENTER button 2 Press the or button to select Equalizer t...

Page 38: ...rack Options then press the ENTER button 3 Press the ENTER button to select Preferred Language Press the or button to choose the language English Spanish or French you want then press the ENTER button...

Page 39: ...igital Output Dolby Digital Sound T V Enter Move Return Return 1 Press the MENU button to display the menu Press the or button to select Sound then press the ENTER button 2 Press the or button to sele...

Page 40: ...i Track Options Auto Volume Off Internal Mute Off Sound Select Main Digital Output Dolby Digital Sound T V Enter Move Return Mode Custom Equalizer SRS TruSurround XT Off Multi Track Options Auto Volum...

Page 41: ...arks of Dolby Laboratories 3 Press the or button to select the appropriate format then press the ENTER button 4 Press the EXIT button to exit This function is supported only with HD Digital channels r...

Page 42: ...hannels Digital The Clear Scrambled Channel function is used to filter out scrambled channels after Auto Program is completed It removes the scrambled channels from the list by tuning the digital cabl...

Page 43: ...12 Air 13 Air 14 Air 15 Air 16 Air 17 Air 18 Air 19 Air 20 Air 21 Air 22 Air 23 Delete All Return Channel List Added List Mode Add All Move Enter DTV Air 2 DTV Air 2 Air 3 Air 4 Air 5 Air 6 Air 7 DTV...

Page 44: ...morized channels can be set as favorite channels All favorite channels will be shown on the Favorite menu To select the favorite channels you have set up press the FAV CH button on the remote control...

Page 45: ...ress the or button to select All Added or Favorite then press the ENTER button Select the Channel list you want to appear when you press the CH LIST button All Shows All the channels when you press th...

Page 46: ...og Channels Use fine tuning to manually adjust a particular channel for optimal reception 1 Press the MENU button to display the menu Press the or button to select Channel then press the ENTER button...

Page 47: ...elect OK then press the EXIT button to exit the menu LNA Low Noise Amplifier If the TV is operating in a weak signal area sometimes the LNA function can improve the reception a low noise preamplifier...

Page 48: ...move to Month Day Year Hour Minute or am pm Set the date and time you want by pressing the or button then press the ENTER button Press the EXIT button to exit The current time will appear every time y...

Page 49: ...press the ENTER button Press the or button to select On or Off then press the ENTER button Press the EXIT button to exit Depending on the broadcast station and signal the auto time may not be set corr...

Page 50: ...3 hours after the TV was turned on by timer This function is only available in timer On mode and prevents overheating which may occur if a TV is on for too long time Setting the Sleep Timer The sleep...

Page 51: ...NTER button 2 Press the or button to select the appropriate language English Espa ol or Fran ais then press the ENTER button Press the EXIT button to exit Plug Play Language English Time V Chip Captio...

Page 52: ...ou want The default is Default Foreground Color This option consists of Default White Black Red Green Blue Yellow Magenta and Cyan You can change the color of the letter The default is Default Backgro...

Page 53: ...el carries data that is intended to augment information carried in the program CC3 Secondary Synchronous Caption Service Alternate program related caption data typically second language captions CC4 S...

Page 54: ...lay the menu Press the or button to select Setup then press the ENTER button 2 Press the or button to select Light Effect then press the ENTER button Press the or button to select Off In Standby In Wa...

Page 55: ...s you to program the time between movement of the picture in minutes 1 Press the MENU button to display the menu Press the or button to select Setup then press the ENTER button 2 Press the or button t...

Page 56: ...screen If the after image is not removed after performing the function repeat the function again Press any key on the remote control to cancel this feature Pixel Shift White Scrolling Side Gray Dark S...

Page 57: ...esets the pin to 0 0 0 0 Power Off MUTE 8 2 4 Power On Change PIN T V 0 9 Enter PIN Enter new PIN Confirm new PIN Return V Chip Lock Off TV Parental Guidelines MPAA Rating Downloadable U S Rating Chan...

Page 58: ...in sophisticated themes sexual content strong language and more intense violence TV MA Mature audiences only This program may contain mature themes profane language graphic violence and explicit sexua...

Page 59: ...display the menu Press the or button to select Setup then press the ENTER button 2 Press the or button to select V Chip then press the ENTER button The message Enter PIN will appear Enter your 4 digit...

Page 60: ...Programming intended for children under age 8 C8 Programming generally considered acceptable for children 8 years and over to watch on their own G General programming suitable for all audiences PG Pa...

Page 61: ...ings Block all Press to lock all TV ratings G General 8 ans Not recommended for young children 13 ans Programming may not be suitable for children under the age of 13 16 ans Programming is not suitabl...

Page 62: ...or button to select Downloadable U S Rating then press the ENTER button If information is not downloaded from the broadcasting station the Downloadable U S Rating menu is deactivated Parental restric...

Page 63: ...Insert a USB drive containing the firmware upgrade into the SERVICE port on the rear panel of the TV 2 Press the MENU button to display the menu Press the or button to select Setup then press the ENT...

Page 64: ...s SAMSUNG is not responsible for any data file damage or data loss The data files in memory cards might be erased due to electrostatic discharge EST loose contact or dust Some memory devices may not b...

Page 65: ...ELINK button on the remote control Exit the screen by pressing the WISELINK button on the remote control and enter the WISELINK screen again Press the WISELINK button on the remote control to turn on...

Page 66: ...ch as gif or tiff will not be displayed Fifteen thumbnail photos are displayed per page The thumbnails are numbered from left to right and from top to bottom from 1 to 15 Folders are displayed first a...

Page 67: ...ou cannot save a zoomed in image When the JPEG image resolution is greater than the screen size you cannot use the Zoom function The Zoom function is not available for the image files that have the re...

Page 68: ...les must be located in the same folder on the memory device To run the slide show repeatedly change the setting by referring to page 73 Press the PLAY PAUSE button when a Photo icon is selected to sta...

Page 69: ...To exit WISELINK mode press the WISELINK button on the remote control Press the EXIT button to switch to the WISELINK start screen where another memory card can be selected When selecting a photo file...

Page 70: ...the photo may not be displayed on the screen To exit WISELINK mode press the WISELINK button on the remote control The rotated file is not saved The Rotating function information icon Displayed at the...

Page 71: ...to the photo X4 To move the enlarged photo image up down left right press the buttons To exit WISELINK mode press the WISELINK button on the remote control Zoom function information icon Displayed at...

Page 72: ...playing time of each MP3 file can be found in the file information When not found it may be displayed as 00 00 00 Music function information icon Displayed at the top left of the screen Icon Current O...

Page 73: ...c Off Doesn t play back repeatedly On Plays back a music file or all music files repeatedly Screen Saver Select to set the waiting time before the screen saver appears The screensaver will appear when...

Page 74: ...t antenna The image is too light or too dark Adjust the Brightness and Contrast Adjust the Fine tuning The image is too large or too small Adjust the Size settings The visual qualities of digital chan...

Page 75: ...cted the message Current position saved as Position1 is displayed 5 Press the ENTER button The saved Position appears on the left side of the OSD Moving to the remembered position 1 Complete Step 1 of...

Page 76: ...ard dimension as they may cause damage to the inside of the TV set For wall mounts that do not comply with the VESA standard screw specifications the length of the screws may differ depending on their...

Page 77: ...inches 430 0 X 268 5 X 640 1 mm Weight Body With stand 98 8 lbs 44 8 kg 106 9 lbs 48 5 kg 130 1 lbs 59 0 kg 141 1 lbs 64 0 kg 6 8 lbs 3 1 kg Environmental Considerations Operating Temperature Operati...

Page 78: ...English 78 Dimensions FP T5094W SIDE VIEW REAR VIEW TOP VIEW FRONT VIEW JACK PANEL DETAIL 2 3 H x 18 8 W 5 8 UP FROM BOTTOM 44 4 50 8 43 6 24 5 29 1 31 7 24 4 3 7 2 0 12 6 4 6 23 6 15 8...

Page 79: ...English 79 Dimensions FP T5894W SIDE VIEW REAR VIEW TOP VIEW FRONT VIEW JACK PANEL DETAIL 2 3 H x 18 8 W 5 8 UP FROM BOTTOM 57 7 33 35 6 29 1 3 9 2 0 13 6 5 3 23 6 15 8...

Page 80: ...Si tiene alguna pregunta o comentario referente a nuestros productos por favor contacte con nuestro Servicio de Atenci n al Cliente Country Customer Care Center Web Site Address CANADA 1 800 SAMSUNG...

Reviews: