background image

Summary of Contents for LN320530

Page 1: ... Inc Customer Service 55 Standish Court Mississauga Ontario L5R 4B2 Canada CANADA 1 800 SAMSUNG 726 7864 www samsung com Samsung Electronique Canada inc Service a la Clientele 55 Standish Court Mississauga Ontario L5R 4B2 Canada Samsung Electronics America inc U S A 1 800 SAMSUNG 726 7864 www samsung com 105 Challenger Road RJdgefield Park NJ 07660 0511 I imagine the possibilities Thank you for pu...

Page 2: ...the warranty period originally specified and to the Original Purchaser only The above described warranty repairs must be performed by a SAMSUNG Authorized Service Center Along with this Statement the Original Limited Warranty Statement and a dated Bill of Sale as Proof of Purchase must be presented to the Service Center Transportation to and from the Service Center is the responsibility of the pur...

Page 3: ... PresetSound Mode 17 Adjusting sound settings 17 Sound Settings 17 Setup Menu 18 Setting the Time 18 Using the Sleep Timer 19 Setting the On Off Timer 19 Locking Programs 19 Other Features 21 Picture in Picture PIP 22 Support Menu 22 Media Play 24 Connecting a USB Device 24 Screen Display 25 PlayingMultiple Files 28 Media Play Additional Functions 28 Anynet 30 Setting Up Anynet 31 Switching betwee...

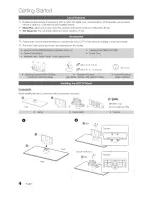
Page 4: ... 24 Self Diagnosis You can check picture and sound operation R 22 Please make sure the following items are included with your LCD TV If any items are missing contact your dealer The items colors and shapes may vary depending on the models _ Xj_ M8 X 19 46 inch TV _ M6 X 16 32 40 inch TVs 46 inch TV Components When installing the stand use the provided components and parts _q 1 EA or or _ SEA M4X L...

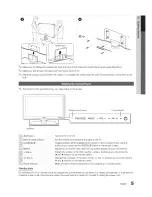
Page 5: ... input sources In the on screen menu use this button as you would use the ENTERE_ button on the remote control MENU Displays an on screen menu the OSD on screen display of your TV s features _VOL Adjusts the volume In the OSD use the VOL buttons as you would use the and _ buttons on the remote control V CH Changes the channels In the OSD use the v CH buttons as you would use the _r and A buttons o...

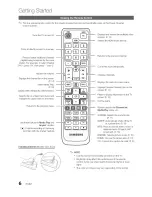
Page 6: ...channels Displays the main on screen menu Displays Favorite Channel Lists on the screen R 13 Press to display information on the TV screen R 18 Exit the menu Returns to the previous menu Use these buttons in Media Play and Anynet modes _ Controls recording on Samsung recorders with the Anynet feature Buttons used in the Channel list Media Play menu etc S MODE Selects the sound mode R 17 SLEEP Auto...

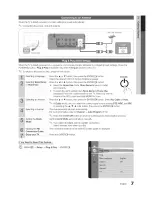
Page 7: ...e Demo Mode isfor retail environments To return the unit s settings from Store Demo to Home Use standard Press the volume button on the TV When you see the volume in the OSD press and hold MENU for 5 sec Press the A or button then press the ENTERI_ button Select Air Cable or Auto In Cable mode you can select the correct signal source among STD HRC and IRC by pressing the A T _ or I_ button then pr...

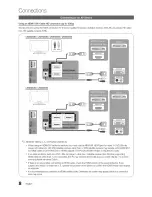
Page 8: ...I DVl to HDMI cable or DVI HDMI DVl to HDMI adapter The PC DW AUDIO B _ jack is required for audio ii If an external device such as a DVD Blu ray player cable box satellite receiver Set Top Box supporting HDMI versions older than 1 3 is connected the TV may operate abnormally e g no screen display no sound annoying flicker abnormal Color i If there is no sound after connecting an HDMI cable check ...

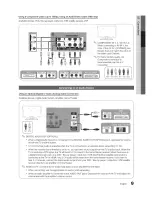
Page 9: ...en the TV is connected to an external device supporting 5 1 CH When the receiver home theater is set to on you can hear sound output from the TV s optical jack When the TV is receiving a DTV signal the TV will send 5 1 CH sound to the home theater receiver When the source is a digital component such as a DVD Blu ray player cable box STB Set Top Box satellite receiver and is connected to the TV via...

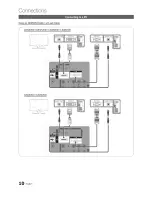
Page 10: ...Connections Using an HDMI DVI Cable a D sub Cable LN32C530 LN37C530 LN40C530 LN46C530 LN40C540 LN46C540 0 English ...

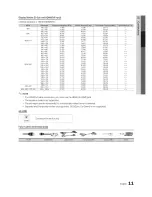
Page 11: ...8 363 60 004 56 476 70 069 60 023 75 029 67 500 75 000 63 981 60 020 79 976 75 025 49 702 59 810 62 795 74 934 60 000 60 000 45 000 60 000 47 712 60 015 55 935 59 887 70 635 74 984 65 290 59 954 52 500 70 000 74 620 70 000 67 500 60 000 ii _ _ _ _ _ _ _iii _I_I _i_ ii ii_i_ _i_i_ii_i _ii_i_i_i_i_i_i_i_i_i_ 25 175 28 322 30 240 57 284 100 000 32 750 81 750 95 750 130 000 25 175 31 500 31 500 40 000...

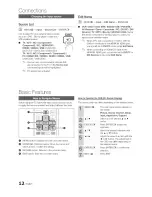
Page 12: ...W port you should set to DVI PC mode under Edit Name When connecting an HDMI DVI cable to the HDMI _N I DV_ port you should set to DVI PC or DVl Devices mode under Edit Name Basic Features Before using the T_ follow the ste s below to learn how to navk ate the menu and select and adjust different functions e O MENU button Displays the main on screen menu ENTERE_ Direction button Move the cursor an...

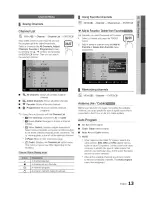
Page 13: ...r shrinks a channel number O Yellow Select Selects multiple channel lists Select desired channels and press the Yellow button to set all the selected channels at the same time The _ mark appears to the left of the selected channels vA Page Move to next or previous page _ _ Tools Displays the Channel List option menu The Options menus may differ depending on the situation Channel Status Display Ico...

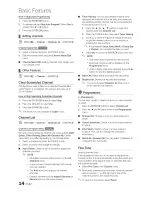
Page 14: ...time even when you are watching another channel Set the current time first to use this function R 18 1 Press the _ _ A buttons to select the desired channel in Channel List 2 Press the TOOLS button then select Timer Viewing 3 Scroll up or down to adjust the settings in the box or use the numeric buttons on your remote for entering the date and time If you selected Once Every Week or Every Day in R...

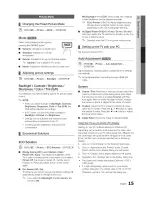
Page 15: ..._ Picture _ ECO Solution _ ENTERI_ Energy Saving Off Low Medium High Picture Off Auto This adjust the brightness of the TV in order to reduce power consumption If you select Picture Off the screen isturned off but the sound remains on Press any button to turn on the screen again Eco Sensor Off On To enhance your power savings the picture settings will automatically adapt to the light in the room I...

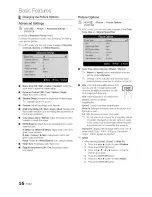
Page 16: ...tness Reset Resets the White Balance to it s default settings Ill Flesh Tone Emphasize pink flesh tone Ill Edge Enhancement Off On Emphasize object boundaries Ill Color Tone Cool Normal Warm1 Warm2 Warm1 or Warm2 will be deactivated when the picture mode is Dynamic Settings can be adjusted and stored for each external device connected to an input on the TV Ill Size Your cable box satellite receive...

Page 17: ...ble only in HDMI mode RGB signals Film Mode Off Auto1 Auto2 Sets the TV to automatically sense and process film signals from all sources and adjusts the picture for optimum quality Available in TV AV COMPONENT 480i 1080i and HDMI 480i 1080i m Auto Protection Time 2 hours 4 hours 8 hours 10 hours Off If the screen remains idle with a still image for a certain period of time defined by the user the ...

Page 18: ...the volume level on each channel set to Normal Ill Night This mode provides an improved sound experience compared to Normal mode making almost no noise it is useful at night Speaker Select External Speaker TV Speaker A sound echo may occur due to a difference in decoding speed between the main speaker and the audio receiver In this case set the TV to External Speaker When Speaker Select is set to ...

Page 19: ...e type of USB make sure the folders assigned to each USB have different names Repeat Select Once Everyday Mon Fri Mort Sat Sat Sun or Manual to set at you convenience If you select Manual you can set up the day you want to activate the timer The _ mark indicates the day is selected Auto Power Off available only when the TV is turned on by the Timer The TV will be automatically turned off after 3 h...

Page 20: ...under the age of 14 18 Adult programming The V Chip will automatically block any category that deals with more sensitive material For example if you block the G category then PG 14 and 18 will automatically be blocked m Canadian French You can block TV programs depending on their French Canadian rating G General 8 ans Programming generally considered acceptable for children 8 years and over to wat...

Page 21: ...lor Options include Default White Black Red Green Blue Yellow Magenta and Cyan You can change the color of the letter The default is White Background Color Options include Default White Black Red Green Blue Yellow Magenta and Cyan You can change the background color of the caption The default is Black Foreground Opacity This adjusts the opacity of text Options include Default Transparent Transluce...

Page 22: ...e desired sound Main Sub in PIP mode Available when PIP is set to On _ MENUiTrl _Support _ ENTERE_ Self Diagnos s Ill Picture Test Use to check for picture problems If the problem continues to occur check the Color pattern Yes If the test pattern does not appear or there is noise in the test pattern select Yes There may be a problem with the TV Contact Samsung s Call Center for assistance 1 800 SA...

Page 23: ...ion regarding our call centers and how to download products and software hstalling the Latest Version Ill By USB Insert a USB drive TV SidePanel containing the firmware upgrade file downloaded from www samsung com into the TV Please be careful not to disconnect the power or remove the USB drive until upgrades are complete The TV will be turned off and on automatically after completing the firmware...

Page 24: ...iles the Not Supported File Format message is displayed If the files are sorted by Basic View up to 1000 files can be displayed in each folder MP3 files with DRM that have been downloaded from a non free site cannot be played Digital Rights Management DRM is a technology that supports the creation distribution and management of the content in an integrated and comprehensive way including the prote...

Page 25: ...are marked with a symbol D Blue Sorting Selects the sort list _ Tools Displays the option menu Using the _ or _ button file list can move to next or previous page Videos Playing Video 1 Press the 41 or _ button to select Videos then press the ENTERI _ button in the Media Play menu 2 Press the 41 _ A _ button to select the desired video in the file list 3 Press the ENTERI _ button or FCq Play butto...

Page 26: ...AAC MPEG4 SP ASP 1920x1080 6 30 8 VRO MPEG1 1920x1080 24 25 30 30 vro AC3 MPEG LPCM VOB MPEG2 1920x1080 24 25 30 30 MPEG1 1920x1080 24 25 30 30 mpg PS MPEG2 1920x1080 24 25 30 30 AC3 MPEG LPCM AAC mpeg H 264 1920x1080 6 30 25 MPEG2 1920x1080 24 25 30 30 ts AC3 AAC MP3 DD tp TS H 264 1920x1080 6 30 25 HE AAC trp VC1 1920x1080 6 30 25 Other Restrictions NOTE If there are problems with the contents o...

Page 27: ...During music playback you can search using 41 and I_ button _ REW and _ buttons do not function during play Only displays the files with MP3 and PCM file extension Other file extensions are not displayed even if they are saved on the same USB device If the sound is abnormal when playing MP3 files adjust the Equalizer in the Sound menu An over modulated MP3 file may cause a sound problem Photos Vie...

Page 28: ...roup Media Play Additional Functions Sorting the file list Press the Blue button in the file list to sort the files at _ ra_j a _ Basic View Title Preference _ Latest Date Earliest Date Artist _ Album Genre Mood Monthly Dbplays the whob folder You can vies the photo by selecting the folder Sorts and displays the fib title in SymboVNumber AIphabet Special order Sorts and displays the fib by prefere...

Page 29: ...uring the slide show You can set and select background music when watching a Slide Show You can zoom into images in full screen mode You can rotate images in full screen mode You can see detailed information about the played file _ iiiiiiiiiiiiiiiiii _ iiiiiiiiiiiiiiiiii _ iiiiiiiiiiiiiiiiii Settings Using the Setup Menu II Continuous Movie Play Help Resume Play On Off Select to display the help p...

Page 30: ...the HDMI INjack of the home theater and the HDMI OUT jack of the corresponding Anynet device using an HDMI cable NOTE Connect the Optical cable between the DIGITAL AUDIO OUT OPTICAL jack on your TV and the Digital Audio Input on the Home Theater When following the connection above the Optical jack only outputs 2 channel audio You will only hear sound from the Home Theater s Front Left and Right sp...

Page 31: ...device is still recording it may turn off 1 2 Switching between Anynet Devices Anynet devices connected to the TV are listed If you cannot find a device you want press the red button to refresh the list Select a device and press the ENTERIZ_ button You can switch to the selected device Only when you set Anynet HDMI CEC to On in the Application menu the Device List menu appears Switching to the sel...

Page 32: ...vice power cord is properly connected Check the Anynet device s Video Audio HDMI cable connections Check whether Anynet HDMI CEC is set to On in the Anynet setup menu Check whether the TV remote control is in TV mode Check whether the remote control is Anynet compatible Anynet doesn t work in certain situations Searching channels operating Media Play or Plug Play initialsetup etc When connecting o...

Page 33: ...n slot is beside the 8 icon 1 Insert the locking device into the Kensington slot 0 on the LCD TV and turn it as shown 0 2 Oonnect the Kensington Lock cable 0 3 Fixthe Kensington Lock to a desk or a heavy stationary object The locking device has to be purchased separately The location of the Kensington slot may be different depending on the TV model Optional Assembling the Blanking Bracket When ins...

Page 34: ... that do not comply with the VESA standard screw specifications Do not use screws that are longer than the standard dimension or do not comply with the VESA standard screw specifications Screws that are too long may cause damage to the inside of the TV set For wall mounts that do not comply with the VESA standard screw specifications the length of the screws may differ depending on the wall mount ...

Page 35: ...w 2 3 1 Firmly fasten the screw to the wall or cabinet where the TV is to be installed Tie the TV Holder attached to the TV and the screw fastened on the wall or cabinet so that the TV is fixed Purchase the screws to be used on the wall or cabinet separately Install the TV close to the wall so that it does not fall When attaching the TV to the wall tie the cord level with the ground or slanted dow...

Page 36: ...lank screen Adjust the Picture options in the TV menu go to Picture mode Oolor Brightness Sharpness R 15 Adjust Energy Saving option in the TV menu go to MENU Picture ECO Solution Energy Saving R 15 Try resetting the picture to view the default picture setting go to MENU Picture Picture Reset R 17 If the picture size is set to Screen Fit change it to 16 9 Change cabb satellite box resolution If yo...

Page 37: ...SOURCE button on the remote control Reboot the connected device by reconnecting the device s power cable e The TV is not receiving all channels Make sure the coaxial cable is connected securely Please try Auto Program to add available channels to the channel list go to MENU Channel Auto program then select Auto and make sure the correct Cable TV signal type is set in the menu There are 3 options S...

Page 38: ...nd will dissipate over time TV Signal Information is unavailable in This function is only available with digital channels from an Antenna RF Coax connection the Self Diagnosis Test menu R 22 TV is tilted to the right or left side Remove the stand base from the TV and reassemble Channel menu isgrey out unavailable Channel menu is only available when the TV source is selected Antenna or Cable Your s...

Page 39: ...X 23 3inches 970 0 X 78 6X 591 3 mm 43 4X3 1X 26 3inches 1102 4 X 78 7X 667 3 mm 38 2X9 5X 25 7inches 970 0X 240 0X 653 5 mm 43 4X 10 2X 28 9inches 1102 4 X 260 1X 733 2 mm 39 0 Ibs 17 7 kg 47 4 Ibs 21 5 kg For information about power supply and more about power consumption refer to the label attached to the product License Z DOLBY DIGITAL PLUS PULSE1 Manufactured under license from Dolby Laborato...

Page 40: ...40 2 22 6 24 4 26 3 28 9 3 1 Unit inches 8 7 9 5 9 5 9 5 10 2 10 2 Ill Jack panel detail rear view oE o_ _ _ _ LN32C530 LN37C530 LN40C530 LN40C540 LN46C530 LN460540 9 8 12 4 2 0 3 2 3 8 3 3 20 9 24 6 7 9 7 9 Unit inches i_il 7 9 7 9 13 2 2 7 4 0 27 6 7 9 7 9 16 1 3 7 4 0 31 8 15 7 15 7 NOTE All drawings are not necessarily to scale Some dimensions are subject to change without prior notice Referto...

Page 41: ...t Balance M T Media Play 24 33 17 C Melody 22 Component 9 Menu Language 21 MP3 Play 27 D O D_G_TALAUDIO OUT 9 30 D sub 10 Optimal resolution 11 DVD home theater 9 P E Photo view 27 Editing channels 14 PIN number 21 Energy Saving 15 PIP 22 Equalizer 17 Power Indicator 5 Timer 19 V Video play 25 Volume 5 6 19 W Wall Mount 33 F R FAV CH button 6 13 Remote Control 6 Favorite Channel 13 RGB 16 English ...

Reviews: