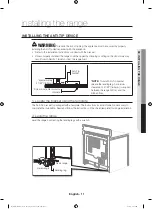
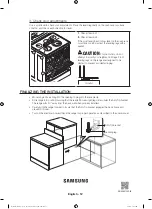
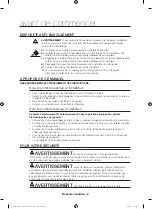
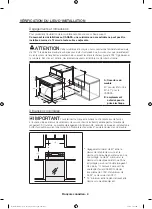
background image

imagine

 the possibilities

Thank you for purchasing this Samsung product. 

Electric Range

installation manual

Manual Installation_30 Oven_SECA_DG68-00109F-08_EN+CFR.indb   1

9/6/2018   6:52:48 PM

Summary of Contents for NE59R6631SG/AC

Page 1: ...imagine the possibilities Thank you for purchasing this Samsung product Electric Range installation manual Manual Installation_30 Oven_SECA_DG68 00109F 08_EN CFR indb 1 9 6 2018 6 52 48 PM ...

Page 2: ... the consumer Important note to the consumer Keep these instructions for the local electrical inspector s use As when using any appliance generating heat there are certain safety precautions you should follow Be sure your range is installed and grounded properly by a qualified installer or service technician Make sure the wall coverings around the range can withstand the heat generated by the rang...

Page 3: ...ble Wrench Pliers 1 4 Nut Driver Phillips Screwdriver Flat Screwdriver Pencil Level What s included with your range Template Anti Tip Bracket Screws 4 ea 4 Wire Cord or 3 Wire Cord UL Approved 40 or 50 AMP What s not included Strain Relief For Conduit Installation Only English 3 01 BEFORE YOU BEGIN PREPARING TO INSTALL THE RANGE Manual Installation_30 Oven_SECA_DG68 00109F 08_EN CFR indb 3 9 6 201...

Page 4: ... electrical outlet area Minimum dimensions IMPORTANTTo eliminate the risk of burns or fire caused by reaching over heated surface units cabinet storage space located above the surface units should be avoided If cabinet storage is to be provided the risk can be reduced by installing a range hood that projects horizontally a minimum of 5 beyond the bottom of the cabinets 30 30 15 30 minimum clearanc...

Page 5: ...ical Code requires that new construction not existing utilize a 4 conductor connection to an electric range When installing an electric range in new construction follow Steps 2 and 3 for 4 wire connection You must use a 3 wire or 4 wire single phase A C 208Y 120 Volt or 240 120 Volt 60 hertz electrical system If the electrical service provided does not meet the above specifications have a licensed...

Page 6: ...sible Access cover Terminal block Specified power supply cord kit rating Range rating watts Specified rating of power supply cord kit amperes Diameter inches of range connection opening 120 240 volts 3 wire Power cord Conduit 8 750 16 500 40 or 50A 13 8 11 8 English 6 Manual Installation_30 Oven_SECA_DG68 00109F 08_EN CFR indb 6 9 6 2018 6 52 51 PM ...

Page 7: ...r left and the lower right terminals of the terminal block 1 Remove the 3 lower terminal screws from the terminal block 2 Insert the 3 terminal screws through each power cord terminal ring and into the lower terminals of the terminal block Be certain that the center wire white neutral is connected to the center lower position of the terminal block 3 Tighten screws securely into the terminal block ...

Page 8: ...into the power cord ground wire terminal ring through the ground plate and into the frame of the range 4 Insert the 3 terminal screws removed earlier through each power cord terminal ring and into the lower terminals of the terminal block Be certain that the center wire white neutral is connected to the center lower position of the terminal block Tighten screws securely into the terminal block 5 G...

Page 9: ...ed location and enclosure of splices etc must conform to good wiring practices and local codes 1 Loosen the 3 lower terminal screws from the terminal block 2 Insert the center bare wire white neutral tip through the bottom center terminal block opening On certain models the wire will need to be inserted through the ground strap opening and then into the bottom center block opening 3 Insert the two...

Page 10: ...tral tip through the bottom center of the terminal block opening 5 Insert the two side bare wire tips into the lower left and the lower right terminal block openings 6 Tighten the screws until the wire is firmly secured 35 to 50 inch lbs Do not over tighten the screws since it could damage the wires 7 Go to step 5 and proceed with the installation Ground strap Ground plate White Black Red Neutral ...

Page 11: ...crete approximately 21 32 16 5mm NOTE To install Anti Tip bracket release the leveling leg A minimum clearance of 21 32 16 5mm is required between the range bottom and the kitchen floor 1 Locate the bracket using the template The Anti Tip bracket is packaged with a template The instructions include information necessary to complete the installation Read and follow the instructions on the sheet tem...

Page 12: ...nted to prevent accidental tipping Ground FINALIZING THE INSTALLATION Move range close enough to the opening to plug into the receptacle Slide range into position insuring that the rear left or rear right leg slides under the Anti Tip bracket The range will sit 0 away from the back wall when properly installed Carefully tip the range forward to insure that the Anti Tip bracket engages the back bra...

Page 13: ... monde de possibilités Nous vous remercions d avoir choisi ce produit Samsung Cuisinière électrique Manuel d installation Manual Installation_30 Oven_SECA_DG68 00109F 08_EN CFR indb 1 9 6 2018 6 52 56 PM ...

Page 14: ...née à l utilisateur Conservez précieusement ces instructions afin que la personne chargée du contrôle électrique puisse s y reporter Comme pour tout appareil générant de la chaleur certaines consignes de sécurité sont à respecter Assurez vous que votre appareil est correctement installé et mis à la terre par un installateur qualifié ou un technicien spécialisé Assurez vous que les revêtements mura...

Page 15: ... Tournevis à douille de 1 4 Tournevis cruciforme Tournevis plat Crayon Niveau Accessoires fournis Modèle Support anti basculement Vis 4 ch Cordon 4 fils ou 3 fils homologué UL 40 ou 50 AMP Accessoires non fournis Protection contre la traction pour le branchement des gaines uniquement Français canadien 3 01 AVANT DE COMMENCER PRÉPARATION AVANT L INSTALLATION DE LA CUISINIÈRE Manual Installation_30 ...

Page 16: ... Unis 30 31 pour le CANADA B emplacement autorisé pour la prise électrique Dimensions minimales IMPORTANTPour éliminer tout risque de brûlure ou d incendie lors de l accès à l espace situé au dessus des éléments de cuisson chauds évitez d y aménager tout meuble de rangement Si toutefois un meuble de rangement doit être monté réduisez ce risque en installant une hotte d aspiration assurant une prot...

Page 17: ... branchement à 4 conducteurs pour les cuisinières électriques Lorsque vous installez une cuisinière électrique dans une construction neuve suivez les étapes 2 et 3 relatives aux connexions à 4 fils Vous devez utiliser un système électrique à 3 ou 4 fils monophasé CA de 208Y 120 V ou de 240 120 V 60 Hz Si votre installation électrique n est pas conforme aux spécifications ci dessus contactez un éle...

Page 18: ...ssification de l équipement nécessaire à la mise sous tension Classification générale watts Classification de l équipement nécessaire à la mise sous tension ampères Diamètre pouces de l ouverture de connexion de la cuisinière 120 240 volts 3 fils Cordon d alimentation Gaine 8750 16500 40 ou 50 A 13 8 11 8 Français canadien 6 Manual Installation_30 Oven_SECA_DG68 00109F 08_EN CFR indb 6 9 6 2018 6 ...

Page 19: ...rnier Les câbles d alimentation doivent être connectés aux bornes inférieures gauches et inférieures droites du bornier 1 Retirez les 3 vis de la borne inférieure du bornier 2 Insérez les 3 vis de la borne dans les bornes inférieures du bornier en passant par chacun des anneaux de la borne du cordon d alimentation Assurez vous que le fil central blanc neutre est relié à l emplacement central infér...

Page 20: ... à la terre du cordon d alimentation en passant par la plaque de masse puis dans le bâti de la cuisinière 4 Insérez les 3 vis de la borne retirées précédemment dans les bornes inférieures du bornier en passant par chacun des anneaux de la borne du cordon d alimentation Assurez vous que le fil central blanc neutre est relié à l emplacement central inférieur du bornier Serrez fermement les vis dans ...

Page 21: ...é Les fils utilisés les emplacements les jonctions de fils etc doivent être conformes aux bonnes pratiques de câblage et aux codes locaux 1 Desserrez les 3 vis de la borne inférieure du bornier 2 Insérez l extrémité du fil nu blanc neutre central dans l emplacement inférieur central de l ouverture du bornier Sur certains modèles le fil devra être inséré dans l ouverture du conducteur de terre puis...

Page 22: ...emplacement inférieur central de l ouverture du bornier 5 Insérez les deux extrémités de fil nu latérales dans les ouvertures inférieure gauche et inférieure droite du bornier 6 Serrez les vis jusqu à fixation complète du fil 35 à 50 pouce livre Ne serrez pas excessivement les vis sous peine d endommager les fils 7 Reportez vous à l étape 5 et procédez à l installation Conducteur de terre Plaque d...

Page 23: ...ment 21 32 16 5 mm REMARQUE desserrez le pied de mise à niveau pour installer le support anti basculement Un dégagement minimum de 21 32 16 5 mm est nécessaire entre le dessous de la cuisinière et le sol de la cuisine 1 Déterminez l emplacement du support à l aide du modèle Le support anti basculement est fourni avec un modèle Les consignes comportent les informations nécessaires à l installation ...

Page 24: ...SE AU POINT DE L INSTALLATION Placez la cuisinière suffisamment près de l ouverture pour permettre le branchement de la prise Positionnez la cuisinière en vous assurant que le pied arrière gauche ou arrière droit se place sous le support anti basculement La distance entre la cuisinière et le mur doit être de 0 lorsque cette dernière est correctement installée Inclinez avec précaution la cuisinière...

Reviews: