background image

NX24BG45411V**
NX24BG35411V**

Summary of Contents for NX24BG45411V Series

Page 1: ...NX24BG45411V NX24BG35411V...

Page 2: ...instructions Safety precautions 3 Before installing 5 Applicance 5 Guideline for ventilation 7 Installation 8 Electrlcal connection 10 Gas connection 11 Converting the gas type 14 Hotplate burners 14...

Page 3: ...nversion to a different type of gas must be undertaken by an authorised expert and carried out in accordance with the currently applicable rules and regulations of the local gas and electricity supply...

Page 4: ...accidents CAUTION The use of a gas cooking appliance results in the production of heat moisture and products of combustion in the room in which it is installed Ensure that the kitchen is well ventilat...

Page 5: ...recommend that you write down the product information here or keep the additional label included with appliance Keep the surroundings of the cooking appliance free of combustible materials fuel or oth...

Page 6: ...nce and the guidelines for ventilation Check the condition of the appliance after unpacking it Do not connect the appliance if it has been damaged in transport Dispose of packaging in an environmental...

Page 7: ...on the top of the gas range the distance could be more than 457mm 2 leave at least 20mm from the back side left side and right side of the oven to the cabinet or any other containers 3 The oven feet m...

Page 8: ...as follows 1 Tilt the appliance by raising one side slightly from the floor 2 With the plates in position screw the adjustable feet into the mounting holes on the underneath of the appliance 3 Repeat...

Page 9: ...ccessory bag 2 The short side of the oil pan is located in the front of the oven put it down horizontally as shown below cover the bake burner and make sure there is no shaking around EN 9 NX24BG45411...

Page 10: ...rating plate The rating plate can be found on the inside of the storage compartment flap Ensure that the power supply is properly earthed and that the fuse and the wiring and piping system in the bui...

Page 11: ...fitting must be carried out professionally according to the currently applicable standards Connecting pieces Description LPG corrugated tube union and seal The burners are set up for G30 liquefied gas...

Page 12: ...1 Use the equipment specified in the figure below to connect the range Supply tube built In COupllng and C oppertube with Y i to the range Nipple of NPT oonical washers that hasthe length ______ 4 CT...

Page 13: ...an 70 C above room temperature Ensure that the full length ofthe hoses are accessible for inspection The installation of a safety valve for opening and closing the gas supply is a compulsory requireme...

Page 14: ...on manual In order to convert to a different type of gas the nozzles must be replaced and the low flame and primary air may have to be adjusted Proceed as follows A B C D A B C Remove the pan supports...

Page 15: ...nd replace it with a nozzle which is suitable for the new type of gas see General nozzle table section Replace the gas label with the new label that was supplied with the nozzle set To reassemble foll...

Page 16: ...the front of the oven burner and pull the burner downwards and towards the front slightly Unscrew the nozzle and replace it with a nozzle which is suitable for the new type of gas see General nozzle t...

Page 17: ...2 80 2 80 10 080 kJ h 10 080 kJ h 68 97 1 75 1 75 6 300 kJ h 6 300 kJ h 53 72 1 00 1 00 3 600 kJ h 3 600 kJ h 72 100 2 20 2 20 7 920 kJ h 7 920 kJ h Semi Rapid burner LR RR Auxiliary RF EN 17 kW NX24...

Page 18: ...25 20 32 34 36 Instructions for door care 19 38 EN 18 26 29 28 30 35 41 36 36 40 NX24BG45411V NX24BG45411V NX24BG45411V NX24BG35411V NX24BG35411V NX24BG35411V...

Page 19: ...ase pass on these manuals and accessories to the new owner if you sell the appliance Check the appliance for damage after unpacking it Do not connect the appliance ifit has been damaged in transport H...

Page 20: ...he oven is working Risk of burns Never touch the burners the surfaces of the cooking compartment the heating elements or the oven steam outlets when they are hot Children must be kept at a safe distan...

Page 21: ...rs in unventilated rooms Cooking with gas burners releases extra heat and moisture During prolonged cooking and baking times switch on the extractor hood or make sure that the area is well ventilated...

Page 22: ...y use the burners if cookware is placed on them Do not heat empty pots or pans This will damage the pan base Do not allow saucepans to boil dry in particular enamel and aluminium saucepans The pan bas...

Page 23: ...to a hot oven This will damage the enamel When making very moist fruit flans do not put too much on the baking tray Fruit juice dripping from the baking tray leaves stains that cannot be removed Do no...

Page 24: ...Your new appliance The control panel Get to know your appliance You will find information about the control panel and hob as well as the oven types of heating and accessories EN 24 NX24BG45411V...

Page 25: ...meter Semi Rapid burner 12 20 cm Rapid burner 20 23 cm Adjust the heat setting of the gas burners using the control knobs The symbol above the control knob shows you to which gas burner the control kn...

Page 26: ...ting 0 250 Meaning Off Oven gas burner on temperature range in C There is a limit stop between settings 250 and 0 Do not turn the knob beyond this point Setting _o Meaning The oven lighting on Sparkin...

Page 27: ...EN 27...

Page 28: ...Your new appliance The control panel Get to know your appliance You will find information about the control panel and hob as well as the oven types of heating and accessories EN 28 NX24BG35411V...

Page 29: ...meter Semi Rapid burner 12 20 cm Rapid burner 20 23 cm Adjust the heat setting of the gas burners using the control knobs The symbol above the control knob shows you to which gas burner the control kn...

Page 30: ...er Setting 0 Meaning Off Oven gas burner on temperature range in C There is a limit stop between settings and 0 Do not turn the knob beyond this point Setting Meaning The oven lighting on Sparking Kee...

Page 31: ...EN 31...

Page 32: ...1 Press the ignitor button 2 Press the knob 3 Turn the knob to desired positon 4 Loose the ignitor button when fires appeared 5 Loose the knob when the fire goes steady EN 32...

Page 33: ...EN 33 NX24BG45411V...

Page 34: ...rol knob pressed for a few seconds with pushing the sparking button until the flame has stabled Then carefully close the appliance door 3 Set the required temperature using the control knob Do not tur...

Page 35: ...RILL Keep the control knob pressed for a few seconds with pushing the sparking button until the flame has stabilized 3 Carefully close the appliance door 4 Do not tum the knob beyond this setting When...

Page 36: ...EN 36 NX24BG45411V...

Page 37: ...cloth Remove the burner cups and lids use soapy water allow to dry well Clean the ignition plugs with a damp cloth or a small soft brush allow lo dry well When refitting Place the burner cup onto the...

Page 38: ...OR FORCED IT MAY WEAKEN ITS STRUCTURE WHICH WOULD INCREASE DAMAGE RISK IN THE FUTURE DO NOT REACH INSIDE THE HINGE Proceed as follows Open the appliance door 2 Lift up the locking levers on both side...

Page 39: ...ooves engage on both sides 4 5 Open the appliance door Fold in the locking levers on both sides 6 Close the appliance door 4 5 6 Grip the door on either side with both hands Close the appliance door a...

Page 40: ...The oven may smoke or emit an odor when you use it for the first time The smoke and or odor will disappear after the first operation EN 40...

Page 41: ...G9 EN 41 120 130V...

Page 42: ...00 12 72 COLOMBIA Sin costo en todo el pais 018000112 112 www samsung com co support Vdesdetu celular 726 COSTA RICA 00 800 1 SAMSUNG 726 7864 DOMINICAN REPUBLIC 1 809 200 7264 ECUADOR 1 800 SAMSUNG 7...

Page 43: ...Cocina a gas NX24BG45411V NX24BG35411V...

Page 44: ...es de instalaci6n Precauclones de segurldad 3 Antes de la instalaci6n 6 6 Guia de ventilaci6n 7 lnstalaci6n 8 Conexlones electrlcas 1o Conexiones de gas 11 Conversi6n del tipo de gas 14 Quemadores 14...

Page 45: ...cocina cocina cocina cocina cocina las hornillas ES 3...

Page 46: ...cocina No se pueden usar protectores de hornillas ya que cocina cocina cocina cocina cocina cocina ES 4...

Page 47: ...cocina cocina ES 5 cocina cocina...

Page 48: ...Cocina cocina cocina cocina cocina ES 6 595 mm 900 mm With feet 20 mm 565 mm 4 6 mm 559mm 6...

Page 49: ...horno incluyendo el embudo y las salidas de gas Instalaci n de cocina de gas 1 Deje al menos 762 mm entre las hornillas de la cocina y cualquier gabinete y o cualquier otro contenedor 2 Deje al menos...

Page 50: ...le las patas ajustables en los orificios de montaje en la parte inferior del aparato 3 Repita el proceso en el otro lado Puede realizar los ajustes finales en los pies para nivelar el aparato una vez...

Page 51: ...de la bolsa de accesorios del horno 2 El lado corto de la bandeja de aceite se encuentra en la parte delantera del horno col quelo horizontalmente como se muestra a continuaci n cubra el quemador de h...

Page 52: ...cocina cocina cocina ES 10...

Page 53: ...L cocina cocina cocina cocina cocina cocina cocina ES 11...

Page 54: ...Conexi n tipo 2 Proporcionado por la compa ia de gas ES 12...

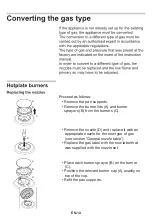
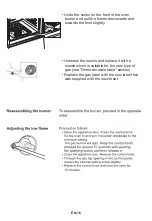
Page 55: ...habitaci n pertinente y la parte superior de la cocina ES 13...

Page 56: ...uirla por una boquilla adecuada al nuevo tipo de gas ver apartado Tabla general de boquillas Reemplace la etiqueta de gas con la nueva etiqueta que se suministr con el juego de boquillas Coloque cada...

Page 57: ...ituirla por una boquilla adecuada para el nuevo tipo de gas ver apartado Tabla general de boquillas Reemplace la etiqueta de gas con la nueva etiqueta que se suministr con el juego de boquillas Para v...

Page 58: ...parte delantera del quemador del horno y tire del quemador hacia abajo y hacia el frente ligeramente Desenroscar la boquilla y sustituirla por una boquilla adecuada para el nuevo tipo de gas ver apart...

Page 59: ...080 kJ h 10 080 kJ h 97 1 75 1 75 6 300 kJ h 6 300 kJ h 72 1 00 1 00 3 600 kJ h 3 600 kJ h 100 2 20 2 20 7 920 kJ h 7 920 kJ h 85 68 53 72 Quemador semirr pido LR RR Auxiliar RF Quemador de horno bajo...

Page 60: ...amiento de los quemadores cocina 20 19 Instrucciones para el cuidado de la puerta ES 18 25 32 34 36 38 26 29 28 30 35 41 36 36 40 NX24BG45411V NX24BG45411V NX24BG45411V NX24BG35411V NX24BG35411V NX24B...

Page 61: ...asegurese de facilitar1e estos manuales y accesorios al nuevo propietario Compruebe si la cocina presenta datios tras desembalar1a No conecte la cocina si ha resultado datiada durante el transporte A...

Page 62: ...Abra la puerta del horno con cuidado Abra la cubierta de vidrio ES 20...

Page 63: ...interruptor ES 21...

Page 64: ...recipientes Tenga cuidado de no co ci n a Al utilizar la cocina la cubierta de vidrio debe estar abierta romper la cubierta de vidrio de la cocina ES 22...

Page 65: ...el interior del horno con papel aluminio No coloque el utensilio de cocci n o de horneado en la parte inferior del horno ya que el calor se acumular y los tiempos No se pare ni se siente sobre la puer...

Page 66: ...Bot n de encendido electr nico sobre el panel de control y la mesa Cubierta de vidrio Mesa O cocina ES 24 NX24BG45411V...

Page 67: ...de sartenes y ollas Quemador semirrapido 12 20cm Quemador rapido 20 23cm Regule el ajuste de calor de los quemadores de gas con la perilla Quemador semirr pido Quemador r pido Quemador auxiliar ES 25...

Page 68: ...Bot n de encendido Quemador de horno ES 26 NX24BG45411V...

Page 69: ...Rejilla de asado y horneado ES 27...

Page 70: ...ES 28 sobre el panel de control y la mesa cocina NX24BG35411V Cubierta de vidrio Mesa O Bot n de encendido electr nico...

Page 71: ...de sartenes y ollas Quemador semirrapido 12 20cm Quemador rapido 20 23cm Regule el ajuste de calor de los quemadores de gas con la perilla Quemador semirr pido Quemador r pido Quemador auxiliar ES 29...

Page 72: ...Bot n de encendido Quemador de horno ES 30 NX24BG35411V 1 4 4...

Page 73: ...Rejilla de asado y horneado ES 31...

Page 74: ...pa de los quemadores est situada 1 Presione el bot n de chispa 2 Presione y gire la perilla hacia la intensidad de fuego 3 Suelte el bot n de chispa y la perilla cuando la hornilla f sforo deseada est...

Page 75: ...Grill ES 33 NX24BG45411V...

Page 76: ...la perilla utiliza No lo gire m s all de 140 de lo contrario el quemador del horno se apagar ES 34...

Page 77: ...puerta del horno debe permanecer cerrada durante el funcionamiento del grill horno ES 35 NX24BG45411V...

Page 78: ...Encienda la luz presionando el bot n ubicado en el panel frontal No utilice productos de limpieza que contengan sustancias abrasivas cidos o accesorios de limpieza como ES 36 NX24BG45411V...

Page 79: ...Parillas del horno No limpie los quemadores de gas del compartimento de cocci n usted mismo cocina cocina cocina ES 37...

Page 80: ...la limpieza A B NO CIERRE LA PUERTA DEL HORNO HASTA QUE TODAS LAS REJILLAS EST N COLOCADAS CORRECTAMENTE NO GOLPE EL VIDRIO CON LA UTENSILIO O CUALQUIER OTRO OBJETO SI EL VIDRIO SE RAYA GOLPE VIBRA O...

Page 81: ...bisagras encajen en ambos lados 4 5 Abra la puerta del aparato Doble las palancas de bloqueo en ambos lados 6 Cierre la puerta del aparato 4 5 6 Sujete la puerta por ambos lados con ambas manos Cierr...

Page 82: ...El horno puede emitir olores o humos cuando se utiliza por primera vez Tras el primer funcionamiento el humo y los olores desaparecer n antes de comunicarse con el servicio postventa cocina cocina coc...

Page 83: ...interruptor interruptor G9 n or h o Retire la cubierta de cristal de la bombilla dentro del horno gir ndola hacia cocina ES 41 120 130V...

Page 84: ...BIA Bogota en el 600 12 72 Sin costc en todo el www samsung com co support pais 018000112 112 Y desde tu celular 726 COSTA RICA 00 800 1 SAMSUNG 726 7864 REPUBLICA 1 809 200 7264 DOMINICANA ECUADOR 1...

Reviews: