background image

Plasma TV

user manual

imagine the possibilities

Thank you for purchasing this Samsung product. 

To receive more complete service, please register 

your product at

http://www.samsung.com/sec/

Model _____________ Serial No. _____________

[BOOK-PC7000]Web Manual-Eng.indb   1

2010-06-21   오전 10:31:30

Summary of Contents for PN50C7000YFXZA

Page 1: ...lities Thank you for purchasing this Samsung product To receive more complete service please register your product at http www samsung com sec Model______________Serial No ______________ BOOK PC7000 Web Manual Eng indb 1 2010 06 21 오전 10 31 30 ...

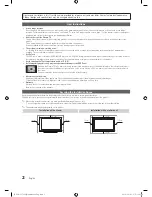
Page 2: ...ese pixels will have no impact on the performance of the product Avoid operating the TV at temperatures below 41 F 5 C A still image displayed too long may cause permanent damage to the PDP Panel Watching the Plasma TV in 4 3 format for a long period of time may leave traces of borders displayed on the left right and center of the screen caused by the difference of light emission on the screen Pla...

Page 3: ... 24 Picture In Picture PIP 25 y y Support Menu 26 Advanced Features y y Network Connection 27 Connecting to a Wired Network 27 Connecting to a Wireless Network 29 Using Data Service 33 y y Media Play 34 Connecting a USB Device 34 Connecting to your PC through a network 34 Screen Display 36 Playing the Multiple Files 41 Media Play Additional Function 41 y y Anynet 43 Setting Up Anynet 44 Switching ...

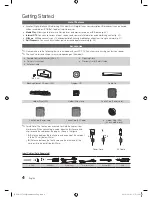
Page 4: ...dealer The items colors and shapes may vary depending on the models y y Remote Control Batteries AAA x 2 y y Owner s Instructions y y Antenna Cable y y Cleaning Cloth y y Warranty Card Safety Guide Blanking Bracket Screw 1EA Program CD Cable Tie Holder Wire 3EA Holder Wire stand Ferrite Core Power cord Ferrite Core Power cord Ferrite Core AV Cable y y Holder Ring 4EA 63 inch model only Ferrite Cor...

Page 5: ...d use the ENTERE button on the remote control 메뉴m Displays an on screen menu the OSD on screen display of your TV s features 음량 Adjusts the volume In the OSD use the 음량 buttons as you would use the and buttons on the remote control 채널 Changes the channels In the OSD use the 채널 buttons as you would use the and buttons on the remote control P Power Turns the TV on or off Standby mode Do not leave yo...

Page 6: ...creen menu items and changes the values seen on the menu Exits the menu 멀티미디어 Displays Media Play p 34 방송안내 Displays the EPG Electronic Program Guide 3D Sets the 3D mode p 19 선호채널 Displays Favorite Channel Lists on the screen p 14 화면크기 Selects the picture size p 18 Data Service button Use it when you use Data broadcasting services p 33 Press to directly access channels Press to select additional c...

Page 7: ...n y y Select the Home Use mode Store Demo mode is for retail environments y y To return the unit s settings from Store Demo to Home Use standard Press the volume button on the TV When you see the volume OSD press and hold 메뉴 for 5 sec 3 Selecting a channel Press the l or button then press the ENTERE button For more information for more information refer to Channel Auto Program p 14 Press the ENTER...

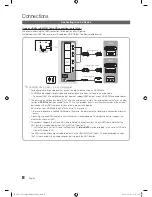
Page 8: ...t the HDMI version and if out of date request an upgrade x x Be sure to use an HDMI cable with a thickness of 14 mm or less Be sure to purchase a certified HDMI cable Otherwise the picture may not display or a connection error may occur x x A basic high speed HDMI cable or one with ethernet is recommended This product does not support the ethernet function via HDMI x x This product supports the 3D...

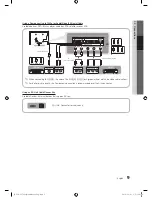
Page 9: ...mponent connection is recommended over the A V connection Using an EX Link Cable Connection Available Devices External devices that support EX Link EX LINK Connector for service only R G B W R W R R G B Y Y W R W R AUDIO OUT R AUDIO L PR PB Y COMPONENT OUT AUDIO OUT R AUDIO L VIDEO OUT Y W R R G B W R Device Device Red White Red White Yellow Red Blue Green Video Cable Not Supplied Component Cable ...

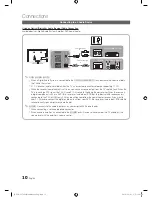
Page 10: ...igital component such as a DVD Blu ray player cable box STB Set Top Box satellite receiver and is connected to the TV via HDMI only 2 CH audio will be heard from the home theater receiver If you want to hear 5 1 CH audio connect the digital audio out jack from your DVD Blu ray player cable box STB satellite receiver directly to an amplifier or home theater 음성출력 Connects to the audio input jacks on...

Page 11: ...1440 x 900 1440 x 900 1680 x 1050 31 469 37 861 37 500 37 879 48 077 46 875 48 363 56 476 60 023 67 500 63 981 79 976 45 000 49 702 62 795 60 000 47 712 55 935 70 635 65 290 59 940 72 809 75 000 60 317 72 188 75 000 60 004 70 069 75 029 75 000 60 020 75 025 60 000 59 810 74 934 60 000 60 015 59 887 74 984 59 954 25 175 31 500 31 500 40 000 50 000 49 500 65 000 75 000 78 750 108 000 108 000 135 000...

Page 12: ... should set the TV to DVI PC or DVI Devices mode under Edit Name 57 ᇡ ಆ Basic Features How to Navigate Menus Before using the TV follow the steps below to learn how to navigate the menu and select and adjust different functions 4 1 2 3 ມ ၙॵᨕ ႊᘂ ᦩԕ ໕ Ⓧʑ ᖁ ձ 3D e ີ ە ᅖȡ ഭ ᱶᅕ ᯙ 채널관리 메뉴 ך A B C D 1 메뉴 button Displays the main on screen menu 2 ENTERE Direction button Move the cursor and select an item ...

Page 13: ...list of programs to be broadcasted after 2 hours 4 Blue Exit Exits the guide 5 Information Displays details of the selected program 6 ENTERE button When selecting the current program you can watch the selected program When selecting the future program you can reserve to watch the selected program To cancel he schedule press the ENTERE button again and select Cancel Schedules 9 1 KBS1 HD Guide DTV ...

Page 14: ...nel selected A channel set as a Favorite A reserved Program Using Favorite Channels O O 메뉴m Channel Channel List ENTERE Add to Favorite Delete from Favorite T Set channels you watch frequently as Favorites 1 Select a channel and press the 간편메뉴 button 2 Add or delete a channel using the Add to Favorite or Delete from Favorite menu respectively To show all Favorite channels click on the button shown...

Page 15: ...ur remote to enter the date and time If you selected Once Every Week or Everyday in Repeat you can enter the date you want 4 Select OK then press the ENTERE button when done NOTE x x Only memorized channels can be reserved x x Reserved programs will be displayed in the Programd menu x x When a digital channel is selected press the button to view the digital program Timer Recording digital channels...

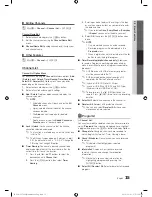
Page 16: ...o the TV Economical Solutions The Eco Function can be used to enhance your power savings Eco Solution O O 메뉴m Picture Eco Solution ENTERE Energy Saving Off Low Medium High Picture Off Auto This adjusts the brightness of the TV in order to reduce power consumption If you select Picture Off the screen is turned off but the sound remains on Press any button except the volume button to turn on the scr...

Page 17: ...erval Select interval to adjust Red Adjust the red level Green Adjust the green level Blue Adjust the blue level Reset Resets the 10p White Balance to its default settings Flesh Tone Emphasize pink Flesh Tone Edge Enhancement Off On Emphasize object boundaries xvYCC Off On Setting the xvYCC mode on increases detail and color space when watching movies from an external device e g BD DVD player conn...

Page 18: ...m signals from all sources and adjusts the picture for optimum quality An 1080p 24Hz HDMI signal must be input to use the Cinema Smooth function Available in TV AV COMPONENT 480i 1080i and HDMI 480i 1080i Motion Judder Canceller Off Standard Smooth Demo Removes drag from fast scenes with a lot of movement to provide a clearer picture If Motion Judder Canceller is Demo you can compare the differenc...

Page 19: ...the emitter and 3D Active Glasses the proper 3D effect may not be obtained 3D Mode Select the 3D input format If you want to feel the 3D effect fully please wear the 3D Active Glasses first and then select 3D Mode from the list below that provides the best 3d viewing experience When watching 3D images turn on 3D Active Glasses 3D Mode Operation Off Turns the 3D function off 2D 3D Changes a 2D imag...

Page 20: ...rmat Standard HDMI 1 4 3D 1920x1080p 24Hz x 2 1920x2205p 24Hz 1280x720p 60Hz x 2 1280x1470p 60Hz The mode is automatically switched to 3D in one of the source signal formats above For the Standard HDMI 3D format with 24Hz the TV is optimized as follows Judder Reduction Display Mode When Auto Motion Plus is set to Smooth or Custom you can watch a smooth picture without judder Before using 3D functi...

Page 21: ...r button to adjust the Horizontal Position Image Reset Resets the image to default settings Using Your TV as a Computer PC Display Setting Up Your PC Software Based on Windows XP Depending on the version of Windows and the video card the actual screens on your PC will probably look different but the same basic set up information will apply in most cases If not contact your computer manufacturer or...

Page 22: ...Auto Volume Off Normal Night To equalize the volume level on each channel set to Normal Night This mode provides an improved sound experience compared to Normal mode making almost no noise It is useful at night Speaker Select External Speaker TV Speaker A sound echo may occur due to a difference in decoding speed between the main speaker and the audio receiver In this case set the TV to External S...

Page 23: ...er 2 Timer 3 Three different on off timer settings can be made You must set the clock first On Time Off Time Set the hour minute and activate inactivate To activate the timer with the setting you ve chosen set to Activate Volume Set the desired volume level Source Select TV or USB content to be played when the TV is turned on automatically USB can be selected only when a USB device is connected to...

Page 24: ...ignal is supplied from an external device to the TV Depending on the broadcasting signal the Analog Caption function may or may not work with digital channels Default Service1 Service6 digital channels only The Digital Captions function works with digital channels Service1 6 may not be available in digital caption mode depending on the broadcast Digital Caption Options digital channels only Size O...

Page 25: ...ff Low Medium High Set so that a melody plays when the TV is turned on or off Melody is disabled when FastStart is On FastStart Off On When the TV is powered on the screen will come on quickly with this feature Wireless Remote Control Off On Turn on off or give permission to Samsung mobile phones devices You must have a Samsung Mobile phone device which supports Wireless Remote Control For more de...

Page 26: ... by network connection or downloading the latest firmware from www samsung com to a USB memory device Current Version the software already installed in the TV Software is represented as Year Month Day_Version Installing the Latest Version By USB Insert a USB drive containing the firmware upgrade file downloaded from www samsung com into the TV Please be careful not to disconnect the power or remov...

Page 27: ...t Configuration Protocol DHCP Modems and routers that support DHCP automatically provide the IP address subnet mask gateway and DNS values your TV needs to access the Internet so you don t have to enter them manually Most home networks are Dynamic Networks Some networks require a Static IP address If your network requires a Static IP address you must enter the IP address subnet mask gateway and DN...

Page 28: ...s a Static IP address Getting the Network Connection Values To get the Network connection values on most Windows computers follow these steps 1 Right click the Network icon on the bottom right of the screen 2 In the pop up menu that appears click Status 3 On the dialog that appears click the Support tab 4 On the Support Tab click the Details button The Network connection values are displayed How t...

Page 29: ...ice nearby this will result in interference and communication failure x x If you apply a security system other than the systems listed below it will not work with the TV x x If you select the Pure High throughput Greenfield 802 11N mode and set your AP s Security Encryption type to WEP TKIP or TKIPAES WPS2Mixed your Samsung TV will not support the connection in compliance with new Wi Fi certificat...

Page 30: ...lso choose one of the other connection setup methods PBC WPS auto or manual 5 Place the AP in a desired location If the AP settings change or you install a new AP you must perform the Samsung Auto Configuration procedure again beginning from Step 1 Network Setup PBC WPS How to set up using PBC WPS If your router has a PBC WPS button follow these steps 1 Connect your TV to Samsung Wireless LAN Adap...

Page 31: ...on To delete the last letter or number you entered press the Green button on your remote 9 When done press the Blue button on your remote The Network Connecting screen appears 10 Wait until the connection confirmation message is displayed and then press the ENTERE button The Network Setup screen re appears 11 To test the connection press the 복귀 button to select Network Test and then press the ENTE...

Page 32: ... Samsung Wireless Link This function lets you connect your TV to a Samsung device router etc that supports PBC WPS You can connect the TV to the device even if a sharer is not connected to the TV For the TV to use Internet TV the AP access point must be connected to the wireless network If a Samsung Wireless Lan Adapter is connected to the USB 2 port the network may not operate normally We recomme...

Page 33: ...ion may vary depending on broadcast While using data service changing the channel using the numeric buttons may not be possible depending on the service 1 Press the button Select a desired service by pressing the and ENTERE buttons If Auto Run Data Service is On the data service will automatically run with loading banner In this case the button does not work 2 Press the red button The data service...

Page 34: ...C in same subnet The first 3 parts of the subnet address of the TV and the PC IP addresses should be the same and only the last part the host address should be changed e g IP Address 123 456 789 2 Using a LAN cable connect between the external modem and the PC onto which the Samsung PC Share Manager Program will be installed You can connect the TV to the PC directly without connecting it through a...

Page 35: ...dicated port USB 1 HDD port x x Do not disconnect the USB device while it is loading x x The higher the resolution of the image the longer it takes to display on the screen x x The maximum supported JPEG resolution is 15360X8640 pixels x x For unsupported or corrupted files the Not Supported File Format message is displayed x x If the files are sorted by Basic View up to 1000 files can be displaye...

Page 36: ...g this feature When the Timeshift Mode is set to Auto the TV stores the channel you watch currently to record automatically When the Timeshift Mode is set to Manual if you press the Play button the TV stores the channel from the point of view you want to record Movie 01 avi 1 1 page Videos Movie 01 2010 01 10 Movie 03 2010 01 12 Movie 02 2010 01 16 Movie 04 2010 01 16 Movie 05 2010 01 12 SUM Selec...

Page 37: ...may appear in front of the application window indicating that the recording or the Timeshift Mode function is closed x x Timeshift Mode function is not supported for analog channels x x The recording and the Timeshift Mode functions are disabled for channels locked with Child Lock x x If the USB device has failed the Device Performance Test the USB device must go through the Device Format and Devi...

Page 38: ...i mkv AVI MKV Divx 3 11 4 x 5 1 6 0 1920x1080 6 30 8 MP3 AC3 LPCM ADPCM DTS Core XviD 1920x1080 6 30 8 H 264 BP MP HP 1920x1080 6 30 25 MPEG4 SP ASP 1920x1080 6 30 8 Motion JPEG 800x600 6 30 8 asf ASF Divx 3 11 4 x 5 1 6 0 1920x1080 6 30 8 MP3 AC3 LPCM ADPCM WMA XviD 1920x1080 6 30 8 H 264 BP MP HP 1920x1080 6 30 25 MPEG4 SP ASP 1920x1080 6 30 8 Motion JPEG 800x600 6 30 8 wmv ASF Window Media Vide...

Page 39: ...2050Hz mono is not supported Playing recorded TV or movie file continuously Resume Play If you exit the playing Recorded TV or Videos function it can be played later from the point where it was stopped If you press the ENTERE button Chaptering during playing the file you can explore scene divided into 5 chapters you want If the index information is damaged or unsupported you will not be able to us...

Page 40: ...usic page Playing My Playlist Select the My Playlist folder and it will play automatically Press the or button to select a different music file within the playlist Photos Viewing a Photo or Slide Show 1 Press the or button to select Photos then press the ENTERE button in the Media Play menu 2 Press the button to select the desired file in the file list 3 Press the ENTERE button or Play button Whil...

Page 41: ...Music Photos Basic View Displays whole folder You can view the file list by selecting the folder Title Sorts and displays the file title in Symbol Number Alphabet Special order Preference Sorts and displays the file by preference You can change the file preference in the file list section using the Green button Latest Date Sorts and shows files by latest date Earliest Date Sorts and shows files by...

Page 42: ... can set and select background music when watching a slide show Zoom You can zoom into images in full screen mode Rotate You can rotate images in full screen mode Home Background You can move the file to the Media Play desktop Information You can see detailed information about the played file Settings Using the Setup Menu Background Setting Select to display the background you want Continuous Movi...

Page 43: ...HDMI 입력 2 ARC port and can only be operated when the TV is connected to an audio receiver that supports the ARC function x x When following the connection above the Optical jack only outputs 2 channel audio You will only hear sound from the Home Theater s Front Left and Right speakers and the subwoofer If you want to hear 5 1 channel audio connect the 디지털 음성출력 옵티컬 jack on the DVD Satellite Box i e...

Page 44: ...et HDMI CEC Off On To use the Anynet Function Anynet HDMI CEC must be set to On When the Anynet HDMI CEC function is disabled all the Anynet related operations are deactivated Auto Turn Off No Yes Setting an Anynet Device to turn off automatically when the TV is turned off If Auto Turn Off is set to Yes running external devices will turn off at the same time as the TV powers off However a device m...

Page 45: ... device list The receiver will work when you have properly connected the optical in jack of the receiver to the 디지털 음성출력 옵티컬 jack of the TV When the receiver i e Home Theater is set to On you can hear sound output from the TV s Optical jack When the TV is displaying a DTV air signal the TV will send out 5 1 channel sound to the receiver When the source is a digital component such as a DVD and is c...

Page 46: ...nge the TV mode Note that the channel button operates only when a tuner embedded Anynet device is not connected The message Connecting to Anynet device appears on the screen You cannot use the remote control when you are configuring Anynet or switching to a view mode Use the remote control when the Anynet setting or switching to view mode is complete The Anynet device does not play You cannot use ...

Page 47: ...rom the web to your TV O 메뉴m Application Content View Internet TV ENTERE Recommended Applications Displays the recommended service by Samsung You are not able to add or delete a service in this list Downloaded Applications Displays the downloaded applications through the Samsung Apps Application service You can experience various service by provided samsung Internet TV Settings Edit and configure ...

Page 48: ...plication on Internet TV must be downloaded to use this feature Depending on your country Ticker application may have a different service or not be supported Channel Bound Service Off On Some channels support applications as an Internet data service allowing you to access the Internet service while watching TV Only available if supported by the broadcaster Change the Service Lock password The defa...

Page 49: ...hen done press the ENTERE button 5 Using the number buttons enter the User account and Password x x Password must be numbers only x x You can delete the entered character using the 이전채널 button x x Using the REW or μ FF button you can select icon you want to enter in icon keypad screen 6 Account created You can use the services provided by all users of your Samsung TV with a single login by linking...

Page 50: ...shows and short length videos y y Sports Displays various sports media such as match information images and short length video y y Game Displays various games such as sudoku and chess y y Lifestyle Includes various lifestyle media services such as music personal photo management tools and social networking such as Facebook and Twitter y y Information Includes various information services such as n...

Page 51: ...Message Media or ScreenShare function The Media function is available in all mobile devices which support AllShare Allowed Denied Allows Blocks the mobile phone Delete Deletes the mobile phone from the list This function only deletes the name of the mobile from the list If the deleted mobile device is turned on or trys to connect to the TV it may appear on the list again Using the Message Function...

Page 52: ...For more detail information refer to Media Play p 34 Using ScreenShare Function Using ScreenShare you can browse various web contents provided by the mobile phone For example the image below displays an access page for contents on a mobile You can read the mobile s files and view the phone book and calendar on the TV Also in the phone book you can make a call to another person or send to SMS NOTE ...

Page 53: ...nformation Assembling the Cables Stand Type 3 1 2 1 2 3 Wall Mount Type Do not pull the cables too hard when arranging them This may cause damage to the product s connection terminals BOOK PC7000 Web Manual Eng indb 53 2010 06 21 오전 10 32 09 ...

Page 54: ...t in severe personal injury NOTE x x Standard dimensions for wall mount kits are shown in the table below x x When purchasing our wall mount kit a detailed installation manual and all parts necessary for assembly are provided x x Do not use screws that do not comply with the VESA standard screw specifications x x Do not use screws that are longer than the standard dimension or do not comply with t...

Page 55: ...50 400 x 400 M8 4 58 63 600 x 400 70 79 800 x 400 80 1400 x 800 Unscrew the hole around before installing Wall Mount on the wall Do not install your Wall Mount Kit while your TV is turned on It may result in personal injury due to electric shock BOOK PC7000 Web Manual Eng indb 55 2010 06 21 오전 10 32 11 ...

Page 56: ...supplied please purchase these additionally 2 Remove the screws from the back center of the TV put the screws into the clamps and then fasten the screws onto the TV again Screws may not be supplied with the product In this case please purchase the screws of the following specifications 3 Connect the clamps fixed onto the TV and the clamps fixed onto the wall with a strong cable and then tie the st...

Page 57: ...on Energy Saving p 16 Try resetting the picture to view the default picture settings go to 메뉴 Picture Picture Reset p 21 There is a dotted line on the edge of the screen If the picture size is set to Screen Fit change it to 16 9 p 18 Change cable satellite box resolution The picture is black and white If you are using an AV composite input connect the video cable yellow to the Green jack of compon...

Page 58: ...PC s output resolution so it matches the resolutions supported by the TV p 11 PC is always shown on the source list even if a PC is not connected This is normal PC is always shown on the source list regardless of whether a PC is connected The video is OK but there is no audio If you are using an HDMI connection check the audio output setting on your PC Network Connection The wireless network conne...

Page 59: ...channels from an Antenna RF Coax connection p 26 The TV is tilted to the side Remove the base stand from the TV and reassemble it The channel menu is greyed out unavailable The Channel menu is only available when the TV source is selected Your settings are lost after 30 minutes or every time the TV is turned off If the TV is in the Store Demo mode it will reset audio and picture settings every 30 ...

Page 60: ...generate the registration code locate the DivX VOD section in the device setup menu Go to vod divx com with this code to complete the registration process and learn more about DivX VOD Pat 7 295 673 7 460 688 7 519 274 Open Source License Notice In the case of using open source software Open Source Licenses are available on the product menu Open Source Licence Notice is written only English Specif...

Page 61: ...Tone 17 Frequency 11 H HDMI 8 43 Home Theater 10 43 I Installation Space 2 Internet TV 47 L Language 24 License 60 M Media Play 34 Melody 25 Menu Transparency 25 Mono 22 Music 40 N Navigate 12 Network Connection 27 Network Setup 28 O Optimal resolution 11 P Password 48 Photos 40 Picture Size 18 42 PIP Picture in Picture 25 Plug Play 7 Power Indicator 5 R Receiver 45 Recording 45 Remote Control 6 R...

Page 62: ...This page is intentionally left blank BOOK PC7000 Web Manual Eng indb 62 2010 06 21 오전 10 32 14 ...

Reviews: