background image

ELECTRONICS

P/N. JF68-60860A

01-cover  3/25/98 4:10 PM  Page 1

Summary of Contents for SF-150T

Page 1: ...ELECTRONICS P N JF68 60860A 01 cover 3 25 98 4 10 PM Page 1 ...

Page 2: ...Operator s Guide SAMSUNG FACSIMILE Please read this guide before you use this equipment 0 0 0 0 0 0 0 0 0 0 0 0 0 0 0 0 0 0 0 0 0 0 01 cover 3 25 98 4 10 PM Page 2 ...

Page 3: ...Do not locate your SAMSUNG fax machine where the cords will be abused by persons walking on them 9 Do not overload wall outlets and extension cords as this can diminish performance and may result in the risk of fire or electric shock 10 Do not allow pets to chew on the AC power or telephone cords 11 Never push objects of any kind into your SAMSUNG fax machine through case or cabinet openings as th...

Page 4: ...g to instructions your SAMSUNG fax machine should not cause interference to the types of equipment expected to be found in a normal residential environment Unauthorized changes or modifications could void the userÕs authority to operate the equipment In the event your SAMSUNG fax machine appears to cause interference to other electronic equipment it can often be easily remedied First determine if ...

Page 5: ... may be found on the label located on the bottom or rear of the machine In some instances you may need to provide these numbers to the telephone company RINGER EQUIVALENCE NUMBER The Ringer Equivalence Number REN is a measure of the electrical load placed on the telephone line and is useful for determining whether you have ÒoverloadedÓ the line Installing several types of equipment on the same tel...

Page 6: ...igh incidence of lightning or power surges we recommend that you install surge protectors for both the power and the telephone lines Surge protectors can be purchased from your dealer or telephone and electronic specialty stores When programming emergency numbers and or making test calls to emergency numbers use a non emergency number to advise the emergency service dispatcher of your intentions T...

Page 7: ... Reception Modes 3 5 Receiving in FAX Mode 3 5 Receiving Manually in TEL Mode 3 6 Receiving in AUTO Mode 3 7 Receiving in TAD Mode 3 7 Canceling Reception 3 9 Using an Extension Telephone 3 9 Voice Request 3 10 Sending a Voice Request 3 10 Answering a Voice Request 3 10 Polling 3 11 CHAPTER 4 SPECIAL FEATURES Automatic Dialing 4 1 Storing a Number for One Touch Dialing 4 1 Using the Keypad to Ente...

Page 8: ...ng Jams 5 1 Paper Jams During Transmission 5 1 Paper Jams During Reception 5 2 Cleaning the Roller and Thermal Head 5 4 Purchasing and Storing Paper 5 5 Understanding LCD Error Messages 5 6 Specifications 5 7 2 CONTENTS Ch 1 3 25 98 6 09 PM Page 6 ...

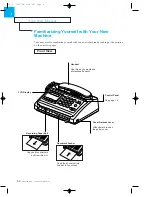
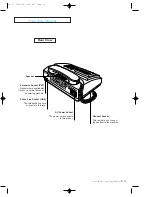
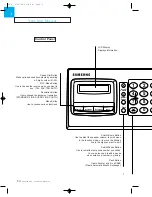
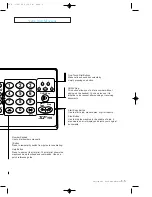
Page 9: ...C h a p t e r O n e YOUR NEW MACHINE Ch 1 3 25 98 6 09 PM Page 7 ...

Page 10: ...dealer CHAPTER ONE YOUR NEW MACHINE 1 1 0 0 0 0 0 0 0 0 0 0 0 0 0 0 0 0 0 0 0 0 0 0 0 0 0 0 0 0 0 0 0 0 0 0 0 0 0 0 0 0 0 0 0 0 0 0 0 0 0 0 0 0 0 0 0 0 0 0 0 0 0 0 0 0 0 0 0 0 0 0 0 0 0 0 0 0 0 Machine Handset Telephone line cord Power cord Coiled Handset cord This manual Quick reference guide Name card Thermal paper roll The power and telephone cords shown in this manual may differ depending on t...

Page 11: ...s on the next few pages Handset Use this as you would use a telephone handset Feed the document into the slot to fax or copy Cover Release Lever Slide upward to open the paper cover Control Panel See page 1 4 Front View 0 0 0 0 0 0 0 0 0 0 0 0 0 0 0 0 0 0 0 0 0 0 LCD Display Document Feeder Recording Paper Exit Copy and fax printouts exit from this slot Ch 1 3 25 98 6 09 PM Page 9 ...

Page 12: ...ket LINE The telephone line cord connects to this jack Handset Socket This is where you connect the handset to the machine 0 0 0 0 0 0 0 0 0 0 0 0 0 0 0 0 0 0 0 0 0 0 0 0 0 0 0 0 0 0 0 0 0 0 0 0 0 0 0 0 0 0 0 0 0 0 0 0 0 Extension Socket EXT Present where applicable Connect a normal phone or answering machine Ch 1 3 25 98 6 09 PM Page 10 ...

Page 13: ... choose the document resolution STANDARD FINE SUPER FINE PHOTO Menu Button Use to choose various functions LCD Display Displays information Scroll Volume Button Use to adjust the speaker volume to scroll menu in the function mode or to move the blinking line to the digit you want to edit Redial Pause Button Use to redial the last phone number you called You can also use it to add a pause when ente...

Page 14: ...o temporarily switch from pulse to tone dialing Help Button Press to print out the Help list The Help list shows the machine s basic functions and commands Use as a quick reference guide Start Copy Button Use to start a job make copies or print reports Stop Button Use to stop the machine in the middle of a job It also clears an error display and ejects your original documents YOUR NEW MACHINE CHAP...

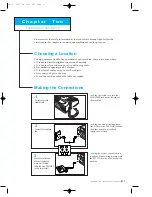
Page 15: ...C h a p t e r T w o INSTALLATION AND SETUP Ch 2 3 25 98 6 11 PM Page 1 ...

Page 16: ...pped Making the Connections CHAPTER TWO INSTALLATION AND SETUP 2 1 1 Connect the coiled handset cord 0 0 0 0 0 0 0 0 0 0 0 0 0 0 0 0 0 0 0 0 0 0 0 0 0 0 0 0 0 0 0 0 0 0 0 0 0 0 0 0 0 0 0 0 0 0 0 0 0 0 0 0 0 0 0 0 0 0 0 0 0 0 0 0 2 Connect the telephone line à Plug the coiled cord into the HANDSET jack on the left side of the machine à Plug one end of the telephone line cord into the TEL LINE jack ...

Page 17: ...ter diameter of the paper roll should not exceed 2 05 in 52mm total length of the paper roll is approximately 98 4ft 30m à If your paper roll is 8 5 in 216mm wide letter size the spacer should be in position ÒAÓ For narrow paper A4 size 8 27 in 210mm place the spacer in position ÒBÓ pushing its pins into two small holes on the left hand wall of the paper compartment 4 Pull the paper end past the e...

Page 18: ...ts you to select the proper contrast DOCUMENT LOADING Ã For more information on contrast see page 3 2 The print resolution is automatically set to FINE when making a copy LIGHT AUTO DARK 2 Select the proper contrast by pressing or AB JK GHI TU PQRS 4 5 7 8 1 2 Redial Pause Scroll Volume 4 Press Start Copy Start Copy Stop WXYZ Help 6 9 3 If required press Resolution until you find the desired setti...

Page 19: ...Z 4 5 6 1 2 3 e e Setting the Date and Time The LCD window displays ÔDATE TIMEÕ 2 DATE TIME 3 Press Start Copy Start Copy Stop Help 9 The LCD prompts you to choose a date format TYPE EUR USA Ã Europe Day Month Year USA Month Day Year 4 Choose the date format by using or A J GHI T PQRS 4 5 7 8 1 2 Redial Pause Scroll Volume Ch 2 3 25 98 6 11 PM Page 5 ...

Page 20: ...umber keypad OHD V Req Start Copy Stop 1 2 3 5 ABC DEF JKL GHI MNO TUV PQRS WXYZ Help 4 5 6 7 8 9 0 1 2 3 Flash Redial Pause Scroll Volume à Month 01 12 Day 01 31 Year 00 99 From 1990 to 2089 Hour 00 23 Minute 00 59 The machine uses 24 hour time format 8 When the date and time are correct press Start Copy Start Copy Stop V WXYZ Help 8 9 0 à If you enter a wrong number use or to move the blinking l...

Page 21: ...ss Start Copy Start Copy Stop Help 8 9 0 The LCD prompts you to enter the telephone number TEL 4 Using the number keypad enter the telephone number of the line to which your machine is connected OHD V R Start Copy S 1 2 5 ABC DEF JKL GHI MNO TUV PQRS WXYZ Help 4 5 6 7 8 9 0 1 2 3 Flash Redial Pause Scroll Volume à You can include special characters space hyphen or plus sign in the number To enter ...

Page 22: ... information using the number keypad to enter name see page 4 2 You can enter a total of up to 20 characters for the name The letter appears in the LCD NAME S 8 Press Start Copy when your name appears correctly in the LCD Start Copy Stop Help 8 9 0 7 When the letter you want appears in the LCD press the button labeled with the next letter you want 1 ABC DEF JKL GHI MNO TUV PQRS WXYZ 4 5 6 1 2 3 e ...

Page 23: ...C h a p t e r T h r e e THE FAX MACHINE Ch 3 3 25 98 6 28 PM Page 1 ...

Page 24: ...ey may jam Instead make a photocopy first and then send the copy Wrinkled or creased paper Curled or rolled paper Torn paper Carbon paper or carbon backed paper Coated paper Too thin less than 0 074mm or thick more than 0 15mm paper Remove clips staples or other similar objects from documents before feeding them into the machine Let ink or paste on documents dry completely before sending The machi...

Page 25: ...ween LIGHT AUTO or DARK LIGHT works with very dark print AUTO works well for normal handwritten typed or printed documents DARK works with light print or faint pencil markings After the document has been loaded press Resolution to increase the sharpness and clarity By pressing Resolution repeatedly you can choose between STANDARD FINE SUPER FINE or PHOTO mode STANDARD works well for printed or typ...

Page 26: ...er to press ÔStartÕ so that you can send the document The LCD window displays ÔPHONEÕ The LCD window displays the number you are dialing PHONE 01952292033 3 If required set the contrast of the document by pressing or GHI PQRS 4 7 1 Redial Pause Scroll Volume à The selected mode flickers The contrast is preset to AUTO For a normal document skip over this step because it is not necessary to change t...

Page 27: ...f you receive an error message press Stop to clear it and try to send the document again For more information about canceling transmission see below You can set your machine to print a confirmation report automatically For more information see page 4 9 The fax transmission is canceled and the machine returns to Standby Mode OK STOP PRESSED 3 Press Start Copy when you hear the fax tone Start Copy S...

Page 28: ...andset it will switch to automatic reception mode In TAD mode you must attach an answering machine to the EXT line socket on your machine When the phone rings the answering machine answers and stores the callerÕs message If your machine hears a fax tone on the line the call automatically switches over to fax receive If you rarely use the fax line for voice conversation set the machine to receive f...

Page 29: ...Start Copy Start Copy Stop WXYZ Help 9 4 Replace the handset à The machine begins receiving and returns to Standby Mode when reception is complete à Take out document loaded if any before pressing the Start Copy button 1 Press RCV Mode repeatedly until ÔTELÕ appears in the display Resolution Rcv Mode Speed Dial Receiving Manually in TEL Mode The LCD displays ÔTELÕ 03 15 12 30 TEL Ch 3 3 25 98 6 28...

Page 30: ... If the machine does not detect a fax signal it will continue ringing to tell you it is a phone call 1 Press RCV Mode repeatedly until ÔAUTOÕ appears in the display Resolution Rcv Mode Speed Dial Receiving in AUTO Mode The LCD displays ÔAUTOÕ 03 15 12 30 AUTO The LCD displays ÔTADÕ 03 15 12 30 TAD 1 Press RCV Mode repeatedly until ÔTADÕ appears in the display Resolution Rcv Mode Speed Dial Receivi...

Page 31: ...all in 4 rings or less If the sound level of the call is too low because of a poor phone connection the fax machine or answering machine may not work properly When using manual reception mode on your machine you must make sure you switch off the answering machine or the outgoing message from the answering machine will interrupt your phone conversation Not all answering machines may work with your ...

Page 32: ...rks when you connected extension telephone to the fax machine 1 When you receive a call on the extension phone and hear fax tones press the buttons Ò 9 Ó on the extension telephone The machine receives the document 7 8 9 0 Ã Ô 9 Õ is the remote receive start code preset at the factory The first and the last asterisks are fixed but you can change the middle number to any digit you choose For more i...

Page 33: ...quest If youÕre sending or receiving a document and you need to speak to the other person during the same phone call use Voice Request to alert the person at the remote site You can also respond to a voice request made by the person on the remote end Sending a Voice Request 1 Press OHD V Req while a document is being sent or received The OHD V Req button lights up and a voice request signal is sen...

Page 34: ... machine requests another machine to send a document This is useful when the person with the original document is not in the office or is not going to pay for the phone call The person who wants to receive the document calls the machine holding the original and requests that the document be sent The LCD window displays the number you are dialing 3 When you hear a fax tone press RCV Mode Resolution...

Page 35: ...C h a p t e r F o u r SPECIAL FEATURES Ch 4 3 25 98 6 32 PM Page 1 ...

Page 36: ...py Sto 1 2 3 5 ABC DEF JKL GHI MNO TUV PQRS WXYZ Help 4 5 6 7 8 9 0 1 2 3 Flash Redial Pause Scroll Volume The display will show the One Touch button number you are going to use The display prompts you for a phone number à If there is a number or name already stored at the One Touch button it will display To change the number or name enter the new information over the old If not press Stop à You c...

Page 37: ...to get the letter or number For a list of letters and corresponding button see the next page The letter appears in the LCD display 1 Repeatedly press the button labeled with the letter you want until the letter appears in the LCD OHD V Re Start Copy Sto 1 2 3 5 ABC DEF JKL GHI MNO TUV PQRS WXYZ Help 4 5 6 7 8 9 0 1 2 3 Flash Redial Pause Scroll Volume 2 When the letter you want appears in the LCD ...

Page 38: ...r 1 2 3 4 5 6 7 8 9 0 Assigned numbers letters or characters Space 1 A B C 2 D E F 3 G H I 4 J K L 5 M N O 6 P Q R S 7 T U V 8 W X Y Z 9 _ 0 4 Press the same number button OHD V Req Start Copy Stop 1 2 3 4 5 ABC DEF JKL GHI MNO TUV PQRS WXYZ Help 4 5 6 7 8 9 0 1 2 3 Flash Redial Pause Scroll Volume 5 When finished entering name press Start Copy Start Copy Stop Help 8 9 0 The same letter appears in...

Page 39: ... 7 8 9 0 1 2 3 Flash Redial Pause Scroll Volume 4 When the number appears correctly in the display press Start Copy Start Copy Stop Help 8 9 0 The display will prompt you for the phone number The display will prompt you for a name à You can store up to 30 phone or fax numbers at any 2 digit Speed Dial location If there is a number or name already at the chosen Speed Dial location the number or nam...

Page 40: ...ore information on how to enter letters using the number keypad see page 4 2 à To cancel the operation press Stop The machine returns to Standby Mode If necessary start over again à For hands off operation press OHD V Req Dialing One Touch Number 2 Press a One Touch button 1 through 5 OHD V Req Start 1 2 3 4 5 DEF MNO WXYZ 6 9 3 à If you pressed OHD V Req pick up the handset when the other person ...

Page 41: ...1 2 5 ABC DEF JKL GHI MNO TUV PQRS WXYZ Help 4 5 6 7 8 9 0 1 2 3 Flash Redial Pause Scroll Volume à If you pressed OHD V Req pick up the handset when the other person answers The LCD prompts you to enter the location number The LCD window displays the Speed Dial number or name 1 Pick up handset à For hands off operation press OHD V Req SPD NO 01 30 460P2114 Ch 4 3 25 98 6 32 PM Page 7 ...

Page 42: ...or hands off operation press OHD V Req 1 When entering the number press Redial Pause at the position in the number where dialing should pause momentarily PQRS 4 7 Flash Redial Pause Menu A ÔPÕ appears in the number you are entering With some telephone systems you must dial an access code Ò9Ó for example and listen for a second dial tone before you can dial an outside number In such cases you shoul...

Page 43: ...me 2 When the special service answers press All following numbers you dial will be Touch Tone 7 8 0 Flash 1 When you are on the telephone and want to connect the caller to someone else press Flash 7 Flash Menu Flash If you get a call and you want to transfer it to someone else press Flash and dial the number of that person This may not work with some phone systems Contact the telephone maintenance...

Page 44: ...ons are currently set print out an option report For more information on printing a report see page 4 11 Setting an Option The LCD window displays ÔSYSTEM DATAÕ The LCD displays ÔCONFIRM REPORTÕ first 3 SYSTEM DATA CONFIRM REPORT 4 Scroll to the option you want to set by pressing or repeatedly A J GHI T PQRS 4 1 Redial Pause Scroll Volume à You can exit from setup mode at any time by pressing Stop...

Page 45: ...unt Select the number of times your machine rings before answering an incoming call If you are using your machine as both a telephone and a fax machine we suggest you set the ring count to at least 4 to give you time to answer Enter a number on the number keypad then press Start Copy Remote receive code The remote receive code allows you to initiate fax receive from a phone extension connected to ...

Page 46: ...eption journal This report gives specific information concerning transmission and reception activity times and dates of the most recent transmissions and receptions phone numbers etc System data list This list shows the status of the user selectable options After you change the settings print out this list to confirm your changes Telephone number list This list shows all numbers currently stored i...

Page 47: ...isplays the report you selected à The available lists are CONFIRM REPORT TX RX JOURNAL SYSTEM DATA LIST TEL NUMBER LIST à The machine will print the selected report 4 The LCD window displays the list from which to choose Select the report you want by using or A J GHI T PQRS 4 7 1 Redial Pause Scroll Volume 5 Press Start Copy Start Copy Stop Help 8 9 0 CONFIRM REPORT 3 Press Start Copy Start Copy S...

Page 48: ...4 5 6 7 8 9 1 2 3 4 Select the desired menu by using or AB JK GHI TU PQRS 4 5 1 2 Redial Pause Scroll Volume 3 Press Start Copy Start Copy Stop Help 9 Ã Menu available TERMINAL ID TX RX JOURNAL SYSTEM DATA ONE TOUCH DIAL SPEED DIAL The LCD window briefly displays the menu you have selected TERMINAL ID 5 Press Start Copy The LCD asks if you are sure you want to clear memory Start Copy Stop Help 9 A...

Page 49: ...t the fax machine to sound an alarm at an appointed time If you set an alarm time the fax machine will sound the alarm automatically at that time everyday 1 Press MENU Flash Pause Menu Resolution Mode 3 Press START COPY Start Copy Stop UV WXYZ Help 8 9 0 2 Press 6 OH Start Copy 1 JKL GHI MNO TUV PQRS WXYZ 4 5 6 7 8 9 1 2 3 The LCD displays ÔALARM TIMEÕ 6 ALARM TIME The LCD prompts if you to set al...

Page 50: ...Volume à Hours 00 23 Minutes 00 59 à The machine uses 24 hour time format 8 When the time is correct press Start Copy Start Copy Stop Help 8 9 0 à If you enter a wrong number use or to move the blinking line under the number you want to correct then enter the correct number To stop the alarm when it sounds pick up the handset or press either Stop or OHD If you donÕt stop the alarm when it sounds i...

Page 51: ...C h a p t e r F i v e CARE AND MAINTENANCE Ch 5 3 25 98 6 36 PM Page 1 ...

Page 52: ...d 0 0 0 0 0 0 0 2 Open the cover by lifting the release lever on the side of the machine 3 Remove the guide by lifting it 0 0 0 0 0 0 0 0 0 0 0 0 0 0 0 0 0 0 0 0 0 0 0 0 0 0 0 0 0 0 0 0 0 0 0 0 0 0 0 0 0 0 0 0 0 0 0 0 0 4 Remove the jammed document 0 0 0 0 0 0 0 0 0 0 0 0 0 0 0 0 0 0 0 0 0 0 0 0 0 0 0 0 0 0 0 0 0 0 0 0 0 0 0 0 0 0 Ã If a document jams during transmission do NOT pull it out of the ...

Page 53: ... the roller lock in place 6 Close the cover firmly 0 0 0 0 0 0 0 0 0 0 0 0 0 0 0 0 0 0 7 Plug in the power cord à Press down on the cover using both hands until it snaps into place Paper Jams During Reception 1 Unplug the power cord 2 Open the cover by lifting the release button à If a document jams during reception do NOT pull the document out of the slot Doing so could harm the machine Ch 5 3 25...

Page 54: ... in the direction of arrow 0 0 0 0 0 0 0 0 0 0 0 0 0 0 0 0 0 0 0 0 0 0 0 0 0 0 0 0 0 0 0 0 0 0 0 0 0 0 0 0 0 0 0 0 0 0 0 0 0 5 Replace the guide 0 0 0 0 0 0 0 0 0 0 0 0 0 0 0 0 0 0 0 0 0 0 0 0 0 0 0 0 0 0 0 0 0 0 0 0 0 0 0 0 0 0 0 0 0 0 0 0 0 6 Close the cover firmly 0 0 0 0 0 0 0 0 0 0 0 0 0 0 0 0 0 0 7 Turn the power back on à Cut off any wrinkled paper from the end of the paper making the end s...

Page 55: ... 0 0 0 0 0 0 0 0 0 0 0 0 0 0 0 0 0 0 0 0 0 0 0 0 0 4 Replace the guide and the recording paper 0 0 0 0 0 0 0 0 0 0 0 0 0 0 0 0 0 0 0 0 0 0 0 0 0 0 0 0 0 0 0 0 0 0 0 0 5 Close the cover firmly Turn the power back on 0 0 0 0 0 0 0 0 0 0 0 0 0 0 0 0 0 0 Cleaning the Roller and Thermal Head To keep your machine working properly occasionally clean the roller and thermal print head as shown below If the...

Page 56: ... paper Other types of paper can produce poor results and even damage your fax machine Contact your dealer for more information on paper Store rolls in a cool dark place at or below 76ûF 24 5ûC and avoid humidity higher than 65 To keep fax pages from darkening and fading keep them out of direct sunlight Avoid temperatures above 105ûF 40 5ûC DonÕt let them come in contact with blueprints diazo copie...

Page 57: ...This may happen if someone faxes several all black copies to your machine When the machine cools down it will automatically go back to showing the date and time The fax machine you want to poll is not ready to answer your poll The person you are polling should know what you want to do and should have loaded their fax machine with the original document There is a problem with facsimile communicatio...

Page 58: ...hod Flat bed scanning using CIS image sensor Printer Thermal Input document size 216 millimeters Effective scanning width 210 millimeters 1 Effective recording width 216 millimeters Thermal paper roll size 30 meters x 216 millimeters wide core 12 7 millimeters diameter Power requirement Check Power Label attached near the power cord connection Power consumption Stand by 7 Watt Maximum when in use ...

Reviews: