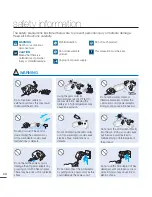
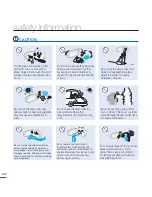
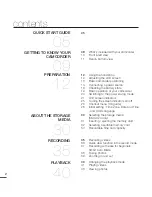
background image

SMX- C20BN/SMX- C20RN/SMX- C20LN/SMX- C20UN
SMX- C24BN/SMX- C24RN/SMX-C24LN/SMX-C24UN
SMX- C200BN/SMX- C200RN/SMX-C200LN/SMX-C200UN

Memory Camcorder

www.samsung.com/register

User Manual

Summary of Contents for SMX-C24UN SMX-C200BN

Page 1: ...SMX C20BN SMX C20RN SMX C20LN SMX C20UN SMX C24BN SMX C24RN SMX C24LN SMX C24UN SMX C200BN SMX C200RN SMX C200LN SMX C200UN Memory Camcorder www samsung com register User Manual ...

Page 2: ...rder has 3DNR 3 dimensional noise reduction high sensitivity color expression intelligent color expression High performance Anti Shake Hyper DIS and automatic face detection features The Digest Storyboard function captures 16 still images from the video you select and saves the images to the storage media You get a quick overview of your video a real help when you want to review a video quickly Pr...

Page 3: ...ordings With this ergonomic design you can shoot subjects comfortably from any position Intelli studio built in editing software installs directly from your camcorder to your PC when you connect the camcorder to your PC via USB cable Using Intelli studio you can upload your videos and photos to your PC with ease and upload them directly to YouTube Flickr or Facebook Sharing videos with your friend...

Page 4: ...hers Please follow them explicitly After reading this section keep it in a safe place for future reference Warning When using the AC power adapter with your camcorder connect the adapter to an outlet with protective grounding Do not expose the camcorder battery to direct sunlight heaters radiators fire or any other source of excessive heat Caution If you replace the battery with the wrong battery y...

Page 5: ...ages Make a backup of important recorded data Protect your important recorded data by copying the files to a PC We recommend copying the data to your PC or other recording media for storage Refer to the software installation and USB connection guide Copyright Please note that this camcorder is intended for consumer use only Data recorded on a card in this camcorder from other digital analog media o...

Page 6: ...ater or oil entering the camcorder or AC power adaptor could cause electric shock malfunctions or defects Heat on surface of product The surface of the camcorder will be slightly warm when used but this does not indicate a fault Be careful of unusual ambient temperature Using the camcorder in a place where the temperature is over 104 F 40 C or lower than 32 F 0 C may result in abnormal recording p...

Page 7: ...e holders Windows is registered trademark or trademark of Microsoft Corporation registered in the United States and other countries Macintosh is trademark of Apple Inc YouTube is a trademark of Google Inc Flickr is a trademark of Yahoo Facebook is a trademark of Facebook Inc All the other product names mentioned herein may be the trademark or registered trademarks of their respective companies Fur...

Page 8: ...rs stoves or other apparatus including amplifiers that produce heat 9 Do not defeat the safety purpose of the polarized or grounding type plug A polarized plug has two blades with one wider than the other A grounding type plug has two blades and a third grounding prong The wide blade or the third prong are provided for your safety If the provided plug does not fit into your outlet consult an electri...

Page 9: ... likely to be walked on or pinched by items placed upon or against them paying particular attention to cords or plugs convenient receptacles and the point where they exit from the unit 20 OUTDOOR ANTENNA GROUNDING CAMCORDER be sure the antenna or cable system is grounded to provide some protection against voltage surges and built up static charges Section 810 of the National Electrical Code ANSI N...

Page 10: ...ER to its normal operation e If the CAMCORDER has been dropped or the cabinet has been damaged f When the CAMCORDER exhibits a distinct change in performance indicating a need for service 27 REPLACEMENT PARTS When replacement parts are required be sure the service technician has used replacement parts specified by the manufacturer having the same characteristics as the original part Unauthorized su...

Page 11: ... correct the interference by one or more of the following measures Reorient or relocate the receiving antenna Increase the separation between the equipment and receiver Connect the equipment into an outlet on a circuit different from that to which the receiver is connected Consult the dealer or an experienced radio TV technician for help and for additional suggestions The user may find the followin...

Page 12: ...o may pose a fire hazard Do not aim the LCD screen directly into the sun Doing so could cause eye injuries as well as lead to malfunctioning of internal parts of the product Using the camcorder at temperatures over 140 F 60 C may result in fire Keeping the battery at a high temperature may cause an explosion Do not disconnect the AC adaptor by pulling on its power cord as this could damage the power...

Page 13: ...msung service center There is a risk of fire or personal injury Do not attempt to disassemble repair or reform the camcorder or the AC adaptor to avoid a risk of fire or electric shock Keep the power cord unplugged when not in use or during lightning storms to prevent a fire hazard When cleaning the AC adaptor unplug the power cord to avoid a risk of a malfunction or electric shock Do not plug or unp...

Page 14: ...gasoline or diesel engines or corrosive gas such as hydrogen sulphide Doing so may corrode the external or internal terminals disabling normal operation Do not expose the camcorder to soot or steam Thick soot or steam could damage the camcorder case or cause a malfunction Do not leave the camcorder in a closed vehicle where the temperature is very high for a long time Do not use the camcorder on a...

Page 15: ...er near strong radio waves or magnetism such as speakers or large motors Noise could enter video or audio that are being recorded Keep important data separately Samsung is not responsible for data loss Use Samsung approved accessories only Using products from other manufacturers may cause overheating fire explosion electric shock or personal injuries due to abnormal operation Place the camcorder on...

Page 16: ... your camcorder 20 Switching to the power saving mode 21 LCD screen indicators 25 Turning the screen indicators on off 26 Shortcut menu OK guide 28 Initial setting Time Zone Date and Time and OSD Language 30 Selecting the storage media SMX C24 only 31 Inserting ejecting the memory card 32 Selecting a suitable memory card 34 Recordable time and capacity 35 Recording videos 36 Quick view function in...

Page 17: ...Lapse REC 58 Guideline 59 Playback menu items 59 Play option 60 Delete 61 Protect 62 Story Board Print 63 Using VIEW 64 Copy SMX C24 only 65 Divide 66 Combine 67 Share Mark 68 Slide Show 69 Slide Show Option 69 File Info 70 Changing the menu settings in settings 71 Settings menu items 72 Storage Info 73 Format 73 File No 74 Time Zone 75 Date Type 76 Time Type 76 Date Time Display RECORDING OPTIONS...

Page 18: ...r Off 81 PC Software 82 TV Display 82 Default Set 83 Version 83 Demo 84 Checking your computer type 85 What you can do with a Windows computer 86 Using the Intelli studio program 92 Transferring videos photos from the camcorder to your computer 94 Connecting to a TV 95 Viewing on a TV screen 96 Recording dubbing images on a VCR or DVD HDD recorder 97 Maintenance 98 Additional information 99 Using ...

Page 19: ...e CHG charging indicator light turns green quick start guide You can record videos in H 264 format You can record videos in H 264 format which enables you to conveniently email and share videos with your friends and family You can also take photos with your camcorder This quick start guide introduces the basic operation and features of your camcorder See the reference pages for more information ST...

Page 20: ... videos quick start guide Recording videos with H 264 format Recording photos Your camcorder uses advanced H 264 compression technology to give you the clearest video quality page 46 1 Open the LCD screen 2 Press the Power button 3 Press the Recording start stop button To stop recording press the Recording start stop button Captures a moving subject instantly and saves the scene as a photo image 1...

Page 21: ... button to select a desired video or photo and then press the Control button OK Viewing videos or photos on the LCD screen Viewing on a TV You can enjoy detailed brilliant quality videos on a connected TV page 95 T W 0 00 00 475Min STBY 9999 Video Move Full View Photo 1 10 Move Play Video 1 10 0 00 55 Photo STEP4 Save recorded videos or photos Simple and fun Enjoy the various features of Intelli s...

Page 22: ...enu page 81 Viewing the videos photos from your PC 1 Launch the Intelli studio program by connecting the camcorder to your PC via the USB cable A new file saving screen appears with the Intelli studio main window Click Yes The uploading procedure starts 2 The new files are saved to your PC and registered to Contents Manager in the Intelli studio program You can arrange the files by different options ...

Page 23: ...nding on the sales region Parts and accessories are available for purchase at your local Samsung dealer SAMSUNG is not responsible for reduced battery life time or malfunctions caused by any unauthorized use of accessories A memory card is not included See page 32 for memory cards compatible with your camcorder Your camcorder includes a user manual CD and a printed quick start guide Optional acces...

Page 24: ...ecording start stop button Control button S T W X OK Zoom W T button MENU button LCD screen Power button Built in speaker Share button Display button Mode button SMART AUTO VIEW button Charging indicator CHG Hand strap hook Photo button Zoom lever W T 10 ...

Page 25: ...lens during recording REAR BOTTOM VIEW Jack Battery pack Memory card cover Memory card slot USB jack Battery pack slot AV jack AV Internal microphone DC IN jack DC IN Tripod receptacle Battery pack release switch SD SDHC Usable Memory Cards 512MB 32GB 11 ...

Page 26: ... finger The screen opens up to 90 2 Rotate the LCD screen When you open the LCD you can rotate it back 25 to the first click so that it is parallel with the lens You can also rotate it up to 180 towards the lens and up to 90 backward To view recordings more conveniently rotate the screen by 180 towards the lens then fold it back to the body OK Remove fingerprints or dust on the screen with a soft clo...

Page 27: ...nds 2 Put one hand through the hand strap loop 3 Make sure your footing is stable and there is no danger of colliding with another person or object 4 Angle the camcorder down at a 25 degree angle See note below This camcorder lens shooting angle is approx 25 higher than the rest of the camcorder body Make sure the camcorder lens is angled for proper shooting We recommend you keep the sun behind yo...

Page 28: ...ng the battery pack Ejecting the battery pack 1 Slide the battery slot cover down and then let it open up as shown in the figure above 2 Insert the battery pack into the battery slot until it locks Make sure that the SAMSUNG logo is facing the LCD display side of the camcorder as shown in the figure 3 Push the battery cover down until it meets the camcorder body then slide it up to close 1 Slide dow...

Page 29: ...or will override the USB If the camcorder is turned on the battery will still charge but more charging time will be needed We recommend you you to keep the camcorder turned off while charging Charging the battery pack at temperatures below 50 F 10 C may take longer or prevent the battery pack from charging fully The green indicator will not turn on Please make sure that there are no foreign substa...

Page 30: ... flickers The device will be forced to turn off after 3 seconds Low battery The Battery Level Display shows the amount of battery power remaining in the battery pack Battery Level Display CHECKING THE BATTERY STATE You can check the charging state and remaining battery capacity When battery charge errors occur continuously contact a SAMSUNG authorized service center or Samsung Customer Care Before ...

Page 31: ...ing starts When actually recording the battery pack may discharge 2 3 times faster than this reference since the record start stop and zoom functions are being operated and playback is performed Prepare additional charged battery pack s to allow for the time you are planning to record on the camcorder Note that the battery pack discharges faster in a cold environment The benefits of the battery pac...

Page 32: ... approved battery packs Do not use batteries from other manufacturers because there is a danger of overheating fire or explosion Samsung is not responsible for problems occurring due to using unapproved batteries Before detaching the power source make sure that the camcorder s power is turned off Failure to do so can result in camcorder malfunction Use a nearby wall outlet when using the AC power a...

Page 33: ...corrective action Mode button Power button Turning the camcorder on or off You can turn the power on or off by pressing the Power button 1 Open the LCD screen and then press the Power button to turn on the camcorder 2 To turn off the camcorder press the Power button Setting the operating modes You can switch the operating mode in the following order each time you press the Mode button Record mode ...

Page 34: ...a DC power cable connection AC power adaptor USB cable While recording playing back or showing a slideshow When the LCD screen is opened The camcorder consumes less battery power in the power saving mode about 50 less than in the standby mode However if you intend to use the camcorder for the maximum length of time before recharging we recommend you turn off the camcorder by pressing the Power but...

Page 35: ...SCENE Smart Auto 20 Record mode The screen above is an example for explanation only It may differ from your actual display The on screen indicators are based on a 16GB SDHC memory card Functions marked with a do not retain their settings when the camcorder is turned off For enhanced performance the display indications and their order are subject to change without prior notice This camcorder provid...

Page 36: ...u OK Guide Return 4 EV Exposure value 5 iSCENE The illustration above shows the EV Exposure value screen Functions marked with a do not retain their settings when the camcorder is turned off The shortcut menu OK guide represents the most frequently accessed functions according to the selected mode Pressing the OK button will display a shortcut menu of frequently used functions on the LCD screen 0 ...

Page 37: ...in memory SMX C24 only 5 Battery info Remaining battery level 6 Video Resolution 7 Protection 8 LCD Enhancer 9 File Name File number 10 Date Time Display 11 Share mark 12 Play Option Video Play mode Shortcut menu OK Guide 100 0001 0 00 00 0 00 55 Multi View 4 3 5 2 1 100 0001 JAN 01 2010 12 00AM 0 00 00 0 00 55 4 11 3 1 2 9 8 7 6 5 12 10 100 0006 Move Play Video 1 10 0 00 55 1 12 1 13 7 9 8 6 5 2 ...

Page 38: ...lected SMX C24 only 1 Photo Play mode 2 Slide Show 3 Image counter current image total number of recorded images 4 Storage media Memory card or built in memory SMX C24 only 5 Battery info Remaining battery level 6 Photo resolution 7 Protection 8 LCD Enhancer 9 File Name file number 10 OK Guide Next image 11 Shortcut menu OK Guide Return 12 OK Guide Previous image 0 00 00 0 00 55 100 0001 JAN 01 201...

Page 39: ...mation display mode Press the Display button while the camcorder is on The full and minimum display modes alternate Minimum display mode Full display mode STBY If the camcorder has warning information a warning message will appear In the menu screen the Display button will be deactivated You can switch the on screen information display mode 0 00 00 475Min STBY 9999 25 ...

Page 40: ...tton to confirm your selection Press the OK button to exit the shortcut menu The selected submenu item indicator displays on the screen preparation The shortcut menu OK guide cannot be used in the Smart Auto mode Before selecting a menu item please make sure that you ve set the appropriate mode first OK The Shortcut menu OK guide contains the most frequently accessed functions according to the selec...

Page 41: ...ayback RPS Reverse Playback Search rate x2 x4 x8 x16 Previous Skip Playback Frame by frame playback Slow motion playback Reverse slow playback Rate x1 2 x1 4 x1 8 x1 16 Previous image Moves to the previous menu RIGHT Quick View Search playback FPS Forward Playback Search rate x2 x4 x8 x16 Next Skip Playback Frame by frame playback Slow motion playback Forward slow playback Rate x1 2 x1 4 x1 8 x1 1...

Page 42: ...and time preparation Turning the date and time display on off To switch the date and time display on or off access the menu and change the Date Time Display mode page 76 Setting the clock to local time when traveling or abroad You can easily set the clock to the local time by setting a time difference when using your camcorder abroad Select Time Zone on the menu then set the time difference page 7...

Page 43: ...on to exit the menu The OSD language is is changed to the language you selected Selecting the OSD language Submenu items English Français Deutsch Italiano Español Português Nederlands Svenska Suomi Norsk Dansk Polski Čeština Slovensky Magyar Română Български Ελληνικά српски Hrvatski Türkçe Even if the battery pack or AC power are removed the language setting will be preserved The Language options ...

Page 44: ...g the built in memory SMX C24 only Using a memory card not supplied 1 Press the MENU button The menu list appears 2 Press the Control button to select Settings 3 Press the Control button to select Storage Type and then press the OK button 4 Press the Control button to select Memory or Card and then press the OK button Memory When using the built in memory Card When using a memory card 5 Press the ...

Page 45: ... in the figure be sure to insert the memory card with the label facing right Do not format the memory card on a PC Do not eject a memory card during operations such as recording playback formatting deleting and editing Doing so may damage the memory card or cause loss of data Be careful not to push the memory card too hard The memory card may suddenly pop out If this is a new memory card a card for...

Page 46: ...the switch up in the direction of the terminals To set write protection move the switch down about the storage media Common cautions for memory card Damaged data may not be recovered We recommend you make a backup of important data on the hard disk of your PC Turning the power off or removing a memory card during operations such as formatting deleting recording and playback may cause data loss If ...

Page 47: ...l pasting portion Be careful to keep the memory card out of the reach of children who might swallow it The camcorder supports SD SDHC memory cards for data storage The data storage speed may differ depending on the manufacturer and production system Users using a lower write speed memory card for recording a video may have difficulties storing the video on the memory card You can even lose your vid...

Page 48: ...1 530 3 040 6 080 9 999 9 999 16 9 848x480 9 999 1 920 3 840 7 680 9 999 9 999 9 999 1696x960 9 999 760 1 530 3 040 6 080 9 999 9 999 Unit Approximate minutes of recording Unit Approximate number of images Recordable time for videos Recordable number of photos 1GB 1 000 000 000 bytes Actual formatted capacity may be less because the internal firmware uses a portion of the memory about the storage m...

Page 49: ...ENU button etc Sound is recorded with the internal stereo microphone on the front of the camcorder Take care that this microphone is not blocked Before recording an important video make sure to test the recording function to check if there is any problem with the audio and video recording Do not operate the Power button or remove the memory card while accessing the storage media Doing so may damag...

Page 50: ... with a USB cable If the camcorder has been restarted after you ve recorded After playing Quick View recording QUICK VIEW FUNCTION IN THE RECORD MODE Quick View playback runs at a normal speed FF REW F ADV Slow functions can be used at the same time in Single view page 42 The volume control is not available during playback in Quick View You cannot select Quick View while Smart Auto mode is in oper...

Page 51: ...e light distance between subjects and camcorder shake the camcorder can detect the same scene differently When the camcorder detects more than two scenes at the same time Smart Auto icon priority order is as follows Night Portrait Portrait Macro White Landscape Night Indoor For example a If portrait and Indoor are detected simultaneously then portrait is actived and the corresponding icon displays...

Page 52: ... the storage media If the focus is not clear enough adjust it manually You can adjust the LCD screen brightness and color from the menu Adjusting the brightness or color of the LCD screen does not affect the images recorded page 77 Do not turn off the camcorder or remove the memory card when taking photos as it may damage the storage media or data Photo image files recorded by your camcorder confor...

Page 53: ...r telephoto Zooming during a recording may cause the camcorder to record the sound of the zoom lever or zoom button Optical zoom preserves image quality but during digital zoom the image quality may suffer Fast zooming or zooming in on a far subject may cause slow focus In this case use Manual Focus page 51 When you do hand held recording we recommend you use Anti Shake HDIS if you zoom in on the ...

Page 54: ...ct Record and the recorded videos or photos are displayed in thumbnail index view When switching to Play mode after recording a video the videos thumbnail index view appears When switching to Play mode after recording a photo the photos thumbnail index view appears How to change between video and photo thumbnail view You can easily switch between video and photo thumbnail view using the zoom lever...

Page 55: ...f there is no file stored to view the message Empty appears Your camcorder may not playback the following videos Videos you edited or renamed on a PC Videos you recorded on devices other than the camcorder Videos you recorded in file formats the camcorder does not support The built in speaker automatically turns off when you connect the Audio Video cable to the camcorder When you connect the camcord...

Page 56: ...ious file is skipped Frame by frame playback ZZ ZZ In pause mode use the Control button to move the video forward or backward one frame at a time To resume normal playback press the OK button Slow motion playback Z Z During pause holding the Control button reduces the playback speed During slow motion playback pressing the Control button repeatedly changes the playback speed Forward slow playback r...

Page 57: ...bnail highlight is on the latest created or played file 2 Select the Photo thumbnail index view screen You can switch between video and photo thumbnail view using the zoom lever 3 Use the Control button to select the desired photos and then press the OK button The Shortcut menu for playback is displayed for a while To view the previous or next photo press the Control button To return to the thumbna...

Page 58: ...e setting guide is presented under the basic state for your easy understanding The setting steps varies depending on the setting status of your camcorder You can change the menu settings to customize your camcorder Access the desired menu screen by following the steps below and then changing the various settings OK MENU Accessible 1 Open the LCD Screen and press the Power button to turn on the cam...

Page 59: ...ive when used outdoors EV value is automatically adjusted to the optimal Spotlight Prevents overexposure of subject portrait face etc when strong light strikes the subject as in a wedding or on stage Beach Where sunlight is intense such as on a beach Snow Where refl ection of light is intense such as in a snowfield High Speed Reduces blurring objects in rapid motion Food Recording close up objects i...

Page 60: ...80 30p resolution at normal image quality Supports viewing with the optimal resolution on a PC 1 Press the MENU button Control button Video Resolution 2 Select the desired submenu item with the Control button OK button 3 Press the MENU button to exit the menu You can record at five resolution levels TV Super Fine TV Fine TV Normal Web Fine or Web Normal However the better the resolution the more me...

Page 61: ...button to exit the menu Photos recorded by your camcorder may not be displayed in another device if the device does not support high resolution For photo development or printing the higher the resolution the finer the image quality The number of images your camcorder can record depends upon the available memory and picture resolutions page 34 High resolution images occupy more memory space than low...

Page 62: ...n 2 0 and 2 0 If you set the exposure to manual the higher the exposure the brighter the recorded photo will be Exposure value setting will be applied and indicator and setting value are displayed You can also set the exposure in the shortcut menu page 27 The shutter speed also varies automatically depending on the EV value Manual exposure is recommended in the following situations When shooting u...

Page 63: ...xecuted Backlight compensation brightens the subject quickly Back lighting influences recording in these situations when the subject is darker than the background The subject is in front of a window The subject is against a snowy background The subject is outdoors and the background is overcast The light sources are too bright The person to be recorded is wearing white or shiny clothes and is place...

Page 64: ...t will adjust focus and exposure to optimal values automatically Face Detection may not operate depending on the recording conditions For example the Face Detection Frame may appear when framing a face like shape even when the subject is not a person s face If this occurs turn off the Face Detection feature The Face Detection feature will not work when framing the side of a person s face or operat...

Page 65: ...Control button to adjust the focus When the manual focus setting is applied the indicator is displayed You can easily adjust the focus using Shortcut menu button page 27 Manual focusing focuses on a point in the framed scene while auto focusing focuses on the center area automatically Use the zoom function to catch the desired target before manually adjusting the focus If you use the zoom function...

Page 66: ...if Anti Shake HDIS On is specified Firmly hold the camcorder with both hands We recommend that you turn Anti Shake HDIS to Off when using the camcorder on a desk or tripod When you record photos with 10x or more magnification and the Anti Shake HDIS is On in dim places after images may stand out In this case we recommend using a tripod not supplied and turning the Anti Shake HDIS to Off Submenu item...

Page 67: ... effect to the image Mirror This mode cuts the image in half and make mirrored image on the other half Pastel This mode applies a pale pastel drawing effect to an image Cosmetic This mode helps correct facial imperfections Step printing This moded records the image in segments 1 Press the MENU button Control button Digital Effect 2 Select the desired submenu item with the Control button OK button ...

Page 68: ...ton 3 Press the MENU button to exit the menu Fade in Press the Recording start stop button when Fader is set to In Recording starts with a dark screen and then the image and sound are faded in Fade out Press the Recording start stop button when Fader is set to Out When recording stops the image and sound are faded out Fade in out Press the Recording start stop button when Fader is set to In Out Re...

Page 69: ...button OK button 3 Press the MENU button to exit the menu Digital Zoom You can select the maximum zoom level if you want to zoom to a level greater than 10x the default setting during recording Zoom up to 10x is achieved optically and after that zoom up to 1200X is achieved digitally Note that the image quality decreases when you use the digital zoom Submenu items Off Only optical zoom is availabl...

Page 70: ... time Hr in the same way 5 Press the OK button to finish setting the times and press the MENU button to exit the menu 6 After setting the Time Lapse REC mode press the Recording start stop button The Time Lapse REC starts The still images are stored one by one according to the record ing interval and total recording time recording options Submenu items Off Disables the function On Interval Sec Imag...

Page 71: ...s the recording up to that point and switches to standby mode After some time it displays a warning message then turns off automatically If memory runs out during a Time Lapse REC the camcorder switches to standby mode after saving what was recorded so far We recommend using the AC power adaptor when using the Time Lapse REC function When a time lapse recording starts a message of Time Lapse Recor...

Page 72: ...enter cross point puts the subject in the middle of the frame Grid For recording multiple subjects Putting subjects at or near the grid cross points creates a balanced composition Safety Zone Positioning subjects within the Safety Zone rectangle ensures they will be recorded 1 Press the MENU button Control button Guideline 2 Select the desired submenu item with the Control button OK button 3 Press...

Page 73: ...elect the Video or Photo thumbnail index view screen You can switch between video and photo thumbnail view using the zoom lever 2 Press the MENU button Control button Play Option 3 Select an option by pressing the Control button and then press the OK button When you playback the video a displayed indicator of the selected Play Option appears on the screen Submenu items Play All Plays back from the...

Page 74: ...ndicator is displayed on the selected videos or photos Pressing the OK button toggles between the selection and release All Files Deletes all videos or photos playback options To protect important images from accidental deletion activate image protection page 61 The protect indicator blinks if you try to delete an image that was previously protected page 61 You must release the protect function to...

Page 75: ...K button 5 Repeat Step 4 for each item you want to protect 6 Press the MENU button to protect the items you selected Submenu items Select Files Protects selected videos or photos from delection To protect individual videos or photos select the desired videos or photos by pressing the OK button Then press the MENU button to confirm The indicator is displayed on the protected videos or photos Pressin...

Page 76: ...s The printed storyboard image files appear on the LCD screen for about 3 seconds A single 16 still image that consists of 16 images selected arbitrarily from the selected video will be saved in the storage media Storyboard images are displayed in 4 3 aspect ratio Hence it may not display the entire image on the LCD screen On a computer it will display the entire image Using the VIEW button you can...

Page 77: ...torage media press the Photo button You can find the saved storyboard image in the photo play mode page 43 Using VIEW Exit Story Board Print If the recorded video is less than 8 seconds long all 16 i Frame thumbnails will not be extracted This function is available only in the video thumbnail index view screen This function provides a preview of a storyboard to be printed giving you a digest of a r...

Page 78: ...idual videos or photos select the desired videos or photos by pressing the OK button The indicator is displayed on the selected videos or photos Then press the MENU button to confirm Pressing the OK button toggles selection and release All Files Copies all the videos or photos If a memory card is not inserted you cannot perform the Copy function You can not copy a file if the memory card has insuffic...

Page 79: ...of the thumbnail index Example You can divide a video clip into two in order to delete a section you no longer need 1 Before dividing 2 After video is divided at 30 second point 3 After deleting first video 0 60 seconds 0 30 seconds 31 60 seconds 0 30 seconds The video clip is divided into two videos The Divide function is not available under the following conditions If the total recorded time of t...

Page 80: ... cannot be combined TV super fine TV fine TV normal vs Web fine Web normal If the videos are in different aspect ratios 4 3 vs 16 9 wide If one file is a Time Lapse REC mode recording and the other is normally recorded file If the total size of the two files to be combined exceeds 1 8GB If the remaining section of the storage media space is less than 40MB A maximum of 2 videos can be combined at a time ...

Page 81: ...tor is displayed on the selected video You can also check the Share mark on the video image by pressing Share button 4 Repeat Step 3 for each video you want to mark 5 Press the MENU button A message appears asking for your confirmation 6 Select Yes By using the software Intelli studio embedded in the camcorder you can easily upload videos marked with Share marks page 89 You can set the Share mark o...

Page 82: ... Press the OK button The indicator is displayed The Slide Show will start from the current image The Slide Show will start at an interval of 2 3 seconds To end the slide show press the OK button again 4 background music files are stored in the camcorder by default When a slide show begins it plays the background music files in a random order You can adjust the background music s volume level using t...

Page 83: ...isplays images consecutively Music If the Music is set to On the slideshow will play back with background music The background music is selected randomly from 4 sample music files stored Slide Show Option You can enjoy a slide show with various effects PRECHECK Press the Mode button to select the Play mode page 19 1 Select the Photo thumbnail index view screen You can switch between video and photo...

Page 84: ... and will be dimmed in the menu Storage Type SMX C24 only Storage Info Format etc settings options CHANGING THE MENU SETTINGS IN SETTINGS The pop up selection menu will appear depending on the selected menu item In this case select the desired item with the Control buttons and the OK button Before selecting a menu item set the appropriate operation mode first page 19 OK You can setup the date time ...

Page 85: ...r Off 78 Auto LCD Off On 78 Menu Design Misty White 79 Transparency 0 79 Beep Sound On 80 Shutter Sound On 80 Auto Power Off 5 Min 81 PC Software On 81 TV Display On 82 Default Set 82 Version 83 Language English 29 Demo On 83 Accessible Not accessible These Items and default values may be changed without notice There are some functions you cannot activate simultaneously in the menu page 108 You ca...

Page 86: ...memory information of the inserted memory card settings options If there is no storage media inserted it cannot be selected and will be dimmed on the menu In the Storage Info display you can check the used and available memory as well as the remaining recording time for each recording resolution For the desired information scroll the screen using the Control button Actual memory capacity may be le...

Page 87: ...ed the card deleted all the files or inserted a new memory card 1 Press the Control button File No OK button 2 Select the desired submenu item with the Control button OK button 3 Press the MENU button to exit the menu Do not format the storage media on a PC or other device Make sure to format the storage media on this camcorder Format the memory card in the following cases If the memory card is new...

Page 88: ... difference between the two locations Cities used to set the time zone Cities Time zone Cities Time zone London Lisbon 00 00 Adelaide 09 30 Rome Paris Berlin Stockholm Madrid Frankfurt 01 00 Guam Sydney Brisbane 10 00 Athens Helsinki Cairo Ankara 02 00 Solomon Islands 11 00 Moskva Riyadh 03 00 Wellington Fiji 12 00 Teheran 03 30 Samoa Midway 11 00 Abu Dhabi Muscat 04 00 Honolulu Hawaii Tahiti 10 0...

Page 89: ...h two digit and year Date Type You can select the desired date type 1 Press the Control button Date Type OK button 2 Select the desired submenu item with the Control button OK button 3 Press the MENU button to exit the menu This function depends on the Date Time Display setting Settings Date Time Displsy Date Type Time Type 2010 01 01 JAN 01 2010 Exit Move Select STBY 0 00 00 475Min 01 JAN 2010 Se...

Page 90: ...ed in 12 hour units 24 Hr The time is displayed in 24 hour units Submenu items Off Current date and time information is not displayed Date Displays the current date Time Displays the current time Date Time Displays the current date and time settings options The date time will read JAN 01 2010 12 00 AM under the following condition The built in rechargeable battery becomes weak or dead This functio...

Page 91: ... button to exit the menu A brighter LCD screen setting consumes more battery power If you adjust the LCD brightness when the ambient lighting is too bright it is hard to see the monitor indoors LCD Brightness does not affect the brightness of images the camcorder records You can adjust the LCD Brightness from 15 to 15 You can manipulate the color displayed on the LCD screen by adjusting the color ...

Page 92: ...ideo the power saving mode starts by dimming the LCD screen Submenu items Off Disables the function On LCD Enhancer operates LCD Enhancer function does not affect the quality of the image being recorded When the LCD Enhancer works at low illumination some stripes may occur on the LCD screen This is not a malfunction Using the LCD Enhancer function may cause color to look different on the display W...

Page 93: ...to the selected value The bigger the value the more transparent the screen is 3 Press the MENU button to exit the menu Transparency 60 Transparency 0 The setting value is applied to the menu screen of Record mode only Submenu items 0 20 40 60 Settings Transparency Auto LCD Off Menu Design Exit Move Select STBY 0 00 00 475Min 40 0 20 Settings Transparency Auto LCD Off Menu Design Exit Move Select S...

Page 94: ...nction On When on a beep sounds every time a button is pressed Submenu items Off Disables the function On When on the shutter sounds each time you press the Photo button settings options The Beep sound function is canceled in the following cases During recording playing When the camcorder has a cable connection AV cable Settings Auto Power Off Beep Sound Shutter Sound Off On Exit Move Select STBY ...

Page 95: ... and photo files on your camcorder using the PC software 1 Press the Control button PC Software OK button 2 Select the desired submenu item with the Control button OK button 3 Press the MENU button to exit the menu Submenu items Off Disables the function On You can use the built in PC software by connecting the USB cable between the camcorder and your PC Auto Power Off is disabled in the following ...

Page 96: ...e Yes if you want all the settings return to the default The Time Zone screen appears after all settings return to the default 3 Set the Date Time Set again page 28 settings options Submenu items Off The OSD appears in the LCD screen only On The OSD appears in the LCD screen and TV Connecting to a TV page 94 Do not turn off the power while using this function Returning the camcorder settings to fa...

Page 97: ...r 5 minutes without operation If you don t want the Demo function to start set Demo to Off In STBY mode holding the MENU button for 5 seconds activates Demonstration mode which starts a demo immediately without your setting Demo on Submenu items Off Disables the function On Activates demonstration mode and shows various features on the LCD screen The Demo function does not operate in the following...

Page 98: ...Windows Using with Macintosh Connect your camcorder to the computer using the USB cable The built in editing software Intelli studio runs on the PC automatically once the camcorder is connected to a Windows computer When you specify PC Software On page 81 The built in software on your camcorder Intelli studio is not Macintosh compliant Play back or edit your recordings on the computer using the bu...

Page 99: ...l Pentium 4 3 0 GHz or higher AMD Athlon FX 2 2 GHz or higher Notebook Intel Core2 Duo 2 2GHz or AMD Athlon X2 Dual Core 2 6GHz or higher recommended RAM 1GB or higher is recommended Video Card nVIDIA Geforce 7600GT or higher ATI X1600 series or higher Display 1024 x 768 16 bit color or higher 1280 x 1024 32 bit color recommended USB USB 2 0 support Direct X DirectX 9 0 or higher Main Functions Sy...

Page 100: ...se steps 1 Click the Safely Remove Hardware icon icon on the taskbar 2 Select USB Mass Storage Device and then click Stop 3 If the Stop a Hardware device window appears click OK 4 Disconnect the USB cable from the camcorder and PC Use the provided USB cable Don t apply excessive force when inserting or extracting the USB cable into or from a USB jack Insert the USB plug after confirming you are ins...

Page 101: ...bnail Displays video and photo thumbnails Global Map Displays the location of shooting place with a map 9 Saves new files to PC 10 Selects the Connected Device 11 Shows directories of Contents Manager and My Computer Contents Manager You can classify and manage videos and photos on your computer My Computer You can view videos and photos saved in the selected directory of your PC 12 Shortcut icons ...

Page 102: ...ll playback the video inside the thumbnail frame allowing you to search for a desired video with ease 4 Once you select the desired video or photo double click to play back Step 4 Editing videos or photos With Intelli studio you can edit videos or photos in various ways Change Size Fine Tuning Image Effect Insert Frame etc When you edit a file using the Intelli studio we recommend using a copy of t...

Page 103: ...ploading A pop up window appears asking for your ID and password 5 Enter your ID and password to access Access to the web site contents can be limited depending on your web access environment For more information about Intelli studio use see the Help Guide by clicking the Help Help You can upload Share marked videos onto YouTube by pressing the Share button page 67 Installing Intelli studio applic...

Page 104: ...re button while your camcorder is connected to a Windows computer using the supplied USB cable Then you can share your recordings with your friends family or the world While your camcorder is connected to the computer press the Share button Videos with the Share marks are displayed on the Sharing screen Click Yes to start uploading If you want to upload directly without showing a pop up sharing wi...

Page 105: ...n be uploaded onto the Youtube site only and Flickr site only allows uploading photo files Both video and photo files can be uploaded to the Facebook site Flickr is an image hosting website web services suite and online community platform In addition to being a popular website for users to share personal photographs the service is widely used by bloggers as a photo repository http www flickr com Face...

Page 106: ...able disk screen appears when you connect the camcorder to a USB device Select Open folders to view files using Windows Explorer and then click OK 4 The folders in the storage media appear Different file types are stored in different folders 5 Save the desired files from the storage media to your PC using with a Windows computer Photos Videos If the Removable Disk window does not appear confirm the co...

Page 107: ...is created when files are created more than 9 999 files As with videos the file number automatically increases when a new image file is created The maximum file number allowed is the same as for videos A new folder stores files starting with SAM_0001 JPG The folder name increases as follows 100PHOTO 101PHOTO etc Up to 9 999 files can be created in one folder A new folder is created when files are created ...

Page 108: ...audio cables to the TV VIDEO AUDIO Monaural Type Red VIDEO AUDIO L R White Yellow Stereo Type Normal TV Camcorder Signal flow AV AV Cable Red Yellow White Make sure that the Audio Video cable is connected to the TV and the camcorder You cannot view the image or hear the sound if the cable is not connected properly When you connect the Audio Video cable match the color of the Audio Video cable jack ...

Page 109: ...camcorder 3 Play back the video You can playback record or set options in the menu while viewing on TV screen Image display depending on TV screen aspect ratio 0 00 00 475Min STBY 9999 0 00 00 475Min STBY 9999 0 00 00 475Min STBY 9999 0 00 00 475Min STBY 9999 0 00 00 475Min STBY 9999 0 00 00 475Min STBY 9999 When TV Display is set to Off OSD On Screen Display does not appear on the TV screen page ...

Page 110: ...ages on the camcorder if the VCRs or DVD HDD recorders is connected to the TV You can connect the external device as the same way of connecting a VCRs or DVD HDD recorders to the TV in home To prevent recording OSD information to be displayed along with the AV signal set the TV Display to Off in Menu Settings page 82 Camcorder VCRs or DVD HDD recorders Signal flow Red Yellow White AV AV Cable To co...

Page 111: ...er could become inoperative It is recommended that you put the camcorder in a box together with a desiccant when storing it in a closet etc Do not store the camcorder in a place subject to strong magnetism or intense vibrations This could cause malfunctions Detach the battery pack from the camcorder and store it in a cool place Leaving the battery pack attached or storing it at high temperature co...

Page 112: ...idity Do not touch the metal parts Copy the recorded files to your PC Samsung shall not be responsible for any lost data We recommend that you also copy the data from your PC to other media for backup storage Recorded contents may be lost due to a mistake when handling this camcorder or memory card etc Samsung shall not be responsible for compensation for damages due to the loss of recorded content...

Page 113: ...the TV or device must be NTSC compatible and have the appropriate Audio Video jacks Otherwise you will need to use a separate video format transcoder for example a NTSC to PAL format converter and the appropriate adapter cables NTSC compatible countries regions Bahamas Canada Central America Japan Korea Mexico Philippines Taiwan United States of America etc PAL compatible countries regions Austral...

Page 114: ...hat Action Memory Full SMX C24 only There is not enough space to record in built in memory Delete unnecessary files in the built in memory Use a memory card Back up files to your PC or another storage media and delete files Insert Card There is no memory card inserted in the card slot Insert a memory card Card Full There is not enough space to record in the memory card Delete unnecessary files from th...

Page 115: ... to PC or another storage device Set File No to Reset File number is full Cannot take a photo Max photo folder and file number has been reached and you cannot take a photo Format storage media using menu item after backing up important files to PC or another storage device Set File No to Reset The number of photo files is full Cannot take a photo The number of photo files has reached the 9 999 max Del...

Page 116: ...ernal lenses of the camcorder and on the reflection lens When this happens you should not use the record or play functions of the camcorder temporarily You can cause a malfunction or damage the camcorder if you use it while there is condensation What can I do Turn the power off and detach the battery pack and leave the camcorder in a dry area for 1 2 hours before using it When does condensation occ...

Page 117: ...t with a charged one Use the AC power adaptor Power cannot be turned off Remove the battery pack or unplug the AC power adaptor and reconnect the power supply to the camcorder before turning it on The battery pack is quickly discharged The ambient external temperature is too low The battery pack is not fully charged Recharge the battery pack The battery pack has reached the end of its lifespan and...

Page 118: ...ssing the Recording start stop button does not start recording There is not enough free space to record on the the storage media Check if memory card is not inserted or write protect tab is set to lock The internal temperature of your camcorder is unusually high Turn off your camcorder and leave it for a while in a cool place Your camcorder is damp and moist inside condensation Turn off your camco...

Page 119: ... recording stops The internal temperature of your camcorder is unusually high Turn off your camcorder and leave it for a while in a cool place Your camcorder is damp and moist inside condensation Turn off your camcorder and leave it for about 1 hour in a cool place You cannot record a photo image Set your camcorder to Record mode page 19 Release the lock on the write protection tab of the memory c...

Page 120: ...not work properly If the temperature inside the camcorder is too high it cannot function properly Turn the camcorder off wait for a few minutes and then turn it on again Playback is interrupted unexpectedly Confirm that the AC adaptor or battery pack is properly connected and stable You cannot hear the sound when playing video recorded by Time Lapse REC The Time Lapse REC does not record sound mute...

Page 121: ... Intelli studio run iStudio exe The image or sound on your camcorder is not played on your computer properly Video playback or sound may stop temporarily depending on your computer The video or sound copied to your computer is not affected If your camcorder is connected to a computer that does not support Hi speed USB USB2 0 the images or sound may not be played back correctly The images and sound...

Page 122: ...t Mirror Mosaic Step printing Anti Shake HDIS 16 9 Wide Digital Effect iSCENE Night Darkness Focus Face Detection iSCENE Digital Effect Video Resolution Web Fine Web Normal Back Light iSCENE Night Darkness Fader Time Lapse REC Smart Auto Video Resolution Web Fine Web Normal 16 9 Wide Video Resolution Web Fine Web Normal Anti Shake HDIS Video Resolution Web Fine Web Normal iSCENE Night Darkness iSC...

Page 123: ...og Audio output 7 5dBm 47KΩ analog stereo USB output mini USB B type USB2 0 High Speed General Power source 5 0V Using AC adaptor 3 7V Using Lithium Ion battery pack Power source type Power supply 100V 240V 50 60Hz Lithium Ion battery pack Power consumption 1 8W LCD on Operating temperature 32 F 104 F 0 C 40 C Operating humidity 10 80 Storage temperature 4 F 140 F 20 C 60 C Dimensions W x H x D Ap...

Page 124: ...sented to the authorized service center EXCLUSIONS WHAT IS NOT COVERED This warranty does not cover damage due to accident fire flood and or other acts of God misuse incorrect line voltage improper installation improper or unauthorized repairs commercial use or damage that occurs in shipping Exterior and interior finish lamps and glass are not covered under this warranty Customer adjustments which ar...

Page 125: ...e the 6 hazardous materials Cadmium Cd Lead Pb Mercury Hg Hexavalent Chromium Cr 6 Poly Brominated Biphenyls PBBs Poly Brominated Diphenyl Ethers PBDEs in our products If you have any questions or comments relating to Samsung products please contact the SAMSUNG customer care center Samsung Electronics America inc 1 800 SAMSUNG 726 7864 www samsung com us ...

Reviews: