


ENGLISH
ESP
AÑOL
IT
ALIANO
POR
TUGUÊS
FRANÇAIS
DEUTSCH
E§§HNIKA
E S I P F D G DB68-01129A(14)
OWNER’S INSTRUCTIONS
MANUAL DE INSTRUCCIONES
ISTRUZIONI PER L’USO
MANUAL DE INSTRUÇÕES
MANUEL D’UTILISATION
GEBRAUCHSANWEISUNG
O¢H°IE™
Split-type Room Air Conditioner
(Cool)
Aire acondicionado doméstico sistema Split
(Refrigeración)
Condizionatore d’aria per ambienti ad unità Separate
(Raffreddamento)
Aparelho de ar condicionado tipo Split
(Refrigeração)
Climatiseur de type Séparé
(Refroidissement)
Geteilte raumklimaanlage
(Kühlen)
¢IAIPOYMENO K§IMATI™TIKO ¢øMATIOY
(æ‡Í˘)
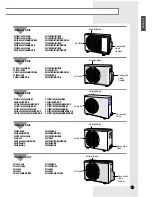
AS24B1(B2)RE/B/C/D
AST24B1(B2)(B5)(B6)(B8)RE/B/C/D
SC24TB1(B2)(B5)(B6)(B8)
AS18B1(B2)(B5)(B6)(B9)(B0)RE/B/C/D
AST18B1(B2)(B5)(B6)(B9)(B0)RE/B/C/D
SC18TB1(B2)(B5)(B6)(B9)(B0)
SC18ZB1(B2)(B5)(B6)(B9)(B0)
AS12B1(B2)(B3)(B4)(B5)(B6)(B7)(B8)(B9)(B0)MB/C/D/E/EA
SC12ZB1(B2)(B3)(B4)(B5)(B6)(B7)(B8)(B9)(B0)
SC12ZB1(B2)(B3)(B4)(B5)(B6)(B7)(B8)A
SC12ZB1(B2)(B3)(B4)(B5)(B6)(B7)(B8)B
SC12AB5
AS09B1(B2)(B3)(B4)(B5)(B6)(B7)(B8)MB/C/D/E
SC09ZB1(B2)(B3)(B4)(B5)(B6)(B7)(B8)
SC09ZB1(B2)(B3)(B4)(B5)(B6)(B7)(B8)A
SC09AB5
AS07B1(B2)(B3)(B4)(B5)(B6)(B7)(B8)MB/C/D/E
SC07ZB1(B2)(B3)(B4)(B5)(B6)(B7)(B8)
SC07ZB1(B2)(B3)(B4)(B5)(B6)(B7)(B8)A
SC07AB5
AS07B5(B6)MA
AS09B5(B6)MA
AS24A1(A2)RE/B/C/D
AST24A1(A2)(A5)(A6)(A8)RE/B/C/D
SC24TA1(A2)(A5)(A6)(A8)
AS18A1(A2)(A5)(A6)(A9)(A0)RE/B/C/D
AST18A1(A2)(A5)(A6)(A9)(A0)RE/B/C/D
SC18TA1(A2)(A5)(A6)(A9)(A0)
SC18ZA1(A2)(A5)(A6)(A9)(A0)
AS12A1(A2)(A3)(A4)(A5)(A6)(A7)(A8)(A9)(A0)MB/C/D/E/EA
SC12ZA1(A2)(A3)(A4)(A5)(A6)(A7)(A8)(A9)(A0)
SC12ZA1(A2)(A3)(A4)(A5)(A6)(A7)(A8)A
SC12ZA1(A2)(A3)(A4)(A5)(A6)(A7)(A8)B
SC12AA5
AS09A1(A2)(A3)(A4)(A5)(A6)(A7)(A8)MB/C/D/E
SC09ZA1(A2)(A3)(A4)(A5)(A6)(A7)(A8)
SC09ZA1(A2)(A3)(A4)(A5)(A6)(A7)(A8)A
SC09AA5
AS07A1(A2)(A3)(A4)(A5)(A6)(A7)(A8)MB/C/D/E
SC07ZA1(A2)(A3)(A4)(A5)(A6)(A7)(A8)
SC07ZA1(A2)(A3)(A4)(A5)(A6)(A7)(A8)A
SC07AA5
AS07A5(A6)MA
AS09A5(A6)MA
Indoor Unit
Indoor Unit


