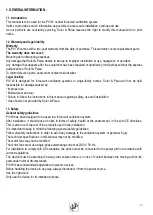
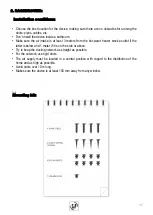
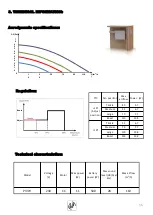
background image

PIV-W

Summary of Contents for PIV-W

Page 1: ...PIV W E 100 B EB 50 2...

Page 2: ......

Page 3: ...2 Informaci n previa 3 Informaci n t cnica 4 Instrucciones de instalaci n 5 Mantenimiento ANEXO Placa electr nica Contenido del embalaje 1 PIV W con filtro y bater a 2 Kit de fijaci n tornillos 3 Manu...

Page 4: ...ciones de este manual en cuanto a la seguridad el uso y la puesta en marcha La utilizaci n de piezas no suministradas por Soler Palau 1 3 Seguridad Normas generales de seguridad La PIV W ha sido dise...

Page 5: ...etro si est en el lateral o por encima Procurar que la red de conductos sea lo m s recta posible Para la red se deben utilizar conductos r gidos La impulsi n de aire deber estar situada en una posici...

Page 6: ...n ventilador Caudal M x Potencia W Trickle 40 5 7 Medium 55 6 7 Large 70 7 7 Boost 110 10 9 Trickle 55 6 7 Medium 70 7 7 Large 110 10 9 Boost 110 10 9 19 Pos ajuste 19 Modelo Tensi n V Motor Potencia...

Page 7: ...r Toma de aire ext Impulsi n PIV W Vista del equipo Toma de aire exterior 4 opciones Impulsi n a la vivienda Interruptor bater a el ctrica opcional Debe incluir una protecci n de 3 Amperios no incluid...

Page 8: ...e espacio alrededor de la plantilla para la colocaci n del equipo y de los paneles 1b Si la toma de aire se realiza por el lado trasero utilizar el conjunto Panel Trasero Carcasa central como plantill...

Page 9: ...se que el cable sale por el hueco previsto en el panel lateral Fijar la unidad mediante los 5 puntos de fijaci n del panel trasero 7 Encajar la cara frontal interna alineando los ocho agujeros para lo...

Page 10: ...estar colocada cerca de la pared exterior y el conducto de conexi n con la toma de aire exterior es suficientemente largo se recomienda aislar este tramo para evitar condensaciones en la superficie e...

Page 11: ...ente y ajustar la velocidad en funci n de las necesidades Para modificar la velocidad del equipo presionar el bot n situado en la parte superior de la tarjeta electr nica situada en el lateral del equ...

Page 12: ...T 25 C On Activado por defecto para el PIV Off Funcionamiento continuo por defecto para el PIV W Contador Tiempo funcionamiento se contabiliza el n mero de horas en funcionamiento hasta 11 a os Pulsa...

Page 13: ...al information 2 Background 3 Technical information 4 Installation instructions 5 Maintenance ANNEX Circuit board Package contents 1 PIV W with filter and battery 2 Mounting kit screws 3 Instruction m...

Page 14: ...llow the instructions in this manual regarding safety use and installation Use of parts not provided by Soler Palau 1 3 Safety General safety guidelines PIV W has been designed to be used in a forced...

Page 15: ...water heater smoke outlet if the latter is below and 1 meter if it is on the side or above Try to keep the ducting network as straight as possible For the network use rigid ducts The air supply must b...

Page 16: ...Fan position Max airflow Power W Trickle 40 5 7 Medium 55 6 7 Large 70 7 7 Boost 110 10 9 Trickle 55 6 7 Medium 70 7 7 Large 110 10 9 Boost 110 10 9 19 Adjust position 19 Model Voltage V Motor Max pow...

Page 17: ...stallation diagram Ext air intake Air flow PIV W View of device Ext air intake 4 options Air flow into home Electric battery switch optional Must include 3 Amp protection not included Dimensions 230 V...

Page 18: ...there is enough space around the guide to install the device and the panels 1b If the air intake is through the rear use the Back Panel Central Housing combination as a guide Mark the location of the...

Page 19: ...ir supply Make sure the cable runs out of the space provided in the side panel Mount the unit using the 5 points on the back panel 7 Fit the internal front panel by aligning the eight rivet holes Atta...

Page 20: ...If the unit can t be mounted near an exterior wall and the duct connection to the exterior air supply is long enough we recommend insulating this section to avoid condensation along the outer surface...

Page 21: ...evice Make sure the unit is working properly and adjust the speed to fit the needs of the space To change the speed press the button on the upper part of the circuit board on the side of the unit Sugg...

Page 22: ...kick up Jumper 4 5 Stop if T 25 C On stop default for PIV Off non stop default for PIV W Time counter counts the number of hours in use up to 11 years Hold the button down to see all the numbers from...

Page 23: ...2 Information pr alable 3 Information technique 4 Instructions d installation 5 Entretien ANNEXE Carte lectronique Contenu de l emballage 1 PIV W avec filtre et batterie 2 Kit de fixation vis 3 Manue...

Page 24: ...s La non observation des instructions signal es dans ce manuel quant la s curit l utilisation et la mise en uvre L utilisation de pi ces non agr es par Soler Palau 1 3 S curit Normes g n rales de s cu...

Page 25: ...ous et 1 m tre si elle est plac e sur le c te ou au dessus S assurer que le r seau des conduits est le plus en ligne droite possible Pour le r seau utiliser des conduits rigides Centrer le plus possib...

Page 26: ...entilateur D bit Max Puissance W Trickle 40 5 7 Medium 55 6 7 Large 70 7 7 Boost 110 10 9 Trickle 55 6 7 Medium 70 7 7 Large 110 10 9 Boost 110 10 9 19 Pos r glage 19 Mod le Tension V Moteur Puissance...

Page 27: ...rise d air ext Insufflatio n PIV W Vue de l quipe Prise d air ext 4 options Insufflatio n dans le logement Interrupteur batterie lectrique optionnel Doit inclure une protection de 3 Amp res non compri...

Page 28: ...amment d espace autour du gabarit pour placer l appareil et les panneaux 1b Si la prise d air se r alise sur le c t arri re utiliser l ensemble Panneau Arri re Bo tier central comme gabarit Marquer su...

Page 29: ...orifice pr vu dans le panneau lat ral Fixer l unit moyennant les 5 points de fixation du panneau arri re 7 Embo ter la face frontale interne en alignant les huit trous pr vus pours les rivets Fixer la...

Page 30: ...e plac e pr s du mur ext rieur et le conduit de connexion avec la prise d air ext rieure est suffisamment long il est recommand d isoler ce tron on pour viter des condensations dans la surface externe...

Page 31: ...vitesse en fonction des besoins Pour modifier la vitesse de l quipe appuyer sur le bouton situ dans la partie sup rieure de la carte lectronique situ e dans la partie lat rale de l appareil 5 Recomma...

Page 32: ...5 C On Activ par d faut pour la PIV Off Fonctionnement continu par d faut pour la PIV W Compteur Temps cumul de fonctionnement Le nombre d heures en fonctionnement est comptabilis jusqu 11 ans En appu...

Page 33: ...nformazioni preliminari 3 Informazioni tecniche 4 Istruzioni di montaggio 5 Manutenzione ALLEGATO Piastra elettronica Contenuto dell imballaggio 1 PIV W con filtro e batteria 2 Kit di fissaggio viti 3...

Page 34: ...nosservanza delle istruzioni del presente manuale in materia di sicurezza uso e messa in servizio Uso di ricambi non forniti da Soler Palau 1 3 Sicurezza Norme generali di sicurezza L impianto PIV W s...

Page 35: ...a sotto e 1 metro se si trova di lato o al disopra Verificare che la rete di condotte sia il pi retta possibile Usare condotte rigide per la rete La mandata dell aria deve trovarsi in posizione centra...

Page 36: ...ione ventilatore Flusso M x Potenza W Trickle 40 5 7 Medium 55 6 7 Large 70 7 7 Boost 110 10 9 Trickle 55 6 7 Medium 70 7 7 Large 110 10 9 Boost 110 10 9 19 Pos regol 19 Modello Corrente V Motore Pote...

Page 37: ...Presa d aria esterna Mandata PIV W Vista dell impianto Presa d aria esterna 4 opzioni Mandata edificio Interruttore batteria elettrica optional Deve includere una protezione da 3 Ampere non di serie...

Page 38: ...Verificare che vi sia spazio sufficiente intorno alla soletta per l installazione dell impianto e dei pannelli 1b Se la presa d aria si realizza dal pannello posteriore usare l insieme Pannello Carca...

Page 39: ...cavo fuoriesca dall apposito foro nel pannello laterale Fissare l unit mediante i 5 punti di fissaggio del pannello posteriore 7 Incastrare il frontale interno allineando gli otto fori per i rivetti F...

Page 40: ...re l unit vicino alla parete esterna e la condotta di allacciamento alla presa d aria sufficientemente lunga si raccomanda di isolare questa sezione per evitare la formazione di condensa sulla superfi...

Page 41: ...amento dell impianto e regolare la velocit in funzione delle necessit Per modificare la velocit dell impianto premere il pulsante superiore della scheda elettronica situata nel laterale dell impianto...

Page 42: ...tivato per difetto per il modello PIV Off Funzionamento continuo per difetto per il modello PIV W Contare di funzionamento contabilizza il numero di ore di funzionamento fino a 11 anni Premendo il pul...

Page 43: ......

Page 44: ...S P SISTEMAS DE VENTILACI N SL C Llevant 4 Pol gono Industrial Llevant 08150 Parets del Vall s Barcelona Espa a Tel 34 93 571 93 00 Fax 34 93 571 93 01 www solerpalau com Ref PIV W 2 09 15...

Reviews: