background image

Installation Instruction

Widespread Lavatory Set 

ALEXIS COLLECTIONS

Please read the instructions completely before beginning the installation.

Alexis Collection

Model Number: 2320HA

Alexis Crystal Collection

Model Number: 2320HC

Flush both supply lines before installation, then shut off both supply lines.
Minimum hole size for the spout and handle trim is 1-1/4” and maximum of 1-1/2”

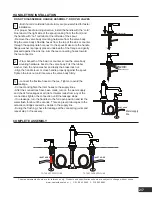
       - Remove the tee connector, spout mounting hardware and tee
       connector washer from the bottom of the spout assembly. Apply
a ring of silicon caulking around the center hole on the top of the sink.
Do not use plumbers' putty which can damage the finish of the faucet.
- From the top of the deck, insert the spout's threaded shank through
the center hole of the sink. Make sure the spout flange washer is
properly placed underneath of the flange and gently pressed against
the sink top.

1

Rev 06/2016

The measurements shown are for reference only. Products and specifications shown are subject to change without notice.

www.santecfaucet.com   |   P: 310.542.0063   F: 310.542.5681    

SPOUT INSTALLATION

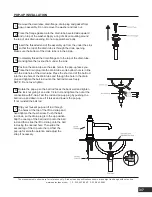
       - Slip the spout mounting hardware back onto the spout. First the
       notched rubber washer, then the notched metal washer and lastly
the brass lock nut. Hand tighten the lock nut.
- Place the pop-up lift rod with the knob through the back hole in the
spout and rotate the notched washers until the lift rod passes through
the notch.
- Tighten the lock nut. Make sure the lift rod operates smoothly. Adjust
it if necessary.
- Place the tee connector washer into the tee connector and thread
the tee connector onto the end of the spout shank. Tighten to seal.
- Align the spout and tighten the shank lock nut firmly.

2

Rubber washer

1/7

Notched rubber washer

Notched metal washer

Spout stabilizer

Brass lock nut

Tee connector

Tee connector washer

Summary of Contents for ALEXIS 2320HA

Page 1: ... underneath of the flange and gently pressed against the sink top 1 Rev 06 2016 The measurements shown are for reference only Products and specifications shown are subject to change without notice www santecfaucet com P 310 542 0063 F 310 542 5681 SPOUT INSTALLATION Slip the spout mounting hardware back onto the spout First the notched rubber washer then the notched metal washer and lastly the bra...

Page 2: ...ghten the lock nut until it secures the valve body firmly 2 HANDLE TRIM INSTALLATION connect the flexible hoses to the tee Tighten to avoid the leakage Connect and tighten the Inlet hoses to the supply lines After the connections have been made turn on the water supply and check for leakages at all joints If water leaks from any of the connections tighten the connection until the leakage stops If ...

Page 3: ... hole of the drain tube and through the hole in the drain plug and tighten the ball rod nut so the ball rod moves freely NOTE Do not over tighten 6 Rotate the pop up so the ball rod faces the back wall and tighten the lock nut giving it an extra 1 4 turn Hand tighten the nut at the connection with P trap Test the rod and pop up plug by pushing the ball rod up and down to see if it raises and lower...

Page 4: ...em Extension SA240 11 Vogue Handle Lever PH0030 12 Valve Adaptor PM 090 13 Rubber Washer PM 407 14 Drop in Valve Hot P0466 15 Drop In Valve Cold P0467 16 Fiber Washer PM 332 17 Brass Lock Nut PM 607 18 Screw PM 617 19 Monza Novo Roman Tub Handle O ring PM 953 20 M16 5 x 1 Hidden Neoperl Laminar Aerator PM 1234 PART DESCRIPTION PART 21 Flexible Hose Cold K1321 22 Flexible Hose Hot K1322 23 Shank K1...

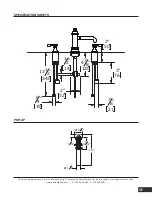
Page 5: ... are for reference only Products and specifications shown are subject to change without notice www santecfaucet com P 310 542 0063 F 310 542 5681 Ø 2 1 4 1 1 16 3 5 16 12 Ø 1 1 4 5 7 POP UP 3 4 19 7 8 21 76 1 2 14 2 52 47 8 123 2 3 50 131 2 343 ...

Page 6: ...inishes or non clear coated finishes Clear coated finishes are more scratch sensitive and are more reactant to harsh cleaning chemicals than non clear coated finishes Once you have identified the specific luxury finish of your SANTEC product please follow the important corresponding care instructions We recommend that all faucets drains etc be gently wiped dry with a soft cloth after use to avoid ...

Page 7: ...ited to heat from soldering during installation the use of plumber s putty damage from tools used during installation the use or exposure to chemicals or cleaning products either abrasive or non abrasive or the use of any cleaning tool or product other than a soft clean cloth Reverse osmosis may also shorten the life of the finish Changes in the finish or in the product due to normal wear or aging...

Reviews: