background image

CE

27LD4-B

CE

27LD4BK-B

CE

32LD4-B

CE

32LD4BK-B

Please read this Instruction book before using your television.  

We wish you many hours of pleasure from your new television.

Colour Television

INSTRUCTION MANUAL

Summary of Contents for CE27LD4-B
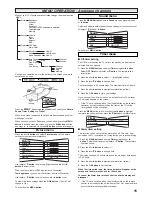
Page 1: ...E27LD4 B CE27LD4BK B CE32LD4 B CE32LD4BK B Please read this Instruction book before using your television We wish you many hours of pleasure from your new television Colour Television INSTRUCTION MANUAL ...

Page 2: ...ce is effective until terminated This licence will terminate automatically without notice if you fail to comply with any of its provisions Disclaimer 1 The Software is to the extent permitted by law supplied as is and SANYO and its suppliers expressly exclude all warranties express or implied including but not limited to warranties of satisfactory quality fitness for purpose and non infringement s...

Page 3: ...f power supply in your home consult your sales person or your local power company Never add accessories that have not been specifically designed for this television Do not drop or push objects into the television cabinet slots or openings Some internal parts carry hazardous voltages and con tact may result in an electric shock hazard Never spill liquids of any kind on the television receiver Do no...

Page 4: ...e mains plug contains a fuse this should have a rating of 5 Amp ensure the fuse cover is correctly fitted If a plug without a fuse is used the fuse at the distribution board should not be greater than 5 Amp Note The severed plug must be destroyed to avoid a possible shock hazard should it be inserted into a 13Amp socket elsewhere The wires in this mains lead are coloured in accordance with the fol...

Page 5: ...0Hz To disconnect completely from the mains or when the TV set is not to be used for an extended period of time it is advisable to discon nect the power cord from the power outlet For all aerial problems please consult your local dealer Install two AAA 1 5 volt batteries so that the and marks on the batteries match the and marks inside the unit into the remote control handset INST INSTALLA ALLATIO...

Page 6: ... sequence as found If you move to another city or cable is installed please follow the description Channel List scan for channels on page 11 or Preset Menu on page 16 for Analogue channels This procedure only appears the first time you switch on 1 Front of LCD TV Press the 5 or 6 button to increase or decrease the programme position Press the 1 or 2 button to increase or decrease the sound volume ...

Page 7: ...e Mute Programme up and down To select the next programme number or previous programme number Volume up down To adjust the sound level Bass selection To get an emphasised bass sound ON or OFF Standby Power on off To switch the TV on and off Also see page 19 Cursors To select the sub menu items in the menu display Up Down Left Right Guide To call up the Digital TV schedule guide display on the scre...

Page 8: ...in your list 7 Press the Blue button to save selection 8 Add more channels move selection rename list remove or swap or press the OK button to finish the list or the MENU button to exit Move selection To change the order of channels in your list 1 Select the channel you wish to move using the e or d button 2 Press the Green button to select the channel 3 Use the e or d button to move to a differen...

Page 9: ...ected this function it will be 1 2 3 4 Use the 7 button to go back and re enter an incorrect digit 5 Select New code by pressing the d button and enter your new code eg 4 3 2 1 6 Select Confirm new code by pressing the d button and re enter the code 4 3 2 1 7 If you are happy with the new code press the OK button to select A prompt Save new code will appear Press the Red button to confirm If Inval...

Page 10: ...ailable then select your preference for the first language Example as shown will give you English first language if not available Welsh may be shown 5 To change press the e or d button to highlight the box and press the 7 or 8 button to select your preferred First language and repeat for Second language 6 Press the d button to select Subtitle display This can be set ON or OFF by pressing the 7 or ...

Page 11: ...turn or the OK button to go back to Technical infor mation screen Software upgrade 1 Press the d button to select Software Upgrade screen Press the 8 button to enter This looks for any new software upgrades that maybe transmitted at any time 2 Press the Return button to go back to Technical information screen 3 Select Product Data by using the e or d button and press the 8 to enter This is useful ...

Page 12: ...o the standby mode when the selected time has elapsed 1 Press the MENU button and select Main Menu 2 Press the d button and select Off Timer Press the 8 button to enter 3 Select Timer using the 7 or 8 button Select OFF Timer using the e or d button The complete line turns yellow 4 Press the 7 or 8 button to select highlighted yellow 5 Press the e or d button to change time The time changes in 30 m...

Page 13: ... channel you are currently on Press the 7 or 8 button to select current programme or next Press the GUIDE button to go to the full guide Press the 5 or 6 button to change to the channel From time to time upgrades will become available When this happens the following screen appears To upgrade press the OK button and the following screen will appear Press the OK button to start this automatically do...

Page 14: ...ion by pressing A B button This operates only analogue channel mode Picture mode selector To access a series of picture modes PERSONAL STANDARD ECO and DYNAMIC Sound mute To switch the sound from the speakers The sound changes as follows Normal volume Half volume Mute Programme up and down To select the next programme number or previous programme number Volume up down To adjust the sound level Bas...

Page 15: ...before the TV switches off a display appears on the screen If the TV set is switched off by the standby button on the remote control or by the standby switch on the front of the TV set the timer settings will be cancelled Press the MENU button to exit or press the 7 button to highlight complete line yellow and then press the d button to set Alarm timer Alarm timer setting This function can be set ...

Page 16: ...to start automatic sorting and storing of TV stations in your area It will sort the channels as in Plug and Play See page 6 To cancel press Menu button repeatedly Prog preset This is used to preset a received channel in any desired programme position 1 Press the MENU button and select Preset press the e or d but ton and select Prog Preset 2 Press the 8 button to enter Semi menu 3 Select Position b...

Page 17: ...51 25 C32 32 E32 E32 559 25 C33 33 E33 E33 567 25 C34 34 E34 E34 575 25 C25 35 E35 E35 583 25 C36 36 E36 E36 591 25 C37 37 E37 E37 599 25 C38 38 E38 E38 607 25 C39 39 E39 E39 615 25 C40 40 E40 E40 623 25 C41 41 E41 E41 631 25 C42 42 E42 E42 639 25 C43 43 E43 E43 647 25 C44 44 E44 E44 655 25 C45 45 E45 E45 663 25 C46 46 E46 E46 671 25 C47 47 E47 E47 679 25 C48 48 E48 E48 687 25 C49 49 E49 E49 695 2...

Page 18: ...screen The 4 coloured buttons give access to the corresponding subjects or pages DS Direct access to a page All the numeric buttons can be used to select a page number directly If you need page 301 press 3 then 0 then 1 Index page selector To call up the Index pages eg P100 Page up and down To select the next page number or previous programme number Teletext TV selector To switch TV MIX and Telete...

Page 19: ...tton to view the picture Album Use the cursors 7 8 e d to highlight a picture for selection Press the OK button to display a full screen Use the cursors 7 8 to cycle through the picture Press the OK button to show the menu or the Blue button to return to Album Auto Album Press the Green button to select Auto album A slide show will begin from the highlighted picture eg 1 2 3 1 2 3 If you wish to s...

Page 20: ...m 14 9 4 3 14 9 16 9 Letterbox Video As zoom 14 9 but bottom is compressed even more to allow subtitles to be seen As zoom 14 9 but bottom is compressed even more to allow subtitles to be seen As zoom 14 9 but bottom is compressed even more to allow subtitles to be seen As zoom 14 9 but bottom is compressed even more to allow subtitles to be seen TITLES ON SCREEN TITLES ON SCREEN TITLES ON SCREEN ...

Page 21: ...ial The following faults are not caused by the receiver GHOSTS Reflections of signals from mountains or high buildings will cause multiple images called Ghosts These abnormal conditions can be reduced to minimum by repositioning aerial or by installing new one suited for your area INTERFERENCE Interference may be caused by electrical appliances car ignition systems etc This should normally be a te...

Page 22: ...This warranty supersedes any other form of guarantee that may inadvertently have been enclosed with or attached to the product Dear Customer Thank you for buying SANYO This equipment should give you many years of pleasure and faithful service but in the event that a fault occurs the following notes for you guidance may be helpful 1 PLEASE RETAIN YOUR PURCHASE RECEIPT WHICH WILL BE REQUIRED FOR SER...

Page 23: ...23 ...

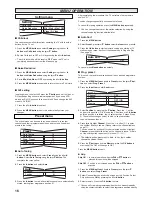
Page 24: ...24 Part No 1KA6P1P0194 B N2WK WKA N2YK YKA Printed in U K ...

Reviews: