background image

1


FXD-RS50

MANU/SKIP

MP3

  45W x 4 

A~ Z/0~ 9

VOLUM E

DIR

LOUD

Full Panel Detachable
High Power FM/MW/LW Stereo Receiver
Compact Disc Player
ISO Mounting with Removable Trim Ring
CD Changer Control
Remote Control 
CD-R/RW Compatibility

(English)

OPERATING INSTRUCTIONS……………. 2~22

CONTENTS

COMPACT DISC CARE ............................................................................................................3
DIGITAL DISPLAY .....................................................................................................................4
DETACHABLE FRONT PANEL .................................................................................................5
GENERAL OPERATION ............................................................................................................6
RADIO OPERATION..................................................................................................................8
CD OPERATION ........................................................................................................................10
CDC OPERATION .....................................................................................................................12
AUX MODE OPERATION ..........................................................................................................14
ERROR SIGNS ..........................................................................................................................15
REMOTE CONTROL READY ....................................................................................................16
HINTS FOR PROPER AND SAFE OPERATION ......................................................................17
TROUBLE SHOOTING ..............................................................................................................18
ACCESSORIES AND HARDWARE...........................................................................................19
INSTALLATION ..........................................................................................................................19

Summary of Contents for FXD-RS50

Page 1: ...ontrol Remote Control CD R RW Compatibility English OPERATING INSTRUCTIONS 2 22 CONTENTS COMPACT DISC CARE 3 DIGITAL DISPLAY 4 DETACHABLE FRONT PANEL 5 GENERAL OPERATION 6 RADIO OPERATION 8 CD OPERATION 10 CDC OPERATION 12 AUX MODE OPERATION 14 ERROR SIGNS 15 REMOTE CONTROL READY 16 HINTS FOR PROPER AND SAFE OPERATION 17 TROUBLE SHOOTING 18 ACCESSORIES AND HARDWARE 19 INSTALLATION 19 ...

Page 2: ...PACT DISC CARE Dirt dust scratches and warpage can cause a deterioration in the sound or intermittent skipping some tracks during play This unit has been designed to play compact discs bearing the identification logo shown on the left No other discs can be played Do not use non conventional discs such as heart shaped octagonal discs etc The player could be damaged Fingerprints and dust should be c...

Page 3: ...ity of the media CD R Media TDK USA Corp Taiyo Yuden U S A Inc Ricoh Corporation Eastman Kodak Company Maxell Corporation of America Mitsubishi Chemical Corporation Fuji Photo Film U S A Inc Mitsui Chemicals Inc Sony Corporation of America Philips Electronics North America Corporation Imation Corp CD RW Media TDK USA Corp Ricoh Corporation Mitsubishi Chemical Corporation Additionally CD R media co...

Page 4: ... button on the front side of the unit Press the button the Microcomputer of the unit returns to the initial settings If the display window is not properly shown or the unit malfunctions press the RESET button Note CAUTION GENERAL OPERATION The unit will not operate if panel is installed incorrectly Do not attempt to remove the panel in a manner other than that described above When installing the p...

Page 5: ... the selected item Make the adjustment within 5 seconds after selecting After 5 seconds the display window will revert to display priority Adjustment Range BASS BAS 00 BAS 10 BAS 10 TREBLE TRB 00 TRB 10 TRB 10 BALANCE BAL L R 10L 10R FADER FAD F R 10F 10R Beep Sound Adjustment Press and hold the SEL button 3 for several seconds enter beep sound adjustment mode then rotate the VOLUME dial 2 clockwi...

Page 6: ... output Press it for several seconds again to release this function EQUALIZATION 7 Press EQ button 7 to turn on equalization function and to select desired audio mode There are five kinds of modes as below FLAT CLASSICS POP M ROCK M DSP OFF MUTE FUNCTION 10 Press MUT button 10 to mute down the sound instantly If any button is pressed in the mute state the mute state is released RADIO OPERATION 2 4...

Page 7: ...rtly to scan preset station in memory STORING PRESET STATIONS 5 The preset buttons 5 can be used to store 6 stations in each band FM 1 FM 2 FM 3 and MW LW for convenient access to your favorite stations Programming stations 1 Select the desired band then tune in the station you want to store in memory 2 Press and hold one of the preset buttons 5 for more than 2 seconds until the corresponding pres...

Page 8: ...e MANU SKIP button to skip to the beginning of the next track Press the MANU SKIP button to skip to the beginning of the previous track Press and hold the MANU SKIP or MANU SKIP 3 for several seconds to search quickly with sound in the forward or reverse direction When the button is released the CD resumes normal play Notes PLACING THE CD IN PAUSE MODE 4 While playing a CD press the PAU button 4 T...

Page 9: ...6 Press the RPT button 6 to play the current track repeatedly To cancel this mode press the RPT button 6 again SHUFFLE MODE 7 This function plays the tracks on a CD in random order Press the SHF button 7 to begin shuffle play To cancel this mode press the SHF button 7 again CD CHANGER OPERATION During playback of a CD the CD running indicator spins The unit will turn on automatically when a CD is ...

Page 10: ... Scan Press the SCN button 4 to play the first several seconds of each track on the current disc in order Playing the beginning of disc Disc Scan Press and hold the SCN button 4 for several seconds to play the first several seconds of each disc in the magazine To cancel the track scan or disc scan mode press SCN button 4 again REPEAT MODE 5 Repeat tracks Press the RPT button 5 to play the current ...

Page 11: ... SWITCHING TO AUX MODE 1 The unit has a pair of auxiliary input terminals see WIRING figure on page 21 This allows you to listen to an auxiliary audio source MP3 portable cassette player etc Press the MODE button 1 with the power on to switch from radio mode or CD mode or CDC mode to AUX mode Use with only SANYO CD Changer ...

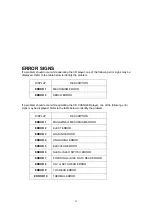
Page 12: ... should occur while operating the CD CHANGER player one of the following error signs may be displayed Refer to the table below to identify the problem DISPLAY DESCRIPTION ERROR 1 MAGAZINE or MECHANISM ERROR ERROR 2 EJECT ERROR ERROR 3 LOADING ERROR ERROR 4 UNLOADING ERROR ERROR 5 ELEVATOR ERROR ERROR 6 SLED or SLED SWITCH ERROR ERROR 7 FOCUSING or DISC DATA READ ERROR ERROR 8 CLV or DATA READ ERRO...

Page 13: ...TE SENSOR IR Point the remote control handset to the remote sensor IR Press the function keys on the handset to control the system IR MANU SKIP MP3 45W x 4 A Z 0 9 VOLUME DIR LOUD 1 POWER 2 SEL 3 VOL 4 VOL 5 MODE 6 MANUAL SKIP 7 MANUAL SKIP 8 AS PS 9 BAND LOUD 10 PAU 11 SCN 12 RPT 13 SHF 14 DISP 15 DISC 16 DISC 17 1 6 Preset buttons ...

Page 14: ... with a soft dry cloth Stains should be removed by wiping the surfaces with a soft cloth immersed in lukewarm water and wrung dry Never use strong chemicals or solvents These will damage the finish of the unit Disc care When not using the disc player for extended periods remove the compact disc and return it to the plastic storage case Do not leave a disc partially ejected from the player If an ej...

Page 15: ...unit See page 20 The sound from the CD player skips The disc is defective Try another disc If it plays properly the first disc may be defective The disc is dirty Clean the disc as explained on page 3 No radio reception The antenna cable is not connected Insert the antenna cable firmly into the antenna jack on the unit The radio does not stop on any stations when automatic tuning is used The signal...

Page 16: ...dard cutout 182x53 mm in the dashboard or console 2 Bend the mounting bracket stopper outward until the bracket fits snugly in the cutout 3 Attaching the Mounting Strap to the underside of the dashboard using screw Attach the back of the unit to the Mounting Strap using support stem bolt and hardware UNIT REMOVAL 1 Insert the unlock levers into the slots on each side of the unit until they click i...

Page 17: ... Accessory Switch Red Ground Wire Black 12V Constant Power Supply Yellow Telephone Mute Pink GREEN BLACK VIOLET BLACK GRAY BLACK WHITE BLACK Power Antenna Amplifier Turn On Blue Red Antenna Socket 2 SPEAKER SYSTEM 4 SPEAKER SYSTEM GREEN WHITE GRAY VIOLET WHITE BLACK GRAY BLACK VIOLET BLACK GREEN BLACK Speaker Rear Left Speaker Front Left Front Right Speaker Rear Right Speaker GRAY VIOLET WHITE GRE...

Page 18: ...emove the blown fuse by using pliers Then install the new 15 amp fuse LINE OUT CONNECTIONS The unit has two pairs of line out terminals see WIRING figure above You can use a separate front or a separate rear channel amplifier to upgrade your system RCA Line out Jacks Connect a patch cable not supplied from the White left channel and Red right channel RCA line output jacks to the line input termina...

Page 19: ...19 FXD RS50 Issue Number 1 Printed in Hong Kong 88 C1980 30 ...

Reviews: