background image

INSTRUCTION MANUAL

LCD-24K50

LCD-24K50(R)

LCD-24K50(W)

LCD TV

Summary of Contents for LCD-24K50

Page 1: ...INSTRUCTION MANUAL LCD 24K50 LCD 24K50 R LCD 24K50 W LCD TV ...

Page 2: ...ion Ensuring the television is not overhanging the edge of the supporting furniture Not placing the television on tall furniture for example cupboards or bookcases without anchoring both the furniture and the television to a suitable support Not standing the televisions on cloth or other materials placed between the television and supporting furniture Educating children about the dangers of climbi...

Page 3: ... be observed This is caused by characteristic of the LCD TV If this occurs turn the LCD TV on and leave it on about 1 hour These dots will gradually disappear T H I S S Y M B O L I N D I C AT E S T H AT DANGEROUS VOLTAGE CONSTITUTING A RISK OF ELECTRIC SHOCK IS PRESENT WITHIN THIS UNIT THIS SYMBOL INDICATES THAT THERE ARE IMPORTANT OPERATING AND MAINTENANCE INSTRUCTIONS IN THE OWNER S MANUAL WITH ...

Page 4: ...s voltage points or short out parts that could result in a fire or electric shock Never spill liquid of any kind on the LCD TV Do not place items such as vases containing liquid on top of the LCD TV Do not install the LCD TV near the ventilation duct of air conditioning equipment This LCD TV should be operated only from the type of power source indicated on the marking label If you are not sure of...

Page 5: ...14 SPORT MODE 14 OFF TIMER 15 WIDE 15 MENU OPERATION TV AV HDMI MODE 16 CHANNEL 16 17 PICTURE 18 SOUND 18 TIMER 19 OSD 19 SETUP 20 MENU OPERATION PC MODE 21 SETUP 21 DEALER MODE 22 23 APPENDIX 24 CLEANING LCD TV 24 FUNCTION OF PRODUCT SAFETY FEATURE 24 TROUBLESHOOTING 25 TECHNICAL SPECIFICATIONS 26 SIGNAL MODE COLUMN Recommended 27 TRADEMARKS Apple Macintosh and PowerBook are trademarks or registe...

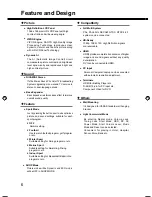
Page 6: ...y entering Dealer mode Volume Lock Tuning Lock Start Mode OSD RC AC Power Mode Start Volume Level Music Mode and Reset can be selected Convenient for placing in Hotel Hospital School Store Bank etc Light Commercial Mode Others 1366 x 768 pixel HD LCD Panel with high contrast ratio and wide viewing angle Just by pressing the button sport mode optimizes picture and sound settings suitable for each s...

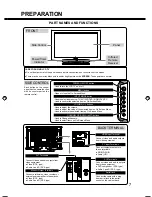
Page 7: ...e TV AV1 AV2 DVD HDMI DVI PC Used to confirm the selected item on On Screen Menu Open or close the On Screen Menu MENU button INPUT MODE button Connect video and audio outputs from video equipment DVD component RCA type Audio L and R RCA type AV2 Terminals Monitor Output Terminals Connect video and audio outputs from video equipment HDMI Input Terminal Connect a television video recorder or extern...

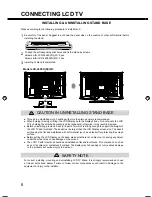
Page 8: ...k or a part of it which is strong enough to support the weight of the LCD TV and this stand The desk must be larger than the LCD Display screen size The desk s surface must be flat and maintained with soft material such as a blanket for protecting the screen surface Before putting the LCD Display on the desk make sure there is no object on it Leaving any object under the screen may cause damage on...

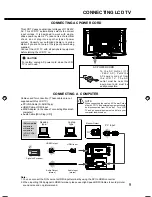
Page 9: ...LCD TV IBM compatible computers or Macintosh computers VGA SVGA XGA Desktop type Cables used for connection These cables are not supplied with this LCD TV PC VGA Cable D SUB 15pin HDMI Cable HDMI Input MAC Adapter in the case of connecting Macintosh computer Audio Cable Mini Plug L R NOTE When connecting the cables AC Power Cords of both LCD TV and external equipment should be disconnected from AC...

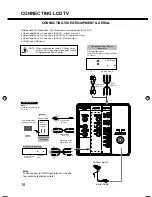
Page 10: ...Cable RCA X1 Audio Cable RCA X2 Monitor Output HDMI Cable HDMI Input NOTE When connecting the cable AC Power Cords of both LCD TV and external equipment should be disconnected from AC outlet External monitor Composite Video and Audio Output Audio Speaker stereo Audio Amplifier Note Video RCA output is for TV or AV MONITOR OUT Video cable RCA x1 Audio cable RCA x 2 Video and Audio cable RCA x 3 Vid...

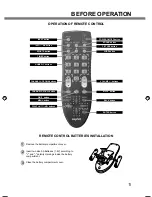
Page 11: ...E button NUMERIC buttons TIMER button BACK button DIGIT button INFO VA B button SPORTS button VOLUME buttons PICTURE button Remove the battery compartment cover Insert two size AA batteries 1 5V according to and polarity markings inside the battery compartment Close the battery compartment cover 1 2 3 OPERATION OF REMOTE CONTROL REMOTE CONTROL BATTERIES INSTALLATION ...

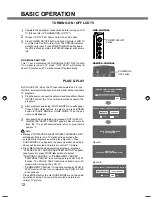
Page 12: ...sage AUTO SET UP COMPLETED HAPPY VIEWING appears About 5 seconds later the TV set will automatically return to programme position 1 PLEASE SELECT AND PRESS ENTER BUTTON HOME MODE SHOP MODE ENTER ENTER SELECT AUTO SET UP COMPLETED HAPPY VIEWING NO STATION PLEASE CONNECT ANTENNA PLUG Figure A ENTER ENTER SELECT PLEASE SELECT AND PRESS ENTER BUTTON TEMPORAL CANCEL PERMANENT CANCEL Figure B Note Messa...

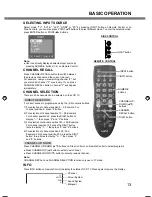
Page 13: ...r selection of channel position 0 9 Example For channel position 8 press 8 button 3 For selection of channel position 100 199 Example For channel position 125 press the DIGIT button twice to display 1 then press 2 and 5 buttons CHANNEL UP DOWN Press CHANNEL UP DOWN buttons on Side Control or on Remote Control to select programs Press CHANNEL UP button to select next channel Press CHANNEL DOWN butt...

Page 14: ... MUTE STEREO MONO SOUND MODE PICTURE button Select image level by pressing PICTURE button on Remote Control PERSONAL User presets picture adjustment in PICTURE MODE STANDARD Natural and splendid picture level preset on this LCD TV SOFT Inhibit strong contrast and color it is beneficial for eye protection Note Select ECO in SETUP menu Then press buttons to select ON While in ECO status press PICTUR...

Page 15: ... that is expanded as ZOOM mode and moved up to show more image to include captions This function can be used for enjoying a letter box picture with captions FULL Provides image to fit width of screen by expanding image width uniformly This function can be used for enjoying a squeezed video signal with wide video aspect ratio of 16 9 screen When your video equipment such as DVD has 16 9 output mode...

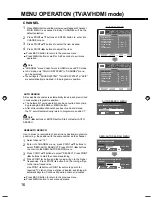
Page 16: ...utton to enter into CHANNEL menu Press POINT buttons to select the item desired Press BACK button to return to the previous menu Press MENU button or wait for 5 60 seconds to exit menu operation 3 AUTO SEARCH MENU SEMI AUTO SEARCH MENU AUTO SEARCH SEMI AUTO SEARCH Enter into CHANNEL menu press POINT buttons to select SEMI AUTO SEARCH Press POINT buttons to enter into the SEMI AUTO SEARCH menu Pres...

Page 17: ...POINT buttons to select SWAPPING item then press POINT buttons or ENTER button to select OK 3 Press BACK button to return to the previous menu Press MENU button or wait for 5 60 seconds to exit menu operation Manual search a channel if it cannot be automatically tuned such as when the signal is poor Press and hold POINT or POINT button to search for required TV station Press ENTER button to save d...

Page 18: ...cy ranges of sound separately by pressing POINT buttons or ENTER button Adjust values of 500 Hz 1 5 KHz 5KHz 10KHz by pressing POINT buttons SOUND MODE Press POINT buttons to select STANDARD NEWS MUSIC or PERSONAL SOUND Press BACK button to return to the previous menu Press MENU button or wait for 5 60 seconds to exit menu operation AUTO VOLUME Switch Auto Volume ON or OFF BASS EXPANDER Switch Bas...

Page 19: ... buttons to enter the item selected 4 OFF TIMER Once OFF TIMER has been set when the set time is reached the TV will shift to stand by status To select OFF 30 MIN 60 MIN 90 MIN or 120 MIN with POINT buttons or TIMER button To cancel OFF TIMER you can choose any option by the following ways Setting OFF in OFF TIMER menu Pressing POWER ON OFF button on Side Control Pressing POWER ON OFF button on Re...

Page 20: ...TIVE CONTRAST ON PC ADJUST SHOP MODE SELECT ADJUST BACK EXIT DYNAMIC AI Used to adjust contrast and color parameters until the display looks good Set it ON or OFF by pressing POINT buttons ACTIVE CONTRAST Used to improved picture contrast by panel s backlight Set it ON or OFF by pressing POINT buttons ECO To select ECO ON or OFF CHILD LOCK When CHILD LOCK is set ON the Side Control buttons will be...

Page 21: ...will become green POWER ON OFF button NUMERIC 0 9 buttons and CHANNEL up down buttons are enabled to switch On TV MENU OPERATION PC mode SETUP Press BACK button to return to the previous menu Press MENU button or wait for 5 60 seconds to exit menu operation SETUP MENU 1 2 Press MENU button and the main menu will appear Press POINT buttons to select SETUP and will display SETUP menu Press POINT but...

Page 22: ...OFF in RC MODE Use this feature to set Remote Control Function including Power ON OFF function ON Set Remote Control to normal function OFF Set buttons on the Remote Control to prohibit to use include Power button TUNING LOCK The way to prevent user from executing the Tuning function TUNING LOCK START MODE OSD RC AC POWER MODE OFF OFF DEALER MODE VOLUME LOCK OFF RESET MUSIC MODE SETUP OFF OFF STAN...

Page 23: ...ected Eco mode is ON AC POWER MODE You can set STAND LAST or ON in AC POWER MODE Use this feature to set TV condition when AC cord plug in STAND When AC cord plug in LCD TV always STAND BY LAST When AC cord plug in the LCD TV will depend on last TV condition ON or Stand by ON When AC cord plug in LCD TV always ON DEALER MODE TUNING LOCK START MODE OSD RC AC POWER MODE OFF OFF DEALER MODE VOLUME LO...

Page 24: ...he LCD TV the protection function works and turn the LCD TV OFF automatically When the LCD TV is turned OFF with this function the POWER indicator becomes red and LCD TV s power cannot be turned ON Disconnect Power cord and contact sales dealer where you purchased the LCD TV or the service center To turn on LCD TV again for checking 1 Disconnect Power cord from AC outlet and plug it on again 2 Ref...

Page 25: ...rtains pointing the light in a different direction etc No image Check the connection between the external equipment and LCD TV When turning LCD TV on it takes a few seconds to display the image Check the system that you select is corresponding with the external equipment or the video equipment Make sure the temperature is not out of the Operating Temperature 0 C 40 C Turn off power then turn on ag...

Page 26: ...ut Composite video Input RCA Jack x1 Audio Input L R Stereo Input RCA Jack x 1 set AV2 Input Video Input Component Y combined with composite video input CB CR Input RCA Jack x1 set Audio L R Stereo Input RCA Jack x 1 set HDMI Input HDMI Terminal 19 pin x1 PC Input Video Input D SUB 15 pin x1 Audio Input Mini stereo jack x 1 Output Terminals Video Monitor Output RCA jack x 1 Audio Monitor Output L ...

Page 27: ...tor that it is no blink of the picture when the V Freq of the signal s 60Hz It is recommended to select 60Hz V Freq of your computer to display better pictures The Dot Clock of the computer s signal must be less than 100 MHz Specifications are subject to change without notice In case of the following things some messages will display on the screen When the input signal from PC is out of the displa...

Page 28: ...Part No 1AA6P1P5952 Z5JJ UE7 C SANYO Electric Co Ltd Printed in Indonesia ...

Reviews: