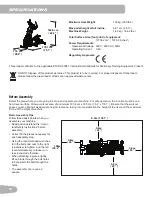
background image

This product is compliant with the 

applicable CE requirements.

ASSEMBLY MANUAL / OWNER’S MANUAL 

270 /

230 /

430i

470i 

2.5

270 /

230 /

2.5

Summary of Contents for 430i Elliptical

Page 1: ...This product is compliant with the applicable CE requirements ASSEMBLY MANUAL OWNER S MANUAL 430i 470i 230...

Page 2: ...in China 2016 Nautilus Inc indicates trademarks registered in the United States These marks may be registered in other nations or otherwise protected by common law Schwinn the Schwinn Quality logo Sch...

Page 3: ...awkward Use a second person when doing the assembly steps involving these parts Do not do steps that involve heavy lifting or awkward movements on your own Set up this machine on a solid level horizon...

Page 4: ...level horizontal surface Make the Foot Pedals stable before you step on them Use caution when you step on and off the machine Disconnect all power before servicing this machine Do not operate this ma...

Page 5: ...5 SAFETY WARNING LABELS AND SERIAL NUMBER WARNING Keep hands and feet away Serial Number 21 54 8mm Product Specification...

Page 6: ...tighten and the left counterclockwise to loosen un less instructed otherwise When attaching 2 pieces lightly lift and look through the bolt holes to help insert the bolt through the holes The assembl...

Page 7: ...Pivot Rod 14 1 Right Leg 4 1 Water Bottle Holder 15 1 Right Pedal 5 1 Console 16 1 Shroud Cap 6 1 Upper Left Handlebar Arm 17 1 Lower Right Handlebar Arm 7 1 Lower Left Handlebar Arm 18 1 Upper Right...

Page 8: ...4 Flat Washer M8 G 12 Lock Washer M8 C 8 Wide Washer M8 H 2 Pivot Sleeve D 4 Button Head Hex Screw M8x16 I 2 Cap E 2 Hex Bolt M8x20 Note Select pieces of Hardware have been provided as spares on the...

Page 9: ...9 ASSEMBLY 1 Attach Front Stabilizer to Frame Note Hardware is pre installed and not on the Hardware Card 13 11 6mm X4...

Page 10: ...10 2 Attach Rail Assembly to Frame Assembly Note Be sure Levelers are fully raised on Rail Assembly Hardware is pre installed and not on the Hardware Card 9 6mm...

Page 11: ...nd not on the Hardware Card NOTICE With the Arm Pivot Rod under the plate junction push the Manual Lift Assembly toward the Frame As sembly and fully tighten hardware Remove the Arm Pivot Rod after ti...

Page 12: ...12 4 Connect the Cable and Attach the Console Mast to Frame Assembly NOTICE Do not crimp Console Cable 16 1 12 B D G 6mm X4...

Page 13: ...13 5 Attach Legs to Frame Assembly 10 14 F X2 A C G X2 6mm...

Page 14: ...14 6 Attach Arm Pivot Rod and Lower Handlebar Arms to Frame Assembly 17 3 7 C G E F I X2 X2 13 mm...

Page 15: ...15 7 Attach Left Pedal to Frame Assembly NOTICE Repeat step on opposite side with the Right Pedal Item 15 15 A C G F 8 C H G A 6mm H...

Page 16: ...16 8 Attach the Upper Handlebar Arms to Frame Assembly Note Hardware is pre installed and not on the Hardware Card Make sure the Upper Handlebar Arms are secure before you exercise 6mm 18 6 X8...

Page 17: ...17 9 Route Cables and Attach the Static Handlebar to Frame Assembly NOTICE Do not crimp the Console Cables 2 X3 6mm...

Page 18: ...18 10 Attach Water Bottle Holder to Frame Assembly Note Hardware is pre installed and not on the Hardware Card 4 2 X3...

Page 19: ...ot crimp the cable Note Hardware is pre installed and not on the Hardware Card 12 Connect Cables and Attach Console to Frame Assembly NOTICE Align the clips on the cable connectors and make sure the c...

Page 20: ...ricant to a cloth and wipe the rails to eliminate roller noise Silicone lubricant is not intended for human consumption Keep out of reach of children Store in a safe place Be sure to record the serial...

Page 21: ...e computer operation BEFORE YOU START Leveling the Machine The machine needs to be leveled if your workout area is uneven or if the Rail Assembly is slightly off the floor To adjust 1 Place the machin...

Page 22: ...Connector I Storage Bin T Fully Shrouded Flywheel J Incline Release Button U USB Port K Incline Adjustment Handle V MP3 Input Use the values calculated or measured by the machine s computer for refere...

Page 23: ...sed workout or goes back to the previous screen GOAL TRACK button Displays the Workout Totals and Achievements for the selected User Profile Increase button Increases a value age time distance or calo...

Page 24: ...can be used as a workout guide for a certain target zone anaerobic aerobic or fat burn Consult a physician before you start an exercise program Stop exercising if you feel pain or tightness in your ch...

Page 25: ...or km in the workout Note To change the measurement units to English Imperial or metric refer to the Console Setup Mode section in this manual Level The LEVEL display shows the current resistance leve...

Page 26: ...time and share your data with MyFitness Pal Review your workouts and results away from the machine when convenient for you The Schwinn Connect web site allows for a workout value to be selected and ha...

Page 27: ...ximately 72 BPM whereas highly trained runners may have readings of 40 BPM or lower The Heart Rate table is an estimate of what Heart Rate Zone HRZ is effective to burn fat and improve your cardiovas...

Page 28: ...your other foot onto the opposite Pedal To dismount your fitness machine 1 Move the Pedal you want to dismount from to the highest position and bring the machine to a complete stop This machine is not...

Page 29: ...nto a power source any button is pushed or if it receives a signal from the RPM sensor as a result of pedaling the machine Auto Shut Off Sleep Mode If the Console does not receive any input in approxi...

Page 30: ...again to end the workout Note The workout results are recorded to the current User Profile User Profiles The Console lets you store and use 2 User profiles The User profiles automatically record the...

Page 31: ...customize which Workout Values are displayed during a workout The Upper Display shows the active value setting ON or OFF Push the Increase or Decrease buttons to hide the active workout value and pus...

Page 32: ...Mount Hood Pyramids Uphill Finish CHALLENGES Cross Training Interval REVED 122612 Easy Tour Easy Tour Pyramids Interval Stream Crossing Summit Pass Stairs MOUNTAINS Pike s Peak Mount Hood ondary Case...

Page 33: ...As your fitness level improves your power output will increase at a given heart rate Note The Console must be able to read the heart rate information from the Contact Heart Rate CHR sensors to work co...

Page 34: ...s to select the Goal type and push OK 4 Push the Increase or Decrease buttons to set the goal value for the workout Note Be sure to allow time for your heart rate to reach the desired heart rate zone...

Page 35: ...Goal Track workout Statistics on the Lower Display in three channels a TIME total DISTANCE total and CALORIES total b SPEED average RPM average and HEART RATE average c TIME average DISTANCE average o...

Page 36: ...machine s computer for reference purposes only 5 Push the Increase button to move to the SAVE TO USB OK prompt Push OK and the ARE YOU SURE NO prompt will display Push the Increase button to change it...

Page 37: ...st the currently active value flashing Push the Left Right buttons to change which segment is the currently active value hour minute AM or PM 5 Push OK to set 6 The Console display shows the Units pro...

Page 38: ...ing the machine Place the power cord in a secure location Daily Before each use examine the exercise machine for loose broken damaged or worn parts Do not use if found in this condition Repair or repl...

Page 39: ...Pedal Arm Left E Arm Pivot Rod Q Console Cable Lower CC Transport Wheel F Console Mast R Incline Assembly DD Front Stabilizer G Water Bottle Holder S Frame Assembly EE Leg Left H Handlebar Arm Lower...

Page 40: ...eam can help make better conduct These are available on the web or at medical or some larger fitness stores Static Handlebar If tests reveal no other issues Static Handlebar should be replaced Console...

Page 41: ...ficult to operate Hardware Tightly secure all hardware on the Pedal Arms and Handlebar Arms Drive train click tick noise once per full crank revolu tion Check crank pulley as sembly Disconnect left an...

Page 42: ...Nautilus Bowflex Schwinn Fitness Universal 8012217 060116 A EN...

Reviews: