background image

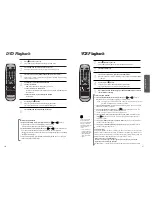
- Region code of DVD/Video player for home is region “2” or ALL. In

inserting a disc with other region code, it does not operate. Please
only use a disc with region code 2 or ALL. 

-

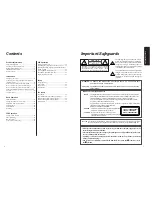
is a ‘DO NOT’ mark. If this mark is displayed in operating the

product, please wait for a while, then use it. If "

DO  NOT" mark

continues to  be displayed in  pressing a  button after  that, it means
the button does not function in the currently played disc.

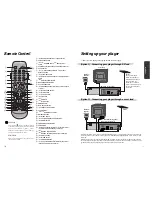
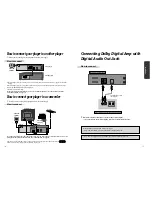
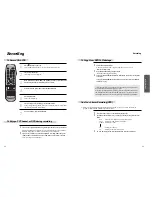
- Press a product button on the REMOTE then use the product. 

• DVD operation  : [

DVD

] button 

• Video operation  : [

VCR

] button 

DVD VIDEO CASSETTE RECORDER

DVC 58X

ENGLISH                GB

INSTRUCTION MANUAL

Summary of Contents for DVC 58X

Page 1: ...ark is displayed in operating the product please wait for a while then use it If DO NOT mark continues to be displayed in pressing a button after that it means the button does not function in the currently played disc Press a product button on the REMOTE then use the product DVD operation DVD button Video operation VCR button DVD PLAYER VIDEO CASSETTE RECORDER DVC 58X ENGLISH GB INSTRUCTION MANUAL...

Page 2: ... within an equilateral triangle is intended to alert the user to the presence of important operating and servicing instructions in the literature accompanying the appliance WARNING TO REDUCE THE RISK OF FIRE OR ELECTRIC SHOCK DO NOT EXPOSE THIS APPLIANCE TO RAIN OR MOISTURE CAUTION TO PREVENT ELECTRIC SHOCK MATCH WIDE BLADE OF PLUG TO WIDE SLOT FULLY INSERT IMPORTANT FOR LASER PRODUCTS LASER This ...

Page 3: ...ention to cords at plugs convenience receptacles and the point where they exit from the unit Important Safeguards PORTABLE CART WARNING symbol provided by RETAC Important Safeguards 13 LIGHTNING For added protection for this unit during a lightning storm or when it is left unattended and unused for long periods of time unplug it from the wall outlet and disconnect the antenna or cable system This ...

Page 4: ...pper and lower sides it may cause flickering of pictures or failure tape is not ejected When you place this player near strong magnetic materials it may affect image or voice poorly or damage recording Do not spill volatile liquids like insect spray over the player Do not leave rubber or plastic products in contact with the player for a long time They will cause deterioration or paint peel off Not...

Page 5: ... button to pause a screen 4 FAST FORWARD button Use to wind currently being played videotape or disc or to playback rapidly 5 OPEN CLOSE Tray button Main body front panel 1 2 345 Identification of Controls Timer Recording Standby Timer Recording Error Recording in Progress Timer Recording in Progress Recording Pause Repeat one chapter DVD Repeat track VCD CD DivX MP3 JPG Repeat title DVD Repeat DI...

Page 6: ...nnect this jack with amp or unit embedded with digital audio decoder Connection to ANTENNA Cable Connection to TV EURO AV1 Jack Main body Rear Panel Disposal of Used Electrical Electronic Equipment The meaning of the symbol on the product its accessory or packaging indicates that thisproduct shall not be treated as household waste Please dispose of this equipment at your applicable collection poin...

Page 7: ...ELECT button DVD VCR NUMBER button VCR TRACKING button SYSTEM button This button is not available for this set SETUP button DVD VCR MOVE SELECT in OSD VCR Channel Up Down button DVD TITLE PBC button DVD AUDIO LANGUAGE Select VCR AUDIO Select button DVD SUBTITLE Select button REVERSE SEARCH button 1 PLAY PAUSE button 2 DVD PREVIOUS button move into a previous chapter or track 3 VCR Record SPEED but...

Page 8: ...om your player Hi Fi Aerial Television Plug a scart to phone cable into the AV1 socket on the back panel and into the audio socket on any audio amplifier if needed Player 200 240V 50 60 Hz Hi Fi Aerial Option 1 Option 2 Connecting your player through extra equipment satellite system Before you start unplug all the equipment from the mains supply Television Aerial Back view of your player 200 240V ...

Page 9: ...on into the first player and press INPUT until AV1 appears on the front display 2 Insert the tape you wish to copy from into the second player Press the PLAY button on the second player 3 Press the RECORD button on the first player The player will start recording If your player has two scart sockets you can use the other socket AV2 to connect other equipment To use this function see page 16 How to...

Page 10: ... 07 PR14 PR SELECT OK CONFIRM SETUP END If you don t see this picture because you don t use a SCART cable search this picture now CH 52 with the station tuning functions of your TV set see its user manual In case of interference problems on CH 52 type in an other transmission channel between 21 and 69 using the number buttons Setting up the player 2nd scart socket If your video has the AV2 output ...

Page 11: ...NTROL PR SELECT OK CONFIRM SETUP END OSD On Screen Display ON OFF To Select DVD To Select VCR To Select Watch Modes or External Input Press VCR button on the remote control to change into VCR Mode and follow the procedure below Call the player s SETUP choose VCR SETUP then CLOCK SET 1 Move to the position you want to change and type in the new values Wait a few seconds after typing a one digit num...

Page 12: ...utomatic Tracking function and enables users to enjoy clear picture without an additional operation Provided that the following problems can be solved by the manual adjustment which improves display quality During automatic display adjustment Adjusting Display are displayed on TV screen If the screen is poor in Playback mode If noises occur in the upper or lower part of screen in slow playback mod...

Page 13: ...button Twice recording for 30 mins from current time 3 times recording for 1 hour 21 recording for 10 hours 22 returning to the status of Once Press 3 3 To stop Recording mode press STOP button more than 5 seconds To Copy From DVD To Videotape One Touch timer Recording OTR 1 1 If you want to playback DVD during recording with video insert a DVD disc Place the desired DVD disc on DVD tray press DVD...

Page 14: ...10 P 10 PR04 P 04 PR11 P 11 PR05 MTV PR12 PR06 P 06 PR13 PR07 P 07 PR14 PR01 ARD PR08 P 08 PR02 ZDF PR09 P 09 PR03 P 03 PR10 P 10 PR04 P 04 PR11 P 11 PR05 MTV PR12 PR06 P 06 PR13 PR07 P 07 PR14 Tuning in New Stations Station names Sorting programme locations Clearing programme locations Tuning in New Stations The TV and player are switched on To see the picture from your player press the input or ...

Page 15: ...e and with sufficient free space for the recording Call the ShowView menu by pressing PROGRAM on the remote control From your TV magazine type in the number next to the programme you want to record and confirm 1 Decide if you want to record ONCE WEEKLY or DAILY and confirm 2 If you wish to make changes Move to the position you want to change using the œ œ buttons Change the setting using the or nu...

Page 16: ...APE REMAIN E 240 01 27 TAPE REMAIN GO TO ZERO COUNTER RESET INDEX INDEX E 180 E 240 E 300 PR SELECT OK CONFIRM SETUP END PR SELECT OK CONFIRM SETUP END When you record a program the VCR places an index mark at the start of the recording To search fo an index mark 1 Call the player s SETUP choose TAPE CONTROL 2 Choose index to search forward or index to search backward The VCR will locate your inde...

Page 17: ...ounter COUNTER RESET 0 00 00 You can play and record the program of 16 9 Wide Screen format with this player 16 9 Set Auto This video automatically detects the program format 16 9 or 4 3 and records or plays this program in the same format ON The video will play or record all broadcasts in 16 9 format 4 3 broadcasts will be converted to 16 9 format OFF The video will play or record all broadcasts ...

Page 18: ...le of stereo sound RF OUTPUT SET 0 9 SELECT 21 69 OK CONFIRM SETUP END CH 52 To the TV via antenna cable if you are not using a SCART cable The player machine records the complete sound signal transmitted by the TV station On the mono VCR you will hear the normal mono sound In addition to the normal mono sound track of VHS video recorders your player machine is equipped with a high quality Hi Fi s...

Page 19: ...tions and Copying Switch off all components when connecting or disconnecting cables To copy to your player from another video machine connect the two machines with a cable between their EURO AV SCART sockets and select as programme AV 1 AV 2 or F AV front sockets using the AV PR or INPUT button Set the other video machine to playback and your machine to record To connect a mono audio source use th...

Page 20: ... disc may not be repeated from A to B At the point where you want to start the repeat playback press A B button The right figure appears and repeat playback start position A is set 1 At the point where you want to end the repeat playback press A B button again The repeat playback end position B is set and a defined period from A to B is playback repeatedly 2 To exit from repeat playback mode press...

Page 21: ...ched using the NUMBER button If it is PBC ON pressing track number converts PBC to OFF mode automatically 1 If you want to search with a track time press SEARCH button twice In case of PBC OFF the screen like the right figure appears It shows total track time Please enter the new time to be searched using the NUMBER button In completing entering please press ENTER PLAY starts from the selected pos...

Page 22: ...ct or subtitle select 01 06 5 1CH ENG SUBTITLE 01 06 ENG Press 3D Every time you press 3D the 3D sound toggles between 3D ON 3D OFF You can enjoy a virtual 3D sound effect from 2 channel sources 3D ON 3D OFF Selecting an audio language Selecting a subtitle language Selecting 3D Audio Confirming the current PLAY mode on screen While in playing press DISPLAY button It shows the current disc mode If ...

Page 23: ...utton 3 Playing a disc containing MP3 or JPG files MP3 JPG MEDIA PLAYER MP3 10 FI ARTIST TRACK 01 MP3 TOTAL 10 LENGTH 03 51 00 00 02 0 1 ARTIST TRA 2 ARTIST TRA 3 ARTIST TRA 4 ARTIST TRA 5 ARTIST TRA 6 ARTIST TRA MEDIA PLAYER JPEG FILES 9268 2 JPG TOTAL 11 Res 1024x768 0 1 9268 2 2 AAFALLROAD12 3 ALL_NITE 4 AMEILEENDONA 5 AMFUNKYFLOWE 6 AMPOPPIESDAI Selecting ZOOM and Multi Angle The user can enla...

Page 24: ...mage sound structure of a recorded file have not been undergone the interleave it will output either the image or the sound MEDIA PLAYER THE ADVENTURES OF ROCKY AVI TOTAL 3 LENGTH 01 31 51 0 ROOT 1 ETHE ADVENTU 2 HTHE ADVENTU 3 THE ADVENTUR 00 00 05 About MP3 JPG and DivX discs Recognizing range for a MP3 disc is stated below The maximum number of directories should not exceed 32 The maximum depth...

Page 25: ...esolution size will be below 720 x 576 width x length pixels only If it has a code unable to display it will display the mark of _ A file name of DivX subtitles must be made with up to English 20 characters only A file of DivX subtitles only supports a file named with the extensions of smi srt or sub The subtitles will not be displayed if the file capacity of subtitles will exceed 250KB The langua...

Page 26: ...2 Xhosa 6890 Bhutani 7383 Icelandic 7779 Moldavian 8378 Shona 8979 Yoruba 6976 Greek 7384 Italian 7782 Marathi 8379 Somali 9072 Chinese 6978 English 7387 Hebrew 7783 Malay 8381 Albanian 9085 Zulu 6979 Esperanto 7465 Japanese 7784 Maltese 8382 Serbian Table of language and Their Abbreviations OSD LANGUAGE AUDIO SUBTITLE DISC MENU GERMAN SPANISH ITALIAN DUTCH RUSSIAN CZECH HUNGARIAN AUTO OSD LANGUAG...

Page 27: ...er can set up a connected TV condition and screen If a user selects 4 3 PS the user can watch only a center of the original scene of 16 9 If a user selects 4 3 LB the user can watch the original scene of 16 9 but the top and bottom of the screen look black color If a disc size is originally recorded in 4 3 a user cannot watch it in a wide screen though a user sets a size as 16 9 Wide DivX REG Plea...

Page 28: ...reensaver functions automatically and DVD logo moves continuously if the resume stop stop open status is maintained for about 5 minutes 3 Restoring DEFAULTS This feature resets every function to its original Factory Defaults except the Parental Control settings 4 Select Parental Press button when the cursor is located in PARENTAL When INPUT PASSWORD appears on the screen input the password Change ...

Page 29: ...xibility and economical performance as well as uncompromised sound quality Bitstream Digital audio data that is decoded into an analog signal for subsequent output to speakers Lt Rt It indicates L R of Dolby Digital 2CH Downmix output Downmix DOWNMIX is reproducing the proper audio when audio format recorded on a disc differs from the output audio channel configuration For example with just one st...

Page 30: ... quickly and easily LP Long Play an intermediate tape recording speed that combines most of the picture audio quality obtainable at the standard recording speed with some of the tape economy of Extended Play EP OSD On screen display of information pertinent to the features of the VCR OTR One touch recording a feature that allows you to record the program you re watching by pressing the REC key Eac...

Page 31: ...ing about troubles VCR Power On does not work It does not work even in Power On A videotape is not inputted in On inputting a videotape the tape is re ejected A videotape is not ejected A channel on video and a play screen does not appear Noise screen noise appears on screen Noise appears on screen after recording While in playing noise appears Sound and screen are irregular Sound comes out but sc...

Page 32: ...hile a DVD is playing MENU does not appear while a DVD is playing The file name of MP3 CD R appears with strange letters Any MP3 CD R file isn t displayed Checks Symptom If a DVD is from overseas it may not be played Please check a DVD s region code whether it has the relative region code 2 or All Please check whether a DVD is inserted in a right direction If it is a CD ROM for PC or DVD ROM it do...

Page 33: ...the OK ENTER button 5 Select the channel that needs to be moved and press the OK ENTER button 6 Press the OK ENTER button in order to select the PR number which you want to place the current selected channel using buttons ie PR01 ARD And press the OK ENTER button to confirm Repeat above 5 6 steps to align the other channels STOP SP PR01 P 01 SETUP TIMER PROGRAM PR PRESET VCR SETUP TAPE CONTROL PR ...

Reviews: