www.FreeStyleFlooring.com
www.StaticStop.com
©2019 SelecTech, Inc. All Right Reserved
Selec
Tech
by
FREESTYLE ™ INSTALLATION GUIDE
When Receiving and Installing FreeStyle
Please inspect your product carefully. If any of the tiles appear damaged
when you open the box do not attempt to install it.
-
FreeStyle Basics
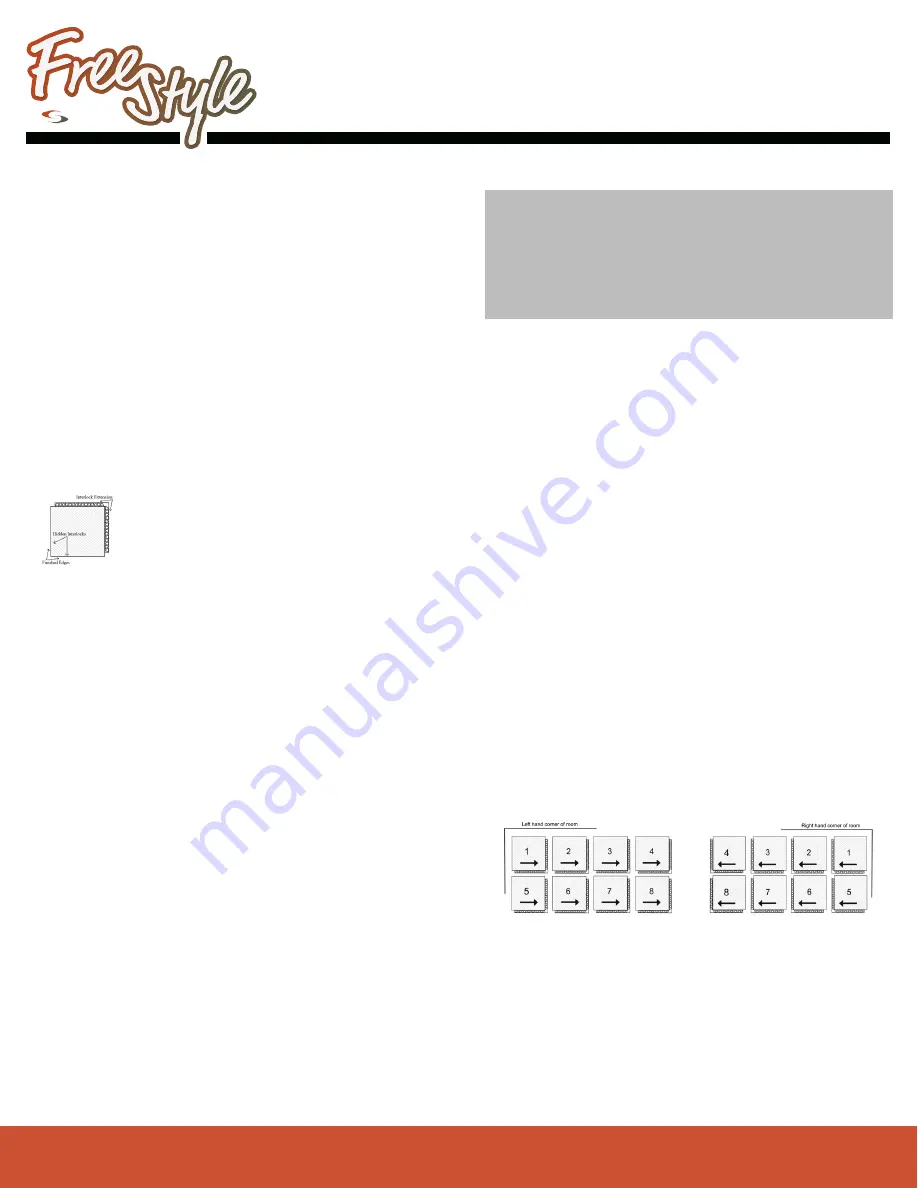
The interlock systems uses two “Interlock Extensions”
that are visible from the top of the tile, and two (2)
“Hidden Interlocks” under the Finished Edges that are
visible from the bottom of the tile. (See Figure 1) To
install, you will mate the Hidden Interlocks on one tile
with the Interlock Extensions on adjacent tiles.
Tile Flatness
Receiving and Storing FreeStyle
Tools
• Dead-blow hammer (21 to 42 oz) available from SelecTech or
at hardware stores
NOTE: RUBBER MALLETS DO NOT WORK
• Utility knife and straight edge.
(Required)
• Carpenter’s square.
(Required)
• Chalk line
(Required)
• Tape Measure
(Required)
• Table saw or circular saw (for making multiple straight cuts).
(Safety devices must be in place and Manufacturer’s instructions and
safety precautions must be observed at all time while using
power equipment)
(Recommended)
• Sharpie or similar marker to mark tile for cutting
• Alternative for straight cuts: A 20” or larger, tile cutter (optional but
highly recommended). These are cost effective on large jobs. Recommended
brand is Bullet Tools, 20” or 26” cutter shear. www.bullettools.com
• 1/4” Spacers
• Jig saw, orbital or similar cutting tool for irregular cuts. Use a medium tooth
finishing blade
• Remove all debris. Sweep and vacuum as necessary.
• Scrape off old adhesive. The surface does not have to be perfect but do
remove large clumps of adhesive (> 1/16” high) (See WARNING above
concerning asbestos containing products)
•
Remove moldings or cove base. You will reinstall old moldings/cove base or
install new ones over the floor after completion.
•
Repair any major surface imperfections (cracks over 3/8”) sharp height tran-
sitions, or voids in the subfloor.
•
If necessary undercut door frames to allow tiles to fit underneath. (Instruc-
tions below)
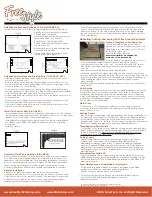
Tile Orientation
Preparation
The hidden interlock design of
FreeStyle
requires that the tiles
must always
be installed in the same rotational direction and with edges and corners in line
with each other. Trying to install otherwise will damage the tiles.
Interlocking Tiles
Prior to interlocking a tile, make sure it is properly aligned with the adjoining
tile(s) and that the interlocks and the floor are free of debris. Align the cor-
ners and interlocks of each tile, placing a “Finished Edge” over the “Interlock
Extension”. Push down on the tile with the heel of your hand until you feel and
see the tile has seated on the adjacent tile at the corner. Gradually work along
the edge of the interlock tapping firmly with the dead-blow hammer until
the edge is fully interlocked.
IF TILES ARE NOT INTERLOCKING WITH RELATIVE EASE RECHECK FOR
PROPER ROTATION AND ALIGNMENT BY REMOVING THE TILE AND
STARTING THE INTERLOCK ENGAGEMENT WITH THE HEEL OF YOUR HAND
AGAIN BEFORE TAPPING JOINT TOGETHER.
CONTINUING TO HIT IMPROPERLY ALIGNED TILES WILL DAMAGE THE LIE
Planning Your Tile Layout
WARNING:
. Appropriate caution and procedures must be used if
removing a preexisting resilient floor covering. Many older vinyl sheets,
floor tile or asphaltic floor coverings contain asbestos that is not readily
identifiable. Removal of these materials must comply with various
federal, state and local regulations pertaining to the removal of in-place
asbestos. Do not sand, dry sweep, dry scrape, drill, saw, bead blast or
pulverize any such existing product(s) unless you are certain they do not
contain asbestos.
FreeStyle is an 18.5” x 18.5” interlocking floor tile. It is a free-lay tile system and
does not require use of adhesives. FreeStyle’s “built-in” subfloor permits
installation over uneven surfaces with minimal preparation of the floor.
FreeStyle can be installed directly over concrete, wood, tile or other standard
floors as well as access floors. FreeStyle
may
be installed over some high
density, commercial grade textured loop carpeting and other firm, resilient
surfaces. If you are considering installing over this type of surface call our
customer service desk to discuss whether going over your existing floor is an
option.
This Installation Guide applies to ALL FreeStyle interlocking floor tiles
including FreeStyle Commercial, FreeStyle BioLock, FreeStyle ESD, FreeStyle
ESD Plus and FreeStyle Designer Series. The method for grounding ESD
versions of FreeStyle are at the bottom of this Guideline and apply to the ESD
products only.
FreeStyle utilizes a patented “zipper” interlock system, designed for adhesive
free installation and providing tight seams, with a flexible, moisture proof
base that is manufactured with recycled content. This design results in a
slight dipping at the edges of the tile which is normal. Some amount of
“cupping” may also be present when removed from the box and on initial
installation. This will diminish over time as the floor “settles in” following
installation, however, FreeStyle tile will maintain some characteristic shape
throughout their lifetime.
STORE TILES FLAT AND CONDITION THEM PROPERLY PRIOR TO
INSTALLATION.
Never store the tiles upright. Stack the boxes of tiles (or
loose tiles) on a flat surface with the edges of the boxes flush to one
another. Unconditioned tiles, improper storage or overhanging edges
will distort the shape and size of the tiles and cause difficulty when
installing. Tiles may vary up to 1/32” when conditioned. These variations
will not negatively affect installation if conditioned tiles are installed in
accordance with these instructions. Size variation can be much greater if
the air temperature and slab temperature are not as specified.
Like all tile products, layout planning begins by finding the center of the room
or area to be covered and establishing lines to guide your layout. Unlike
ceramic or vinyl tile products, for much easier and efficient installation
FreeStyle should be installed starting in a corner of the room with the
Finished Edges (See Figure 1) facing the walls. Use the steps outlined below to
establish Control Lines and the Starting Point for your installation. Using these
methods will provide an installation with balanced cut rows along each wall.
Start the process along your longest straightest wall. Determine which corner
will be your starting point. Do not start in a corner with a doorway.
FAILURE TO CAREFULLY MAINTAIN A STRAIGHT LINE ON THE FIRST ROW
OF THE INSTALLATION WILL CAUSE DIFFICULTY IN THE INSTALLATION,
PARTICULARLY IN LARGE AREAS.
FIGURE 1
IF YOU ENCOUNTER ANY CONDITION OR DEFECTS DURING INSTALLA-
TION WHICH COULD JEOPARDIZE THE INSTALLATION OR AFFECT THE
INSTALLATION PROCEDURE YOU SHOULD STOP IMMEDIATELY AND
CONTACT SELECTECH’S CUSTOMER SERVICE DESK (508)583-3200
KEEP TEMPERATURE OF THE ROOM, SUBFLOOR, AND TILE AT A
MINIMUM OF 65 ºF (18ºC) TO A MAXIMUM OF 85ºF (29ºC) FOR AT
LEAST 48 HOURS PRIOR TO INSTALLATION. IF THE TILES HAVE BEEN
SHIPPED IN EXTREME WEATHER CONDITIONS, UNDER 40ºF (4ºC) OR
OVER 95ºF THE CONDITIONING TIME SHOULD BE A MINIMUM OF 72
HOURS.
FIGURE 2


