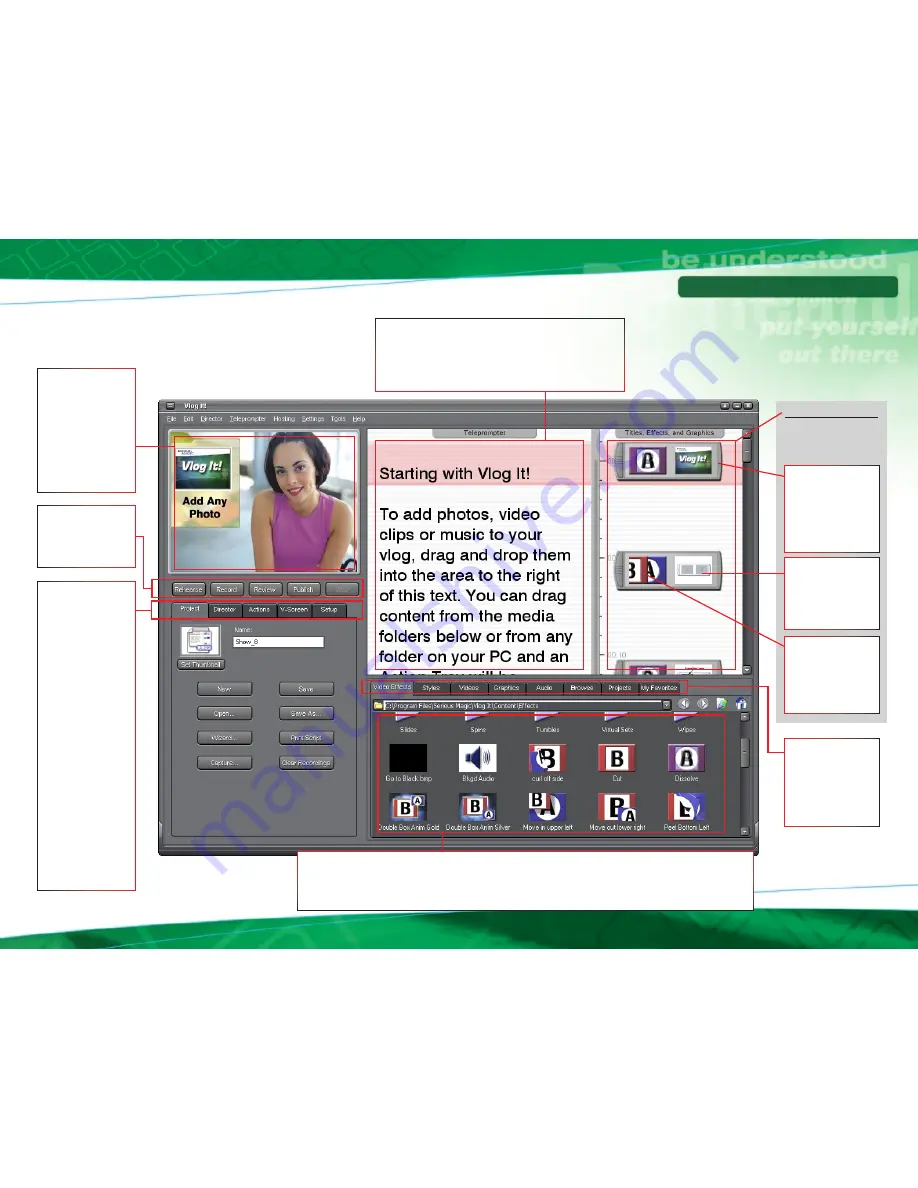
Output Monitor
Window
See the live output
of Vlog It with video,
effects, titles and
graphics added in
real-time as you
Rehearse or Record
your vlog.
The Action Area
Where you add effects,
titles, graphics,
pictures and music.
Action Tray
Slide these trays next
to the words in your
script where you want
the particular action
to take place.
Media
Drag and drop titles,
videos, graphics,
pictures or music into
this action area.
Media Folders
Use the tabs to select
the effects and con-
tent for your videos.
Use the Browse tab to
find your own media.
Action
Drag and drop effects
into the left side of the
action tray next to the
content it goes with.
Main User Interface
Show Controls
Use these buttons to
Rehearse, Record and
Publish your vlog.
Project
– Start, save
or open a project file,
print a script, launch
the Wizard, or capture
video.
Director
– This is
where you can control
the teleprompter
scrolling.
Actions
– Control
duration of effects,
edit titles, and adjust
colors and volume
levels on pictures or
video clips.
V–Screen
– Activate
and control V-Screen.
Setup
– Go here first
to select your video
and audio devices
and adjust controls for
these devices.
The Teleprompter
Read your script as it scrolls up while Vlog It automatically
records your show! This has been designed for you to read
the text as it appears in the red bar. You can adjust the scroll
speed under the Director Project Tab.
Media Files
Depending on which Media Folder tab is selected above, you’ll see effects, titles, graphics, sounds and pictures
appear here. The Browse tab will let you navigate to and use your own standard media content from your PC.
Drag and drop media from here into the Action Area to add it to a show.
Vlog It!
Main User Interface
Vlog It!


