background image

Summary of Contents for 3-Z15 Series

Page 1: ......

Page 2: ...ING AND INSTALLATON OF THE FIXING PLATES 8 4 2 DRILLING AND INSTALLATION OF THE SECURITY SENSOR 10 4 3 INSTALLATION OF THE LATERAL ARMS 11 4 4 CONNECTION OF THE TRANSFORMER 11 5 CONNECTION OF THE ELEC...

Page 3: ...ay with batteries x Do not allow children to play with items of packaging Plastic bags sheets and boxes can cause suffocation and injury x Do not open neither the electric Servetto A B nor the transfo...

Page 4: ...H Adjustable clothes tube I Drilling template L Fixing screws M end caps N Remote control one button Fig 1 Buttons layout 1 Voltage signal led 2 Radio programming signal led 3 Radio programming button...

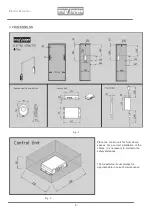
Page 5: ...DIMENSIONS Fig 3 Place the control unit far from damp spaces For a correct installation of the cables it is necessary to maintain the safety distances The transformer must always be approachable in ca...

Page 6: ...one security sensor is necessary for the use of the electric Servetto In case of a two doors wardrobe we recommend the use of two security sensors one for each wardrobe side Fig 6 The control unit bee...

Page 7: ...l unit and transformer fixed above the wardrobe Fig 8 In Fig 8A our indications for the milling of the wardrobe side in case of unsight wiring The wiring installation is at discretion of the technicia...

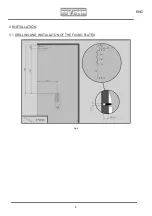
Page 8: ...ENG 8 4 INSTALLATION 4 1 DRILLING AND INSTALLATON OF THE FIXING PLATES Fig 9...

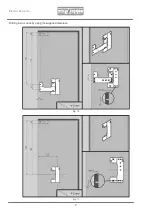
Page 9: ...Electric Servetto 9 Drilling instructions by using the supplied template Fig 10 Fig 11...

Page 10: ...ENG 10 Fig 12 4 2 DRILLING AND INSTALLATION OF THE SECURITY SENSOR Fig 13...

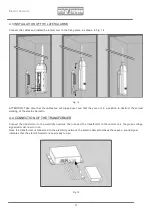
Page 11: ...in a position to obstruct the correct working of the electric Servetto 4 4 CONNECTION OF THE TRANSFORMER Connect the transformer to the electricity network then connect the transformer to the control...

Page 12: ...k 3 Retighten the screws and fix the battery compartment cover The complete installation procedure is shown in Fig 16 Fig 16 When not used the remote control goes into standby mode To reactivate it pr...

Page 13: ...te control the wardrobe compartment Fig 19 3 Press the button SERV Fig 20 Fig 18 Fig 19 Fig 20 The electric SERV has now acquired the command of the button SERV of the selected wardrobe compartment 5...

Page 14: ...e been deleted You can now start a new programming of the remote control Fig 23 6 DISPOSE Dispose all the components of the electric Servetto including the batteries through proper channels for the co...

Page 15: ...oduce this warranty together with the proof of purchase invoice or receipt showing the date of purchase SERVETTO srl Via Brughetti 32 I 20813 Bovisio M go MB Tel 39 0362558899 Sito internet www servet...

Reviews: