
濡れた状態での充電は、
異常な発熱・焼損などの
原因となり大変危険です。
June 2018, 1st Edition
Sold by: KDDI CORPORATION,
OKINAWA CELLULAR TELEPHONE COMPANY
Manufactured by: SHARP CORPORATION
Setting Guide
SHV42
When using the product
●
The battery is built into the product, and cannot be removed by the customer.
●
To force the power off, hold
f
down for 8 or more seconds (Release your finger after the product
vibrates to turn the power off).
Basic Operations
For detailed operations, refer to the Online Manual (Japanese).
You can switch the display language for function names and other items to English.
●
On the home screen
→
“App list screen”
→
[
設定
] (Settings)
→
[
システム
] (System)
→
[
言語と入力
]
(Languages & input)
→
[
言語
] (Languages)
→
[
言語を追加
] (Add a language)
→
[English]
→
[United
States]
→
Long touch “English (United States)” and drag it to the top of the list.
①
Display
Touch it directly with your fingers to operate.
②
^
(Back key): Tap it to return to the previous screen.
③
#
(Home key): Tap it to display the home screen.
④
$
(Recent Apps key): Tap it to display Recent Apps screen.
⑤
f
(Power key): Hold it down to turn the power on. Hold it
down while the power is turned on
→
[Power off] to turn it off.
Unlocking the screen
Unlock the screen by swiping “ ”
up.
●
If a password, etc. is set for the
screen lock, it is displayed as
“ ”.
Displaying the App list screen
On the AQUOS Home
screen, swipe the screen up
The app list screen is
displayed.
■
App Permissions Settings
When you activate applications/functions to access to the function or information of the product for the
first time, the confirmation screen for requesting the permission of access authority is displayed.
When the confirmation screen is displayed, check the displayed contents carefully and follow the on-screen instructions.
●
The explanation screen for permissions may be displayed depending on the applications/functions.
Also, multiple confirmation screens may be displayed or the displayed contents may differ. Check the
displayed contents carefully and follow the on-screen instructions.
If you deny the permission, the application/function may not be activated or the use of function may be restricted.
●
In this manual, some description of the confirmation screens may be omitted.
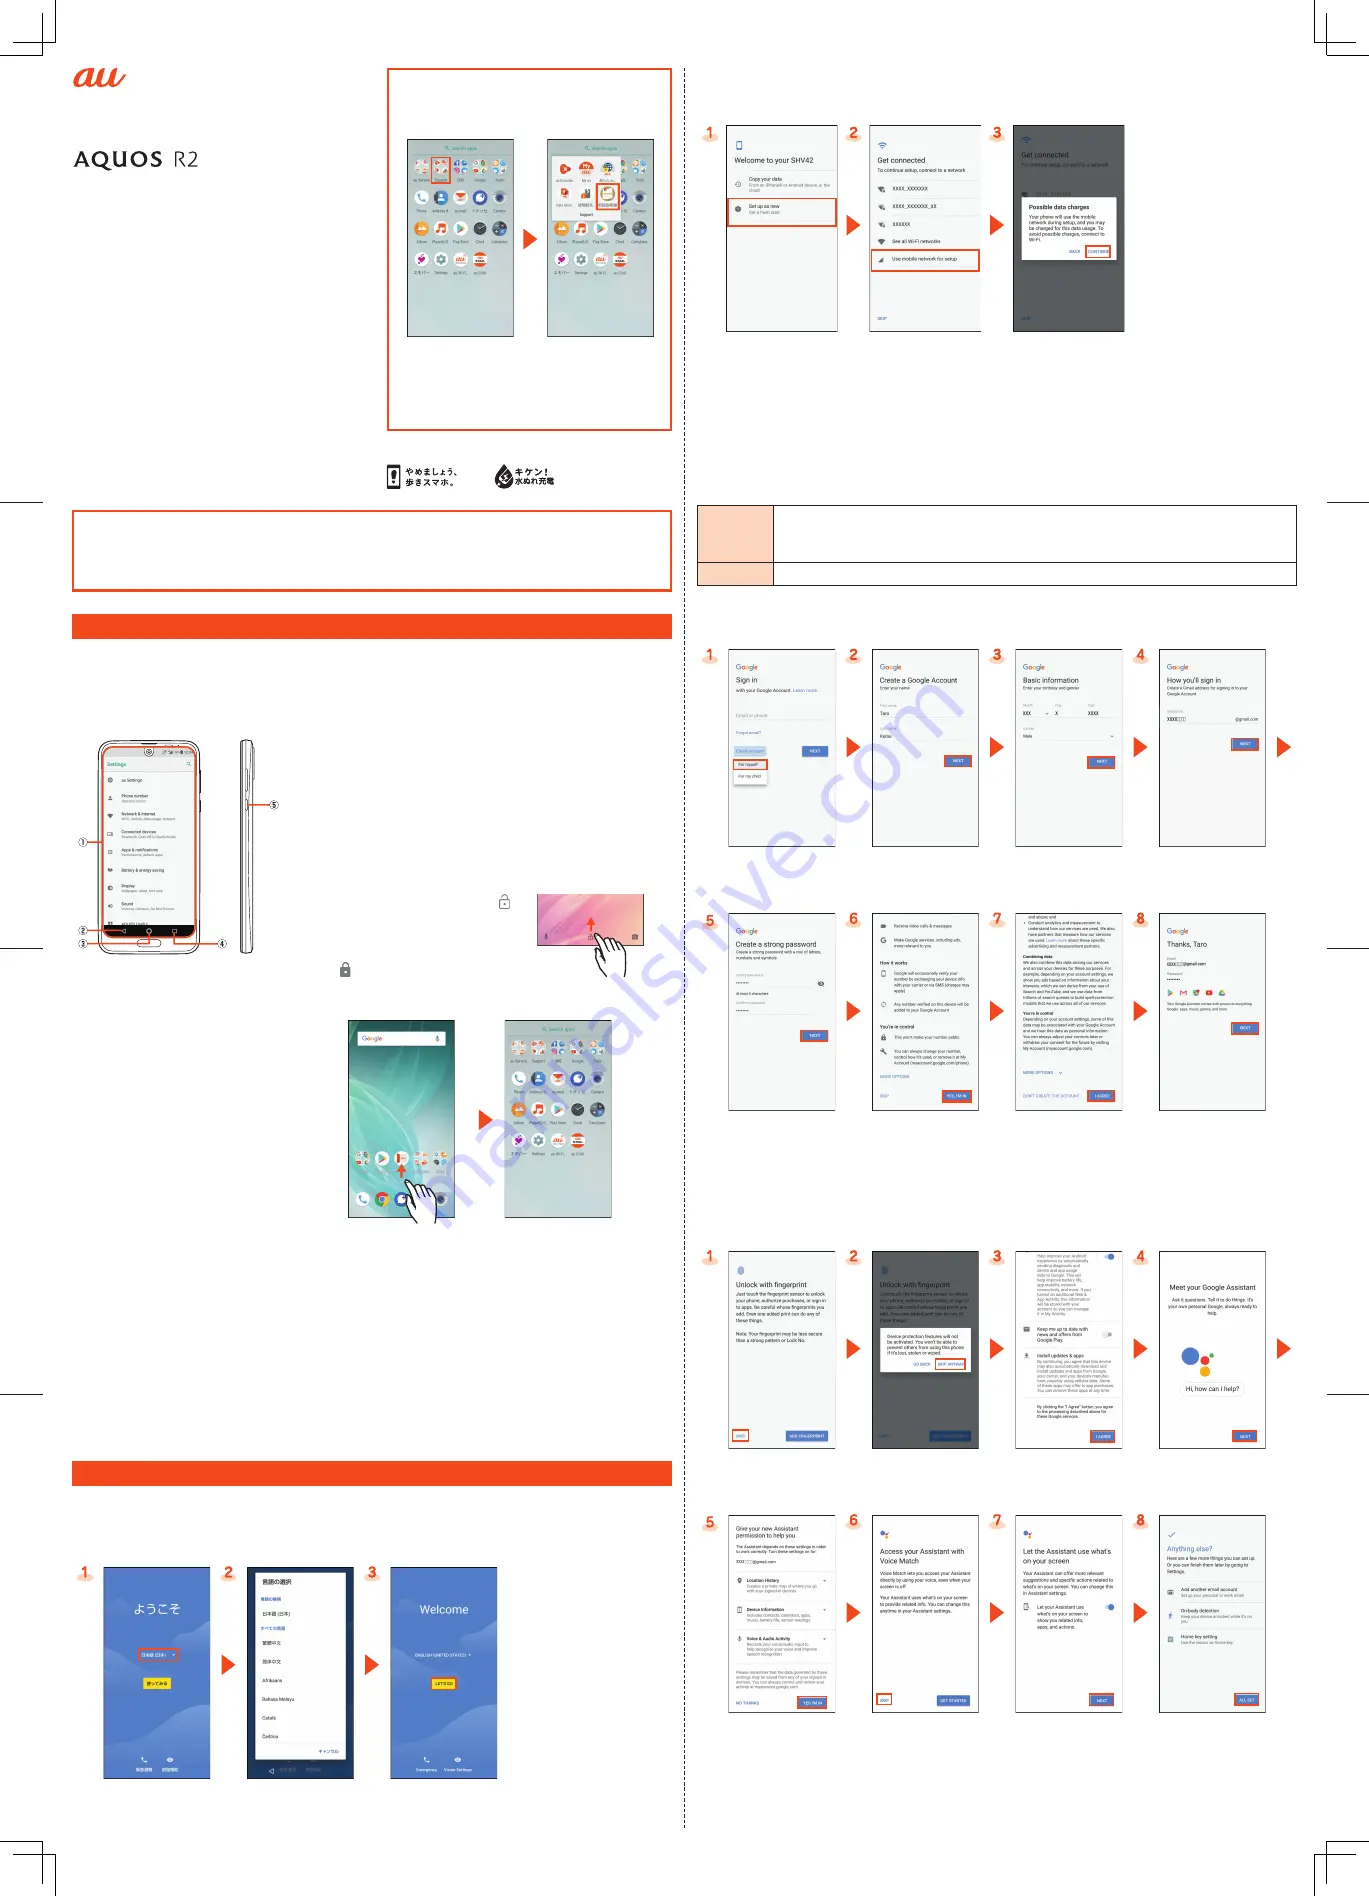
Initial Settings
The Google™ initial settings screen is displayed automatically when you turn the power on for the first
time. Follow the on-screen instructions to set each function.
■
STEP1: Language Setting
[
日本語(日本)
].
Select the language.
[LET'S GO].
■
STEP2: Data Transfer/Wi-Fi
®
Connection Settings
You may skip the steps here for transferring data from another device/making Wi-Fi
®
Connection settings.
By using “Copy your data”, you can transfer data from an old device etc.
[Set up as new].*
[Use mobile network for
setup].
Confirm the contents
and [CONTINUE].
* To transfer data from another device, select “Copy your data” and follow the on-screen instructions.
■
STEP3: Google Account Settings
You can use applications provided by Google Inc. such as “Play Store” and “Calendar” by setting up a
Google account. You can use the product without a Google account set, but in such case some
applications are not available.
The main setting items are as follows.
Username
Register your Google account (user ID) and any characters which you want to use as a
mail address. You can register any user name but you cannot set the same user name as
another user's.
Password
Register the password for using your Google account.
●
The Google account setup screen is displayed when you also activate an application for which a
Google account is required for the first time.
●
Depending on how you operate, screens other than those below may be displayed.
[Create account]
*1
→
[For myself].
*2
Enter your “First name”
and “Last name”
→
[NEXT].
Enter basic information
→
[NEXT].
Enter your “Username”
→
[NEXT].
Enter the password
→
[NEXT].
Confirm the contents
→
[YES I'M IN].
Confirm the contents
→
[I AGREE].
[NEXT].
*1 If you already have a Google account, enter the e-mail address.
*2 To create an account for your child, select [For my child] and follow the on-screen instructions.
■
STEP4: Google service Settings etc.
Set other items such as Google service, screen unlock.
[SKIP].
*1
[SKIP ANYWAY].
Confirm the contents of
Google services
→
[I AGREE].
[NEXT].
[YES I'M IN].
[SKIP].
[NEXT].
[ALL SET].
*2
*1 To set the fingerprint, select “ADD FINGERPRINT” and follow the on-screen instructions.
*2 To use each items, select it and follow the on-screen instructions.
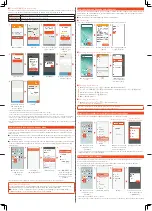
Using “Online Manual” (Japanese)
You can check “Online Manual” (Japanese) that
describes detailed of various functions by
operating the product as follows.
On the App list screen,
[Support].
[
取扱説明書
] (Online
Manual) (Japanese).
Also, you can check “Online Manual” (Japanese)
on the au homepage.
https://www.au.com/online-manual/shv42/
Thank you for buying the “AQUOS R2 SHV42”
(simply called the “product” from here on).
This manual describes settings for using the
product.
* For illustrations and descriptions in this manual, refer to
“Basic Manual” available on the au homepage.
* Descriptions in this manual are based on Android™ version
8.0.
* The company names and product names appearing in this
manual are trademarks or registered trademarks of their
respective holders.
* Phone illustrations and screen shots are for descriptive
purposes only, and may differ from the actual product.


