background image


P
r
e
f
a
c


i


7


Summary of Contents for AQUOS V

Page 1: ...P r e f a c e i M 7 ...

Page 2: ...ce On or Off 7 Turn Device On or Off 7 Restart Device 7 Set Device to Airplane Mode 7 Set Device to Sleep Mode 7 1 6 Locking and Unlocking the Screen 8 1 7 Using the Headset 9 1 8 Adjusting the Volume 9 Chapter 2 The Basics 10 2 1 Home Screen 10 Status Bar 11 Notifications Panel 12 Open Applications 12 View Recently Used Applications 12 Control Panel 13 Widgets 13 Folders 14 Set Wallpaper 15 Manag...

Page 3: ...ssages 27 Receive and Manage Messages 27 Delete a message thread 27 Delete all message threads 27 5 2 Multimedia Message 29 Create and Send MMS Messages 29 5 3 Customizing Message Settings 30 5 4 Email Accounts 32 Set Up Email Account 32 Add More Email Accounts 33 Select Email Accounts 34 Delete Email Accounts 34 5 5 Using Email 35 Compose and Send Emails 35 Receive Emails 35 Read and Reply to Ema...

Page 4: ...mail 54 9 5 Files 55 9 6 Clock 56 9 7 Using Flashlight 58 9 8 Messages 59 9 9 Photos 59 9 10 Contacts 59 9 11 Phones 59 9 12 Settings 59 9 13 Calendar 60 Chapter 10 Managing Your Phone 61 10 1 Device Settings 61 10 2 Changing Basic Settings 66 Date and Time 66 Display Settings 67 10 3 Using Wireless networks 68 10 4 Protecting Your Phone 68 Encrypt Phone 68 Enable SIM Card Lock 68 10 5 Configuring...

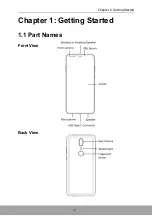
Page 5: ...Chapter 1 Getting Started 1 Chapter 1 Getting Started 1 1 Part Names Front View Back View ...

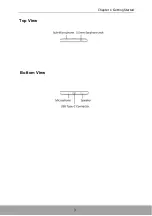
Page 6: ...Chapter 1 Getting Started 2 Left View Right View ...

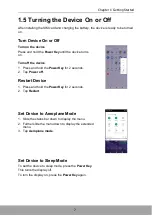
Page 7: ...Chapter 1 Getting Started 3 Top View Bottom View ...

Page 8: ...y of them is missing please contact your retailer Smartphone Headset Quick Start Guide USB cable Charger SIM Eject Pin Warranty Card 1 3 Installing SIM Card and Memory Card Remove the nanoSIM microSD Tray 1 Insert the SIM Eject Pin through the hole on the card tray 2 Push to eject the card tray ...

Page 9: ...install two 2 nanoSIM cards or one 1 nanoSIM and one 1 memory microSD card Place the two 2 nanoSIM cards onto the tray as illustrated Install the memory microSD card Place the memory microSD card onto the tray Replace the nanoSIM microSD Tray Push the nanoSIM microSD Tray into the card slot ...

Page 10: ...layed on the status bar When the battery is fully charged the icon is displayed on the status bar Warning Please use indoors and in dry places Overheat protection mechanism is activated the device will temporarily stop charging When the system temperature reaches the maximum operating temperature the device will automatically activate the overheat protection mechanism and temporarily stops battery...

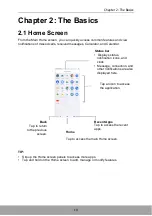
Page 11: ...f the device 1 Press and hold the Power Key for 2 seconds 2 Tap Power off Restart Device 1 Press and hold the Power Key for 2 seconds 2 Tap Restart Set Device to Aeroplane Mode 1 Slide the status bar down to display the menu 2 Further slide the menu down to display the extended menu 3 Tap Aeroplane mode Set Device to Sleep Mode To set the device to sleep mode press the Power Key This turns the dis...

Page 12: ...t the screen locks after being idle for a period of time see Display Settings on page 65 Lock the screen To manually lock the screen and turn off the display press the Power Key Unlock the screen 1 If the display is turned off press the Power Key 2 Slide up to unlock the screen NOTE Tap to use the Camera Tap to use the Google Assistant ...

Page 13: ...ility to hear outside sounds may be limited Do not use a headset if it will endanger you Do not set the headset volume to its maximum as it may damage your hearing 1 8 Adjusting the Volume There are two ways to adjust the volume Press the Volume Up Down key repeatedly to adjust the volume Press the Volume Up or Down key once Drag the volume slider to adjust the volume ...

Page 14: ...r Status bar Displays status notification icons and clock Message connection and other notifications are also displayed here Tap an icon to access the application Back Tap to return to the previous screen Home Recent Apps Tap to access the recent apps Tap to access the main Home screen TIP Slip up the Home screen panels to access more apps Tap and hold on the Home screen to add manage or modify fe...

Page 15: ...charging Missed call notification Battery is completely discharged New text message notification 4G enabled network signal strength Fewer bars indicate lower signal strength New email notification WLAN is connected Silent mode is activated Bluetooth connection is active Vibrate mode is activated An alarm is set Aeroplane mode is activated File is downloading or has finished downloading Google Maps...

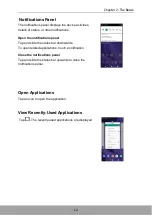
Page 16: ...the notifications panel Tap and slide the status bar downwards To open related applications touch a notification Close the notifications panel Tap and slide the status bar upwards to close the notifications panel Open Applications Tap an icon to open the application View Recently Used Applications Tap The recently used applications are displayed ...

Page 17: ...on the Home screen and get all your personalized updates in one place Add a Widget 1 Tap and hold on an empty spot on the Home screen 2 Swipe the upper screen to select the Home screen panel where you want to add a Widget 3 Swipe the lower screen until you find the Widget you want to add 4 Tap on the Widget to add it on the selected Home screen Remove a Widget Tap and hold the widget then drag it ...

Page 18: ...r 2 Type the folder name NOTE The default folder name is Unnamed Folder Modify a Folder 1 Tap to open the folder you wish to modify 2 Do one of the following To remove an application from the folder tap on the application icon then drag it out of the folder To remove the application totally from the device drag the icon to the To rename the folder tap on the folder name For example Folder ...

Page 19: ...e Home screen individually Set Wallpaper Customize the device wallpaper 1 From the Control Panel tap Wallpapers 2 Swipe to scroll through the wallpaper options 3 Tap on a wallpaper to use it Manage Resources Manage the resources on your phone by closing the recent active applications 1 From the Home screen tap 2 Swipe an application upwards to end the individual application ...

Page 20: ...gs menu you can configure the network connections device personal settings accounts and system To access the Settings menu tap Settings or slide the status bar downwards then tap For more information on Settings menu please refer to Device Settings on page 61 ...

Page 21: ... page 21 3 1 Adding Contacts 1 From the Home screen tap Contacts 2 Tap one of the following Sign in To import contacts from an email account Skip Skip importing contacts NOTE If you have already configured Google account in your phone tap to add a new contact 1 Enter contact information such as name phone number Tap MORE fields to add other contact information 2 To add a contact picture tap the ph...

Page 22: ...tacts Call Contacts NOTE The available call options vary depending on the phone number s saved for a specific contact and the number of SIM cards installed on the device 1 From the Home screen tap Contacts 2 Tap a contact 3 Tap the phone number to call the contact See Making a Call on page 23 NOTE Swipe the screen to see the call history messages and contact related agenda on your phone Text Conta...

Page 23: ...ss 4 Compose and send your email See Compose and Send Emails on page 35 3 4 Managing Contacts Edit Contacts 1 From the Home screen tap Phone Contacts 2 Tap the contact that you want to modify 3 Tap 4 Modify the necessary information or add additional information by tapping More fields 5 Tap Save to save changes ...

Page 24: ...t Information You can send contact information to other devices through a sharing application such as Messages Gmail Bluetooth or Save to Drive 1 From the Home screen tap Contacts 2 Tap a contact 3 Tap Share 4 Tap a sharing application to send the contact information Add Contact to Blacklist 1 From the Home screen tap Contacts 2 Tap the contact that you want to modify 3 Tap Block numbers 4 To undo...

Page 25: ... the Home screen tap Phone then swipe the screen until you find the Favourites tab Add to Favourites 1 From the Home screen tap Contacts 2 Tap the contact you want to add to the Favourites list 3 Tap Remove from Favorites 1 From the Home screen tap Contacts Favourites 2 Tap and hold the contact that you want to remove from the Favourites list 3 Tap Remove ...

Page 26: ... with the letter For example to view names that start with B tap B and the list of contacts will be displayed 3 7 Grouping Contacts You can create groups of contacts to make it easier to find specific contacts such as your classmates colleagues and more 1 From the Home screen tap Contacts 2 Tap and hold the contact that you want to add to label 3 Tap Add to label to create a new label 4 Give a nam...

Page 27: ...how the onscreen keypad Tap to show Recent calls 4 1 Making a Call Make a call from the Phone screen 1 From the Home screen tap Phone 2 Tap the phone number on the keypad TIP As you enter the number matching contacts appear To call a contact tap the contact from the list Tap to erase a wrong number Tap and hold to erase the entire number 3 Tap to call the number 4 To end the call tap ...

Page 28: ...ing a call When an incoming call is received the device may ring or vibrate and the screen displays an incoming call message If the caller is listed in your Contacts the contact s name appears You may also see the caller s phone number if available Accept or reject an incoming call Swipe up to answer a call Swipe down to reject the call To reject the call with a message tap then choose a message t...

Page 29: ... a call To end a call tap 4 4 In Call Options To display the on screen keypad tap To mute or unmute the microphone tap To use the speakerphone tap To put the call on hold tap To set up a conference call tap and enter the second phone number ...

Page 30: ...nt outgoing received or missed calls To view the call history from the Home screen tap Phone Tap to access more options To call an entry tap the corresponding contact To remove the entry from the list tap and hold on the entry you can select other entries from the list then tap Delete ...

Page 31: ...finger up or down the screen to scroll the contacts list and select contact s 4 Compose your message 5 Tap to send your message NOTE If you close Messaging before sending your message the unsent message will be automatically saved as a draft You can also send text messages via Contacts application See Contacts on page 17 Receive and Manage Messages When you send and receive messages from a contact...

Page 32: ...reen tap Messages 2 Tap the message thread you want to delete 3 Tap Delete 4 Tap Delete to confirm Delete all message threads 1 From the Home screen tap Messages 2 Tap and hold a message thread 3 Select the message threads you want to delete 4 Tap 5 Tap Delete to confirm ...

Page 33: ...one number TIP To add recipients from Contacts flick your finger up or down the screen to scroll the contacts list and select contact s 4 To attach files to your message tap then tap one of the following Attach an emotion Attach a gif Attach a sticker Tap to give access to Location Tap and hold to attach a record file Share a contact to attach Attach pictures from Gallery Attach a video file 5 Com...

Page 34: ...for the matching between device and computer then the user could send and receive the messages on the computer Note The only website for QR code scanning is https messages android com Enable dark mode Enable the dark mode and when you are in the dark mode you could flick Disable dark mode to recover the daytime mode Settings Customization for your message function Help feedback Seek for help and s...

Page 35: ...MS messages Selected the message Tap then Add contact Add new contacts to the contact Details Get more information regarding the message Archive Archive the messages Delete Delete the selected messages Help feedback Seek for help and support ...

Page 36: ...setting up the email account make sure the phone is connected to a wireless network or mobile data connection Set Up Email Account 1 From the Home screen tap Gmail 2 Tap Add an email address 3 Select from a list of email providers To manually enter the email settings tap Other Skip to step 6 4 Enter your Email address and Password 5 Tap Next The device will automatically retrieve the email setting...

Page 37: ...ebmail mail is synced between mail server and client 7 Follow the on screen instructions and enter all the server information Domain Username Password and other related information when requested Tap Next to continue NOTE Your account settings may vary depending on the kind of email service for the account For setup parameter details please check with your service provider 8 Once the account setup...

Page 38: ...n tap Gmail 2 Tap 3 Tap the current email account 4 Tap the account you want to access Delete Email Accounts 1 From the Home screen tap Settings Accounts Other account Google depends on account type 2 Tap the account you want to delete 3 Tap 4 Tap REMOVE ACCOUNT to confirm ...

Page 39: ...a subject 5 Compose your email 6 Tap Add attachments to email messages 1 Before sending your message tap Attach file or Insert from Drive Google Drive 2 Select the type of file then select the file you want to attach Receive Emails Emails are automatically received in the Inbox folder when the device connects to a network Manually receive e mails 1 From the Home screen tap Gmail 2 Swipe down the s...

Page 40: ...tachment to Drive Tap on the attachment A pop up menu appears Depending on the file type tap an option Save to save the attachment Save all to download all attachments Save to Drive to save the attachment to Google Drive Share to share the attachment via Photos Gmail Maps Bluetooth Messaging or Google Drive Share all to share all the attachments via Photos Gmail Maps Bluetooth Messaging or Google ...

Page 41: ...elete emails 1 From the Home screen tap Gmail 2 On the Inbox screen tap and hold the message you want to delete 3 Tap to delete the message NOTE If deleting the message was unintentional you can recover the message within a few seconds by tapping UNDO Archive emails to 1 From the Home screen tap Gmail 2 On the Inbox screen tap and hold the message you want to archive 3 Tap to archive the message N...

Page 42: ...n tap Gmail 2 On the Inbox screen tap and hold the message 3 Tap then tap any of the following Snooze Change labels to add label to the email Add star to display the email in the Starred folder Mark important to display the email in the Important folder Mute to hide the email from the Inbox or Primary folder The email can still be accessed from the All mail folder Report spam to report the email a...

Page 43: ...e settings of your email account such as account name email checking frequency default account notifications and server settings Configure account settings 1 From the Home screen tap Gmail Settings then tap an email account 2 Tap the options to configure the account settings ...

Page 44: ...et 3 Tap Wi Fi to enable Wi Fi via Settings menu 4 Tap to enable Wi Fi Connect to a Wi Fi network 1 Turn on Wi Fi 2 The available networks are listed Tap a network to connect to NOTE You can also tap Add network to manually add a connection See Add Wi Fi network on page 41 3 When connecting to a secured network you will be prompted for the password Enter the password then tap CONNECT When WLAN is ...

Page 45: ...o connect to is not on the list scroll to the bottom of the list and tap Add network 5 Follow the on screen instructions and enter the necessary information then tap to save the settings Advanced Wi Fi settings 1 From the Home screen tap Settings 2 Tap Network Internet 3 Tap Wi Fi scroll to the bottom of the list and tap Wi Fi preferences 4 Tap Advanced to access and set up more advanced options ...

Page 46: ... screen tap Settings Network Internet 2 Tap the SIM card that has data network if two SIM cards are inserted 3 The following mobile network settings are available SIM cards Active or deactive the SIM card Data usage Turn on to enable data connec tion and Monitor data traffic Mobile network Select the preferred network type Available options 4G recommended 3G 2G Enable or disable data roaming confi...

Page 47: ...tive web pages in windows Tap to access more features and settings Search bar Viewing the page To scroll the page swipe your finger up or down Manage Web Page While viewing a web page tap to change view settings or apply other functions Tap to bookmark the page Tap to download the page for offline reading Tap to view the page information Tap to refresh the page ...

Page 48: ...ving of passwords Payment methods Select to setup credit card for payments and fill up forms Addresses and more Add and save the information such as phone numbers email addresses and delivery addresses Homepage Set the default homepage Privacy Select to configure privacy and security settings including navigation error suggestions search and site suggestions security reports safe browsing and more...

Page 49: ...Bluetooth devices 7 1 Connecting to Bluetooth Devices A connection to a Bluetooth device is called a partnership You need to pair and create a partnership with a Bluetooth device to exchange information 1 From the Home screen tap Settings or slide down the status bar and tap 2 Tap Connected devices Connection preferences 3 Tap Bluetooth 4 To search for a new device tap Pair new device 5 Tap a dete...

Page 50: ... tap If you want to adjust the camera settings apply effects choose a scene mode and more tap and do the modifications before taking a shot See more settings options in Configure Camera Settings on page 50 2 Zoom in out the device at the subject Tap to set flash mode Tap to select other mode Tap to take a delay time Tap to set beauty mode Tap to configure camera settings Tap to set motion mode Tap...

Page 51: ...ideo NOTE 0 The video recording starts immediately after you tap If you want to adjust the camera settings video quality timer resolution tap and do the modifications before recording a video See more settings options in Configure Camera Settings on page 50 To zoom in on the subject move your fingers apart from each other at the location of the screen where you want to zoom in To zoom out on the s...

Page 52: ...Live Bokeh In this mode the camera will take a photo with Virtual Background Square In this mode the camera will take a square photo PRO Use this mode to customize the advanced settings such as white balance ISO EV saturation and contrast just like a professional photographer Take Panorama Shots Tap to start taking a shot 1 From the Home screen tap Camera 2 Tap Panorama on the camera application s...

Page 53: ... tapping Review Photos After taking a photo tap the mini window to preview the latest captured photo on the screen and you will be directed to the Photos directly To return to the Camera mode tap To share the photo via Gmail Photos Maps Bluetooth Messaging or Google Drive tap To delete the photo tap To edit the image tap Via image editing menu you can apply a filter rotate crop configure color set...

Page 54: ...ettings do the following On the Home screen tap Camera Tap the setting name to open its respective menu After you choose a function in the menu the icon of the respective function menu will automatically change For example you chose HDR Support On The mode icon will become Setting Available options HDR Support High Dynamic Range HDR imaging adds more ratio of light to dark in your photographs help...

Page 55: ...he image to be captured Tap More Watermark to select the watermark Mirror photos for front camera Save photos in mirror info Location tag Save photo location info Data storage Save picture in phone Resolution Set Resolution of photo video of main or front camera Reset settings Restore camera to its default settings ...

Page 56: ... do any of the following a Tap to view your photos and videos b Tap and hold a thumbnail to select a photo or video Tap Share and then tap on the app that you want to use for sharing the photo or video Tap Delete to delete the photo or video 3 Tap an image or a video to view in full screen 4 Swipe your finger to the left right to view the previous next file ...

Page 57: ...th the following pre installed programs 9 1 Chrome From the Home screen tap Chrome to view web pages See Connecting to Internet on page 40 9 2 Calculator With Calculator you can perform basic arithmetic functions on this device From the Home screen tap Calculator ...

Page 58: ...a Capture images with this device See Photos and Videos on page 46 9 4 Gmail Use Gmail to connect to your remote mailbox to retrieve new e mail messages or view previously retrieved e mail messages offline See Using Email on page 35 ...

Page 59: ...e storage to manage Managing files and folders To open a folder or file tap on the folder or file or to access all the files saved on the phone s storage or SD card To delete move share copy rename or view file or folder details tap and hold to view the respective options Then tap a desired option To delete move share or copy files or folders tap and hold a thumbnail then tap All Then tap the desi...

Page 60: ... city 4 Select the city and then the selected city will appear on the list Setting up alarms 1 From the Home screen tap Clock Alarm 2 To set up an alarm tap 3 To set the time slide the numbers to set the hour and minute 4 To set repeat mode tap Repeat and select the desired week days 5 To add an alarm label tap Label and tap OK 6 To vibrate when the alarm sounds turn on Vibrate 7 To set the ringto...

Page 61: ...m the Home screen tap Clock Timer 2 Input the numbers to set the hour and minute 3 Tap to start timer Using the Stopwatch 1 From the Home screen tap Clock Stopwatch 2 Tap to start the counter 3 Tap Lap to mark the lap or tap to pause the counter ...

Page 62: ...ms 9 7 Using Flashlight When using this device in a dark environment you can use this device as a flashlight 1 From the Home screen slide the status bar down 2 Tap to switch on the torch Tap again to switch off the torch ...

Page 63: ...ecorded video clips and downloaded images in Photos See Viewing Photos Videos on page 52 9 10 Contacts View or manage your contact list See Contacts on page 17 9 11 Phone Use Phone to make phone calls or manage contact list See Making a Call on page 23 9 12 Settings In the Settings menu you can view and adjust various phone settings See Device Settings on page 61 ...

Page 64: ...60 Chapter 9 Programs 9 13 Calendar Use Calendar to mark important events and set reminders 1 From the Home screen tap Calendar 2 To create a new note tap 3 Enter the details of the event 4 Tap to save ...

Page 65: ...tions VPN Set up and manage Virtual Private Networks VPNs Private DNS Select private DNS mode Connected Config the connected devices devices Apps noti Recently opened Review apps related information and manage apps fications apps Time spent in apps Display the time spent in apps Notification Manage app notifications Default apps Display the default apps App permissions Config app permissions Emerg...

Page 66: ...nywhere on the screen to wake device Device theme Select device theme Sound Media volume Adjust the volume for media files Call volume Adjust the volume for calls Ring volume Adjust the volume for ringing Alarm volume Adjust the volume for alarm Also vibrate for calls Enable or disable to vibrate when call is received Do not disturb Set the mode of Do not disturb Shortcut to prevent Display the sh...

Page 67: ...vior Locate this device remotely and help you keep your data safe if the device is lost Update the security Enable or disable status bar to be slid down when the phone screen is locked Set all notification show or not when screen is locked Set up fingerprint recognition This option becomes available after you set a screen lock Set your phone unlocked when it is safe with you Use location Display c...

Page 68: ...y Configure various accessibility options such as TalkBack select to speak Switch Access Captions and more Digital Wellbeing Set the digital wellbeing such as Dashboard Wind Down Google Includes all of the google applications setting you can set your google information ...

Page 69: ...elated settings such as set the default OSD language configure spell checker auto fill service personal dictionary virtual keyboard physical keyboard and more Gestures Configure various gestures options such as Turn over to reject call Mute on pickup Jump to camera Lift to check phone and more Date time Set date and time information Backup Configure your phone s backup settings Reset options Confi...

Page 70: ...e tap the on off slider To manually set the date and time 1 From the Home screen tap Settings or slide down the status bar and tap 2 Tap System Date time 3 Turn off Automatic date time 4 Tap Set date to set the date Scroll the screen up or down to select the correct year month and day Tap OK CANCEL to exit 5 Turn off Automatic time zone to manually select the time zone from the list 6 Tap Set time...

Page 71: ...ettings or slide down the status bar and tap 2 Tap Display 3 Tap Brightness level 4 Drag the Brightness level slider to adjust brightness settings Your setting is automatically saved Change the screen orientation 1 From the Home screen tap Settings or slide down the status bar and tap 2 Tap Display Advanced 3 Tap Auto rotate screen to enable or disable screen orientation when rotating the device O...

Page 72: ... Phone You can protect your phone from unauthorized users by requiring the PIN code your personalized unlock pattern or a password Encrypt Phone Requires you to enter a numeric PIN or password to decrypt your phone each time you power it on 1 From the Home screen tap Settings or slide down the status bar and tap 2 Tap Security location and configure the necessary security settings Enable SIM Card ...

Page 73: ...der when you reach the maximum limit 1 From the Home screen tap Settings or slide down the status bar and tap 2 Tap Network Internet Data usage 3 Select the SIM card then tap Mobile data 4 Set Data warning limit to set limit 5 To view the data usage used by the applications on Data traffic control screen tap App data usage ...

Page 74: ...Resetting the Device You can reset your phone to its factory defaults 1 From the Home screen tap Settings or slide down the status bar and tap 2 Tap System Advanced Reset options 3 Tap Erase all data factory reset 4 Tap RESET PHONE to reset ...

Page 75: ...mera Front 8M FF Rear 13MP Color w OIS 13MP Mono WLAN 802 11 a b g n ac Bluetooth BT5 0 GPS GPS A GPS GLONA Sensors Ambient light sensor Proximity sensor Accelerometer G sensor E compass Gyroscope Fingerprint Sensor Interface Type C cable 3 5mm audio jack Battery 3100 mAh Dimensions 157 28 75 99 8 98mm Weight 173g with battery pack Warning This device does not guarantee compatibility with all Micr...

Page 76: ... on your device and connect it to your computer using the Type C cable 2 From the Windows desktop double click on My Computer and locate the CD drive 3 Browse and double click setup exe 4 Follow the on screen instructions to complete the driver installation ...

Page 77: ...ff before cleaning the device NEVER attempt to connect or disconnect the power adapter with wet hands Clean the touch screen with a soft cloth If needed dampen the cloth slightly before cleaning Never use abrasives or cleaning solutions DO NOT disassemble the device Only a certified service technician should perform repair Please check with your Local Authority or retailer for proper disposal of e...

Page 78: ...oard in most countries Copyright Information Copyright SHARP Corporation 2012 All rights reserved This product has an Android platform based on Linux which can be expanded by a variety of JME based application SW Android Google Google Play the Google Play logo and other marks are trademarks of Google Inc microSD is a trademark of SD Card Association All products use in this device and trademarks m...

Page 79: ...g the measure distance of 0 mm and at the body is 1 586 W kg the measure distance of 5 mm Use of device accessories and enhancements may result in different SAR values SAR values may vary depending on national reporting and testing requirements and the network band WEEE Notice The WEEE logo on the product or on its box indicates that this product must not be disposed of or dumped with your other h...

Page 80: ...se three 3 months warranty period is provided European Union Regulatory Conformance The equipment complies with the RF Exposure Requirement 1999 519 EC Council Recommendation of 12 July 1999 on the limitation of exposure of the general public to electromagnetic fields 0 300 GHz This equipment meets the following conformance standards EN50360 EN62209 1 2 EN50566 EN62311 EN62479 EN60950 1 EN50332 2 ...

Page 81: ...ronmental conditions or a rapid change in such conditions corrosion oxidation unauthorized modifications or connections 5 Deterioration of the product due to normal wear and tear Products installed or integrated with software or applications which are not made or authorized by SHARP Be sure to back up data and remove any confidential proprietary or personal information from the product when asking...

Page 82: ...ange in the following countries AT BE BG HR CY CZ DK CH H EE FI FR DE EL HU IE LI IT LV LT LU MT NL PL IS PT RO SK SI ES SE UK NO Manufacturer s Address SHENZHEN FUTAIHONG PRECISION INDUSTRIAL CO LTD C16 1F No 2 DongHuan 2ND Road YouSong Industry Park LongHua Dist ShenZhen City Guangdong Province China ...

Page 83: ......

Reviews: