background image

Assembly Instructions

 
Thank you for purchasing a Shelti product.  All of us at Shelti want you to be completely satisfied with 
your Blue Line Air Powered Hockey game, so feel free to contact us for help with the assembly of your 
product, Shelti parts, or other information you may require. 

Tools Required:
 

5mm Hex Wrench 


14mm Wrench or Socket (For disassembly only)


Phillips Head Screw Driver


Level

Step #1

•  Lift air hockey table out of the box and flip it upside down on a smooth surface.  
•  Remove the legs from the shipping board and locate the accessory package (may be located in one of 
    the legs).

Contents

Enforcer Air Hockey Cabinet
Left Leg Assembly
Right Leg Assembly
Accessory Package
Enforcer Assembly Instructions

Part Number

KS-AHC-0
KS-LLA-1
KS-RLA-1
KS-ASA-0
210-0120-0

Quantity

1
2
2
1
1

Accessory Package Contents

Score Post
Score Rod
Red Score Bead
Black Score Bead
Score Post Screw—Flat Phillips Head
5½” Carriage Leg Bolt 
7½” Carriage Leg Bolt 
Leg Nut
Leg Wa

sher

3¼” Puck
Mallet
5mm Hex Wrench

003-0004-0
205-0007-0
003-0002-0
003-0003-0
301-0036-0
301-0074-0
301-0075-0
203-0023-0
303-0035-0
201-0093-0
201-0094-0
205-0068-0

4
2
5
5
4
8
8

16
16

3
2
1

Summary of Contents for Enforcer

Page 1: ...ace Remove the legs from the shipping board and locate the accessory package may be located in one of the legs Contents Enforcer Air Hockey Cabinet Left Leg Assembly Right Leg Assembly Accessory Package Enforcer Assembly Instructions Part Number KS AHC 0 KS LLA 1 KS RLA 1 KS ASA 0 210 0120 0 Quantity 1 2 2 1 1 Accessory Package Contents Score Post Score Rod Red Score Bead Black Score Bead Score Po...

Page 2: ...r end through the same hole as the other wires Plug all three wires into the scoring unit as shown If scored goals credit the wrong team simply switch the two identical wires as they were plugged into the wrong position Line up the holes of the scoring unit with the smaller holes on the side rail Fasten with a bolt in each hole with a Philips head screw driver Step 3 Attach the Manual Scoring Unit...

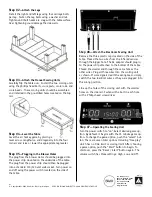
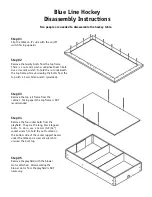
Page 3: ...er the table and a crescent wrench to unscrew the bolt top Step 1 Flip the table on it s side with the on off switch facing upwards Step 5 Remove the playfield with the blower motor attached Disassembling the blower motor from the playfield is NOT necessary Two people are needed to disassemble the hockey table Step 2 Remove the twenty bolts from the top frame There is a nut and a washer underneath e...

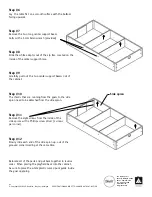
Page 4: ...m bolts with a 5 mm Allen wrench provided Step 8 Slide the white adaptor out of the zip ties located on the inside of the center support brace Step 9 Carefully pull out the two center support beams out of the cabinet Step 10 The chords that are running from the goals to the side apron need to be detached from the side apron Step 11 Remove the eight screws from the inside of the side aprons with a ...

Reviews: