background image


Shark Spot One                     V1 

Highlite International B.V. – Vestastraat 2 – 6468 EX – Kerkrade – the Netherlands 

ENGLISH 

Ordercode: 45023 

MANUAL 

Summary of Contents for Shark Beam FX one

Page 1: ...Shark Spot One V1 Highlite International B V Vestastraat 2 6468 EX Kerkrade the Netherlands ENGLISH Ordercode 45023 MANUAL ...

Page 2: ...ed 10 Multiple Sharks Master Slave control 10 Multiple Sharks DMX Control 11 Fixture Linking 12 Data Cabling 12 Control Panel 13 Control Mode 13 DMX Addressing 13 Menu Overview 14 Main Menu Options 15 1 DMX Address 15 2 DMX Channel 15 3 Running Mode 15 4 Programs 16 5 Settings 16 5 1 Calibration 17 6 System Info 18 Remote Control 19 DMX Channels 20 8 channels 20 14 channels 21 Maintenance 23 Repla...

Page 3: ...gher operating temperatures than in ideal or singular optimum conditions For this reason when all color LEDs are used at their fullest intensity life of the LEDs is significantly reduced If improving the lifespan is of higher priority place care in providing for lower operational temperatures This may include climatic environmental and the reduction of overall projection intensity Safety Instructi...

Page 4: ...f at least 50 cm around the unit for ventilation Always disconnect power from the mains when device is not used or before cleaning Only handle the power cord holding it by the plug Never pull out the plug by tugging the power cord Make sure that the device is not exposed to extreme heat moisture or dust Make sure that the available voltage is not higher than stated on the rear panel Make sure that...

Page 5: ...becomes void Any other operation may lead to dangers like short circuit burns electric shock crash etc You endanger your own safety and the safety of others Rigging Please follow the European and national guidelines concerning rigging trussing and all other safety issues Do not attempt the installation yourself Always let the installation be carried out by an authorized dealer Procedure If the Sha...

Page 6: ... mains Connect the device to the mains with the power plug Always check if the right color cable is connected to the right place International EU Cable UK Cable US Cable Pin L BROWN RED YELLOW COPPER PHASE N BLUE BLACK SILVER NEUTRAL YELLOW GREEN GREEN GREEN PROTECTIVE GROUND Make sure that the device is always properly connected to the earth Improper installation can cause serious injuries and or...

Page 7: ...mber 04 A brief description of the symptoms Claims The client has the obligation to check the delivered goods immediately upon delivery for any short comings and or visible defects or perform this check after our announcement that the goods are at their disposal Damage incurred in shipping is the responsibility of the shipper therefore the damage must be reported to the carrier upon receipt of mer...

Page 8: ...t in programs Sound controlled Master Slave DMX 512 Dimmer 0 100 Strobe 0 20Hz Pan range 540 Tilt range 270 Pan Tilt resolution 16bit Zoom Motorized Prism 3 facet prism Rotating gobo wheel 5 gobos open Color wheel 7 dichroic filters white Gobo functions Gobo flow gobo shake Color functions Rainbow flow effect Onboard OLED display for easy setup Housing Metal flame retardant plastic Connections 3 p...

Page 9: ...8 Ordercode 45023 Shark Spot One Frontside Fig 02 01 1 x 60W White LED 02 IR receiver 03 Built in microphone 04 OLED display control buttons ...

Page 10: ...before the whole system is set up and connected properly Always disconnect from electric mains power supply before cleaning or servicing Damages caused by non observance are not subject to warranty Set Up and Operation Follow the directions below as they pertain to your preferred operation mode Before plugging the unit in always make sure that the power supply matches the product specification vol...

Page 11: ...for more information about the Auto show Built in programs and Sound controlled mode Multiple Sharks Master Slave control 01 Fasten the effect light onto firm trussing Leave at least 0 5 meter on all sides for air circulation 02 Use a 3 pin XLR cable to connect the Shark The pins 01 Earth 02 Signal 03 Signal 03 Link the units as shown in fig 04 Connect the first unit s DMX out socket with the seco...

Page 12: ...ect the first unit s DMX out socket with the second unit s in socket using a DMX signal cable Repeat this process to link the second third and fourth units 05 Supply electric power Plug electric mains power cords into each unit s IEC socket then plug the other end of the mains power cord into proper electric power supply sockets starting with the first unit Do not supply power before the whole sys...

Page 13: ... on a power link 230V 18 fixtures Data Cabling To link fixtures together you must obtain data cables You can purchase DAP Audio certified DMX cables directly from a dealer distributor or construct your own cable If you choose to create your own cable please use data grade cables that can carry a high quality signal and are less prone to electromagnetic interference DAP Audio DMX Data Cables DAP Au...

Page 14: ...dress of the third Shark should be 15 14 29 029 etc Please be sure that you do not have any overlapping channels in order to control each Shark correctly If two or more Sharks are addressed similarly they will work similarly Controlling After having addressed all Shark fixtures you may now start operating these via your lighting controller Note After switching on the Shark will automatically detec...

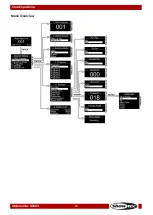
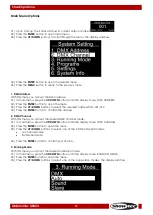
Page 15: ...14 Ordercode 45023 Shark Spot One Menu Overview ...

Page 16: ...the UP DOWN buttons to select the required address from 001 512 04 Press the ENTER button to confirm the address 2 DMX Channel With this menu you can set the desired DMX channel mode 01 In main menu press the UP DOWN buttons until the display shows DMX CHANNEL 02 Press the ENTER button to open the menu 03 Press the UP DOWN buttons to select one of the 2 DMX channel modes 14 channel mode 8 channel ...

Page 17: ...03 Press the UP DOWN buttons to select one of the 8 built in programs 04 Press the ENTER button to confirm your choice 05 The device will now run the chosen built in program 5 Settings With this menu you can set the Shark s settings 01 In main menu press the UP DOWN buttons until the display shows SETTINGS 02 Press the ENTER button to open the menu 03 Press the UP DOWN buttons to select the desire...

Page 18: ...o save changes 5 1 Calibration With this menu you can set the initial parameters of the Shark 01 Once you have chosen CALIBRATION see above press the ENTER button to open the menu 02 You will now need to insert the password in order to access the menu Press the UP DOWN buttons until the display shows 018 and press the ENTER button to confirm The display will show 03 The submenus are All To Origin ...

Page 19: ... status of the Shark 01 In main menu press the UP DOWN buttons until the display shows SYSTEM INFO 02 Press the ENTER button to open the menu The display will show 03 It is now possible to view the current software version currently active operation mode and the DMX starting address ...

Page 20: ...the spot dimmer brightness There are 8 steps 0 100 Strobe Press the button to set the spot strobe frequency There are 8 steps from low to high frequency Clear settings Press the button to clear gobo gobo rotation color strobe macro and prism settings Function buttons Press the buttons while in Auto Sound controlled or Pan tilt manual mode Auto mode Press the button to activate Auto mode Press the ...

Page 21: ...gh frequency 251 255 Shutter open Channel 6 Focus 0 255 Gradual focus adjustment Channel 7 Color Gobo Prism programs Dimmer must be open 0 10 Not functional 11 20 White open 21 30 Blue gobo 1 31 40 Purple gobo 2 41 50 Orange gobo 3 51 60 White gobo 4 61 70 White gobo 5 71 80 White open prism 81 90 Blue gobo 1 rotation medium speed prism 91 100 Purple gobo 2 rotation medium speed prism 101 110 Oran...

Page 22: ...rtical movement Tilt Move the slider up in order to move head vertically TILT Gradual head adjustment from one end of the slider to the other 0 255 128 center The head can be turned by 270 and stopped at any position you wish Channel 4 Tilt fine 16 bit Channel 5 PAN TILT Speed 0 255 From Max Speed 0 to Min Speed 255 Channel 6 Dimmer 0 255 Dimmer intensity from dark to brightest Channel 7 Strobe Sh...

Page 23: ...8 Prism OFF 129 255 Prism ON Channel 13 Color Gobo Prism programs Dimmer must be open 0 10 Not functional 11 20 White open 21 30 Blue gobo 1 31 40 Purple gobo 2 41 50 Orange gobo 3 51 60 White gobo 4 61 70 White gobo 5 71 80 White open prism 81 90 Blue gobo 1 rotation medium speed prism 91 100 Purple gobo 2 rotation medium speed prism 101 110 Orange gobo 3 rotation medium speed prism 111 120 White...

Page 24: ...ixture s light output will be significantly reduced Disconnect the mains power supply and then wipe the cover with a damp cloth Do not immerse in liquid Wipe lens clean with glass cleaner and a soft cloth Do not use alcohol or solvents The front lens will require weekly cleaning as smoke fluid tends to build up residues reducing the light output very quickly Keep connections clean Disconnect elect...

Page 25: ...lacing the fuse 04 If all of the above appears to be O K plug the unit in again 05 If you are unable to determine the cause of the problem do not open the Shark as this may damage the unit and the warranty will become void 06 Return the device to your Showtec dealer No Response to DMX Suspect the DMX cable or connectors a controller malfunction a light effect DMX card malfunction 01 Check the DMX ...

Page 26: ...ed cables Data link not terminated with 120 Ohm termination plug Insert termination plug in output jack of the last fixture on the link Incorrect addressing of the fixtures Check address setting One of the fixtures is defective and disturbs data transmission on the link Bypass one fixture at a time until normal operation is regained unplug both connectors and connect them directly together Have th...

Page 27: ...tandard DMX controller Onboard OLED display for easy setup Control Auto Built in programs Sound controlled Master Slave DMX 512 Pan range 540 Tilt range 270 Pan Tilt resolution 16bit Zoom Motorized Prism 3 facet prism Rotating gobo wheel 5 gobos open Color wheel 7 dichroic filters white Gobo functions Gobo flow gobo shake Color functions Rainbow flow effect Connections 3 pin XLR connectors IN OUT ...

Page 28: ...27 Ordercode 45023 Shark Spot One Dimensions ...

Page 29: ...28 Ordercode 45023 Shark Spot One Notes ...

Page 30: ...29 Ordercode 45023 Shark Spot One ...

Page 31: ...30 Ordercode 45023 Shark Spot One ...

Page 32: ... 2017 Showtec ...

Reviews: