background image


User’s Manual 


For 


PV-A88XP series 

PV-A878P series 

PV-A713X series 


DOC NO: 54-A881P+-01    Rev.A 

05/10/13 

Summary of Contents for PV-A713X Series

Page 1: ...User s Manual For PV A88XP series PV A878P series PV A713X series DOC NO 54 A881P 01 Rev A 05 10 13...

Page 2: ...he receiving antenna Relocate the computer away from the receiver Move the computer away from the receiver Plug the computer into a different outlet so that the computer and the receiver are on differ...

Page 3: ...ademark Acknowledgements All brand names and trademarks are the property of their owners Limited Warranty Our company warrants this product against defects in materials and workmanship for a period of...

Page 4: ...tallation 12 3 2 Application Installation 13 3 3 DirectX Installation 17 4 Honestech TVR 18 4 1 Introducing Honestech TVR 18 4 2 Using Your Honestech TVR 19 4 3 Menu and settings 25 1 Product Introduc...

Page 5: ...coding Support 3D comb filter For TYPE 4 option 1 2 System Requirements Intel Pentium III 800MHz or higher and compatible computer PCI local bus PnP 2 1 compliant SVGA support higher than 640x480 Hi c...

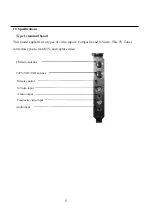
Page 6: ...This model supports two types of video inputs Composite and S Video This TV Tuner card allows you to watch TV and capture video Remote control Composite video input FM radio antenna Audio output S Vi...

Page 7: ...6 Type 2 standard board FM connector different Type 3 Low profile version I Remote control Composite video input FM radio antenna Audio output S Video input CATV VHF UHF antenna Audio input...

Page 8: ...7 Audio input FM radio antenna CATV VHF UHF antenna S Video input Composite video input Audio output Remote control...

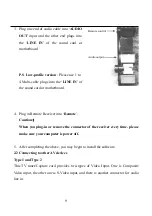
Page 9: ...ner Capture card into your computer s PCI slot Make sure the adapter card is well seated in the slot then fasten it with screws Then Replace case 2 Connect the CATV VHF UHF antenna and FM radio antenn...

Page 10: ...ceiver into Remote Caution When you plug in or remove the connector of the receiver every time please make sure your computer is power off 5 After completing the above you may begin to install the sof...

Page 11: ...e card provides 4 to 1 cable One is Composite Video input the other one is S Video input remote connector and there is another connector for audio out please plugs into the Motherboard Line in Audio i...

Page 12: ...11 Audio input 1 to 4 Multi cable plugs into the LINE IN...

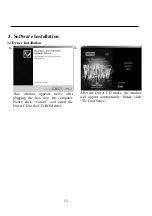
Page 13: ...nstallation 1 This window appears twice after plugging the box into the computer Please click Cancel and insert the Driver CD to the CD ROM drive 2 After the Driver CD works the window will appear aut...

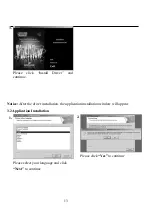
Page 14: ...l Driver and continue Notice After the driver installation the application installation window will appear 3 2 Application Installation 1 Please select your language and click Next to continue 2 Pleas...

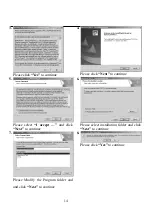
Page 15: ...ase click Next to continue 5 Please select I accept and click Next to continue 6 Please select installation folder and click Next to continue 7 Please Modify the Program folder and and click Next to c...

Page 16: ...15 9 Please click Yes to continue 10 Please click Next to continue 11 Please click Next to continue 12 Please click Next to continue...

Page 17: ...Please click Finish to continue 14 Please click Finish to continue 15 Then click OK to restart you computer 16 After restart you should see this TVConfig window Select the appropriate country then cli...

Page 18: ...s version is 8 1a or later You can install DirectX 9 0C from the installation CD please click on DirectX I Select I accept the agreement and click Next on this message box II Click Next to install Dir...

Page 19: ...ing and pausing without having to rewind any tape Here are the requirements and features of the program System Requirements Features System Requirements z TVR will run on Microsoft Windows 2000 or Win...

Page 20: ...make a sandwich and then resume watching without missing any of the show z Watch video in a resizable preview window Choose to freely resize or retain the original ratio Adjust the brightness and col...

Page 21: ...Honestech TVR z Receiving a Program z Choosing a Program to Watch z Recording a Program z Scheduling Your Program Recording z Time Shifting z Adjusting the Volume z Taking Snapshots z Change Skin z A...

Page 22: ...open the Property Settings box and then click the TV Setting tab TV category setting Specify minimum or maximum channel range Available channels will be displayed Country code specification Auto Detec...

Page 23: ...elected Perform auto scanning of available channels Display available channels Choosing a Program to Watch After you have installed TVR and scanned for programs you can select a program from the list...

Page 24: ...ecording shows in the future Press Open Schedule Recording Setting box Add To add your schedule entry Edit Edit selected schedule item Delete selected item Delete All Added all items OK and Cancel End...

Page 25: ...shift is similar to Instant TV Replay in regards to the instant replay capability but may only be used to video content Clicking will start Time Shifting function and buffering window will be automati...

Page 26: ...ill reflect the changes Clicking will turn the sound on and off Audio mode switch Clicking will switch audio mode between stereo and mono Taking Snapshots If is selected you can dump current frame in...

Page 27: ...a will be listed the program status You can see the recoding time recoding file size and current time Input source part you can select your input source here Channel select part you can select program...

Page 28: ...use here to control volume Video Folder when you captured a frame or recorded a program the File pool function will be open You can edit send to mail or view files in here Click white delta to hide or...

Page 29: ...see the following menu This will give you quick control over how you watch the program Close the menu Click to close the right click menu Screen You can change screen size Aspect ratio Change screen r...

Page 30: ...rfing Start Channel surfing review Property setting Open Property Setting Box Schedule setting Open Schedule setting Box Mute Mute sound Always on top Screen always shows under windows desktop Show co...

Page 31: ...30 You can set up the scan parameters to more efficiently scan for available television programs and channels Video Setting...

Page 32: ...31 You can adjust the brightness and the color in the picture Select your sound device and video device...

Page 33: ...32 Record Setting This tab will let you adjust your recording preferences Etc Dialog...

Page 34: ...33 This table let you setting surfing...

Reviews: