

Montageanleitung für / Assembly Instructions for IE RJ45 Plug PRO (6GK1901-1BB10-6AA0)
SIMATIC NET
Produktinformation
Product Information
Stand / Dated / 10.2010
A5E01171835A-2
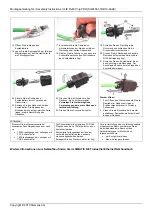
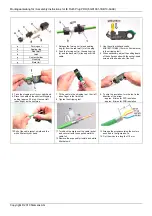
Montageanleitung für / Assembly Instructions for
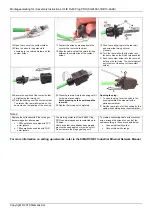
SIMATIC NET Industrial Ethernet
IE RJ45 Plug PRO
6GK1901-1BB10-6AA0
an /with
IE FC ITP Standardleitung 2x2
6XV1840-2AH10
IE FC Flexible Cable GP 2x2
6XV1870-2B
IE FC Trailing Cable GP 2x2
6XV1870-2D
IE FC ITP Trailing Cable 2x2
6XV1840-3AH10
IE FC Torsion Cable GP 2x2
6XV1870-2F
IE FC ITP Marine Cable 2x2
6XV1840-4AH10
IE FC Food Cable 2x2
6XV1871-2L
IE FC Festoon Cable 2x2
6XV1871-2S
UL/ CSA conditions:
Wire size: AWG 22 (solid wire only)
Max. Voltage: 50 V
Max. Amperes: 1.75 A
CAUTION: NOT FOR INTERRUPTING CURRENT!
ATTENTION: NE PAS UTILISER POUR COUPER LE COURANT
Nachfolgend finden Sie Informationen in deutscher Sprache. Die aktuellsten Hinweise finden Sie unter folgendem
Link:
http://support.automation.siemens.com
unter Produktsupport.
This document contains information in English. For the latest advices please follow this link:
http://support.automation.siemens.com
under product support.
A5E01171835A-2
© SIEMENS AG 2010
Änderungen vorbehalten
Subject to change