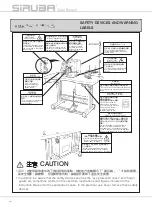
background image

LKS-1900AN 

使用說明書

INSTRUCTION BOOK

Summary of Contents for LKS-1900AN

Page 1: ...LKS 1900AN 使用說明書 INSTRUCTION BOOK ...

Page 2: ......

Page 3: ...minor injury if the person in charge or any third party mishandles the machine or does not avoid the dangerous situation when operating or maintaining the machine 危險 警告 注意 DANGER WARNING CAUTION Introduction TO ENSURE SAFE USE OF YOUR SEWING MACHINE For the sewing machine automatic machine and ancillary devices hereinafter collectively referred to as machine it is inevitable to conduct sewing work...

Page 4: ... is a risk of injury if contacting a moving section 作業時拿縫紉機的話 有讓手受傷的危險 Be aware that holding the sewing machine during operation can hurt your hands 有接觸高電壓部 造成觸電的危險 There is a risk of electrical shock if contacting a high voltage section 有捲入皮帶 造成受傷的危險 There is a risk of entanglement in the belt resulting in injury 有接觸高溫部 造成燙傷的危險 There is a risk of a burn if contacting a high temperature section 觸摸...

Page 5: ...accessories of the machine before using the machine Carefully keep the instruction manual and the explanatory documents at hand for quick reference 2 The content of this section includes items which are not contained in the specifications of your product 3 Be sure to wear safety goggles to protect against accident caused by needle breakage 4 Those who use a heart pacer have to use the machine after...

Page 6: ...the machine which has been modified or altered Education and training 1 In order to prevent accident resulting from unfamiliarity with the machine the machine has to be used only by the operator who has been trained educated by the employer with respect to the machine operation and how to operate the machine with safety to acquire adequate knowledge and operation skill To ensure the above the emplo...

Page 7: ... sure to turn the power off in the case of power failure in order to prevent accident resulting of breakage of electrical components Transportation 1 Be sure to lift and move the machine in a safe manner taking the machine weight in consideration Refer to the text of the instruction manual for the mass of the machine 2 Be sure to take sufficient safety measures to prevent falling or dropping before...

Page 8: ...and repair in order to prevent accident that can result in personal injury or death Ⅱ Cable and wiring 1 Be sure to prevent an extra force from being applied to the cable during the use in order to prevent electrical shock earth leakage or fire accident In addition if it is necessary to cable near the operating section such as the V belt be sure to provide a space of 30 mm or more between the opera...

Page 9: ...ey 3 If the table stand with casters is used be sure to secure the table stand by locking the casters or with adjusters if provided in order to protect against accident caused by abrupt start of the machine During operation 1 Be sure not to put your fingers hair or clothing close to the moving sections such as the handwheel hand pulley and motor or place something near those sections while the mach...

Page 10: ...e motor power box shielded in order to prevent fire accident by overheat Lubrication 1 Be sure to use SIRUBA genuine oil and SIRUBA genuine grease to the parts to be lubricated 2 If the oil adheres on your eye or body be sure to immediately wash it off in order to prevent inflammation or irritation 3 If the oil is swallowed unintentionally be sure to immediately consult a medical doctor in order to ...

Page 11: ...op completely before cleaning the machine in order to prevent accident caused by abrupt start of the machine or motor 6 Be sure to turn the power off and verify that the machine and motor stop completely before carrying out maintenance inspection or repair of the machine For the machine with a clutch motor the motor will keep running for a while by inertia even after turning the power off So be ca...

Page 12: ...operation 35 to 85 5 Dew condensation can occur if bringing the machine suddenly from a cold environment to a warm one So be sure to turn the power on after having waited for a sufficient period of time until there is no sign of water droplet in order to prevent accident caused by breakage or malfunction of the electrical components 6 Be sure to stop operation when lightning flashes for the sake of ...

Page 13: ...s dangerous due to the needle breakage or the like 3 Do not turn OFF the power in a state that the needle is lowered Wiper may break the needle CAUTION 1 In case nothing is displayed in the operation panel even when the power switch is turned ON turn OFF the power switch and check the power voltage and phase 2 To prevent personal injury or death never put finger into the thread take up lever work ...

Page 14: ...e protection cover or any other safety devices removed 8 To prevent personal injury or death do not operate the sewing machine with its covers removed 9 The operation panel displays safety warnings It is necessary therefore to first verify normal display on the panel when the power switch is turned on before operating the sewing machine 10 To prevent personal injury or death do not press the hand ...

Page 15: ...ever this phenomenon is not abnormal and does not affect the components or the like 18 Do not lubricate the machine oil to the places other than the oil tank and the hook section The grease lubricating system except the hook section is employed for this sewing machine and the grease flow out when lubricating the machine oil resulting in worn out of the components 19 Be careful of handling this pro...

Page 16: ... 眼睛的護罩 This is a cover for protecting eyes from being injured by a broken needle 手指防護器 Finger guard 這是防止手指和機針接觸的 護罩 This is a cover for preventing contact between fingers and the needle EU規格 EU type 觸電危險標籤 參照ⅱ頁觸電危險標籤 Electrical shock danger label Refer to Electrical shock danger label on page ⅱ 記載著為了防止觸電 避免危險的安 全注意事項 In order to protect against electrical shock safety precautions to be taken to av...

Page 17: ...ATION OF THE SEWING 8 MACHINE HEAD 7 廢油槽和機頭支撐橡膠的安裝 7 INSTALLING THE DRAIN RECEIVER AND THE 9 HEAD SUPPORT RUBBER 8 安全開關 8 SAFETY SWITCH 9 9 縫紉機的放倒方法 9 TILTING THE SEWING MACHINE HEAD 10 10 操作盤的安裝 10 INSTALLING THE OPERATION PANEL 10 11 電纜線的連接 11 CONNECTING THE CORD 11 12 電線的處理 12 MANAGING THE CORD 12 13 護目鏡的安裝 13 INSTALLING THE EYE PROTECTION COVER 13 14 線架的安裝 14 INSTALLING THE THREAD STAND 13 4 縫...

Page 18: ...SEWING USING THE 36 BOBBIN THREAD COUNTER 4 暫停的使用方法 4 HOW TO USE THE TEMPORARY STOP 37 5 圖案線張力的設定 5 SETTING THE PATTERN THREAD TENSION 37 6 使用時的注意 6 CAUTIONS IN OPERATION 39 7 維修 7 MAINTENANCE 40 1 針桿高度 1 ADJUSTING THE HEIGHT OF THE NEEDLE BAR 40 2 機針與旋梭 2 ADJUSTING THE NEEDLE TO SHUTTLE 40 RELATION 3 壓腳的高度 3 ADJUSTING THE LIFT OF THE WORK CLAMP 43 FOOT 4 移動刀和固定刀 4 THE MOVING KNIFE AND COUNTER KNI...

Page 19: ...WITCH 9 其他 9 OTHERS 58 1 設定開關的設定 1 SETTING THE DIP SWITCH 58 2 標準圖案規格對應表 2 TABLE OF THE STANDARD PATTERN 59 SPECIFICATION 3 標準圖案一覽表 3 TABLE OF THE STANDARD PATTERNS 60 4 壓腳一覽表 4 TABLE OF THE WORK CLAMP FOOT 62 5 LKS 1900AN 數據 ROM 5 LKS 1900AN DATA ROM 64 6 異常一覽表 6 ERROR LIST 65 7 縫製時的故障 原因和對策 7 TROUBLES AND CORRECTIVE MEASURES 68 SEWING CONDITIONS 8 選購品零件一覽表 8 TABLE OF THE OPTIONAL PARTS 70 ...

Page 20: ...ility X 方向 Y 方向各為 20 200 1 為單位 20 to 200 1 step in X direction and Y direction respectively 12 放大 縮小方式 Enlarging Reducing method 增減縫跡長度方式 Pattern enlargement reduction can be done by increasing decreasing the stitch length 13 縫紉速度限制 Max sewing speed limitation 400 3 200sti min 100sti min 單位 400 to 3 200 sti min 100 sti min steps 14 圖案選擇功能 Pattern selection 圖案 No 指定方式 1 200 Specifying pattern No ty...

Page 21: ...P2 縫紉機機頭 布壓腳 線架裝置 操作盤 電源開關 控制箱 踏板開關 1 主機的名稱 Introduction 2 各部的名稱 2 CONFIGURATION 1 Names of main unit Machine head Work clamp feet Thread stand Operation panel Power switch Control box Pedal switch ...

Page 22: ...返回到初期值等時使用 This key is used for canceling error or returning the set value to the initial value 方式 鍵 Mode key 記憶體開關的設定方式 This key makes the setting mode of the memory switch 前進傳送 鍵 後退傳送 鍵 Feed forward key and Feed backward key 使用於圖案 No 擴大縮小率的變更 前進 後退送布 This key is used for changing pattern No and X Y scale and feed forward feed backward 選擇 鍵 Selection key 選擇設定的項目 被選擇的項目的項目選擇 LED 和設定值被顯示 This key s...

Page 23: ... Needle thread clamp display LED 登記圖案 登記後的圖案 只要一按此鍵就可以立即進行縫製 變更擴大縮小率 縫製位置等可以進行登記 This key registers the pattern When this key is pressed the pattern registered here can sew immediately X Y scale sewing position etc can be changed and registered P4 圖案 No Pattern No 縫製計數器 Sewing counter 卷線 Bobbin winder X 擴大縮小率 X scale Y 擴大縮小率 X Y scale 線張力 Thread tension 最高速度限制 Max speed limitation 壓腳下降 Work clamp ...

Page 24: ...ide of the table at the location illustrated using round head bolt plain washer spring washer and nut supplied with the machine and using bolt having hexagonal indentation on the head spring washer and plain washer supplied with the machine 2 Attaching the connecting rod Fix connecting rod to installing hole of pedal lever with nut when connecting rod is installed in installing hole the depressing...

Page 25: ...power switch Fix power switch under the machine table with wood screws Fix the cable with staples supplied with the machine as accessories in accordance with the forms of use Five staples including the staple for fixing the operation panel cable are supplied as accessories 4 電源開關的安裝 連接 電源開關的安裝 請把電源開關 用木螺絲 固定到機台下 面 請根據使用狀態 用附屬的卡扣 固 定好電纜線 卡扣 包括固定操作盤電纜用共附屬了 5 個 P6 Introduction ...

Page 26: ...the specifications 單相 200V 220V 230V 和 240V 的連接 Connecting single phase 200V 220V 230V and 240V 電壓注意標籤 Voltage caution seal 額定規格標牌 Rating label 機台Table 褐色 Brown 褐色 Brown 淺藍 Light blue 淺藍 Light blue 綠 黃 Green Yellow 控制箱 Control box 綠 黃 Green Yellow 插頭 Plug 電源線 Power source cord 電源開關 Power switch GND AC200V AC220V AC230V AC240V 褐色Brown Light blue 淺藍 綠 黃 Green Yellow GND AC200V AC220V AC230V AC240V 褐...

Page 27: ...ively it will not work properly So be careful 2 When carrying the sewing machine hold sections with hands to support the side faces of the sewing machine 搬運縫紉機時 請一定 2 人以上進行搬運 To prevent possible accidents caused by the full of the sewing machine perform the work by two persons or more when the machine is moved WARNING 警告 Introduction 5 How to carry the sewing machine To carry the sewing machine pl...

Page 28: ...t s very dangerous to use the safety switch without removing tape since the sewing machine works even in the state that it is tillted 2 In case error 302 occurs when the sewing machine works after installation loosen the safety switch fitting screw with a screwdriver and lower the switch to the downside of the sewing machine 7 Installing the drain receiver and the head support rubber Fix drain rec...

Page 29: ...Tilting the sewing machine head When tilting the sewing machine head tilt the head gently until it touches the head support rod 10 Installing the operation panel Fix operation panel installing plate on the machine table with wood screws and pass the cable through hole in the machine table Fix the operation panel on panel installing plate with screws supplied as accessories Fix the cable on the bot...

Page 30: ...e 白色White 黃色 Yellow P11 11 電纜線的連接 卸下 4 根固定電氣箱裡蓋的螺絲 打 開裡蓋時 如圖所示用手一邊按壓一邊 打開約 90 不動為止 注意 為了不讓裡蓋掉落 請一定用手按住 另外 請不要用力 按壓打開的裡蓋 Caution Be sure to lend your hand to the rear cover in order not to let the rear cover fall In addition do not apply force to the rear cover opened 在機台下面安裝操作盤時請參照下圖進行安 裝 Refer to the figure on the below side when installing the panel under the table 11 Connecting the cord Remove ...

Page 31: ...clamp 一邊輕輕地按住 一邊下拉電纜夾 再向上提電纜夾 Lightly pressing Pull down the clamp The clamp goes up 輕輕地按壓鉤部的方塊 聽到喀喳的聲音就固定好了 Lightly press the corner of clamp Cord clamp is locked with a click 電纜夾的固定方法How to lock the cord clamp 鉤部 Clamp 電纜夾的解開方法How to remove the cord clamp 一邊輕輕地按住 一邊下拉電纜夾 再向上提電纜夾 Lightly pressing Pull down the clamp The clamp goes up 輕輕地按壓鉤部的方塊 聽到喀喳的聲音就固定好了 Lightly press the corner of clamp Cord ...

Page 32: ...it on installing section with screws 14 Installing the thread stand Assemble the thread stand unit and insert it in to the hole on the machine table Tighten locknut to fix the thread stand For ceiling wiring pass the power cord through spool rest rod 4 OPERATION OF THE SEWING MACHINE 1 加油方法 請確認機油在下線 B 和上線 A 之間 如果 機油過少時 請用附屬的加油器進行加油 1 Lubrication Check that the place between lower line B and upper ...

Page 33: ...e made as shown in attach the needle facing to the direction to a small extent Introduction A B 為了防止突然的起動造成人身事故 請關掉電源後再進行操作 Turn OFF the power before starting the work so as to prevent accidents caused by abrupt start of the sewing machine WARNING 警告 為了防止突然的起動造成人身事故 請關掉電源後再進行操作 Turn OFF the power before starting the work so as to prevent accidents caused by abrupt start of the sewing machine WARNI...

Page 34: ...rted bobbin case may slip off during sewing 3 Threading the machine head Pull out the thread by approximately 40mm from the needle after threading through the needle 4 Installing and removing the bobbin case Open hook cover Raise latch of bobbin case and remove the bobbin case When installing the bobbin case fully insert it into the shuttle shaft and close the latch 為了防止突然的起動造成人身事故 請關掉電源後再進行操作 Tur...

Page 35: ...Set the bobbin into bobbin case in the direction shown in the figure Pass the thread through thread slit of bobbin case and pull the thread as it is By so doing the thread will pass under the tension spring and be pulled out from thread hole Pass the thread through thread hole of the horn section and pull out the thread by 25mmfrom the thread hole 6 Adjusting the thread tension If thread tension c...

Page 36: ...un thread 50 is obtained at the set value 50 at the time of standard delivery When thread tension No 1 is released 7 Adjusting the thread take up spring The standard stroke of thread take up spring is 8 to 10 mm and the pressure at the start is 0 1 to 0 3N Adjusting the stroke Loosen setscrew and turn thread tension asm Turning it clockwise will increase the moving amount and the thread drawing am...

Page 37: ... 0 1N 聚酯短纖維線 50 Polyester spun thread 50 毛 Wool 50 55 10mm 13mm 0 2N 聚酯短纖維線 60 夾線 OFF Polyester spun thread 60 Thread clamp OFF T C 寬頻 T C broad 30 35 8 10mm 11 13mm 0 1N 棉線 50 Cotton thread 50 牛仔布 Denim 35 45 10mm 13mm 0 1N 棉線 20 Cotton thread 20 牛仔布 Denim 35 45 8 10mm 11 13mm 0 1N Introduction 8 Example of the thread tension When using the sewing machine for the first time adjust the thread tens...

Page 38: ...cated on the data display 2 Setting of the pattern No 1 Press the key to indicate the item Pattern NO 2 Press the or key to indicate 14 on the display Pattern No is set to 14 3 Setting of the X scale 1 Press the key to indicate the item X Scale 2 Press the or key to indicate 100 Set X scale to 100 5 縫紉機的操作 基礎篇 5 OPERATION OF THE SEWING MACHINE BASIC 注意 圖案號碼 請參照附錄一覽表 Caution Refer the pattern No to...

Page 39: ...cale 1 Press the key to indicate the item Y Scale 2 Press the or key to indicate 100 Set Y scale to 100 5 Setting of the max sewing speed limitation 1 Press the key to indicate the item Speed 2 Press or key to indicate 400 Setting of 400 sti min 6 Setting the thread tension 1 Press key to indicate the item THREAD TENSION 2 Press or key to indicate 50 0 to200 can be set 最高轉速限制的設定 1 按 鍵 設定為 轉速 的專案 顯...

Page 40: ...When key was pressed the set values of pattern No X Y scale etc are memorized If key was pressed you can make sure of the respective setting items again However the items can not be changed in the state that the SEWING LED is lit up When key was pressed the READY LED goes off Set values of the respective items can be changed Thread tension can be changed even when the sewing LED lights up Thread t...

Page 41: ...lowered The work clamp feet do not go up even when the foot switch is detached Confirm the contour of the pattern with key or key The work clamp feet will go up when key is pressed 1 選擇圖案後 請一定確認圖案的形狀 萬一圖案遠離壓腳 縫製途中機針 會碰到壓腳 弄斷機針 2 確認圖案形狀時 請注意如果在針桿下降後的狀態下按了 鍵的話 針桿將自動地復位到上位置之後壓腳才移動 1 Make sure without fail of the contour of the sewing pattern after selection of the sewing pattern If the sewing pattern...

Page 42: ...Especially when the needle position comes to the rear on the right side the clearance is decreased 3 Sewing Set a workpiece on the work clamp foot section Depress the pedal switch to the first step and the work clamp feet will come down If you detach your foot from the pedal switch the work clamp feet will go up Depress the pedal switch to the second step after descending the work clamp feet at th...

Page 43: ...wing LED lights up and the sewing machine is in the sewing ready state 5 Winding a bobbin To wind a bobbin while the sewing machine is performing sewing Thread the bobbin winder and wind the bobbin thread onto the bobbin as illustrated in the figure 選擇圖案後 請一定確認圖案的形狀 萬一圖案遠離壓腳 縫製途中機針會碰到壓腳 弄斷機針 Make sure without fail of the contour of the sewing pattern after selection of the sewing pattern If the se...

Page 44: ... 5 再次踩踏板 或者按 鍵 鍵 之後縫紉機停止轉動 6 按 鍵之後 縫製 LED 滅燈 壓腳 上升 鍵變為有效 To wind a bobbin independently 1 Press key to make the SEWING LED go off 2 Select the bobbin winder with key Caution Selection cannot be performed when the Sewing LED is lit up 3 Press key The work clamp feet come down and the Sewing LED lights up 4 When the pedal switch is depressed the sewing machine rotates 5 When the pedal is depressed a...

Page 45: ...he needle thread clamp motion make shorter the length of needle thread remaining on the needle at the sewing start for use When the length of needle thread is lengthened needle thread on the wrong side of material is apt to protrude In addition when the length is excessively lengthened the end of needle thread held by the needle thread clamp may be rolled in the seams 1 In case of with the needle ...

Page 46: ...he pattern which the stitch length for neatly rolling in needle thread is short needle thread may protrude from the wrong side of material Select with without thread clamp referring to the item below 1 When the sewing length is short less than approximately 10 mm the end of needle thread may protrude like beard even when adjusting needle thread shorter 3 When the type of lower plate that material ...

Page 47: ...itch No 35 with crossover stitch etc or X shape etc needle thread on the wrong side of material becomes easy to be rolled in In this case it is recommended to use the thread clamp 5 When the thread clamp is used and bobbin thread at the sewing start appears on the right side of material reduce thread tension at the sewing start 2 to 3 stitches and bobbin thread becomes less conspicuous Example of ...

Page 48: ...速限制 線張力 縫製位置就可以登 記 用圖案 No 的滾動視窗選擇同樣可以登 記圖案 可以一次地叫出 P1 P25 選擇了 P6 P25 時 用下表所示的 鍵的組合 同時 按 進行縫製 往圖案鍵上的登記 設定例 把圖案 No 3 X 擴大縮小 50 最高速度限制 2000sti min 線張力 50 圖案位置右移 0 5mm 前移 1mm 的設定登 記到 P2 1 Performing sewing using the pattern keys and Patterns No 1 to 200 which have been already registered can be registered to P1 to P50 It is possible to change and register the scale max speed limitation thread tension ...

Page 49: ...th or key 6 按 鍵 用 鍵 鍵設定為 X 擴大縮小率 50 Y 擴大縮小率 80 最高速度限制 2000 sti min 線張力 50 6 Press key and set as follows with or key X Scale rate 50 Y Scale rate 80 Max speed limitation 2000 sti min Thread tension 50 7 按 鍵之後 變為 X 擴大縮小率 顯示 0 0 X 方向的移動量可以以 0 1mm 為 單位進行設定 用 鍵 鍵設定為 0 5 7 Press key and X Scale rate indication becomes 0 0 Traveling amount in X direction can be set in 0 1 mm unit Set 0 5 with or key Int...

Page 50: ...腳下降 檢 索原點後 移動到縫製開始點 然後壓 腳上升 P 鍵在縫制 LED 亮燈時 也 可以按鍵變換圖案 2 Sewing operation Operation example After performing sewing with the contents of the registered P2 perform sewing with the contents of P3 1 Turn ON the power switch 2 Press the key 3 Press the key and when the sewing LED lights up the work clamp foot goes up after it has moved 4 Check the contour of the sewing pattern Refer to the item Ⅰ 5 2 C...

Page 51: ...rn by pressing the or key P1 to P25 which have not been registered are not indicated Caution Press P1 to P25 key while the sewing LED lights up and the presser comes down Be careful that your fingers are not caught in the presser Reference Pattern register from P26 to P50 can be performed Register can not be performed in to key Designate the pattern by the pattern selection only Indicate the patte...

Page 52: ...to the first pattern of C1 P1 to P50 can be selected with or key as well 2 使用組合功能 複合 的縫製 按順序排列已經登記的圖案登記 P1 P50 登記到 C1 C20 每縫製之後按 順序變換縫製圖案 1 個組合號碼最多可以 登記 30 個圖案 組合的登記 設定例 按 P1 P2 P3 的順序組合進 行登記到 C1 2 Performing sewing using the combination function By arranging in the order of use of the pattern register P1 to P50 which have been already registered and registering in C1 to C20 the sewing pattern wil...

Page 53: ...按 鍵 P3 被設定到 C1 的第 3 圖案 用 選擇 P1 P50 6 Press key and then press key P3 is set to the third pattern of C1 P1 to P50 can be selected with or key as well 7 按 鍵結束登記 7 Press key to finalize the register 8 按 鍵 結束組合登記方式 8 Press key Combination register mode is finalized 9 按 鍵 結束方式設定 返回通常方式 9 Press key Mode setting is finalized and the mode returns to the normal mode Introduction ...

Page 54: ...f the contour of the pattern is acceptable the sewing can be made 5 Every time the sewing is finished the step is made in the order of the combination After completing one cycle of sewing the step returns to the first step The sewing can be made repeatedly When you desire to return the pattern to the previous one or skip the next pattern after sewing press or key in a state that the sewing LED lig...

Page 55: ...oduction counter can be used as the bobbin thread counter In case a same sewing pattern is sewn in repetition the sewing machine will stop sewing when the number of times the specified number that can be sewn with a bobbin is reached The bobbin thread counter is of the subtracting method Press key to indicate the Counter Then press the key Then press the or key and set the specified number of time...

Page 56: ...g by means of the start switch 2 Press key to perform thread trimming perform positioning with or key and re start by means of the start switch 3 Press key to perform thread trimming and press again key to return to the origin 5 Setting the pattern thread tension Needle thread tension for 6 stitches at the sewing start the portion which is changed over from basting stitch to zigzag stitch and the ...

Page 57: ...P38 Introduction ...

Page 58: ...ped sewing of 6 x 12 layered denim Cotton thread 20 DPx17 19 H 厚料 2500sti min H Heavy weight material 2500 sti min 編織料 肩紐帶 3 1 層 聚酯短纖維線 60 DPx5 11 Tricot shoulder strap 3 1 layered section Polyester spun 60 DPx5 11 F 內衣 2000sti min F Foundation 2000 sti min 6 使用時的注意 誤顯示亮燈後 請一定查清原因 進行處 理 縫製中請不要拉縫製物 有可能使針位 置偏斜 萬一針位置偏斜了 請按 2 次 鍵 返回正常的原點位置 在機針降下的狀態 請不要關閉電源 壓 腳下降 有挑線桿和機針相碰 斷針等危 險 為了防止針熱造成的斷線 請根據上述的縫 製條...

Page 59: ...ar Caution After the adjustment make sure that there is no uneven torque When stitch skipping occurs in accordance with the sewing conditions adjust the height of the needle bar so as to lower it by 0 5 to 1 mm from the needle bar engraved line 2 Adjusting the needle to shuttle relation Turn the handwheel by hand When needle bar has gone up adjust so that lower marker line engraved on the needle b...

Page 60: ...n setscrew in the driver Open inner hook pressers to the right and left and remove inner hook presser Adjust so that the blade point of inner hook aligns with the center of needle and that a clearance of 0 mm is provided between the front end of the driver and the needle as the front end face of driver receives the needle to prevent the needle from being bent Then tighten setscrew of the driver 0 ...

Page 61: ...大旋梭的 間隙應為 7 5mm 然後鎖緊大旋梭固定螺 絲 Loosen setscrew of the shuttle and adjust the longitudinal position of the shuttle To do this adjustment turn shuttle race adjusting shaft clockwise or counterclockwise to provide a 0 05 to 0 1 mm clearance between needle and the blade point of inner hook After adjusting the longitudinal position of the shuttle further adjust to provide a 7 5 mm clearance between the n...

Page 62: ...the work clamp foot With the machine in stop mode remove six setscrews of the top cover and take off top cover Apply L shaped wrench to socket bolt of clamp and loosen the socket bolt Push down L shaped wrench to increase the lift of the work clamp foot or pull it up to decrease the lift After the adjustment securely tighten socket bolt If the right and left work clamp feet are not levelled loosen...

Page 63: ...sed by abrupt start of the sewing machine WARNING 警告 為了防止突然的起動造成人身事故 請關掉電源後再進行操作 Turn OFF the power before starting the work so as to prevent accidents caused by abrupt start of the sewing machine WARNING 警告 4 移動刀和固定刀 放鬆調節螺絲 向箭頭方向移動活動 刀 把從針板前端到切線小撥桿 前端 的距離調整為 18 5mm 放鬆固定螺絲 移動固定刀 把針孔 導線器 和固定刀 之間的間隙調整為 0 5mm 4 The moving knife and counter knife Loosen adjusting screw so that a clearance of 18 5 mm i...

Page 64: ...amp foot can prevent stepping on needle thread when it comes down Especially when the thin needle is used adjust the distance wide to such an extent of 23 mm The position of the needle is when the sewing mechine has stopped after the sewing finished 為了防止突然的起動造成人身事故 請關掉電源後再進行操作 Turn OFF the power before starting the work so as to prevent accidents caused by abrupt start of the sewing machine WARNIN...

Page 65: ... adjustment screw in setscrew and fix it 注意 1 在標準出貨狀態 輕輕鎖緊 回轉 4 圈的位置 2 弄小油量時 不要一次鎖緊 鎖緊 回轉 2 圈 待半日左右觀看一下 鎖得過緊 的話會磨損旋梭油管 Caution 1 The state of standard delivery is the position where is lightly screwed in and returned by 4 turns 2 When reducing the amount of oil do not screw in the screw at once Observe the state for approximately half a day at the position where is screwed in and returned by 2 tur...

Page 66: ...sed and the sewing machine can be continuously used Afterwards however the error No E220 is displayed every time the power is turned ON In addition when the sewing machine is used further for a certain period of time after the display of error No E220 the error No E221 is displayed and the sewing machine fails to operate since the error cannot be released even when the RESET key is pressed When th...

Page 67: ...screw from the grease inlet cover located at periphery of crank rod 3 Fill coupling with grease through Grease B tube 4 Sink screw supplied with the unit into the coupling to add the grease 5 After adding the grease securely tighten set screw which has been removed 2 Replenishing the oscillator pin section with grease 1 Tilt the machine head and remove the grease cover 2 Remove setscrew in oscilla...

Page 68: ...鍵變更記憶體開關的內 容 4 Change the contents of the memory switch with or key 5 按 鍵 可以返回到工廠出貨設定值 5 The value can be returned to the value at the time of delivery from the factory with key 6 按 鍵 登記變更內容 縫製 LED 滅燈 返回記憶體開關號碼的選擇狀態 6 Press key to register the contents of change Sewing LED goes off and the mode returns to the selective state of the memory switch No 7 按 鍵 結束記憶體開關設定方式 返回到通常狀態 7 Press key to finalize ...

Page 69: ...被顯示 2 Press key in the state that memory switch No 1 is indicated to make the sewing LED light up The contents of memory switch No 1 max sewing speed limitation value of the sewing machine are indicated 3 用 鍵 鍵設定為 1800 3 Set 1800 with or key 4 按 鍵登記 縫製 LED 滅燈 4 Register the value with key Sewing LED goes off 5 按 鍵 返回待機狀態 5 Press key to return to the normal state 注意 在待機狀態 縫紉機速度不能設定到該值以上 Caution The...

Page 70: ...d the set value of the first stitch is indicated 2 縫製開始緩啟動速度的設定 縫製開始的第 1 針 第 5 針的速度可以以 100sti min 為單位進行設定 可以設定為有 夾線和沒有夾線 參照 Ⅰ 8 3 記憶 體開關功能一覽表 P 55 2 Setting the soft start speed at the sewing start The speed of the first stitch to the fifth stitch at the sewing start can be set in a unit of 100 sti min Two kinds of settings in case of with needle thread clamp and of without needle thread clamp can...

Page 71: ...he sewing speed of the second stitch 7 按 鍵 縫製 LED 亮燈 第 2 針的設定 值被顯示出來 7 Press key The sewing LED lights up and the set value of the second stitch is indicated 8 用 鍵 鍵顯示出 2000 按 鍵則返回工廠出貨時的初期值 按 鍵 之後 現在的操作全被取消 返回 6 的狀 態 8 Indicate 2000 with or key The value returns to the initial value at the time of delivery from the factory with key Press key to cancel the operation here and return to the state of ...

Page 72: ...attern No 3 with or key 7 按 鍵 把設定值設定為 0 7 Set the set value to 0 with key 8 按 鍵 登記設定值 縫製 LED 滅燈 8 Press key to register the set value The sewing LED goes off 9 按 鍵 結束記憶體開關設定方式 返回待機狀態 9 Press key The memory switch setting mode is finalized and the mode returns to the normal mode 3 是否可以呼出圖案資料的設定 設定為不能呼出不要的圖案 防止錯誤的 圖案呼出 另外 可以呼出能夠使用的需 要圖案 設定例 把圖案 No 2 3 設定為不能呼出 3 Setting whether the calling of pattern ...

Page 73: ...數器 1 底線計數器 4 Set the set value to 1 with key Set value 0 Production counter Set value 1 Bobbin thread counter 5 按 鍵 登記設定值 縫製 LED 滅燈 5 Press key to register the set value The sewing LED goes off 6 按 鍵 結束記憶體開關設定方式 返回待機狀態 6 Press key The memory switch setting mode is finalized and the mode returns to the normal mode 4 計數器動作的設定 設定例 把生產計數器 加算方式 變更 為底線計數器 減算方式 4 Setting the counter operation Setting exam...

Page 74: ...of X Y scale rate and max speed limitation is acceptable Prevention of misapplication 第1針的縫製速度 夾線 可以以100sti min為單位設定 第 2 針的縫製速度 夾線 可以以100sti min為單位設定 第 3 針的縫製速度 夾線 可以以100sti min為單位設定 第 4 針的縫製速度 夾線 可以以100sti min為單位設定 第 5 針的縫製速度 夾線 可以以100sti min為單位設定 第 1 針的線張力 夾線 切線時的線張力 切線時的線張力變換同步時間 第 1 針的縫製速度 不夾線 可以以100sti min為單位設定 第 2 針的縫製速度 不夾線 可以以100sti min為單位設定 第 3 針的縫製速度 不夾線 可以以100sti min為單位設定 第 4 針的縫製速度 不夾線...

Page 75: ...ey 2 External switch 0 不響蜂鳴音 1 操作盤操作音 2 操作盤操作音 異常錯誤音 0 Without buzzer sound 1 Panel operation sound 2 Panel operation sound error sound 1 7針 1 to 7 stitches 10 0 0 通常 1 禁止 0 Normal 1 Prohibited 8 16 0 縫製開始移動後 壓腳上升 1 縫製結束立即上升 2 縫製開始後 踩踏板上升 0 Work clamp foot goes up after moving at the sewing start 1 Work clamp foot goes up immediately after the end of sewing 2 Work clamp foot goes up by pedal opera...

Page 76: ...t return of the last wiper With return of the last wiper 可以禁止縫釘鈕扣的縫製開始固定縫製 僅限LKS 1903AN Tie stitching at the start of sewing of the pattern for button sewing can be prohibited For LKS 1903AN only 0 固定縫有效 1 固定縫無效 0 Tie stitching effective 1 Tie stitching ineffective 0 LKS 1903AN以外不能顯示 For the machines other than LKS 1903AN thus function is not indicated 原點位置為前面 5mm Position of origin moves 5 mm to ...

Page 77: ...設定開關的設定 SDC 電路板 上的設定開關 SW1 設定 為 ON 之後 可以加強貫穿力 如果縫製厚料貫穿力不足時 請設定為 ON 其他設定開關全部設定為 OFF MAIN 電路板的設定開關全部為 OFF 1 Setting the DIP switch When 4 of DIP switch on SDC circuit board is turned ON the penetrating force is increased Turn it ON when the penetrating force is insufficient Turn OFF all DIP switches other than the switch above Turn OFF all DIP switches of MAIN p c b SDC 電路板 SDC p c b MAIN 電路板 MAIN p...

Page 78: ... eyelet 小加固 孔眼 Small size bartacking eyelet 小加固 孔眼 Small size bartacking eyelet 針織加固Knit goods bartacking 針織加固Knit goods bartacking 針織加固Knit goods bartacking 線加固Straight line bartacking 線加固Straight line bartacking 線加固Straight line bartacking 線加固Straight line bartacking 線加固Straight line bartacking 線加固Straight line bartacking 線加固Lengthwise bartacking 線加固Lengthwise bartacking 線加固Lengthwise bartacking...

Page 79: ...4 6 6 6 8 8 8 注2 壓腳號碼 Note 2 No of work clamp foot 落針圖 Stitch diagram 針 數 Number of stitches 縫製尺寸 mm Sewing size mm 縱 Length wise Cross wise 橫 注2 壓腳號碼 Note 2 No of work clamp foot 1 2 3 1 2 3 1 4 6 7 1 2 3 1 4 1 2 3 1 4 6 7 6 7 8 5 3 4 6 8 9 10 上 Other side 下 This side 上 Other side 下 This side 上 Other side 下 This side 上 Other side 下 This side 上 Other side 下 This side 上 Other side 下 This side 上 Oth...

Page 80: ...fferent by 5 mm up and down from that of lengthwise bartacking pattern Nos 23 to 26 12 12 12 12 12 12 15 13 13 13 13 14 14 6 7 5 16 No 落針圖 Stitch diagram 針 數 注意Caution 半 月 形 加 固 Semilunar bartacking 大 加 固 Large size bartacking 針 織 加 固 圓 形 加 固 縱 線 加 固 Lengthwise bartacking Radial tacking 菊 花 鎖 眼 Number of stitches 縫製尺寸 mm Sewing size mm 縱 Length wise Cross wise 橫 注2 壓腳號碼 Note 2 No of work clamp foo...

Page 81: ... 29 25 17 5 14 5 20 4 6 21 2 5 4 5 6 7 8 9 布壓腳 Work clamp foot P804JK A 組件 asm P805JK A 組件 asm P806JK A 組件 asm 布壓腳下板 Feed plate D804JK D814JK D832JK D838JK D816JK 有齒牙 With knurl 有齒牙 With knurl 有齒牙 With knurl 無齒牙 Without knurl 無齒牙 Without knurl 縫製規格 Sewing specification S H S F F 手指保護器 Finger guard BF867JK BF897JK 備考 Remarks 選購品 Optional H 厚料 規格機頭上標 準裝備 Standard accessory for H type Heavy weight ma...

Page 82: ...ith knurl 有齒牙 With knurl 有齒牙 With knurl 縫製規格 Sewing specification F S S S S 手指保護器 Finger guard BF898JK 備考 Remarks 選購品 Optional 選購品 Optional 選購品 Optional 選購品 Optional 選購品 Optional 更換壓腳時 請安裝適合各壓腳的手指保護 器 Install a finger guard suitable for each work clamp foot when replacing the work clamp foot 4 33 23 5 60 13 6 92 8 41 14 23 12 29 45 ø 1 2 10 30 45 1 0 14 28 45 ø 1 4 30 16 6 50 14 4 9 4 ø 1 2 4 ø 1 ...

Page 83: ...No 與標準圖案相同時 數據 ROM 內的圖案優先 5 LKS 1900AN data ROM Insert LKS 1900AN data ROM to the IC socket on MAIN p c b for use ROM which can be used 27C256 EPROM Caution 1 Be careful of the inserting direction 2 EEPROM cannot be used 3 When the pattern No is the same as that of the standard pattern the pattern in the data ROM is prior to other pattern ...

Page 84: ...d check the pattern No Check the contents of memory switch No 201 用手轉動手輪 把針桿調整到規定的位置 Turn the hand pulley to return the needle bar to its specified position 按重定開關 確認圖案和 X Y 擴大率 Press the reset switch and check the pattern and X Y scale rate 按重定開關 確認圖案和 X Y 擴大率 Press the reset switch and check the pattern and X Y scale rate 關閉 OFF 電源 確認資料 ROM Turn OFF the power switch and check the data ROM 按重定開關切線...

Page 85: ...nnected 關閉 OFF 電源開關 確認主馬達的杯環是否不鬆動 Turn OFF the power switch and check whether coupling of the main motor is loose 確認電源電壓 Check the power source voltage 確認電源電壓 Check the power source voltage 關閉 OFF 電源 稍待一些時間後再次打開 ON 電源 Turn OFF the power switch and turn ON the power switch again after some time 關閉 OFF 電源 確認 SDC 電路板 F1 保險絲 Turn OFF the power switch and check F1 fuse of SDC circuit board 關閉 OFF 電源 確認...

Page 86: ...閉 OFF 電源開關 確認 MAIN 電路板 CN34 是否鬆動 Turn OFF the power switch and check whether CN34 of MAIN circuit board is loose 關閉 OFF 電源開關 確認 MAIN 電路板CN32 SDC 電路板 CN15 是否鬆動 脫落 Turn OFF the power switch and check whether CN32 of MAIN circuit board or CN15 of SDC circuit board is disconnected or loose 關閉 OFF 電源 稍待一些時間後再次打開 ON 電源 Turn OFF the power switch and turn ON the power switch again after some time 關閉 OFF 電...

Page 87: ...se the tension of the thread tension controller No 1 Decrease the tension of the bobbin thread Increase the clearance between the needle hole guide and the counter knife Decrease the tension at 1st stitch Decrease the number of rotation at 1st stitch at the sewing start Extent of 600 to 1 000 sti min Increase the number of stitches of thread clamp to 3 to 4 stitches Make the pitch at 1st stitch lo...

Page 88: ...asures 現象 Trouble 原因 Cause 頁 Page 加強上線張力 確認縫製中第 2 線張力盤是否浮起 加強第 1 線張力 把夾線裝置設定為 OFF 把夾線裝置設定為 OFF 使用暗縫式下板 Increase the needle thread tension Check whether or not the tension disc No 2 is released during bar tracking Increase the tension of the thread tension controller No 1 Correct the position of the moving knife Turn OFF the thread clamp Turn OFF the thread clamp Use the lower plate the hole of whi...

Page 89: ... processing Sewing area lengthwise 30 X crosswise 40 有齒牙 有表面處理 右 縫製範圍 縱 20 橫 40 With knurl Processed right Sewing area lengthwise 20 X crosswise 40 有齒牙 有表面處理 左 縫製範圍 縱 20 橫 40 With knurl Processed Left Sewing area lengthwise 20 X crosswise 40 有齒牙 有表面處理 右 縫製範圍 縱 30 橫 40 With knurl Processed right Sewing area lengthwise 30 X crosswise 40 有齒牙 有表面處理 左 縫製範圍 縱 30 橫 40 With knurl Processed Left Sewing are...

Page 90: ...e bartacking A 66 5 B 43 BF897JK B A 針孔導向器 Needle hole guide A B 大擺動用 For large size bartacking A 59 B 74 H 規格 H types A 2 3 B 4 0 無槽Without relief slit E152JK BF867JK ø A ø B 手指保護器 1 Finger guard 1 零件名稱 Name of Parts 備考 Remarks 種類 Type 貨號 Part No ...

Page 91: ...明書中與零件圖之產品及外觀的修改恕不事先通知 The specification and or appearances of the equipment described in this instruction book parts list are subject to change because of modification which will without previous notice BY808JK JAN 2016 ...

Reviews: