background image


Manuel d’Instructions 
Instructions Manual 
Manual de instrucciones 


 KSM24XU - KSM36XU 

Summary of Contents for KSM24XU

Page 1: ...Manuel d Instructions Instructions Manual Manual de instrucciones KSM24XU KSM36XU ...

Page 2: ...EN 2 2 INDEX WARNINGS AND REQUIREMENTS 3 RECOMMENDATIONS AND SUGGESTIONS 6 DIMENSIONS and MAIN PARTS 7 INSTALLATION 8 USE 11 CARE 12 ...

Page 3: ...LL WALL AND FLOOR OPENINGS WHERE THE RANGEHOOD IS INSTALLED MUST BE SEALED This rangehood requires at least 24 of clearance between the bottom of the rangehood and the cooking surface or countertop Consult the cooktop or range installation instructions given by the manufacturer before making any cutouts MOBILE HOME INSTALLATION The installation of this rangehood must conform to the Manufactured Ho...

Page 4: ...cy Massachusetts 02269 This appliance should be connected directly to the fused disconnect or circuit breaker through flexible armored or nonmetallic sheathed copper cable Allow some slack in the cable so the ap pliance can be moved if servicing is ever necessary A UL Listed 1 2 conduit connector must be provided at each end of the power supply cable at the appliance and at the junction box When m...

Page 5: ...e American Society for Heating Refrigeration and Air Conditioning Engineers ASHRAE and the local code authorities When cutting or drilling into wall or ceiling do not damage electrical wiring and other hidden utilities Ducted fans must always be vented to the outdoors W A R N I N G Electrical ground is required on this rangehood If cold water pipe is interrupted by plastic nonmetallic gaskets or o...

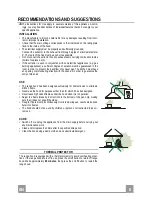
Page 6: ...e kitchen must have an opening communicating directly with the open air in order to guarantee the entry of clean air USE The range hood has been designed exclusively for domestic use to eliminate kitchen odors Never use the hood for purposes other than for which it has ben designed Never leave high naked flames under the hood when it is in operation Adjust the flame intensity to direct it onto the...

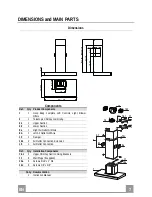
Page 7: ...y comprising 2 1 1 Upper Section 2 2 1 Lower Section 8a 1 Right Air Outlet Grill Aria 8b 1 Left Air Outlet Grill Aria 10 1 Damper 14 1 2 Air Outlet Connection Extension 15 1 Air Outlet Connection Ref Q ty Installation Components 7 2 1 2 Upper Chimney Section Fixing Brackets 11 6 Wall Plugs if supplied 12a 6 Screws 3 16 x 1 3 4 12c 6 Screws 1 8 x 3 8 Q ty Documentation 1 Instruction Manual 11 12a 1...

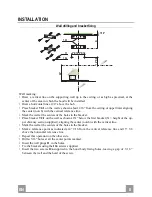
Page 8: ...he holes in the bracket Place bracket 7 2 1 on the wall as shown at X below the first bracket X height of the up per chimney section supplied aligning the center notch with the vertical line Mark the wall at the centers of the holes in the bracket Mark a reference point as indicated at 4 9 16 from the vertical reference line and 13 3 8 above the horizontal reference line Repeat this operation on t...

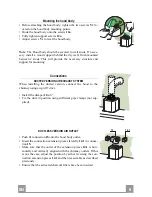
Page 9: ... EXHAUST SYSTEM When installing the ducted version connect the hood to the chimney using a rigid 6 duct Install the damper 10 ø 6 Fix the duct in position using sufficient pipe clamps not sup plied 10 DUCTLESS VERSION AIR OUTLET Push fit connection 15 onto the hood body outlet Insert the connection extension pieces laterally 14 1 in connec tion 15 Make sure that the outlet of the extension pieces ...

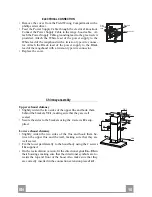
Page 10: ...exhaust chimney Slightly widen the two sides of the upper flue and hook them behind the brackets 7 2 1 making sure that they are well seated Secure the sides to the brackets using the 4 screws 12c sup plied Lower exhaust chimney Slightly widen the two sides of the flue and hook them be tween the upper flue and the wall making sure that they are well seated Fix the lower part laterally to the hood ...

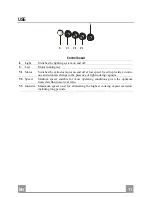
Page 11: ... motor on and off at low speed Used to provide a contin uos and silent air change in the presence of light cooking vapours V2 Speed Medium speed suitable for most operating conditions given the optimum treated air flox noise level ratio V3 Intensive Maximum speed used for eliminating the highest cooking vapour emission including long periods ...

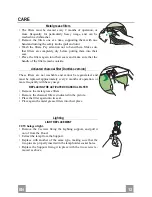
Page 12: ...version These filters are not washable and cannot be regenerated and must be replaced approximately every 4 months of operation or more frequently with heavy usage REPLACING THE ACTIVATED CHARCOAL FILTER Remove the metal grease filters Remove the charcoal filter as indicated in the picture Place the filter again into its seat Place again the metal grease filters into their place Lighting LIGHT REP...

Page 13: ...436004107_01 080325 ...

Reviews: