background image

1

© 2018 by Snow Joe

®

, LLC

All rights reserved. Original instructions.

SAVE THESE INSTRUCTIONS

1

A Division of Snow Joe

®

, LLC

Model iON15SB-CT

Form No. SJ-iON15SB-CT-880E-M

OPERATOR’S MANUAL

R

CORDLESS SNOW  

BLOWER - CORE TOOL

15-INCH | 40-VOLT MAX*

IMPORTANT!

Safety Instructions
All Operators Must Read These 

Instructions Before Use

Read all instructions when using cordless snow blowers.  

Basic safety precautions should always be followed to reduce 

the risk of fire, electric shock, and personal injury. 

General Safety Rules

Notice the personal safety alert symbol 

m

 used in this 

manual to draw your attention to a WARNING given along 

with the particular operating instruction. This means that 

the operation requires special ATTENTION, CAUTION, and 
AWARENESS.

• 

Keep work area clean and well lit –

 Cluttered, dark areas 

invite accidents.

• 

Keep bystanders away – All bystanders and pets should 

be kept a safe distance away from the work area. 

• 

Dress properly – 

Do not wear loose clothing or jewe

lry. 

They can get caught in moving parts. Protective rubber 

gloves and non-slip footwear are recommended when 

working outdoors.

• 

Use the right product – Do not use this machine for any 

job except that for which it is intended.

• 

m

CAUTION! –

 Exercise caution to avoid slipping or falling. 

Wear protective footwear that will protect your feet and 

improve your footing on slippery surfaces.

• 

Use safety glasses –

 Also use safety footwear, snug-fitting 

clothing, protective gloves, hearing and head protection. 

• 

Do not force the snow blower – Use the snow blower 

at the rate for which it was designed to ensure optimal 

performance and safe operation.

• 

Stay alert – Watch what you are doing. Use common 

sense. Do not operate the snow blower when you are tired 

or 

under the influence of alcohol or drugs.

• 

Do not overreach –


Keep proper footing and balance at  

all times.

• 

Store indoors –

 When not in use, the snow blower should 

be kept dry and stored out of the reach of children in a high 

or locked place.

• 

Maintain snow blower with care – Follow instructions for 

lubricating and changing accessories.

m

WARNING! 

Always disengage the switch lever and 

remove the battery pack before making any adjustments, 

inspecting, servicing, changing accessories, cleaning the snow 

blower, or when any other dangerous conditions present. Any 

such operation should be performed after revolving parts 

inside the snow blower stop completely. Such preventive 

safety measures reduce the risk of starting the power tool 

accidentally.

m

WARNING! 

When replacing any parts, you must strictly 

observe the instructions and procedures described in this user 

manual. Special care should be paid to any rubber parts, since 

these parts may increase the engine load and decrease its 

mechanical power if damaged.

m

WARNING! 

If you notice that the snow blower is not 

running properly or hear abnormal sounds from the engine 

when it is in use, immediately stop the machine, disconnect 

the battery, and contact your service center.

• 

Surfaces – This snow blower is intended for use on 

paved surfaces. Do not use on gravel, stone or other 

unpaved surfaces unless the snow blower is adjusted for 

such surfaces according to the instructions given in the 

operator’s manual.

• 

Moving parts present risks –

 Keep your face, hair, 

clothing, hands, and feet away from moving parts. All 

guards and safety attachments must be installed properly 

before using the unit. Shut off and disconnect the battery 

before touching any parts other than the handles and 

switch.

• 

Avoid unintentional starting – Make sure the safety switch 

and the switch lever are in the off position before inserting 

the battery in the unit. Do not carry the snow blower with 

the safety switch and the switch lever engaged.

• 

Do not overreach – Maintain proper footing and balance 

at all times. Place heels firmly on the ground and tightly 

grasp the handle bar. Watch for uneven surfaces and do not 

overreach. In case you fall or collide with the snow blower, 

inspect the unit for any damages or cracks. When stepping 

backwards, be careful to avoid obstacles beneath 

your feet 

or behind you to avoid falling.

m

WARNING! 

If the snow blower strikes any object, 


follow these steps:

  i)   Stop the snow blower. Remove the battery.
  ii)  Inspect for damage.
 iii) Repair any damage before restarting and operating  

     the snow blower.

Summary of Contents for iON15SB-CT

Page 1: ...anging accessories mWARNING Always disengage the switch lever and remove the battery pack before making any adjustments inspecting servicing changing accessories cleaning the snow blower or when any other dangerous conditions present Any such operation should be performed after revolving parts inside the snow blower stop completely Such preventive safety measures reduce the risk of starting the po...

Page 2: ...s when the charger is in use Do not use the charger with a damaged cord or plug Replace a damaged charger immediately Do not use an extension cord unless it is absolutely necessary Using the wrong damaged or improperly wired extension cord poses a risk of fire and electric shock If an extension cord must be used plug the charger into a properly wired 16 gauge or larger extension cord with the fema...

Page 3: ...er to a power supply with the voltage marked on the rating plate Never connect it to a different mains voltage 2 Protect the battery charger and its cord from damage Keep the charger and its cord away from heat oil and sharp edges Have damaged cords repaired without delay by a qualified technician at an authorized Snow Joe Sun Joe dealer or call the Snow Joe Sun Joe customer service center at 1 86...

Page 4: ... an object If the snow blower accidentally strikes an object first stop the snow blower and remove the battery next inspect for damage finally repair or replace any damaged part before restarting and operating the snow blower Discharge chute safety Never direct the snow discharge chute at the operator at bystanders at vehicles or at windows The discharged snow which may contain foreign objects acc...

Page 5: ...on WARNING Do not expose the unit to rain or wet conditions Keep dry CAUTION Beware of stones and other foreign objects that could be thrown from the appliance DANGER Cutting dismemberment hazard Keep hands away from the rotating auger Do not use hands to unclog rotor housing Stop motor before removing debris DANGER Cutting dismemberment hazard Keep feet away from the rotating auger Symbols Symbol...

Page 6: ...fluffy Tire Size 6 3 in 16 cm Directional Control 180º auto rotate chute Weight snow blower alone 19 4 lbs 8 8 kg Weight snow blower with battery installed 20 9 lbs 9 5 kg Initial no load voltage when fully charged peaks at 40 volts nominal voltage under typical load is 36 volts 1 ON OFF switch lever 2 Handle bar 3 Safety switch button 4 Upper handle 5 Upper chute crank 6 Cotter pin 7 Cord clip 2 ...

Page 7: ... NOTE Do not discard the shipping carton and packaging material until you are ready to use the electric snow thrower The packaging is made of recyclable materials Properly dispose of these materials in accordance with local regulations or save the packaging for long term product storage IMPORTANT The equipment and packaging material are not toys Do not let children play with plastic bags foils or ...

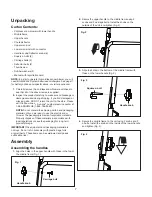
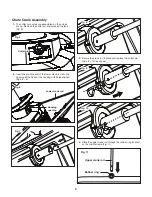
Page 8: ...ower crank rod into the opening at the back of the housing with holes aligned Figs 6 8 3 Secure the crank rod in place and replace the cotter pin Figs 9 10 as shown 4 Slide the upper crank rod through the rubber ring located on the middle frame Fig 11 Fig 5 Cotter pin Fig 6 Lower crank rod Housing opening Fig 7 Fig 8 Fig 9 Fig 10 Fig 11 Upper crank rod Rubber ring ...

Page 9: ...attery pack is completely sealed and maintenance free Battery Charge Level Indicator The battery pack is equipped with a push button for checking the charge level Simply press the push button to read off the battery charge level from the LEDs of the battery indicator All 3 level monitoring LEDs are lit Battery charge level is high 2 level monitoring LEDs are lit Battery charge level is decreasing ...

Page 10: ...battery pack s charge before starting a big job or after a long day of use Charging the Battery 1 Pull the push lock button on the battery to pull the battery pack up and out of the equipment Fig 16 2 Check that the mains voltage is the same as that marked on the rating plate of the battery charger Then insert the charger s plug into the electrical wall outlet When you plug in the charger the top ...

Page 11: ...WARNING Keep the area to be cleared free of stones toys or other foreign objects that the rotor blades might pick up and throw Such items could be covered by snow and are easy to overlook so be sure to conduct a thorough inspection of the area before beginning work NOTE Before using this machine make sure that the snow blower s roll shaft and rubber plates are firmly secured with screws and that t...

Page 12: ... force You should push the machine gently and evenly in accordance with the unit s throw rate 7 Do not apply additional man made load to the motor since this may cause motor damage 8 Some parts of the snow blower may freeze under extreme temperature conditions Do not attempt to operate the snow blower with frozen parts If the parts freeze while the snow blower is in use stop the snow blower remove...

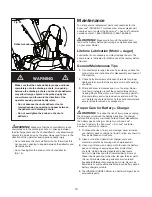
Page 13: ...the unit Rotate the chute deflector by the chute control crank several times to remove any excess snow Proper Care for Battery Charger mWARNING To reduce the risk of injury always unplug the charger and remove the battery pack from the charger before performing any maintenance task Never disassemble the battery pack or charger Contact your Snow Joe Sun Joe dealer or the Snow Joe Sun Joe customer s...

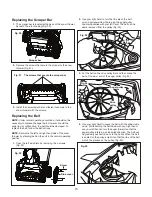
Page 14: ...emoving the 4 screws on each side Fig 24 2 Remove the belt from the drive wheel Fig 25 3 Remove the drive wheel by turning it clockwise Fig 26 4 Remove the screws and washer on the other side and remove the auger axle Figs 27 28 5 Remove the old auger from the housing Fig 29 6 Install the replacement auger by following the above steps in reverse order Fig 24 Screw Side cover Fig 25 Belt Drive whee...

Page 15: ...removing the 4 screws Fig 32 2 Use your right hand to turn the rib side of the belt up and pull upwards while turning the auger pulley counterclockwise with your left hand The belt can be easily removed from the pulley Fig 33 3 Put the belt on the drive pulley first and then place the belt at the lower end of the auger pulley Fig 34 4 Use your right hand to press the belt with the ribbed side down...

Page 16: ...storage to maintain optimal battery performance Battery Caution Disposal Information Always dispose of your battery pack according to federal state and local regulations Contact a recycling agency in your area for recycling locations mCAUTION Even discharged battery packs contain some energy Before disposing use electrical tape to cover the terminals to prevent the battery pack from shorting which...

Page 17: ...ed online at snowjoe com or via phone by contacting the Snow Joe Sun Joe customer service center at 1 866 SNOWJOE 1 866 766 9563 Accessories Item Model 1 iONMAX 40 V 4 0 Ah Lithium Ion Battery Battery Charge Time Max iCHRG40 3 hours iCHRG40 DPC 3 5 hours Battery Run Time Max 32 min iBAT40 2 iONMAX 40 V 5 0 Ah PRO SERIES Lithium Ion Battery Battery Charge Time Max iCHRG40 3 5 hours iCHRG40 DPC 4 ho...

Page 18: ...18 NOTES ...

Page 19: ... the owner s manual Snow Joe Sun Joe will not be responsible for the cost of any unauthorized warranty repairs This warranty does not cover any cost or expense incurred by the purchaser in providing substitute equipment or service during reasonable periods of malfunction or non use of this product while waiting for a replacement part or unit under this warranty Wearing parts like belts augers chai...

Page 20: ...snowjoe com ...
Reviews: