background image


Pellet


Stove


English 


Instruction Manual


Models  

Douro 12/17/23 kW


Read  these  instructions  carefully  before  installing,  using  and  servicing  the  unit.  This 

instruction manual is provided with the product.


Mod. 216-G 

Summary of Contents for Douro 12

Page 1: ...let Stove English Instruction Manual Models Douro 12 17 23 kW Read these instructions carefully before installing using and servicing the unit This instruction manual is provided with the product Mod 216 G ...

Page 2: ...luded in this manual All local regulations including but not limited to national and European standards must be observed when installing operating and servicing the unit For assistance please contact your unit s supplier or installer You must have the wood pellet stove serial number located on the identification plate on unit s back panel and on the sticker on the plastic cover of this manual read...

Page 3: ...s and fume extraction systems 14 5 4 Installation without a chimney 14 5 5 Installation with a chimney 18 6 Hydraulic Installation 19 6 1 Operating mode for radiator buffer tank 19 7 Fuel 20 8 Using the Free Standing Pellet Fire 21 9 Remote Control 23 9 1 Remote control and display 23 9 2 Display information summary 24 9 2 1 Menu 24 9 2 2 Water temperature 25 9 2 3 Date 25 9 2 4 Timer 28 9 2 5 Sle...

Page 4: ...8 13 3 Additional cleaning 52 13 4 Cleaning the glass 57 14 Alarm Failure Recommendation List 58 15 Maintenance Plan and Log 60 16 Maintenance Guide Label 64 17 Installation Diagrams 65 18 Electrical diagram of the Free Standing Pellet Fire unit 69 19 Pump UPM3 FLEX AS 15 70 130mm 70 20 Life Cycle of a Free Standing Fire Unit 73 21 Sustainability 73 22 Warranty 74 22 1 Model specific conditions 74...

Page 5: ......

Page 6: ...s network of partners Solzaima is today leader in the production of biomass heating whose best examples are the recuperators of central heating to water and its range of salamanders to pellets We annually equip more than 20 000 homes with biomass heating solutions It signals that consumers are aware of the most environmentally friendly and economical solutions Solzaima has ISO9001 2015 Quality Cer...

Page 7: ...al Power cable 1 1 Unpacking the unit When unpacking the unit please refer to the illustrations below First remove the retractable bag containing the cardboard box 1 a Then pull the cardboard box out 1 b by lifting it and remove the bag containing the free standing fire unit 1 c and the styrofoam plates Finally unscrew the four parts securing the unit to the wood pallet 1 d and e a b c d e Figure ...

Page 8: ...he unit All the unit s components guarantee its operation and energy efficiency and should only be replaced with original parts provided by an authorised technical assistance centre The unit must be serviced at least once a year by the installation engineer This manual is provided with the product Please keep it close to the unit 2 1 For your safety we recommend that Make sure you fully read and u...

Page 9: ...ke For this reason you should have a natural fume extraction system like a chimney available Solzaima offers you an optional safety system which allows the Free Standing Fire unit to be connected to a UPS so that during any power failure the fume extractor will still operate until complete extraction of all the fumes If you intend to use the Free Standing Fire unit while you are away from home or ...

Page 10: ...you should call the fire department Close the doors and windows or partition where the fire has flared Disconnect the electric current and close the gas before leaving your home Once outside you must wait for the firefighters and be ready to give you the following information location of the fire possible materials that are burning and what they can do to prevent the progression of fire ...

Page 11: ...4 W Rated voltage 230 230 230 V Nominal frequency 50 50 50 Hz Thermal yield at rated thermal power 92 0 91 1 89 2 Thermal yield at reduced thermal power 95 0 93 8 93 8 Combustion gas flow max 21 0 14 8 18 8 g s Combustion gas flow min 44 0 6 9 6 9 g s Max gas temperature 108 128 153 ºC Min gas temperature 62 66 66 ºC CO emissions at rated thermal power 0 0136 0 02 0 02 CO emissions at reduced ther...

Page 12: ...nsions of the free standing pellet fire unit Douro 12 kW Front Side Rear Top Figure 3 Dimensions of the free standing pellet fire unit Douro 17 kW Front Side Rear Top Figure 4 Dimensions of the free standing pellet fire unit Douro 23 kW ...

Page 13: ...8 Figure 5 Hydraulic connections of the free standing pellet fire unit Douro 12 kW Figure 6 Hydraulic connections of the free standing pellet fire unit Douro 17 kW ...

Page 14: ...rform the following steps Upon reception check the product for completeness and to determine that is does not show any damage signs Any damages or defects should be checked before the unit is installed The unit is equipped with four adjustable height feet at the base which allow for a simple regulation when installed on a non flat surface Figure 8 Adjustable feet ...

Page 15: ...te control has a programmable thermostat As an option a conventional external programmer may be used not included to automatically setup the unit s operating periods This should be connected through cable to the optional 230VAC programmer plug not provided 5 1 Assembly of removable parts After the installation the Free Standing Fire unit should be fitted with the removable covers Douro 12 kW Befor...

Page 16: ...ust include the following parts CASINGS 12 kW Bordeaux White or Black Figure 10 Douro 12 kW Colors CASINGS Douro 12 kW Oak Figure 11 Douro 12 kW Oak The covers should be placed on the pillars and grille slots identified in Figure 12 a and Figure 12 b The screw placed in the salamander must be removed and tightened after placing the side cover as shown in Figure 12 c ...

Page 17: ... Douro 17 kW and Douro 23 kW Top front cover To install the top front cover place it over the unit Figure 13 a and then tighten the screws that secure it to the top panel of the unit Figure 13 b a b Figure 13 Assembly of the top front cover ...

Page 18: ... The minimum distance between the free standing pellet fire unit and particularly flammable surfaces is specified in Figure 15 The top of the unit must be at least 100cm separated from the ceiling especially in rooms with ceilings consisting of flammable materials The base supporting the unit cannot be made of combustible material e g carpet so make sure you use an adequate protection a b Figure 1...

Page 19: ...ey with other equipment Pipes outside the operating area must have double stainless steel insulation and an internal diameter of 80 mm Douro 12 kW or 100 mm Douro 17 kW and Douro 23 kW The fume exhaust pipe may generate condensation so we recommend that the appropriate systems for collecting condensates should be installed 5 4 Installation without a chimney The installation of the free standing pe...

Page 20: ...15 Figure 16 Side view of the installation without a chimney illustrating the inspection point a ...

Page 21: ...16 b c Figure 17 Examples of standard installations Failure to comply with these requirements may prevent the correct operation of the unit Follow all the instructions presented on the diagrams ...

Page 22: ...f fumes Draught in the chimney The figures below show three standard diagrams specifying adequate lengths and diameters Any other type of installation must guarantee a draught of 12 Pa 0 12 mbars measured when hot and at the maximum power Ventilation To get the optimum operation of the unit it is necessary that the installation location has an air inlet with a minimum section of 100 cm2 preferably...

Page 23: ... A T tube must be attached to the base of the pipe to allow for periodic inspection and annual maintenance as illustrated in Figure 18 Figure 18 Side view of the installation with a chimney showing the inspection point We do not recommend that you use the unit in rough weather conditions that may seriously impact the draught particularly with very strong winds If you do not use the unit for a long...

Page 24: ...ed in the quantity recommended by the manufacturer If the unit installation or the fluid pipes are installed are likely to freeze the installation engineer must add to the circulating fluid the amount of antifreeze product recommended by the manufacturer to avoid freezing at the estimated minimum temperature 6 1 Operating mode for radiator buffer tank IMPORTANT The boiler is programmed to work dir...

Page 25: ...l reduce the efficiency of the unit and cause deficient combustion Only certified pellets should be used and a sample must be tested before buying large bulks The physicochemical properties of the pellets namely calibre friction density and chemical composition may vary within specific tolerances and across manufacturers Please note that this may cause changes to the feeding process and consequent...

Page 26: ...te painted with high temperature resistant paint which releases fumes during the initial burn due to the paint s curing process Avoid touching the unit during its first burn to prevent leaving permanent marks on the paint The paint goes through a more plastic phase during the curing process The curing of the paint occurs at approximately 300ºC for 30 minutes Please make sure the room where the uni...

Page 27: ...emperature This probe is attached to the grid at the rear panel Figure 20 For a good reading of the room temperature avoid the contact between the end of the probe and the unit surfaces You may also attach the probe to the wall beside the unit Figure 20 Room temperature probe ...

Page 28: ... and exit menus esc d Key to scroll the menus to the left to increase and reduce the fan flow and increase or reduce the set point temperature b Key to access menus and confirmation key ok e Key to scroll menus to the right and increasing and to reduce the unit s power c Key to start stop the unit and reset error messages ON OFF MENU MODE ESC 20 5ºC 16 03 OFF OK ...

Page 29: ...e in this mode the unit shall be turned on at maximum power until reaching a temperature of 1ºC above the temperature selected set point temperature Upon reaching the set temperature the unit changes to minimum operating power The set point temperature can be set between 5 and 40ºC by pressing the and keys Manu mode in this mode the unit will run at the speed selected with the key which may vary b...

Page 30: ...starts to flash Press the or key to select the desired temperature and then ok to confirm Press the key to go to the Temperatura de sanitários Bathroom Temperature menu Note in the equipment the water temperature can be regulated by the user water set point temperature between 50 and 80ºC Bathroom temperature this mode is disabled 9 2 3 Date To set the Date press the Menu key twice and Data Date a...

Page 31: ...splay starts to flash Press the or key to select the desired month and then ok to confirm Press the key to go to the Dia do Mês Day of the month menu ON OFF OK MENU MODE ESC MAN AUT esc 4 Set Mês Day of the month To set the Day of the month press set The display starts to flash Press the or key to select the desired day and then ok to confirm Press the key to go to the Dia Day menu ON OFF OK MENU ...

Page 32: ...ss the or key to select the desired time and then ok to confirm Press the key to go to the Minutos Minutes menu ON OFF OK MENU MODE ESC MAN AUT esc 16 Set Hora Minutes To set the Minutes press set The display starts to flash Press the or key to select the desired minutes and then ok to confirm Press the esc key to exit Press the key to go to the next menu and the Crono Timer menu appears ON OFF OK...

Page 33: ... the profile load menu or by the daily programmer P1 to P6 only one option can be active they do not work simultaneously Press the key to scroll to the Carga Perfil Profile Load menu There are 10 weekly programmes available on the Timer see item 24 in the annexes The selected programme runs from Monday to Friday and from Saturday to Sunday Press set the display starts to flash Press the or key to ...

Page 34: ...ammes for each day of the week To set up programmes P1 to P6 select the desired programme using the and keys and press set to select The Habilitação Activation menu appears can only be enabled after time scheduling Press the key to go to the H Inicio Star Time menu To set the starting time for Programme P1 press set The display starts to flash Press the or key to select the time and then press ok ...

Page 35: ...gured within the same day To set the set point temperature for Programme P1 press Set The display starts to flash Press the or key to select the desired temperature followed by Ok to confirm Press the key to go to the P1 Temp Água P1 Water Temp menu To select the set point water temperature in program P1 press set and start flashing press or to select the desired temperature press ok to confirm va...

Page 36: ...Press ok to confirm the selection Press the esc key to go to the P1 Dia P1 Day menu Press esc twice and then to access the Configurações Configuration menu Press set again and when flashing press the or keys to select On or Off Press ok to confirm your choice Repeat the above steps for programmes P2 to P6 To activate Timer mode press esc once and then until you find the Activation menu press the s...

Page 37: ...essage in the display chrono prog 9 2 5 Sleep this menu is displayed only while the unit is operating The Sleep menu allows you to setup the time you want the unit to turn off ON OFF OK MENU MODE ESC MAN AUT esc OFF Set SLEEP Press set The display starts to flash Select the desired time using the and keys After choosing the time press ok to confirm Press esc to return to the menu and to go to the ...

Page 38: ... key to scroll to the Código de Segurança Security Code menu Software code Security firmware Press the key to scroll to the Código Display Display Code menu ON OFF OK MENU MODE ESC MAN AUT esc 520420 ódigo Seguranç Software code Display firmware Press the key to scroll to the Código de Parâmetros Parameter Code menu ON OFF OK MENU MODE ESC MAN AUT esc 500308 Código Display ...

Page 39: ...u shows the number of operating hours the unit has registered since its last servicing The number of hours at which the next servicing should take place ON OFF OK MENU MODE ESC MAN AUT esc 144 oras de Serviç Very Important When the machine is close to service hours it is recommended to call an accredited technician to perform its maintenance This menu shows the phase status of the free standing fi...

Page 40: ...ed by air sensor ON OFF OK MENU MODE ESC MAN AUT esc 40 lpm xo de Ar Medid Theoretical pellet consumption Fume temperature ON OFF OK MENU MODE ESC MAN AUT esc 18ºC emperatura Fum Worm drive rotation On time ON OFF OK MENU MODE ESC MAN AUT esc 0 rpm Set Rotações Expulsor ...

Page 41: ...nguage press set Using the or keys select the language Pt Portuguese Nl Dutch Gr Greek Tr Turkish It Italian En English Fr French Es Spanish De German Press ok to confirm Press the key scroll go to the Eco menu Eco mode When the ECO mode is enabled at the same time as the Thermostat feature the unit will operate at maximum power until the thermostat opens contact NO The unit then will operate at m...

Page 42: ...f button in the display To enable the eco mode press set The display starts to flash To activate the eco mode press set The display starts to flash Select On or Off using the and keys Press set to confirm the selection Press esc to return to the previous menu and then press to go to the Iluminação Lighting menu ON OFF OK MENU MODE ESC MAN AUT esc Off Set Eco Lighting To select lit screen press set...

Page 43: ...ture Temperature unit ºC ºF To select ºC ºF press set The display starts to flash Press the or key to select ºC ºF or Auto and then ok to confirm Press the key to go to the Combustion recipe menu ON OFF OK MENU MODE ESC MAN AUT esc Auto Set ºC ºF Combustion recipe Press set to display the Combustão receita Combustion recipe menu Pellet This feature allows the user to increase or decrease up to 25 ...

Page 44: ...uired Each unit must be multiplied by 2 5 to obtain the correct percentage Press ok to confirm Press esc to return to the Receita de pellets Pellet recipe menu and then press to go to the Carga pellet Pellet loading menu Pellet loading esta função só aparece com a máquina em Off This feature allows you to enable the worm drive to fill the channel when it is empty to keep the unit running Press set...

Page 45: ...en once to switch to the Active Pump menu Active Pump this function only appears with the machine in Off This function allows the water pump to be driven manually Press set and the message enabled appears Press the esc key once and then to go to the Technical Menu menu The technical menu is not available to the end user 9 2 8 Technical Menu This feature allows the user to adjust the unit s differe...

Page 46: ... letter Press Ok to confirm the numbers 00 start to flash Using the and keys select the desired number Confirm by pressing OK to go to the Configuração Settings menu ON OFF OK MENU MODE ESC MAN AUT esc A 00 Ok Password Note The password is only provided to authorised technicians ...

Page 47: ...ower selection button for approximately 1 second You can select from the five pre set power levels that are available The selected power is indicated on the display The initial power status at each start up will correspond to the power level set before the last stop Important notice Before starting up the unit please check to determine if the deflector plate is in place 10 1 Stop The stop sequence...

Page 48: ...ower fixtures Do the opposite to assemble the unit Figure 23 Removal of side covers 11 2 Pellet reservois lid The pellet reservoir is opened by sliding the bolt sideways Figure 24 a and lifting the lid Figure 24 b a b Figure 24 Opening the lid 11 3 Filling the pellet reservoir 1 Open the pellet reservoir lid at the top of the unit as shown in Figure 24 ...

Page 49: ... and operation with the remote control chrono thermostat not included in free standing units The free standing pellet fire units are mass produced with the command device display Alternatively they can be used with a generic remote control unit programmable thermostat Note the remote control is usually accompanied by a manual To use the remote control you must install an interface Figure 26 b a b ...

Page 50: ...l only change the power of the machine between minimum output open contact NO and maximum power closed contact NC Note the external command as a rule comes with a manual In the case of wireless remote control is necessary to connect the two wires as shown in the following figure a b Figure 27 Connection of the wireless remote control For the wired remote control the black and grey wires must be co...

Page 51: ...ions for remote control assembly 1 Turn off the unit at the power switch remove both the right side cover of the free standing pellet fire unit Figure 29 a and the plate with the microjoints Figure 29 b a b 2 Remove the unit s terminals phase F and neutral N c ...

Page 52: ...nect the wires on the ON OFF connector contact Figure 29 f direct the wires through the cable gland to the interior of the unit Figure 29 g f g 5 Assemble the interface at the appropriate location on the unit and position the remote control On Off contact switch to remote Figure 29 h h i ...

Page 53: ... done by using a simple household vacuum cleaner It should be cleaned after burning approximately 30kg Douro 12 kW 60kg Douro 17 kW and Douro 23 kW of pellets Note However before cleaning the power of the unit must be turned off and the unit should be allowed to cold off to prevent any accident 13 2 Weekly Maintenance Douro 12 kW To perform maintenance on the backboiler model clean the airflow pip...

Page 54: ...ning the interior of the backboiler model Then remove the burning basket Figure 32 a and the ash basket Figure 32 b and vacuum the ashes from both The interior of the unit must also be cleaned by opening the hatch as shown in figure Finally assemble the parts in the reverse to which they were removed and close the unit door a b Figure 32 a Burning basket b Ash basket ...

Page 55: ...aintenance on the backboiler model clean the airflow pipes To do this raise the lid on the top of the unit Figure 33 a and then turn Figure 33 b and lift the levers inside several times Figure 33 c to make the dirt accumulated inside the pipes fall out a b c Figure 33 Cleaning the turbulators Then clean the inside of the unit using a steel brush on the surfaces where dirt has accumulated Figure 34...

Page 56: ...5 b must then be removed and the ash vacuumed from both The interior of the unit must also be cleaned by opening the hatch as shown in Figure 37 Finally assemble the parts in the reverse to which they were removed and close the unit door a b Figure 35 a Burning basket b Ash basket Figure 36 Cleaning the burning basket ...

Page 57: ...r 16 13 3 Additional cleaning Douro 12 kW Additional cleaning should be performed for every 1300 1700 lbs 600 800 kg of pellets consumed Remove the side covers to access the side lids of the combustion chamber To clean the interior of the unit remove the lid and vacuum the ashes Using a 20 25mm wide 80cm long steel brush thoroughly clean the fume ducts Figure 38 Figure 38 Cleaning Vacuum the inter...

Page 58: ...cedure involves cleaning the air flow pipes and turbulators To do this open the lid on the top of the unit Figure 40 a and Figure 40 b and remove the four sticks Figure 40 c and Figure 40 d Then pull the turbulators up Figure 40 e A vacuum cleaner must be used to clean this area Figure 40 f and the interior of the pipes can be cleaned with a steel brush The turbulators that are removed must also b...

Page 59: ...the lid on the top of the unit Figure 41 a and remove the six wing nuts securing each turbulator set Figure 41 b and Figure 41 c Then pull the turbulators up Figure 41 d and Figure 41 e A vacuum cleaner must be used to clean this area Figure 41 f and the interior of the pipes Figure 41 g can be cleaned with a steel brush The turbulators that are removed must also be cleaned with a steel brush Figu...

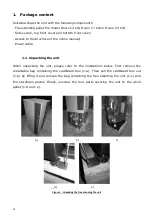
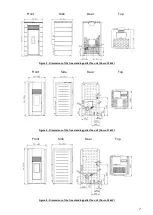
Page 60: ...55 a b c d e f ...
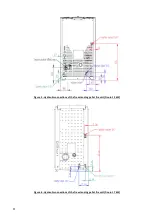
Page 61: ...ing extracted in the best manner possible we recommend you clean the extractor as shown in Figure 42 and Figure 43 However we recommend that you perform this procedure at least once a year a b Figure 42 a Remove the screws b Remove the extractor Figure 43 Vacuum the air flow pipes ...

Page 62: ...s so that no undesirable oxidation occurs The sealing ring is glued so should not be exposed to moisture from water or cleaning products Figure 44 Incorrect cleaning of the glass a b Figure 45 Cleaning of the glass a moisten a soft cloth with liquid b clean the glass with the cloth WARNING The maintenance task frequency depends on the quality of the pellets Note See the warning label and read the ...

Page 63: ...or is open lack of draught or extractor fault for 180 sec Close the door and clear the error message on the faulty pressure regulator Obstruction of the exhaust pipe or faulty extractor Air mass probe A06 40 Ipm delta for 3600 sec Pipes with insufficient extraction or obstructed pipes The door is open A07 Door open for 120 seconds Close the door clear the error message Faulty air mass sensor Fume ...

Page 64: ...e due indicates that the unit has exceeded 2100 operating hours In this case the client must perform the unit s maintenance procedure following the instruction on the Technical Manual Once this procedure is completed the hour meter may be reset to clear the waning message This message does not impact the normal operation of the unit It is simply a warning Important notice The errors can be reset o...

Page 65: ... tasks that must be performed by authorised technicians only Please contact the person responsible for installing the unit To make sure the warranty remains valid the maintenance operations performed on this unit must comply with the frequency requirement specified in the manual and the service technician must fill and sign the maintenance log Client data Name Address Telephone Model Serial Number...

Page 66: ...61 ...

Page 67: ...62 ...

Page 68: ...63 ...

Page 69: ...l is attached from factory to the unit s pellet lid in the Portuguese language Attached to the manual you will find other language versions of the sticker labels Spanish English French and Italian If necessary remove the Portuguese language label and replace it with the label in your country s language ...

Page 70: ...eating radiators Note The chrono thermostat should have 1 to 2 C of hysterisis Hydro independiente On water temperature controlled regulation Modulating pump On Water sensing inhibition On Alternative hydro shutdown On Pump On 50 C Pump Off 50 C We can set change according to the customer s discretion to another temperature 1 1 ...

Page 71: ...y water combined with solar panel Example electrical connection of a thermostat ambient air monitoring of a differential thermostat connected to the deposit and three way valve to a relay box Figure 49 Electrical connection of a thermostat ambient air monitoring of a differential thermostat connected to the deposit and three way valve to a relay box ...

Page 72: ...Hydro independiente Off water temperature controlled regulation put the boiler in manual mode and power nivle to 5 Modulating pump On Water sensing inhibition On Alternative hydro shutdown On Pump On 50 C Pump Off same or thermostat temperature 1 C below the temperature differential thermostat When using the generator with differential thermostat the machine must be connected in the CONNECTION Rem...

Page 73: ...njunction with another boiler support and sanitary water combined with solar panel Figure 51 Connecting underfloor heating in conjunction with another boiler support and sanitary water combined with solar panel Simbology Figure 52 Simbology ...

Page 74: ...69 18 Electrical diagram of the Free Standing Pellet Fire unit Figure 53 Electrical diagram Douro 12 kW Figure 54 Electrical diagram Douro 17 kW and Douro 23 kW ...

Page 75: ... pump performance graph User interface The user interface was designed with a single button a red green LED and four yellow LEDs Figure 56 User interface When the pump is operating the LED 1 is green 4 yellow LEDs indicate the current performance of the pump as shown in the following table LEDs Botão ...

Page 76: ...city 75 100 Changing the setting of the pump Can be chosen between the the view of the performance of pump and th view of settings just press the button once If you need to change the pump performance you must press the button for 2 seconds Figure 58 after this action the LEDs start blinking then you must press the button until the desired setting Table 5 after 10 seconds the display automatically...

Page 77: ...e If the pump detects one or more errors the LED 1 changes from green to red when the alarm is activated the yellow LED indicates the type of alarm see Table 6 if we have several alarms at the same time the yellow LED indicates the alarm with higher priority the priority sequence is defined on table as follows Display Priority Alarm Action LED 1 red LED 5 yellow 1 Rotor is blocked Wait or deblock ...

Page 78: ...s to ensure an efficient carbon cycle management Solzaima makes all efforts to learn and to know the national forest park while efficiently responding to energy demands taking permanent care to maintain its biodiversity and natural wealth that are essential for the quality of life on our Planet SOLZAIMA is a member of the Portuguese Sociedade Ponto Verde which manages packaging waste from products...

Page 79: ...her a guide intended to be enlightening for the effective activation of the legal warranty that benefits consumers from now on mentioned as Warranty This document does not affect the legal rights of warranty emerging from the purchase agreement whose purpose is the Product s 2 Product identification on witch rests the warranty The activation of the warranty presupposes prior and correct identifica...

Page 80: ...sixty days after the date on which it has detected it in the case of domestic use of the product 3 5 2 Thirty 30 days from the date of its detection in the case of professional use of the Product 3 6 In the pellet range equipments the commissioning service is required to activate the waranty It must be registered up to 3 months after the date of invoice or 100 hours of work of the product whicheve...

Page 81: ...means of a cabinet or a properly ventilated protective caseAppliances should not be installed in places that contain chemicals in their atmosphere in saline or high humidity environments as mixing them with air may produce rapid corrosion in the combustion chamber In this type of environment it is especially recommended that the appliance be protected with anti corrosion products for this purpose ...

Page 82: ... use dielectric separators in the connection of the equipment to metal pipes whose characteristics of the materials applied to this type of corrosion Product Warranty does not include damages caused by non use of such dielectric separators 3 14 The water or thermofluid used in the heating system hydro toves boilers central heating stoves among others must comply with the legal requirements in forc...

Page 83: ...00 operating hours 4 2 Refurbished and resold products 4 3 Maintenance operations Product settings commissioning cleaning elimination of errors or anomalies that are not related to deficiencies of equipment components and replacement of the batteries 4 4 Components in direct contact with fire such as vermiculite supports deflector or protective plates vermiculite sealing lanyards burners ash drawe...

Page 84: ...the intended use of the Product or from abnormal climatic factors unusual operating conditions overload or maintenance or cleaning performed improperly 4 10 The Products that have been modified or manipulated by people outside the Official Technical Services of the brand and consequently without the explicit authorization of Solzaima SA 4 11 Damage caused by external agents rodents birds spiders e...

Page 85: ...s 4 16 The installation of the equipment supplied by Solzaima S A should contemplate the possibility of their easy removal as well as points of access to the mechanical hydraulic and electronic components of the equipment and the installation When the installation does not allow immediate and safe access to the equipment the additional cost of access and security will always be borne by the Buyer ...

Page 86: ... outside the scope of the warranty are subject to the application of the current tariff 8 Warranty Services performed out of scope Warranty The interventions carried out outside the scope of the Warranty and carried out by the official technical assistance service of Solzaima have a 6 month guarantee 9 Warranty Spare Parts provided by Solzaima As Peças fornecidas pela Solzaima no âmbito da venda c...

Page 87: ...efault interest at the maximum legal rate in force 12 Competent court For the resolution of any dispute arising from the purchase and sale agreement having as object the products covered by the warranty the contracting parties attribute exclusive jurisdiction to the courts of the district of Águeda with express waiver of any other ...

Page 88: ...0 11 12 13 14 15 16 17 18 19 20 21 22 23 Mon Fri Sat Sun Mon Fri Sat Sun Mon Fri Sat Sun Mon Fri Sat Sun Mon Fri Sat Sun Mon Fri Sat Sun Mon Fri Sat Sun Mon Fri Sat Sun Mon Fri Sat Sun Fri Sat Sun P10 P04 P05 P06 P07 P08 P09 P03 Prog No P01 Days Daily programming P02 ...

Page 89: ...84 23 2 Flow chart Douro 12 kW Flow chart 1 Lighting ...

Page 90: ...85 ...

Page 91: ...86 Flow chart 2 Disabling Note The circulator pump off below 40 C water temperature ...

Page 92: ...87 23 3 Flow chart Douro 17 kW and Douro 23 kW Flow chart 1 Lighting ...

Page 93: ...88 ...

Page 94: ...89 Flow chart 2 Disabling Note The circulator pump off below 40 C water temperature ...

Page 95: ...ignação comercial registada e endereço de contacto do fabricante Nombre marca registrada y la dirección de contacto de lo fabricante Name registered trade name and contact address of the manufacturer Nom marque déposée et l adresse de contact du fabricant Nome denominazione commerciale registrata e Indirizzo del costruttore SOLZAIMA SA RUA DOS OUTARELOS Nº111 3750 362 BELAZAIMA DO CHÃO ÁGUEDA PORT...

Page 96: ... Le débit calorifique nominal Nominal heat output Flusso termico nominale CO 0 04 OK Caudal térmico reduzido Flujo térmico reducido Reduced thermal flow Flux thermique réduit Flusso termico ridotto CO 0 0256 Caudal térmico reduzido Flujo térmico reducido Reduced thermal flow Flux thermique réduit Flusso termico ridotto CO 0 06 Libertação de substâncias perigosas Emisión de sustâncias peligrosas Re...

Page 97: ...mos deve ser colocado um suporte de carga cada 10 m de la salida de humos se debe colocar un soporte de carga every 10 m of the flue should be placed a load support tous les 10 m de conduit de fumée doit être placé un support de charge ogni 10 m della canna fumaria deve essere posto un supporto di carico De acordo com os requisitos De acuerdo con los requisitos According to the requirements Selons...

Page 98: ...tible con las prestaciones declaradas en el punto 9 La presente declaración se expide bajo la exclusiva responsabilidade del fabricante identificado en lo punto 4 Performance of the product stated in points 1 and 2 is consistent with the declared performance in point 9 This declaration of performance is issued under the sole responsibility of the manufacturer identified in point 4 Les performances...

Page 99: ... contacto do fabricante Nombre marca registrada y la dirección de contacto de lo fabricante Name registered trade name and contact address of the manufacturer Nom marque déposée et l adresse de contact du fabricant Nome denominazione commerciale registrata e Indirizzo del costruttore SOLZAIMA SA RUA DOS OUTARELOS Nº111 3750 362 BELAZAIMA DO CHÃO ÁGUEDA PORTUGAL 5 Sistema de avaliação e verificação...

Page 100: ...ue nominal Nominal heat output Flusso termico nominale CO 0 04 OK Caudal térmico reduzido Flujo térmico reducido Reduced thermal flow Flux thermique réduit Flusso termico ridotto CO 0 024 Caudal térmico reduzido Flujo térmico reducido Reduced thermal flow Flux thermique réduit Flusso termico ridotto CO 0 06 Libertação de substâncias perigosas Emisión de sustâncias peligrosas Release of dangerous s...

Page 101: ...a 10 m de la salida de humos se debe colocar un soporte de carga every 10 m of the flue should be placed a load support tous les 10 m de conduit de fumée doit être placé un support de charge ogni 10 m della canna fumaria deve essere posto un supporto di carico De acordo com os requisitos De acuerdo con los requisitos According to the requirements Selons les exigences Secondo i requisiti 4 2 4 3 EN...

Page 102: ...aciones declaradas en el punto 9 La presente declaración se expide bajo la exclusiva responsabilidade del fabricante identificado en lo punto 4 Performance of the product stated in points 1 and 2 is consistent with the declared performance in point 9 This declaration of performance is issued under the sole responsibility of the manufacturer identified in point 4 Les performances du produit indiqué...

Page 103: ...contacto do fabricante Nombre marca registrada y la dirección de contacto de lo fabricante Name registered trade name and contact address of the manufacturer Nom marque déposée et l adresse de contact du fabricant Nome denominazione commerciale registrata e Indirizzo del costruttore SOLZAIMA SA RUA DOS OUTARELOS Nº111 3750 362 BELAZAIMA DO CHÃO ÁGUEDA PORTUGAL 5 Sistema de avaliação e verificação ...

Page 104: ...t Le débit calorifique nominal Nominal heat output Flusso termico nominale CO 0 04 OK Caudal térmico reduzido Flujo térmico reducido Reduced thermal flow Flux thermique réduit Flusso termico ridotto CO 0 024 Caudal térmico reduzido Flujo térmico reducido Reduced thermal flow Flux thermique réduit Flusso termico ridotto CO 0 06 Libertação de substâncias perigosas Emisión de sustâncias peligrosas Re...

Page 105: ...deve ser colocado um suporte de carga cada 10 m de la salida de humos se debe colocar un soporte de carga every 10 m of the flue should be placed a load support tous les 10 m de conduit de fumée doit être placé un support de charge ogni 10 m della canna fumaria deve essere posto un supporto di carico De acordo com os requisitos De acuerdo con los requisitos According to the requirements Selons les...

Page 106: ...atible con las prestaciones declaradas en el punto 9 La presente declaración se expide bajo la exclusiva responsabilidade del fabricante identificado en lo punto 4 Performance of the product stated in points 1 and 2 is consistent with the declared performance in point 9 This declaration of performance is issued under the sole responsibility of the manufacturer identified in point 4 Les performance...

Reviews: