background image


Model KCS-5200 


Color Scanning Sonar 


Operation Manual 


Ver 1.48 E 

Rev 0 


Summary of Contents for KCS-5200

Page 1: ...Model KCS 5200 Color Scanning Sonar Operation Manual Ver 1 48 E Rev 0...
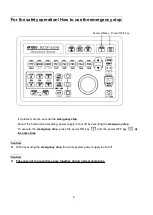
Page 2: ......

Page 3: ...ter 2 Names and Function of Keys of the Controller 2 1 2 1 Name of the Keys 2 1 2 2 Key Functions 2 2 Chapter 3 Marks and Numerical Displays 3 1 Chapter 4 Menu Operation 4 1 4 1 Opening the Menu 4 1 4...

Page 4: ...8 Discrimination 5 13 5 4 9 TX Power 5 13 5 4 10 TX Pulse 5 13 5 4 11 Synchronization 5 13 5 4 12 Dwell 5 13 5 4 13 Noise Reduction 5 13 5 4 14 STC Level 5 14 5 4 15 Screen Mode 5 14 5 4 16 Sub Area 1...

Page 5: ...22 6 7 3 Audio Gate Width Change 6 23 6 8 Orthogonal Screen 6 24 6 8 1 Orthogonal Screen Mode 6 24 6 8 2 Display Area Change 6 25 6 8 3 Display Size Change 6 26 6 8 4 Range and Depth Change 6 27 6 8 5...

Page 6: ...9 12 9 7 Precautions Concerning the Protrusion of the Hoist Unit into Equipment at the Bottom of the Boat9 14 9 7 1 Adjusting the Clearance Between the Pressure Receiving Ring and the Skirt 9 14 9 7...

Page 7: ...andle the instrument the possibility of causing death or a serious injury is anticipated The symbol means if you mishandle the instrument the possibility of causing a moderate or light injury or damag...

Page 8: ...r a location in the vicinity of a heating appliance 2 Avoid using the instrument at a location where the instrument directly receives spindrift or at a humid location Warning at the check of the ship...

Page 9: ...at sea When the transducer or the hoisting device is damaged at sea the sonar system cannot be used accordingly the operation or safe navigation is sometimes hindered Furthermore it takes a large amo...

Page 10: ...nged there is a risk of smoking and ignition Target of exchange As to a battery the target life is set to about two years as a standard When the battery is used under a high temperature the life becom...

Page 11: ...al temperature of those devices may cause their malfunction The outlets of the fans therefore should be inspected regularly to check that the fan motors are working properly Although the service life...

Page 12: ...g power supply is shut off by executing the emergency stop To execute the emergency stop press the power ON key and the power OFF key at the same time Caution When executing the emergency stop the who...

Page 13: ...ent Features The entire circumference can be searched at the same time The sonar has a special transmission system and therefore is excellent in detecting distance The cross section display function c...

Page 14: ......

Page 15: ...to Chapter 9 Handling and Maintenance of Hoist Unit of this manual 1 2 Basic Operation 1 2 1 On Off of Power Supply 1 Apply the power supply Press the power ON key of the controller for one second or...

Page 16: ...descent key flashes on The message for the lower limit is indicated on the screen Perform the descent operation for the hoist unit at a ship speed of 15 knots or less When the hoisting amount increase...

Page 17: ...device operation during ascent or descent operations press the stop key The upper lamp of the stop key flashes on The hoisting amount at the time of stopping the hoisting device is indicated When you...

Page 18: ...ain is automatically increased By virtue of this fish shoals at both long distance and short distance are displayed similarly on the screen 1 2 5 Tilt Adjustment The tilt is adjusted by the tilt keys...

Page 19: ...r OFF key 3 Ascent key 4 Stop key 5 Decent key 6 Tilt key 7 Gain key 8 Range key 16 Fish school mark key 17 Fish school mark erasing key 19 Two touch key block 14 Picture save key 15 Off center key 12...

Page 20: ...e keys The display range is changed to longer range by the key or changed to shorter range by the key 9 Bearing mark keys An Audio mark is moved clockwise by key or counterclockwise by key 10 Event ke...

Page 21: ...tandard setting is NR5 While NR1 setting is the weakest signal processing NR10 setting is the strongest signal processing Normally the standard setting should be used because the strong setting of thi...

Page 22: ...2 4...

Page 23: ...Mark 24 Cross Cursor 26 Wake Mark 30 Event Mark 29 Event Mark 28 Event Mark 31 Multiple Mark 5 Wind Direction Speed Mark 27 Tidal Current Mark 32 Color Bar 9 Range 8 Tilt 7 Gain 10 Hoist Unit Stroke 1...

Page 24: ...converted into audio sound and the range to be displayed in the dual audio screen The area surrounded by two yellow lines is the signal range 4 Bow line Shows the bow direction blue line 5 Wind Direc...

Page 25: ...itude 14 Latitude and Longitude Shows the latitude and longitude of the ship This information is not displayed when it is not input from an external device Note 15 Ship Speed Shows the speed of the sh...

Page 26: ...vent mark However even the latitude and longitude are selected the latitude and longitude are not display if those of the ship are not input from an external device Note 22 Fish School Mark Shown on t...

Page 27: ...time the event key is pressed 29 Event Mark Shows event mark on the cross cursor position each time the event key is pressed 30 Event Mark Shows event mark on the cross cursor position each time the e...

Page 28: ...3 6...

Page 29: ...unctionally and effectively To operate the menu use the menu key and the trackball of the controller 4 1 Opening the Menu Press the menu key on the controller to display the following menu on the lowe...

Page 30: ...le Loading the standard setting Press the menu key of the controller to open the menu Place the cross cursor over it and press the menu key Hierarchy 1 Press Place the cross cursor over Memory and pre...

Page 31: ...ing of the TX Pulse Press the menu key to open the menu The menu is a hierarchy structure Select the menu item one by one from each hierarchy with the cross cursor and the menu key For increasing the...

Page 32: ...u item of the previous hierarchy Example Returning to the menu from the TX Pulse Returning with the key and the trackball of the controller To return to the horizontal screen menu of Hierarchy 2 from...

Page 33: ...if the parameters are changed the sonar may not be able to fulfill the functions Basically the parameters are set by our service staff however if you change the parameters change them very carefully...

Page 34: ...ning the Option Menu The Option can be opened as follows Move the cross cursor to the bottom of the screen and press the of the controller to open the Option menu Move the cross cursor to the bottom o...

Page 35: ...menu items To check the preset menu items press the menu key of the controller to open the menu and select Preset To register these preset menu items as shortcuts the following two registration method...

Page 36: ...select the function you want to register Press any one of the preset keys from to of the controller to use it for the registration After the registration is completed the registered preset key appear...

Page 37: ...o which you registered the preset menu item Then the red LED over the preset key turns on 2 Operate the and keys on the right side of the preset key to change the setting of the function you registere...

Page 38: ...e menu and press the menu key 3 Place the cross cursor over the function of the preset menu item you want to register and press the menu key 4 Place the cross cursor over the preset screen frame of ei...

Page 39: ...ter TX Pulse in TX Power Step 1 Open the Preset menu then align the cross cursor with TX Power and press Step 2 Move the cross cursor to the TX Pulse border to be registered Step 3 Pressing the Menu k...

Page 40: ...tems to set any value you want by increasing and decreasing the value Before setting the values check the setting details in 5 3 3 Preset Menu List For the items to set the fixed value the setting seq...

Page 41: ...imination Discrim 1 Discrim 2 Discrim 3 Discrim 4 Discrim 5 Discrim 6 Discrim 7 Discrim 8 Discrim 9 Discrim 10 TX Power Any value in the range from 0 to 10 in increments of 1 TX Pulse Any value in the...

Page 42: ...ayed on the sonar screen After this Wake Mark Erase is executed the wake display will return to the state of the sonar startup and the wake display cannot be displayed again Therefore be careful when...

Page 43: ...n the preset key in which Net Cast is registered Then the red flag mark disappears Note This function is enabled only when the red LED over the registered preset key is turned OFF When this function i...

Page 44: ...gistered Then the Net Set ring mark disappears Operation procedure 2 using this function after it is registered in the sub area selection area of the sonar screen a Register the Net Set in the sub are...

Page 45: ...or to the ship Then the VRM disappears After that press the preset key in which VRM is registered Operation procedure 2 using this function after it is registered in the sub area selection area of the...

Page 46: ...5 12 A display example of Net Cast Net Set and VRM Wake Net Cast mark Net Set ring mark VRM VRM distance...

Page 47: ...t a fish school in the shallows or when you want to confirm the density of a fish school 5 4 11 Synchronization This function is used to synchronize sonar operations When the setting is Internal the s...

Page 48: ...n the screen relative to the movement of the ship Normally the system is operated using these settings for finding the fish school 2 RM NU In this mode the top of the screen always points north The sh...

Page 49: ...adjust the audio volume No audio sound is produced when the setting is 0 The audio volume is the maximum level when the setting is 10 5 4 24 Panel Brightness This function is used to adjust the bright...

Page 50: ...5 16...

Page 51: ...nging the sonar area mode with two touch key of the controller is easier and it does not require complicated menu setting Changing with the two touch key To change the sonar screen mode with the two t...

Page 52: ...key to open the menu 2 Place the cross cursor over Screen Sub Screen and press the menu key to open Screen Sub Screen menu 3 Place the cross cursor over Screen Mode and press the menu key to open Scre...

Page 53: ...ing image of the horizontal screen to display it on the entire screen If this mode is used for small reactions at a long range the reactions can be identified easier Note In the full screen mode the T...

Page 54: ...tting The gain can be adjusted by menu setting with the cross cursor and the menu key Operation procedure 1 Press the menu key to open the menu 2 Place the cross cursor over Basic Opearation and press...

Page 55: ...d to Keys from PS1 to PS5 of the Controller and also 5 3 1 Preset Menu Setting Change Key Adjustment method using a sub screen The Gain function can be registered in the Preset Screen of sub screen 1...

Page 56: ...t can be adjusted by menu setting with the cross cursor and the menu key Operation procedure 1 Press the menu key to the menu 2 Place the cross cursor over Basic Operation and press the menu key to op...

Page 57: ...d to Keys from PS1 to PS5 of the Controller and also 5 3 1 Preset Menu Setting Change Key Adjustment using a sub screen The Tilt function can be registered to the Preset Screen of sub screen 1 or sub...

Page 58: ...ted by menu setting with the cross cursor and the menu key To change the range by menu setting select a range from 15 pre registered ranges displayed on the menu Operation procedure 1 Press the menu k...

Page 59: ...d to Keys from PS1 to PS5 of the Controller and also 5 3 1 Preset Menu Setting Change Key Adjustment using a sub screen The Range function can be registered to the Preset Screen of sub screen 1 or sub...

Page 60: ...6 10 6 4 Horizontal Screen 6 4 1 Horizontal Screen Mode The horizontal screen mode displays a 360 degree horizontal image Sub Screen 1 Sub Screen 2 Sub Screen 3 Sub Screen 4...

Page 61: ...to PS5 keys The Gain function can be registered to the to keys of the controller and also the gain of the horizontal screen can be adjusted For the method of operation refer to 5 2 1 Using the Functio...

Page 62: ...e PS1 to PS5 keys The Tilt function can be registered to the to keys of the controller and also the tilt of the horizontal screen can be adjusted For the method of operation refer to 5 2 1 Using the F...

Page 63: ...t with the PS1 to PS5 keys The Range function can be registered to the to keys of the controller and also the range of the horizontal screen can be adjusted For the method of operation refer to 5 2 1...

Page 64: ...ayed in the lower part of the screen starting from the left to the right Up to four multiple screens can be displayed at a time and the fifth screen of the multiple screens renews the oldest screen st...

Page 65: ...renewal timing can be changed by the menu and can be selected from 5 timing settings Manual Every Ping 1 2 1 4 and 1 8 Operation procedure 1 Press the key to open the menu 2 Place the cross cursor ove...

Page 66: ...reen of multiple screens is displayed Every Ping A sub screen of multiple screens is renewed each time the area with set mark is transmitted 1 2 1 4 1 8 These figures decide transmission times of the...

Page 67: ...n 1 Press the menu key to open the menu 2 Place the cross cursor over Horizontal Sonar and press the menu key to open Horizontal Sonar menu 3 Place the cross cursor over Tilt and press the menu key to...

Page 68: ...rmed This is also for changing an angle set by the auto tilt mode each time the transmission is performed For example when the tilt is 0 and 2 in the auto tilt mode the tilt continually changes each t...

Page 69: ...image on the same screen At a place that is too small to install both the sonar and echo sounder this function is useful to view images of both the sonar and the echo sounder simultaneously For infor...

Page 70: ...usted by the menu setting with the cross cursor and the menu key Operation procedure 1 Press the key to open the menu 2 Place the cross cursor over the Screen Sub Screen and press the menu key to open...

Page 71: ...The range can be adjusted by menu setting with the cross cursor and the menu key Operation procedure 1 Press the menu key to open the menu 2 Place the cross cursor over Screen Sub Screen and press the...

Page 72: ...ting an active speaker enables you to hear sound as an audio signal For connecting an active speaker contact our service staff 6 7 2 Audio Bearing Change The audio bearing can be changed by pressing t...

Page 73: ...oss cursor over Screen Sub Screen and press the menu key to open Screen Sub Screen menu 3 Place the cross cursor over Audio and press the menu key to open Audio menu 4 Place the cross cursor over Gate...

Page 74: ...area is 180 The sonar picture the red arrow area in the bearing direction with the center on the bow bearing is displayed in the horizontal axis direction of the orthogonal screen The center of the ho...

Page 75: ...r on the bow bearing Operation procedure 1 Press the menu key to open the menu 2 Place the cross cursor over Screen Sub Screen and press the menu key to open Screen Sub Screen menu 3 Place the cross c...

Page 76: ...menu key to open the menu 2 Place the cross cursor over Screen Sub Screen and press the menu key to open Screen Sub Screen menu 3 Place the cross cursor over Orthogonal and press the menu key to open...

Page 77: ...nu key to open Screen Sub Screen menu 3 Place the cross cursor over Orthogonal and press the menu key to open the Orthogonal menu 4 Place the cross cursor over Display Axis and press the menu key to o...

Page 78: ...6 28 Menu Screen Sub Screen Orthogonal Display Axis...

Page 79: ...Screen and press the menu key to open Screen Sub Screen menu 3 Place the cross cursor over Orthogonal and press the menu key to open the Orthogonal menu 4 Place the cross cursor over Enlargement and p...

Page 80: ...6 30...

Page 81: ...o disabled while the over range display is enabled 7 1 2 Off Center Displaying Procedure Off center displaying procedure 1 Position the cross cursor on the horizontal screen 2 The ship mark is enlarge...

Page 82: ...the bearing mark The over range display is disabled in the full screen mode and in the orthogonal screen mode While the over range is enabled the off center display is disabled An example of the over...

Page 83: ...the menu 2 Position the cross cursor over Screen Sub Screen and press the menu key to open the Screen Sub Screen menu 3 Position the cross cursor over Ov Range Disp and press the menu key to open the...

Page 84: ...7 4...

Page 85: ...is successful When capturing a sonar picture is successfully completed the following message appears on the sonar screen Message when capturing fails Due to insufficient inner memory capacity if sonar...

Page 86: ...ow Displaying procedure 1 Press the menu key to open the menu 2 Position the cross cursor over Memory and press the menu key to open the Memory menu 3 Position the cross cursor over the Capture Disp i...

Page 87: ...screen in the past 3 Position the cross cursor over and press the menu key to display a new sonar screen 4 Position the cross cursor over and press the menu key to end the reading of the sonar screen...

Page 88: ...d 1 Read a sonar picture and position the cross cursor over or Then press the menu key to select the sonar picture to be deleted 2 Position the cross cursor over and press the menu key Then the follow...

Page 89: ...cursor over and press the menu key Then the following message appears Position the cross cursor over OK to delete all pictures collectively or CANCEL to cancel the deletion and press the menu key 3 Po...

Page 90: ...8 6...

Page 91: ...art of the Model M 94 Hoist Unit 1 Relay box 2 Emergency shutdown button 3 Cable gland 4 Junction box 5 Cable fixing piece 6 Limit switches 7 Guide ring 8 Dome 9 Gland retainer 10 Feed screw 11 Motor...

Page 92: ...For details refer to 9 2 Relay Box 3 Cable gland Used to fix the oscillator cable by retaining it at the exit of the UP Down pipe and packing it 4 Junction box Uses connectors for connecting the oscil...

Page 93: ...Procedure for Operating the Manual Handle 13 Hoist motor Used to drive the hoist up and down Specifications 3 220 V 1 5 kW Provided with brake 14 Skirt The skirt is welded to the bottom of the boat It...

Page 94: ...ble is connected only in the case of a half scanning sonar system 3 In the case of a system that has a stabilizing function an inclinometer is installed Inclination sensor IMU 3 Reverse rotation preve...

Page 95: ...t 6 LED 24 V Used for checking the 24 V power supply Lights in the case of a KCH 5180 half scanning sonar system Goes out in the case of another system 7 7 segment LED Described later 8 Information LE...

Page 96: ...ON the 7 segment LED lights as follows 1 Version information for HPC 2 software Lights for about 1 seconds 2 Information concerning the model name and size of the hoist Lights for about 1 second 3 In...

Page 97: ...OK monitor is operating Numbers flicker Condition in which a limit is applied only to the part corresponding to the flickering LED E 00 01 Rotary switch code setting error The type and stroke of the h...

Page 98: ...on in order to prevent danger Note If the emergency shutdown button is pressed during an AUTO operation the hoisting operation will stop To resume operation press the UP or DOWN switch on the indicato...

Page 99: ...ackening bolts 4 Turning the manual handle to the right or left causes the hoist to ascend or descend Turn the handle in the desired direction to the target position 5 Upon completion of the above wor...

Page 100: ...7 1 2 Lubricating the hoist unit 3 9 1 Lubricate the parts of the hoist indicated by circles in the figure at left once a month When applying grease first wipe away the dirty grease If lubrication wa...

Page 101: ...limit and confirm that the hoist stops at the lower limit If operation of the hoist is normal the three phases are wired correctly f In step e if the hoist does not move up or down when the UP and DO...

Page 102: ...imit or lower limit limit switch malfunctioning Does it make a noise when pressed by hand Adjust the limit switch B The electromagnetic switch functions but the hoist unit does not move 1 Is the motor...

Page 103: ...t to stop Likewise when the Up Down pipe is descending the lower limit switch operates causing the hoist to stop 2 Mounting position One upper and lower switch on the side of the column 3 Adjustment m...

Page 104: ...ng the skirt on the bottom of the boat must be the skirt OD plus no more than 5 mm The strain generated when the skirt is welded to the bottom of the boat must be within about 2 mm 1 3 Adjusting the c...

Page 105: ...sluggish in either the manual or auto mode With the transducer protruding into the bottom of the boat confirm that when it is pushed horizontally by hand the degree of looseness is no more than about...

Page 106: ...9 16...

Page 107: ...rating function The menu key the menu back key and the trackball on the controller are shown below A general type mouse can be used however the use of a mouse trackball type is recommended The Tilt ke...

Page 108: ...or should be connected Note Your mouse trackball can also be connected However additional wiring work is required if the place you use the mouse trackball is away from the place where the processor is...

Page 109: ...ss the menu key of the controller to open Option 2 Position the cross cursor over Initial Setting in the option menu and press the menu key of the controller to open Initial Setting menu 3 Position th...

Page 110: ...hown in the figure by turning the scroll wheel you can face the transducer beam angle in the direction of the sea surface upward tilt or in the direction of the seabed downward tilt The upper limit of...

Page 111: ...the menu key of the controller to open Option menu 2 Position the cross cursor over Initial Setting in the option menu and press the menu key of the controller to open Initial Setting menu 3 Position...

Page 112: ...ss the wheel button to display Event and press the right button to display Event The event deleting function is not available with the mouse trackball Use the event erasing key of the controller to de...

Page 113: ...ifferent depending on the screen mode How to open the menu in the full screen display mode 1 Move the cross cursor to the right edge of the screen in the red box 2 Press the left button of the mouse t...

Page 114: ...a of the dual screen area 2 Press the left button of the mouse trackball to open the option menu Horizontal screen Multiple screen Audio screen and Echo Sounder screen Press the left button to of the...

Page 115: ...h the left button of the mouse trackball does not function Note that in the area surrounded by the yellow border in the orthogonal display the left button of the mouse trackball will not function when...

Page 116: ...10 10...

Page 117: ...0log 30log 40log 10log TVG Far Set diffusion attenuation further than the TVG Range setting for Horizontal Sonar 0log 5log 10log 20log 30log 40log 20log Synchronization Select sonar Synchronization In...

Page 118: ...from STC Range settings in Horizontal Sonar 0 0 10 0 5 0 Clutter Remove low level noise that occurs during Horizontal Sonar 0 0 10 0 2 0 C Clutter Clutter for removing Horizontal Sonar color Removes...

Page 119: ...ar screen mode Full Horizontal Multi Echo Sounder Audio Orthogonal Horizontal Ov Range Disp You can select whether or not to display the sonar screen outside the B Mark Off On Off Multi Refresh Timing...

Page 120: ...In Orthogonal the Horizontal Sonar displayed in PPI is rendered in the horizontal axis bearing direction and distance direction on the vertical axis Select the horizontal direction bearing range 180 3...

Page 121: ...quare indicates the Event Mark hexagon and indicates the event mark circle Relative Deviation Lat Lon Relative Deviation Lat Lon Relative Deviation Lat Lon Deviation Sub Screen3 Select event informati...

Page 122: ...atch delete resets the Wake Mark status when starting sonar which cannot be displayed again Clear Clear Event Mark Select the Event Mark type shown on the sonar screen Normal Cross Cross Volume Displa...

Page 123: ...Select the type of display mark for off center operation Large displays the B Mark at a distance of 1 5x normal range and Small displays the B Mark at the normal range Normal Large Normal Cursor Sele...

Page 124: ...andard value OK CANCEL Memory1 10 You can restore saved settings by selecting the desired setting number OK CANCEL Save Memory1 10 Save the currently set operation to the selected setting number OK CA...

Page 125: ...ol Preset key Discrimination Assign the Menu Horizontal Sonar School Discrim function to the Sub Screen Preset screen and control Preset key TX Power Assign the Menu Horizontal Sonar TX Power function...

Page 126: ...set screen and control Preset key TM RM Assign the Menu Screen Sub Screen TM RM function to the Sub Screen Preset screen and control Preset key Tilt Mode Assign the Menu Horizontal Sonar Tilt Tilt Mod...

Page 127: ...setting Tx Beam Display the Menu Horizontal Sonar TX Beam setting Noise Reduction Display the Menu Horiz Noise Reduction Noise Reduction setting Table2 STC Level Display the Menu Horiz Noise Reduction...

Page 128: ...3 RX Width Display the Option RX RX Width setting AD Curve Display the Option RX AD Curve setting TX VB Display the Option TX TX VB setting AGC Mode Display the Option AGC AGC Mode setting RCG Level D...

Page 129: ...A3 Baud Rate Select the NMEA3 input baud rate 2400bps 4800bps 9600bps 19200bps 38400bps 4800bps Pulse Select the stroke pulse setting 100p NM 200p NM 200p NM Ship Position Select the longitude latitud...

Page 130: ...on Spd Crs Lat Lon Date Time Year Change the Year 2000 2100 2000 2100 Month Change the month 1 12 1 12 Day Change the date 1 31 1 31 Hour Change the Hour 0 23 0 23 Minute Change the minutes 0 59 0 59...

Page 131: ...ated in addition to Menu Menu Event Menu RC Brightness Key Brightness Adjust the device s Key Brightness red 1 10 5 Panel Brightness Adjust the device s Panel Brightness green 1 10 5 Echo Sounder Sign...

Page 132: ...range 6 150m 10000m 800m Range7 Set range 7 150m 10000m 1000m Range8 Set range 8 150m 10000m 1200m Range9 Set range 9 150m 10000m 1500m Range10 Set range 10 150m 10000m 1800m Range11 Set range 11 150m...

Page 133: ...the TVG Mid curve range for Horizontal Sonar 0 1200 640 RX Clutter Adjust the RX horizontal directional angle for Horizontal Sonar 0 FF 10 RX Width Set the Horizontal Sonar AD conversion curve to 2 st...

Page 134: ...othing settings for Horizontal Sonar 0 1 10 0 1 0 Plane Filter You can select the Plane Filter mode for Horizontal Sonar Off 2 3 4 5 2 Pl Method Select the Horizontal Sonar Plane Filter Method Max Ave...

Page 135: ...othing settings for Horizontal Sonar 0 1 10 0 1 0 Plane Filter You can select the Plane Filter mode for Horizontal Sonar Off 2 3 4 5 2 Pl Method Select the Horizontal Sonar Plane Filter Method Max Ave...

Page 136: ...othing settings for Horizontal Sonar 0 1 10 0 1 0 Plane Filter You can select the Plane Filter mode for Horizontal Sonar Off 2 3 4 5 3 Pl Method Select the Horizontal Sonar Plane Filter Method Max Ave...

Page 137: ...othing settings for Horizontal Sonar 0 1 10 0 1 0 Plane Filter You can select the Plane Filter mode for Horizontal Sonar Off 2 3 4 5 3 Pl Method Select the Horizontal Sonar Plane Filter Method Max Ave...

Page 138: ...thing settings for Horizontal Sonar 0 1 10 0 1 0 Plane Filter You can select the Plane Filter mode for Horizontal Sonar Off 2 3 4 5 3 Pl Method Select the Horizontal Sonar Plane Filter Method Max Ave...

Page 139: ...thing settings for Horizontal Sonar 0 1 10 0 1 0 Plane Filter You can select the Plane Filter mode for Horizontal Sonar Off 2 3 4 5 3 Pl Method Select the Horizontal Sonar Plane Filter Method Max Ave...

Page 140: ...othing settings for Horizontal Sonar 0 1 10 0 1 0 Plane Filter You can select the Plane Filter mode for Horizontal Sonar Off 2 3 4 5 4 Pl Method Select the Horizontal Sonar Plane Filter Method Max Ave...

Page 141: ...thing settings for Horizontal Sonar 0 1 10 0 1 0 Plane Filter You can select the Plane Filter mode for Horizontal Sonar Off 2 3 4 5 4 Pl Method Select the Horizontal Sonar Plane Filter Method Max Ave...

Page 142: ...thing settings for Horizontal Sonar 0 1 10 0 1 0 Plane Filter You can select the Plane Filter mode for Horizontal Sonar Off 2 3 4 5 5 Pl Method Select the Horizontal Sonar Plane Filter Method Max Ave...

Page 143: ...thing settings for Horizontal Sonar 0 1 10 0 1 0 Plane Filter You can select the Plane Filter mode for Horizontal Sonar Off 2 3 4 5 5 Pl Method Select the Horizontal Sonar Plane Filter Method Max Ave...

Page 144: ...time Dwell Alt 100 1000 200 Dwell 3 Set the TX interval for three time Dwell Alt 100 1000 300 Noise Reduction2 Median Select the Median filter mode for Horizontal Sonar Off Soft Medium Hard Max Off I...

Page 145: ...time Dwell Alt 100 1000 200 Dwell 3 Set the TX interval for three time Dwell Alt 100 1000 300 Noise Reduction4 Median Select the Median filter mode for Horizontal Sonar Off Soft Medium Hard Max Off I...

Page 146: ...time Dwell Alt 100 1000 200 Dwell 3 Set the TX interval for three time Dwell Alt 100 1000 300 Noise Reduction6 Median Select the Median filter mode for Horizontal Sonar Off Soft Medium Hard Max Off I...

Page 147: ...time Dwell Alt 100 1000 200 Dwell 3 Set the TX interval for three time Dwell Alt 100 1000 300 Noise Reduction8 Median Select the Median filter mode for Horizontal Sonar Off Soft Medium Hard Max Off I...

Page 148: ...time Dwell Alt 100 1000 300 Dwell 3 Set the TX interval for three time Dwell Alt 100 1000 500 Noise Reduction10 Median Select the Median filter mode for Horizontal Sonar Off Soft Medium Hard Max Off I...

Page 149: ...G 0 255 80 B 0 255 132 User5 R 0 255 0 G 0 255 100 B 0 255 126 User6 R 0 255 12 G 0 255 120 B 0 255 120 User7 R 0 255 24 G 0 255 140 B 0 255 114 User8 R 0 255 36 G 0 255 160 B 0 255 108 Set user colo...

Page 150: ...5 12 G 0 255 160 B 0 255 84 User13 R 0 255 0 G 0 255 150 B 0 255 78 User14 R 0 255 0 G 0 255 140 B 0 255 72 User15 R 0 255 0 G 0 255 130 B 0 255 66 User16 R 0 255 0 G 0 255 120 B 0 255 60 Function des...

Page 151: ...30 G 0 255 255 B 0 255 0 User21 R 0 255 240 G 0 255 255 B 0 255 0 User22 R 0 255 255 G 0 255 215 B 0 255 0 User23 R 0 255 255 G 0 255 195 B 0 255 0 User24 R 0 255 255 G 0 255 175 B 0 255 0 Standard va...

Page 152: ...255 255 G 0 255 0 B 0 255 0 User29 R 0 255 220 G 0 255 0 B 0 255 0 User30 R 0 255 180 G 0 255 0 B 0 255 0 User31 R 0 255 140 G 0 255 0 B 0 255 0 User32 R 0 255 96 G 0 255 0 B 0 255 0 Set user color 2...

Page 153: ...ish Mark This is multiplied by the value set in Volume Adj1 0 0 10 0 2 0 Volume Adj2 Adjust the volume displayed below the Fish Mark This is multiplied by the value set in Volume Adj2 Multiplied by 1...

Reviews: