background image


Model SCS-60 


Scanning Sonar 


Operation Manual 


Ver.5.00E   

Rev. 0 


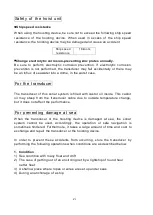
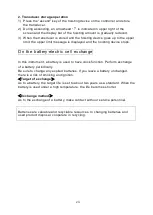
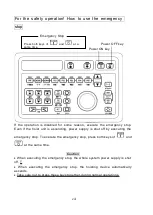
Summary of Contents for SCS-60

Page 1: ...Model SCS 60 Scanning Sonar Operation Manual Ver 5 00E Rev 0...

Page 2: ...MEMO...

Page 3: ...unctions 2 2 Chapter 3 Marks and Numerical Displays 3 1 Chapter 4 Menu 4 1 4 1 Entering the menu 4 1 4 2 Settings of the MENU 4 2 4 2 1 Selecting a setting 4 2 4 2 2 Setting a numeric value 4 3 4 3 Re...

Page 4: ...es 6 1 6 2 Sonar area mode change 6 1 6 3 Full screen 6 3 6 3 1 Full screen mode 6 3 6 3 2 Gain Adjustment 6 4 6 3 3 Tilt Adjustment 6 5 6 3 4 Range Adjustment 6 6 6 4 Horizontal screen 6 7 6 4 1 Hori...

Page 5: ...each part of the SHC 10 board 7 6 7 2 3 Automatic ascending 7 10 7 3 Manual handle operation procedure 7 11 7 4 Maintenance and care of the hoisting system 7 13 7 5 Angle adjustment of the clinometer...

Page 6: ...symbol means if you mishandle the instrument the possibility of causing death or a serious injury is anticipated The symbol means if you mishandle the instrument the possibility of causing a moderate...

Page 7: ...te with each other at any time Warning Caution Caution about installation location 1 Avoid using the instrument at a location where the temperature becomes 50 C more such as a location where the instr...

Page 8: ...with castor oil inside This castor oil may steep from the transducer cable due to outside temperature change but it does not affect the performance For preventing damage at sea When the transducer or...

Page 9: ...battery electric cell exchange In this instrument a battery is used to have clock function Perform exchange of a battery periodically Be sure to change any expired batteries If you leave a battery unc...

Page 10: ...ing the emergency stop To execute the emergency stop press both keys of and at the same time Caution When executing the emergency stop the whole system power supply is shut off T When executing the em...

Page 11: ...se of the fine performance of this instrument Features The entire circumference can be searched at the same time The image processing function developed even further from the previous model attains cl...

Page 12: ...x MEMO...

Page 13: ...Chapter 7 Operation and Maintenance of the Hoisting System 1 2 Basic operation 1 2 1 ON OFF of the power supply 1 Apply the power supply Press the power ON key of the controller for one second or more...

Page 14: ...ng completely filled and the upper lamp of the descending key is turned on Further the lower limit message is displayed on the screen When the hoisting amount has reached the lower limit the transmiss...

Page 15: ...the gain is automatically increased By virtue of this fish schools at both long distance and short distance are displayed similarly on the screen 1 2 5 Tilt adjustment The tilt is adjusted by the tilt...

Page 16: ...1 4 MEMO...

Page 17: ...2 Power OFF key 17 Ascent key 18 Descent key 16 Two touch keys block 15 Tilt keys 14 Gain keys 13 Range keys 11 Fish school mark key 10 Fish school mark erasing key 3 Off center key 4 Menu key 5 Menu...

Page 18: ...u key Turns the menu display ON 5 Menu back key Turns the menu display OFF 6 Event erasing key Older event marks are erased in the order of hexagon round and square Also it is possible to erase any ev...

Page 19: ...touch key block The keys in this block can be used in combination with the and keys Select a function key first the light of the key turns ON and then change its set value with the or keys a PP filter...

Page 20: ...1 to STD10 internal cards d Preset key Each key is used to register one menu item selected from the preset menu e UP key This key is used to increase a set value f DOWN key This key is used to decreas...

Page 21: ...nformation from external equipment 3 Audio mark This mark shows the signal range using audible sound and an audio screen The signal range is the region between the two lines yellow 9 Range 8 Tilt 7 Ga...

Page 22: ...of the directional transmission reception beam that is currently in use 9 Range This field shows the range of the sonar image that is currently in use The range is interlocked with an off center valu...

Page 23: ...If the wind speed and wind direction information is not input from external equipment it will not be displayed 20 Event Information The information of the event mark is shown You can select event inf...

Page 24: ...the cross cursor position 26 Cross cursor With the track ball of the controller you can move the cross cursor freely 27 User s ship mark This mark indicates the position of the ship appearing in the c...

Page 25: ...he signal strength is the redder the indication shows 33 Current Mark1 Shows the tidal current signal received from a current meter The direction shows the tidal current direction and the length shows...

Page 26: ...the transmission directional width at the distance at a position where the tilt line and the multiple mark cross each other 7 Tilt line The center line indicates the current tilt and the upper and low...

Page 27: ...ing the menu key on the controller and the cross cursor operated by the track ball 4 1 Entering the menu Press the menu key on the controller The menu screen is displayed in the right part of the scre...

Page 28: ...enu key to select a setting Example When restoring the standard settings Press the menu key of the controller to open the menu Step 1 Press Put the cross cursor on MEMORY and press Step 2 Put the cros...

Page 29: ...he menu and press the menu key to decrease the numeric value Example Changing the numeric value setting of the clutter Press the menu key of the controller to open the menu The menu has a hierarchical...

Page 30: ...o that of the upper hierarchy Example When returning from the numeric value setting clutter menu This explains how to change the menu using the menu key and trackball To return from the clutter menu o...

Page 31: ...em performance If you cannot restore the original settings perform the procedure described in Example When restoring the standard settings of 4 2 1 Selecting a setting Then you can restore the standar...

Page 32: ...4 6 MEMO...

Page 33: ...rved items using a preset function You can confirm the reserved menu items by pressing the menu key on the controller to open MENU and then by selecting PRESET Preset menu items To register these pres...

Page 34: ...he function that you want to register selected by the cursor press one of the to keys of the controller When registration is completed the preset key to which the function is registered is displayed o...

Page 35: ...ocated at the right side of the preset keys you can change the setting of the function registered to the preset key for which the LED is ON The UP DOWN keys and function differently depending on the p...

Page 36: ...VENT DEPTH WIND SHORTCUT2 SUB AREA 3 NON NET INFO EVENT SUB AREA 4 NON TEMP GRAPH FISH GRAPH CURRENT GRAPH EVENT TILT TILT MODE MANUAL AUTO ONE SHOT TRACK AUTO TILT 2 5 10 WAKE RESET 4 TX BEAM WIDTH M...

Page 37: ...press the menu key 3 With the function that you want to register selected by the cursor press the menu key 4 Put the cross cursor on the frame of the function that you want to register on the reservat...

Page 38: ...ction that you want to register using the cross cursor and then press the menu key Select TX PULSE Put the cross cursor on the item DWELL here that you want to change on the reservation screen of a su...

Page 39: ...VRM 3 DISCRIM DISCRIM1 DISCRIM2 DISCRIM3 DISCRIM4 DISCRIM5 DISCRIM 6 DISCRIM10 PP FILTER PP FILTER 1 PP FILTER 2 PP FILTER 3 PP FILTER 4 PP FILTER 5 PP FILTER 6 PP FILTER 10 TX POWER Any value from 0...

Page 40: ...e reservation screen and then press the menu key or the menu back key I Menu for setting any given value Preset menu Value to set setting range TX POWER 0 10 1 TX PULSE 1 20 1 DWELL 40 800 20 AUDIO VO...

Page 41: ...5 PP FILTER 6 PP FILTER 10 TX POWER Any value from 0 to 10 can be set TX PULSE Any value from 1 to 10 can be set TX SYNCRO INTERNAL EXTERNAL TX CYCLE Any value from 40 to 800 can be set SONAR AREA FUL...

Page 42: ...e same time a net is cast A red flag mark then appears at the location of the ship c To erase the red flag press again the preset key to which NET CAST is registered Operation procedure 2 When this fu...

Page 43: ...s on the screen c To erase the ring mark press again the preset key to which NET SET is registered Operation procedure 2 When this function is used after it is registered in SUB AREA on the sonar scre...

Page 44: ...or to the ship Then the VRM disappears After that press the preset key in which VRM is registered Operation procedure 2 using this function after it is registered in the sub area selection area of the...

Page 45: ...5 13 A display example of Net Cat Net Set and VRM Wake Net Cast mark Net Set mark VRM VRM distance...

Page 46: ...or TX SYNCRO the sonar will be operated in synchronized mode When External is set the sonar will be operated in synchronization with external signals If there is a lot of echo sounder noise etc it is...

Page 47: ...the ship and fish schools When the ship goes out of screen the screen automatically changes so that the ship is displayed at the center of the screen once again Information on the ship speed and bear...

Page 48: ...hen selecting Track Event 1 is tracked and the tilt value is changed 5 3 18 AUTO TILT AUTO TILT is used to set the change amount during automatic tilt mode 5 3 19 AUDIO VOL AUDIO VOL is used to adjust...

Page 49: ...ey on the controller a Register the WAKE RESET function to any preset keys of to The details are described in 5 2 1 b Press the preset key in which WAKE RESET is registered and then the red LED on the...

Page 50: ...5 18 MEMO...

Page 51: ...es by means of the two touch keys of the controller is simpler than the menu operations which involve a complicated procedure Change by means of two touch key operation The sonar area modes can be cha...

Page 52: ...open the menu 2 Place the cross cursor over SUB SCREEN and then press the menu key to open the SUB SCREEN menu 3 Place the cross cursor over SONAR AREA and then press the menu key to open the SONAR AR...

Page 53: ...y of the heading or true bearing images of the horizontal screen using the entire screen This mode will aid the identification of small response that is detected with a long distance Note Neither true...

Page 54: ...or to anywhere on the screen and by pressing a gain key or of the controller Gain adjustment by menu operation The gain can be adjusted by menu operation using the cross cursor and the menu key Operat...

Page 55: ...the screen and by pressing a tilt key or of the controller Tilt adjustment by menu operation The tilt can be adjusted by menu operation using the cross cursor and the menu key Operation procedure 1 Pr...

Page 56: ...key or of the controller Range adjustment by menu operation The range can be adjusted by menu operation using the cross cursor and the menu key When changing the range by menu operation select a rang...

Page 57: ...ation using the cross cursor and the menu key Gain adjustment by gain key operation The gain in the horizontal screen mode can be adjusted by moving the cross cursor to anywhere on the screen and by p...

Page 58: ...operation using the cross cursor and the menu key For more details refer to 6 3 3 6 4 4 Range adjustment The range in the horizontal screen mode can be adjusted by operating the range keys and of the...

Page 59: ...ultiple screens sub screens can be displayed in the lower part of the screen starting from the left to the right Up to four multiple screens sub screens can be displayed at a time and the fifth sub sc...

Page 60: ...le screen mode with a sub screen is started 6 5 3 Sub screen input setting In the sub screen input settings the renewal timing of the multiple screen mode display can be changed The timing can be sele...

Page 61: ...ing key is pressed the multiple screens are renewed 1 1 The multiple screens of areas with the set mark is renewed for each transmission of the areas 1 2 1 4 1 8 These are to determine transmission ti...

Page 62: ...he menu key to open the menu 2 Place the cross cursor over SUB SCREEN and then press the menu key to open the SUB SCREEN menu 3 Place the cross cursor over TILT and then press the menu key to open the...

Page 63: ...is performed in the order of 2 4 2 0 2 0 Oneshot Unlike the continual change in the auto tilt mode the oneshot mode is for performing only one cycle of the auto tilt mode For example when the tilt is...

Page 64: ...SUB SCREEN menu 3 Place the cross cursor over TILT and then press the menu key to open the TILT menu 4 Place the cross cursor over AUTO TILT and then press the menu key to open the AUTO TILT menu 5 P...

Page 65: ...ith the sonar image on the same screen At places without enough space to install both the sonar and echo sounder this function is useful to view images of the sonar and echo sounder simultaneously For...

Page 66: ...ation The gain can be adjusted by menu operation using the cross cursor and the menu key Operation procedure 1 Press the menu key to open the menu 2 Place the cross cursor over SUB SCREEN and then pre...

Page 67: ...operation The range can be adjusted by menu operation using the cross cursor and the menu key Operation procedure 1 Press the menu key to open the menu 2 Place the cross cursor over SUB SCREEN and the...

Page 68: ...rea This mode can be used for viewing the history of fish movement 6 7 2 Audio bearing change The audio bearing can be changed by pressing the bearing mark keys and of the controller in all 360 direct...

Page 69: ...ration procedure 1 Press the menu key to open the menu 2 Place the cross cursor over AUDIO and then press the menu key to open the AUDIO menu 3 Place the cross cursor over GATE WIDTH and then press th...

Page 70: ...6 20 MEMO...

Page 71: ...on of each part of the M 120 hoisting system 1 Hoist control box C 93 2 Rocker switch 3 Cable gland 4 Gear box 5 Cable fixing brackets 6 Limit switch 7 Guide ring 8 Transducer 9 Seal holder 10 Feed sc...

Page 72: ...Gear box This houses the drive gears When the top cover is opened hoisting operation is stopped 5 Cable fixing brackets For fixing the cables from the transducer 6 Limit switch Switch for stopping th...

Page 73: ...d to perform the ascending or descending operation of the hoisting system when the power is OFF For details refer to 7 3 Manual handle operation procedure 13 Fall stopper Structure for preventing the...

Page 74: ...7 4 7 2 Hoist control box C 93 hoisting control box 7 2 1 Hoist control box Name of each part of the hoist control box i ii iii iv v vi vii Reset button...

Page 75: ...en a trip occurs the switch is raised To use it again it is necessary to press the reset button iv Rocker switch Power supply ON OFF switch of the hoisting system with a built in circuit protector 10A...

Page 76: ...witch ii Manual hoisting switch iii 12 V NON ISO LED iv 12 V ISO LED v DOWN LED vi UP LED vii UPPER LMT LED viii LOWER LMT LED ix HANDLE SW LED x 5 V NON ISO LED xi CLINO TX LED xii TB202 connector co...

Page 77: ...tion the hoisting system operation stops when the AUTO MANUAL selecting switch is released from the MANUAL position After maintenance or inspection be sure to have the i AUTO MANUAL selecting switch s...

Page 78: ...D LED that is turned ON when the data is output from the clinometer xii TB202 connector contact signal output According to the hoisting system condition the ON OFF contact signals are output Please in...

Page 79: ...is in operation ascending descending Open The contact is always OFF xiv TB201 connector CB561 Connector for connecting the CB561 cables Table TB201 pin assignment TB201 CB561 wire color Signal name Si...

Page 80: ...utomatic ascending circuit for the transducer is installed in this system When the transducer is projected at the lower limit pressing the OFF key of the controller activates the automatic ascending o...

Page 81: ...otor 2 spots in the drawings Also you need to confirm if this handle is operative manually 3 Remove the cover of the fall stopper and then turn the lever in the lower part 4 Turn the manual handle and...

Page 82: ...oosen by one turn the brake release screw 2 spots of the bottom part of the Hoist Motor and then make sure that the manual handle is not turned 7 Remove the manual handle and return it to the specifie...

Page 83: ...f any impure grease Sliding area of hoisting pipe Apply grease to the entire upper circumference of the seal holder Feed screw Apply grease to the feed screw from the clearance of the cover Drive gear...

Page 84: ...ket head cap screws to remove the zinc ring After replacement tighten the zinc ring with fixing screws The order model number Name Order number Qt Zinc ring 59 00184 1 Zinc ring Fixing screw Hexagon s...

Page 85: ...e task remove screw A and remove the clinometer together with the base plate from the hoist control box Remove screw B and change the direction of the clinometer in increments of 90 before mounting th...

Page 86: ...7 16 MEMO...

Page 87: ...d A mouse trackball can be connected to the USB port on the connector panel of the processor Note A mouse trackball that is prepared by yourself can be connected to the processor However if the place...

Page 88: ...sed through the menu Procedure for enabling wheel tilt adjustment 1 Move the cross cursor to the bottom of the screen and then press the menu key to open OPTION 2 Place the cross cursor over BASIC OPT...

Page 89: ...8 3 8 1 2 Tilt adjustment method The tilt can be adjusted upward and downward by turning the wheel as follows Upward tilt adjustment Downward tilt adjustment...

Page 90: ...ough the menu Procedure for enabling wheel event display 1 Move the cross cursor to the bottom of the screen and then press the menu key to open OPTION 2 Place the cross cursor over BASIC OPTION in th...

Page 91: ...enabled the functions of the left button of the mouse trackball and the menu key become the same Similarly the functions of the right button of the mouse track ball and the menu back key become the sa...

Page 92: ...menu 1 Place the cross cursor in any position at the bottom of the sub screen area the area in the figure below 2 Click the left button of the mouse trackball or press the menu key to open the OPTION...

Page 93: ...ure for opening the option menu in full screen mode 1 Place the cross cursor in any position at the right end at the bottom of the display area 2 Click the left button of the mouse trackball or press...

Page 94: ...8 8 MEMO...

Reviews: