background image

HD ELECTRONIC VIEWFINDER

HDVF-200

電気製品は、安全のための注意事項を守らないと、
火災や人身事故になることがあります。

このオペレーションマニュアルには、事故を防ぐための重要な注意事項と製品
の取り扱いかたを示してあります。

このオペレーションマニュアルをよくお読

みのうえ、

製品を安全にお使いください。お読みになったあとは、いつでも見ら

れるところに必ず保管してください。

OPERATION MANUAL

[Japanese/English]

1st Edition (Revised 1)

Summary of Contents for HDVF-200

Page 1: ...VF 200 電気製品は 安全のための注意事項を守らないと 火災や人身事故になることがあります このオペレーションマニュアルには 事故を防ぐための重要な注意事項と製品 の取り扱いかたを示してあります このオペレーションマニュアルをよくお読 みのうえ 製品を安全にお使いください お読みになったあとは いつでも見ら れるところに必ず保管してください OPERATION MANUAL Japanese English 1st Edition Revised 1 ...

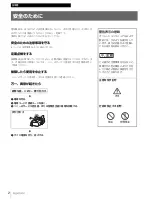
Page 2: ...定期点検を実施することをおすすめしま す 点検の内容や費用については ソニーのサービス担当者または営業担当者に ご相談ください 故障したら使用を中止する ソニーのサービス担当者 または営業担当者にご連絡ください 万一 異常が起きたら m a 電源を切る b 電源コードや接続コードを抜く c ソニーのサービス担当者 または営業担当者に修理を依頼する m a すぐに電源を切り 消火する 異常な音 におい 煙が出たら 炎が出たら 警告表示の意味 オペレーションマニュアルおよび 製品では 次のような表示をして います 表示の内容をよく理解し てから本文をお読みください この表示の注意事項を守らないと 感電やその他の事故によりけがを したり周辺の物品に損害を与えた りすることがあります 注意を促す記号 行為を禁止する記号 日本語 ...

Page 3: ...目次 3 目次 注意 4 概要 5 各部の名称と働き 6 カメラ カムコーダーに取り付ける 8 取りはずすときは 8 アイピース部を取りはずす 9 再び取り付けるには 9 マイクを取り付ける 10 画面や内部をクリーニングする 10 アイピース部を分解するには 10 特殊環境使用後のアフターケア 11 M52 規格の市販のパーツを取り付ける 11 仕様 12 JP ...

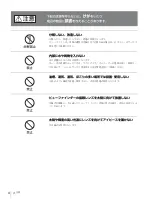
Page 4: ...ご依頼ください 内部に水や異物を入れない 水や異物が入ると火災の原因となります 万一 水や異物が入ったときは すぐにカメラ カムコーダーの電源を切り 接続コー ドを抜いて ソニーのサービス担当者または営業担当者にご相談ください 油煙 湯気 湿気 ほこりの多い場所では設置 使用しない 上記のような場所で設置 使用すると 火災や感電の原因となります ビューファインダーの接眼レンズを太陽に向けて放置しない 太陽光が接眼レンズを通してビューファインダー内部に焦点を結び 火災の原因となる ことがあります 太陽や輝度の高い光源にレンズを向けてアイピースを覗かない 目を痛める原因になります ...

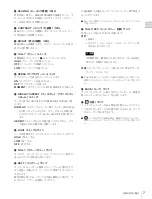
Page 5: ...ン カメラ カムコーダーからの制御信号により これまでの 60i に加えて 24PsF や 50i などの各種フォーマットに対応 します 高性能ブラウン管 クイックスタートタイプ 電源を入れるのとほとんど同 時に画像が現れます 高解像度 低フレア マーカー表示 カメラ カムコーダー側で センターマーカーやセーフ ティーゾーンマーカーなどのマーカー表示が ON に設定さ れている場合 本機のスイッチで マーカー表示を ON OFF できます 着脱可能なアイピース部 アイピース部を取りはずして画面を見ることができます また 画面やミラーにほこりが付着したときは アイピー ス部を取りはずしてクリーニングすることができます ...

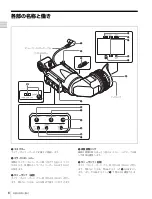
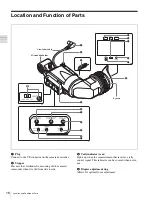
Page 6: ...カムコーダーからはずれるの を防ぎます c タリーランプ 後面 カメラ カムコーダーにタリー信号が入力されると点灯し ます 使わないときは ふたを閉めて隠すことができます d 視度調整リング 画面の映像が最もはっきり見えるように このリングを回 して視度を調整します e タリーランプ 前面 カメラ カムコーダーにタリー信号が入力されると点灯し ます 使わないときは TALLY スイッチ 9 を OFF にし ます また TALLY スイッチ 9 で明るさを調整できま す qd qf qg qh qj 4 3 qs 2 5 7 6 8 9 0 qa 1 マイクホルダー アイカップ ビューファインダーケーブル ...

Page 7: ...チをこの位置に押し下げるたびに マス ク表示の ON OFF が切り換わります l LIGHT スイッチとライト レンズを照明するライトとそのコントロールスイッチです HIGH 明るくする LOW 暗くする OFF 消灯する m TALLY グリーンタリー ランプ カメラコントロールユニットから グリーンタリー信号が 送られてきたとき緑色に点灯します n BATT バッテリー ランプ カメラ カムコーダーに接続したバッテリーの電圧が下が ると赤色に点滅します バッテリーが使用できなくなると 点灯します 動作中断を防ぐため ランプが点滅を開始した時点で す みやかにバッテリーを交換してください 点滅を開始する電圧を カメラ カムコーダー側で設定す ることができます 詳しくは 使用しているカメラ カムコーダーのマニュアルを ご覧ください o TALLY REC レッドタリー 記録 ランプ 状況...

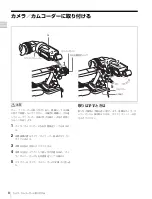
Page 8: ...を結び 火災の原因と なることがあります 1 カメラ カムコーダーの左右位置固定リングをゆるめ る 2 本機裏側の溝をカメラ カムコーダー前面のスライド ガイドにはめる 3 本機を矢印の方向にスライドさせる 4 本機を左右にスライドして取り付け位置を決め カメ ラ カムコーダーの左右位置固定リングを締める 5 コネクターをカメラ カムコーダーのVF 端子に差し込 む 取りはずすときは 取り付け操作の手順を逆に実行します 本機をカメラ カ ムコーダーから抜き取るときは スライドストッパーを引 き上げてください 1 5 3 4 2 VF 端子 コネクター 溝 スライドガイド スライドストッパー 左右位置固定リング ...

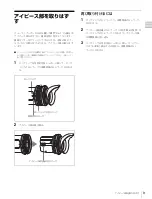
Page 9: ...ニングおよび市販の MC フィルターなどの取り付けにつ いて詳しくは 画面や内部をクリーニングする 10 ページ をご覧ください 1 ロックリングを反時計方向いっぱいに回して ロック リングの合いマークと本機筒部の合いマークを合わせ る 2 アイピース部を抜き取る 再び取り付けるには 1 ロックリングの合いマークと 本機筒部の合いマーク を合わせる 2 アイピース部先端の合いマーク 上記手順 2 を参照 を ロックリングの合いマークに合わせて アイピース部 を本機筒部に差し込む 3 ロックリングを時計方向いっぱいに回し ロックリン グの LOCK 表示の上の矢印を 本機筒部の合い マークに合わせる ロックリングの合いマーク 筒部の合いマーク ロックリング アイピース部先端の合いマーク ...

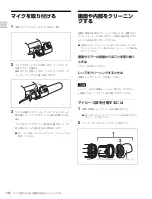
Page 10: ...要があります 詳しくは 使用しているカメラアダプターのマニュアルを 参照してください 画面や内部をクリーニン グする 本機の画面や内部をクリーニングするときは 本機をカメ ラ カムコーダーから取りはずし 内部の部品を傷つけな いように充分注意して行ってください 本機をカメラ カムコーダーから取りはずす方法については カメラ カムコーダーに取り付ける 8 ページ の手順を参 考にしてください 画面やミラーの表面からほこりを取り除く ときは ブロアーをお使いください レンズをクリーニングするときは 市販のレンズクリーナーをお使いください シンナーなどの溶剤は いっさい使わないでください 防滴のため アイカップは必ず取り付けてください アイピース部を分解するには 1 本機の筒部から アイピース部を取りはずす 取りはずしかたについては アイピース部を取りはずす 9 ページ をご覧ください 2 アイ...

Page 11: ...奨しま す 1 セットの中に入っている砂やほこりをエアーブラシ等 で慎重に取り除く 2 海水中の塩分や温泉中の硫黄分が外装の非塗装面に付 着すると 白く腐食することがある 付着した場合は アルコール等で速やかにクリーニングする 3 コネクターの接続面をクリーニングする 4 一般動作チェックを行い 正常に動作することを確認 する M52 規格の市販のパーツ を取り付ける アイカップフォルダーに M52 規格の市販のプロテクト フィルターやクローズアップレンズなどを取り付けること ができます 取り付けかたについて詳しくは ソニーのサービス担当者 または営業担当者にご相談ください ...

Page 12: ...80TV 本 画面中心部 信号方式 BTA S001 および SMPTE 274M 規格準拠 ビデオ入力 1 0 Vp p 6 dB 75Ω 終端 表示ランプ TALLY REC BATT SAVE 付属品 オペレーションマニュアル 1 別売品 ビューファインダー回転収納機構 BKW 401 関連製品 HD カラーカメラ HDC1500 シリーズ HD カムコーダー HDW 700 シリーズ 仕様および外観は 改良のため予告なく変更することがあ りますが ご了承ください お使いになる前に 必ず動作確認を行ってください 故障 その他に伴う営業上の機会損失等は保証期間中および保証 期間経過後にかかわらず 補償はいたしかねますのでご了 承ください ...

Page 13: ...entative for EMC and product safety is Sony Deutschland GmbH Hedelfinger Strasse 61 70327 Stuttgart Germany For any service or guarantee matters please refer to the addresses given in separate service or guarantee documents Pour les clients européens Ce produit portant la marque CE est conforme à la Directive sur la compatibilité électromagnétique EMC émise par la Commission de la Communauté europ...

Page 14: ...8 Detaching the Viewfinder 18 Detaching the Eyepiece 19 Refitting the Eyepiece 19 Attaching a Microphone 20 Cleaning the Screen or Interior 20 Disassembling the Eyepiece for Cleaning 20 Check the Viewfinder after Using it in Harsh Environments 21 Attaching a Commercially Available M52 Standard Protecting Filter 21 Specifications 22 ...

Page 15: ...ol signals from the camera camcorder High performance CRT Quick start type The image appears as soon as the camera camcorder is turned on Enhanced resolution Reduced flare Marker indication When the camera camcorder setting allows the center marker or safety zone marker indication the viewfinder can set the marker indication on or off Removable eyepiece The eyepiece can be detached and the screen ...

Page 16: ...der from coming off the camera camcorder when it is slid from side to side c Tally indicator rear Lights up when the camera camcorder receives a tally control signal This indicator can be covered when not in use d Diopter adjustment ring Allows for optimal focus adjustment qd qf qg qh qj 4 3 qs 2 5 7 6 8 9 0 qa 1 Viewfinder cable Microphone holder Eyecup ...

Page 17: ...isplay on and off l LIGHT switch and light The light illuminates the lens and the switch controls the light as follows HIGH Brighter LOW Darker OFF Turns the light off m TALLY indicator green Lights up when the camera camcorder receives a green tally control signal from the camera control unit n BATT indicator Starts flashing in red when the battery voltage supplied to the camera camcorder drops b...

Page 18: ...the camera camcorder into the slide rail which is located on the back of the viewfinder 3 Slide the viewfinder in the direction of the arrow 4 Position the viewfinder by sliding it from side to side and tighten the left right positioning ring on the camera camcorder 5 Connect the plug to the VF connector on the camera camcorder Detaching the Viewfinder To detach the viewfinder from the camera camc...

Page 19: ...ng fully counterclockwise to line up the red match mark on the locking ring on the viewfinder barrel 2 Detach the eyepiece Refitting the Eyepiece 1 Align the match mark on the eyepiece locking ring with that on the viewfinder barrel 2 Align the match mark on the end of the eyepiece see step 2 above with that of the eyepiece locking ring then insert the eyepiece into the viewfinder barrel 3 Turn th...

Page 20: ...Interior When cleaning the screen or the interior of the viewfinder detach the viewfinder from the camera camcorder then clean it taking care not to damage the components For information about detaching the viewfinder from the camera camcorder see the procedure explained in Attaching the Viewfinder to a Camera Camcorder on page 18 To remove dust from the screen or the mirror Use a dust blower To c...

Page 21: ... sulfur from hot springs can result in whitish corrosion on the non painted surfaces of the viewfinder Use a cleaning solution such as ethanol to remove any adhering salt or sulfur from the non painted surfaces as soon as possible 3 Clean the contacts of the connector 4 Check that the viewfinder is working correctly Attaching a Commercially Available M52 Standard Protecting Filter Commercially ava...

Page 22: ... Ω terminated Indicators TALLY REC BATT SAVE Accessories Operation manual 1 Accessories not supplied BKW 401 Viewfinder Rotation Bracket Related equipment HDC1500 series HD Color Video Camera HDW 700 series HD Camcorder Design and specifications are subject to change without notice Always verify that the unit is operating properly before use SONY WILL NOT BE LIABLE FOR DAMAGES OF ANY KIND INCLUDIN...

Page 23: ...s the property of Sony Corporation and is intended solely for use by the purchasers of the equipment described in this manual Sony Corporation expressly prohibits the duplication of any portion of this manual or the use thereof for any purpose other than the operation or maintenance of the equipment described in this manual without the express written permission of Sony Corporation ...

Page 24: ...Sony Corporation HDVF 200 SY 3 875 453 02 1 Printed in Japan 2008 10 13 2008 この説明書は 再生紙を使用しています Printed on recycled paper ...

Reviews: