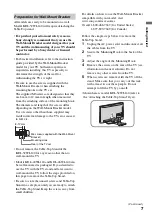
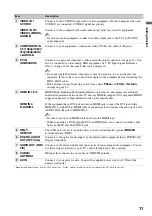
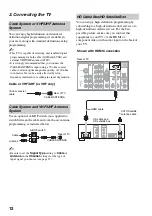
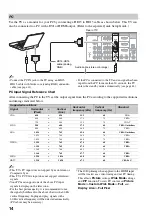
background image

© 2008 Sony Corporation

LCD Digital Color TV

4-113-059-

11

(1)

KDL-40WL140
KDL-46WL140
KDL-52WL140

Operating Instructions

Summary of Contents for KDL-40WL140 - Bravia Lcd Television

Page 1: ... 2008 Sony Corporation LCD Digital Color TV 4 113 059 11 1 KDL 40WL140 KDL 46WL140 KDL 52WL140 Operating Instructions ...

Page 2: ...d marks of Gemstar TV Guide International Inc and or one of its affiliates In Canada TV Guide is a registered mark of Transcontinental Inc and is used under license by Gemstar TV Guide International Inc The TV Guide On Screen system is manufactured under license from Gemstar TV Guide International Inc and or one of its affiliates The TV Guide On Screen system is protected by one or more of the fol...

Page 3: ...ing Up the Channel List Initial Setup 16 Operating the TV Inserting Batteries into the Remote Control 18 When Using the Remote Control 18 TV Controls 18 Remote Control Button Description 19 Indicators 23 Exploring Fun Features Favorites 24 Displaying Favorites 24 Navigating Favorites 24 Adding to Favorites 24 Removing from Favorites 24 Background TV 25 Navigating Background TV 25 Using BRAVIA Sync...

Page 4: ...nections This manual explains basic setup connections see page 12 The Quick Setup Guide enclosed separately illustrates how to connect other optional equipment Picture Quality and Aspect Ratio You can enjoy crisp clear images smooth movement and high impact visuals from 1080 HD signals When you compare a high definition signal to a standard analog signal you will notice a big difference High defin...

Page 5: ... BRAVIA TV is Energy Star Compliant It meets strict energy efficiency guidelines set by the EPA and US Department of Energy ENERGY STAR is a joint program of these government agencies designed to promote energy efficient products and practices When the TV is initially set up it is designed to stay within the Energy Star guidelines Changes to certain features settings and functionalities of this TV...

Page 6: ...above the speaker grill area put stress on the LCD panel Do not lift the TV from the bottom center Follow the assembling steps required to place on a TV stand except model KDL 52WL140 1 Remove the Table Top Stand and screws from the carton The screws can be found in the accessory bag For product protection and safety reasons Sony strongly recommends that you use the screws provided with the TV 2 P...

Page 7: ... other than to wall mount the TV Models KDL 40WL140 and KDL 46WL140 can be wall mounted as packaged If you decided to use the TV with the TV stand and later want to wall mount the TV follow the steps provided on this page to remove the Table Top Stand Be sure to store the unused screws and Table Top Stand in a safe place until you are ready to attach the Table Top Stand Keep the screws away from s...

Page 8: ...to a warm area a sudden room temperature change may cause the TV s picture to blur or show poor color due to moisture condensation Should this occur please wait a few hours to allow the moisture to evaporate before powering on the TV You can bundle the connecting cables as illustrated below When Installing the TV Against a Wall or Enclosed Area 30 cm 11 7 8 inches 6 cm inches 4 inches 10 cm 4 inch...

Page 9: ...e to the wall stud attach the other side to the TV stand Secure the TV to the Stand Use the optional hardware listed below not supplied M6 10 12 mm anchor bolt screwed into the TV s Table Top Stand A screw or similar attach it to the TV stand Rope or chain strong enough to support the weight of the TV Make sure that there is no excess slack in the rope or chain An alternative way to secure the TV ...

Page 10: ... 720p 1080i and 1080p video formats 1080 24p is available only with HDMI connection AC IN CABLE ANTENNA DMe x SERVICE 4 1 3 1 3 2 IN VIDEO IN VIDEO L MONO AUDIO R S VIDEO COMPONENT IN L R PB RGB DIGITAL AUDIO OUT OPTICAL PC IN AUDIO OUT VAR FIX 1080p 1080i 720p 480p 480i 1 AUDIO L R AUDIO AUDIO AUDIO R L PR Y VIDEO L MONO AUDIO R VIDEO IN IN 2 2 Rear of TV 1 2 8 9 4 3 5 6 7 4 Side Panel 1 ...

Page 11: ...ot clear adjust Phase and Pitch of Screen settings on page 36 4 HDMI IN 1 2 3 HDMI IN 4 R AUDIO L HDMI High Definition Multimedia Interface provides an uncompressed all digital audio video interface between this TV and any HDMI equipped A V equipment HDMI supports enhanced or high definition video plus digital audio If the equipment has a DVI jack and not an HDMI jack connect the DVI jack to the H...

Page 12: ...t the Signal Type setting to Cable or Antenna in the Channel settings for the type of input signal you choose see page 37 You can enjoy high definition programming by subscribing to a high definition cable service or a high definition satellite service For the best possible picture make sure you connect this equipment to your TV via the HDMI or component video with audio input on the back of your ...

Page 13: ...480i 1 AUDIO L R AUDIO AUDIO AUDIO R L PB PR Y DIGITAL AUDIO OUT OPTICAL AUDIO L white AUDIO R red Audio cable DVI to HDMI cable HD cable box HD satellite box CATV Satellite antenna cable Rear of TV 4 1 3 1 3 2 IN VIDEO IN VIDEO L MONO AUDIO R S VIDEO COMPONENT IN L R RGB PC IN AUDIO OUT VAR FIX 1080p 1080i 720p 480p 480i 1 AUDIO L R AUDIO AUDIO AUDIO R L PB PR Y DIGITAL AUDIO OUT OPTICAL Componen...

Page 14: ... 60 Hz vertical frequency In plug and play signals with a 60 Hz vertical frequency will be detected automatically PC reboot may be necessary The 1080p timing when applied to the HDMI input will be treated as a video timing and not PC timing This affects Picture settings Wide Mode settings and PIP function To view PC content set Picture Mode to Custom Wide Mode to Full and Display Area to Full Pixe...

Page 15: ...AUDIO R S VIDEO COMPONENT IN L R PB RGB DIGITAL AUDIO OUT OPTICAL PC IN AUDIO OUT VAR FIX 1080p 1080i 720p 480p 480i 1 AUDIO L R AUDIO AUDIO AUDIO R L PR Y DVD player Personal computer Digital satellite receiver CABLE ANTENNA Digital audio equipment Analog audio equipment A V Receiver Home Theater Digital recorder VCR Camcorder Blu ray Disc Player PS3 Game system Digital cable box Rear of TV Audio...

Page 16: ...dio is available only for digital programs see page 35 4 Set the date and time Begin your TV Guide On Screen Setup When the Initial Setup is completed the TV will display this screen and prompt you to set up the electronic program guide Follow the on screen instructions using your remote control Next you will see a confirmation screen with instructions on how to acquire the TV Guide On Screen serv...

Page 17: ...dd Digital Channels feature as described on page 37 Useful for antenna installations If you accidentally turn off the TV during the Initial Setup process the Initial Setup will restart from the beginning when the TV is turned back on Auto Program may be canceled while the channels are being scanned Press RETURN first then press either B b on the remote control Select Yes to cancel or No to resume ...

Page 18: ...irectly at the IR sensor located on your TV Make sure that no objects are blocking the path between the remote control and the IR sensor on your TV Fluorescent lamps can interfere with your remote control try turning off the fluorescent lamps If you are having problems with the remote control reinsert or replace your batteries and make sure that they are correctly inserted The buttons located on t...

Page 19: ...ss once to display the Sync d HDMI Devices while a Control for HDMI device is not selected Select the HDMI device and then press SYNC MENU to display the menu of connected equipment not available on all Control for HDMI equipment x STOP Press to stop playback THEATER Press to turn on and off the Theater Mode The picture settings will be set for a cinema like experience and the audio will be switch...

Page 20: ...nd Press again or press VOL to restore the sound qf POWER Press to turn on and off the TV qg FREEZE Press once to display a frozen image with the current program in a window Press again to fill the screen with the frozen image Press a third time to return to the current program Press the V v B b to move the small window showing current program to a different location on the screen With the Freeze ...

Page 21: ...d Photo Standard Photo Original Photo Custom Video Text Available options depend on the current mode The picture modes can also be accessed in the Picture settings For details see Picture settings on page 32 Button Description Menu Item Reference Page Picture Adjustments See page 32 Sound Adjustments See page 34 P P or PIP See page 28 Exit P P or Exit PIP See page 28 Motion Enhancer See page 33 Sp...

Page 22: ...z CH Press to scan through channels To scan quickly through channels press and hold down either ws JUMP Press to jump back and forth between two channels The TV alternates between the current channel and the last channel that was selected Button Description 4 3 Original source Standard definition source 16 9 Original source High definition source m m Wide Zoom Wide Zoom Normal Normal This mode is ...

Page 23: ...ain lit even if the TV is turned off For details see page 31 Timer and page 42 Picture Off 4 STANDBY LED Lights up in red when your TV is in PC standby mode If the LED blinks in red continuously this may indicate that the TV needs servicing see contacting Sony information on the back cover 5 IR Infrared Receiver Receives IR signals from the remote control Do not put anything near the sensor as its...

Page 24: ...s icon and press To clear your recently viewed channels and inputs list highlight the list in Favorites and press OPTIONS then select Clear Recently Viewed Recently viewed items are also cleared when the TV is powered off 1 While tuned to a channel or input you wish to add press OPTIONS 2 Press V v to highlight Add to Favorites and press 1 While tuned to the channel or input you wish to remove pre...

Page 25: ...r HDMI The Control for HDMI function must be set up in order for the TV to communicate with other Control for HDMI enabled equipment See page 41 for information on how to set up this TV s Control for HDMI function For other equipment refer to its operating instructions Available options using Control for HDMI The following operations are available after you connect the supported Sony equipment wit...

Page 26: ...w TV Guide Press GUIDE to display the TV Guide Press GUIDE again to exit or press HOME to exit to XMB The TV Guide will time out in approximately 5 minutes when no action is taken Find a program to watch Use V v B b to highlight a program The CH buttons can be used to page up down through the listings The program information will appear in the Info Box Press to tune to the highlighted program Retu...

Page 27: ... setup progress and diagnostics information Change channel display Highlight SETUP on the Service Bar then press v to highlight the Change channel display then press Highlight a channel then press OPTIONS to display the Grid Options Make the changes using V v and or 0 9 buttons When the changes are made select done and press The Grid Options can also be used to re sort the channel display numerica...

Page 28: ...dow press INPUT to select an input to watch In the sub window change the channel by pressing CH entering the channel number using the 0 9 numeric buttons or pressing JUMP to switch to the previously viewed channel You can change the channel of the sub window by pressing CH entering the channel number using the 0 9 numeric buttons or pressing JUMP to switch to the previously viewed channel 1 Press ...

Page 29: ...s applied Unavailable options are grayed out or not displayed Watching TV Navigate through the channel list or select the TV Guide On Screen icon located at the top of the channel list to select a channel see page 26 You can also select a TV channel using the 0 9 or CH buttons see remote control section on pages 20 and 22 Accessing External Inputs Watch a movie play a game record a program or work...

Page 30: ...r HOME to exit Settings TV Guide On Screen and available channels are listed under the TV icon Select inputs from CTRL HDMI Control for HDMI Video 1 3 Component 1 2 HDMI 1 4 PC under the External Inputs icon Available TV settings and features are listed under the Settings icon CC Product Support page 31 Clock Timers page 31 Picture page 32 Sound page 34 Screen page 35 Channel page 37 Closed Captio...

Page 31: ...are update is performed while the TV is powered on The Broadcast Download is performed while the TV is off Do not turn off the TV during software update otherwise software corruption may occur Clock Timers Settings Current Time Set the current day and time date hour minutes and AM PM The Timer feature will not be available until you set the Current Time If the option is disabled the TV Guide On Sc...

Page 32: ... the text shown on the screen Picture Mode for all inputs can also be accessed by pressing PICTURE on the remote control to directly toggle the modes The options for Picture Mode may vary depending on the Video Photo Optimizer setting see page 33 and PC input Reset Resets the current settings to the default values Backlight Brightens or darkens the backlight Picture Increases or decreases picture ...

Page 33: ... on the video noticeable change may not be seen Motion Enhancer is not available when Game Mode is set to On CineMotion Automatically detects film based content and applies an inverse 3 2 pull down process and a motion estimation engine to improve film content and de interlacing performance Auto 1 Applies an inverse 3 2 pull down process along with motion estimation to obtain the smoothest picture...

Page 34: ... and width by emphasizing the high and low frequency sounds Select High Low or Off for the amount of boost you desire Selecting Off will bypass the emphasis Only available when in Standard mode Steady Sound Select On to stabilize the volume across all programs and commercials Select Off to disable this feature Volume Offset Adjusts the volume level of the current input TV or video input relative t...

Page 35: ... channels with 4 3 content Zoom Select to enlarge the picture horizontally and vertically to fill the screen while maintaining the aspect ratio Wide Mode can also be accessed by pressing WIDE on the remote control See WIDE button description on page 22 for accessing the Wide Mode Normal is available with 480i or 480p sources only H Stretch is only available with 720p 1080i 1080p and 1080 24p sourc...

Page 36: ...ion channels Auto Adjust Select Yes to start the auto adjust for the PC input Reset Resets the settings to the default values Phase Adjust after Pitch to fine tune overall sharpness Pitch Adjust uneven sharpness on screen For the PC input Signal Reference Chart see page 14 H Center Allows you to move the position of the picture horizontally left and right V Center Allows you to move the position o...

Page 37: ...l channels Be sure to have the Signal Type option selected appropriately for the signal source Useful for antenna installations Show Hide Channels Allows you to show or hide channels when you surf with the CH button or in the TV channel list on the XMB 1 Press V v to scroll through the channels until you highlight the channel to show or hide 2 Press to select Shown or Hidden To show or hide more c...

Page 38: ...analog EIA 608 and digital EIA 708 closed caption options Select from Service 1 6 and CC1 4 advanced digital closed caption options Display Options Customize the Closed Captions CC displays with Text Character Size Character Style Character Color Character Opacity Edge Type Edge Color Background Color and Background Opacity Closed Captions CC can be turned On Off or On with Muting directly by pres...

Page 39: ...A where advanced ratings exist Off Turn Digital Rating off No programs containing digital ratings are blocked from viewing Clear All Select to clear the downloaded ratings Custom Select to customize the Parental Lock with downloadable digital ratings Unrated Available only when Country is set to U S A Allow Allows programs and movies that are broadcasted without a rating Block Blocks all programs ...

Page 40: ... audience TV PG Parental guidance suggested TV 14 Parents strongly cautioned TV MA Mature audience only Content Based Ratings FV Fantasy violence D Suggestive dialogue L Strong language S Sexual situations V Violence To ensure maximum blocking capability set the Age Based Ratings English Rating C All children C8 Children 8 years and older G General programming PG Parental guidance 14 Viewers 14 an...

Page 41: ...nal input Enabled Select to allow the TV to exit from the external input and return to a TV channel when pressing the tuning keys Disabled Select to disable the tuning keys during external input mode and prevent unintentionally exiting the external input Useful for applications that do not have a connection to the CABLE ANTENNA input HDMI Settings Control for HDMI On Off feature allows your TV to ...

Page 42: ...navigation speed through menu items Standard Select to scroll quickly with V v buttons Mode 1 Select to scroll slowly with V v buttons Mode 2 Select to scroll individually with repeated V v B b button press Power Saving Reduces the power consumption by adjusting the backlight brightness This also enhances the black level Select from Off Low High and Picture Off While Picture Off is set pressing VO...

Page 43: ...ideo sources Check the connection between the optional video equipment and the TV Press INPUT on the remote control see page 20 Press HOME on the remote control Select your desired input from the External Inputs list Poor picture Picture quality not as good as viewed at the store Picture quality depends on the signal content See Quick Setup Guide supplied to display the best possible picture for t...

Page 44: ...Sound settings see page 34 Set Audio Out to Fixed in the Sound settings see page 35 BRAVIA Sync Cannot find connected BRAVIA Sync HDMI device Make sure that the Control for HDMI is set up on both the TV and the optional device compatible with BRAVIA Sync see page 25 Second A V receiver is not listed on the Device List Only one A V receiver may be used with the BRAVIA Sync and Control for HDMI func...

Page 45: ... display less detail than usual or cause artifacts small blocks or dots pixelations to appear on your screen These signal compressions are more visible and are dependent on the clarity and resolution of the TV Remote control does not operate To determine if the problem is with the remote control or not press a button on the TV Check the polarity of the batteries or replace the batteries Point the ...

Page 46: ...y 500 mVrms Typical Impedance 47 kilohms AUDIO OUT 500 mVrms typical DIGITAL AUDIO OUT OPTICAL PCM Dolby Digital optical signal PC IN D sub 15 pin analog RGB 0 7 Vp p 75 ohms positive See the PC Input Signal Reference Chart on page 14 PC AUDIO INPUT Stereo mini jack 500 mVrms Typical Impedance 47 kilohms Power and others Power requirement 120 V AC 60 Hz Power consumption in use 230 W 275 W 295 W i...

Page 47: ...a wall 7 J JUMP button 22 L Language 42 Light Sensor Described 23 Setting 42 Logo Illumination 42 M Manage Inputs 41 Motion Enhancer 33 Movie Rating 40 MPEG Noise Reduction 32 MTS 34 MUTING button 20 N Noise Reduction 32 O OPTIONS button 21 P P P 28 Password 38 PC IN jack 11 PC Power Management 42 Phase 36 PIC OFF TIMER LED 23 Picture 32 Picture Adjustments 32 PICTURE button 21 Picture Mode 32 PIP...

Page 48: ...tvsupport or to speak with a support representative 1 800 222 SONY 7669 For Canada http www sony ca support or to speak with a support representative 1 877 899 SONY 7669 Sony will work to resolve your questions more quickly than your retailer or place of purchase Please Do Not Return the Product to the Store On line Registration Available Be sure to register your TV United States http productregis...

Reviews: