background image

© 2004 Sony Corporation

Operating Instructions

Before operating the TV, please read the ‘Safety Information’ section of this 
manual. Retain this manual for future reference. 

Trinitron
Integrated Digital 
Television

2-318-615-

12

GB

KD-28DL11U
KD-28DX51U
KD-32DC11U
KD-32DX51U

®

DX51 DL11U.book  Page 1  Tuesday, May 24, 2005  9:44 AM

Summary of Contents for Trinitron KD-28DX51U

Page 1: ...ting the TV please read the Safety Information section of this manual Retain this manual for future reference Trinitron Integrated Digital Television 2 318 615 12 GB KD 28DL11U KD 28DX51U KD 32DC11U KD 32DX51U DX51 DL11U book Page 1 Tuesday May 24 2005 9 44 AM ...

Page 2: ...oduct Model No KD 28DL11 KD 28DX51U KD 32DC11U KD 32DX51U Serial No ______________ Please note The information in this manual was correct at the time of going to print However some minor changes may have been made late in the product s development All illustrations in this manual have been created during the product s development and may differ slightly to the finished product CAUTION TO PREVENT E...

Page 3: ...ctronic Programme Guide EPG 19 The Favourite list 21 Using the TV menu system 22 Picture Adjustment menu 22 Sound Adjustment menu 23 Detail Adjustment menu 23 Timer menu 24 Set Up menu 24 Manual Programme Preset menu 25 Detail Set Up menu 26 Digital Set up menu 27 Technical Set up menu 28 Digital Tuning menu 28 Connecting Other Equipment Overview of the rear sockets 29 Overview of the front socket...

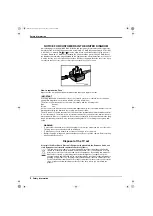
Page 4: ...N or coloured black The wire which is coloured brown must be connected to the terminal which is marked with the letter L or coloured red Do not connect either wire to the earth terminal in the plug which is marked by the letter E or by the safety earth symbol I or coloured green or green and yellow WARNING To prevent shock hazard do not insert the plug cut off from the mains lead into a socket out...

Page 5: ...stall the TV where it may be exposed to mechanical vibrations Clean the screen and cabinet with a soft lightly dampened cloth Do not use any type of abrasive pad alkaline cleaner scouring powder or solvent such as alcohol or benzine or antistatic spray As a safety precaution unplug the TV before cleaning it Pull out the power lead by the plug Do not pull on the power lead itself Take care not to p...

Page 6: ...ity when inserting batteries dispose of batteries in an environmentally friendly way Checking the supplied accessories 1 Inserting batteries into the remote control 2 Remote control SONY CORPORATIO N JAPAN 4 S O N Y C O R P O R A T IO N JA P A N 4 SONY CORPORATION JAPAN 4 DRY BATTERY R6 3 NS SIZE AA 1 5v Batteries RF lead DX51 DL11U book Page 6 Tuesday May 24 2005 9 44 AM ...

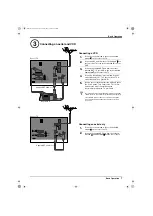
Page 7: ... Insert a pre recorded tape into the VCR and press the PLAY button This enables the TV to locate and store the video channel during the Automatically tuning the TV procedure z Socket names may vary depending on make and model of VCR Refer to your VCR instruction manual for details If your VCR does not have a scart socket follow the connecting instructions above ignoring the scart lead connection 1...

Page 8: ...tore 3 The autotune prompt appears Press the OK button to select Yes The autotune procedure begins 4 The digital autotune display appears on screen and the TV starts to search for all the available digital channels This may take some time please be patient and do not press any buttons on the TV or remote control If no digital or analogue channels are found a message appears asking you to confirm t...

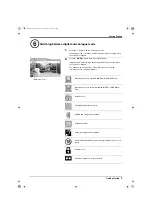
Page 9: ...ons to provide information on the current programme Interactive service is available MHEG or MHP Digital Text Interactive service is currently disabled MHEG or MHP Digital Text Radio Service Scrambled Subscription service Multiple audio languages available Subtitles available Hard of Hearing subtitles available Recommended minimum age for current programme from 4 to 18 years Parental Lock Current ...

Page 10: ...nel button In TV mode Press to return to the previous channel watched provided that the channel was watched for more than five seconds 9 Coloured buttons In digital menu systems Press to select the options at the bottom of the screen in the Favourite and EPG digital menus In analogue text mode Press to use Fastext Refer to page 18 q EPG button In digital TV mode Press to access the Digital Electro...

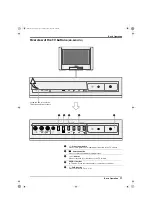
Page 11: ...he automatic tuning process 3 2 buttons Press to increase or decrease the TV volume 4 PROG buttons In TV mode Press to view the next or previous channel 5 On Off button Press to switch the TV on or off Overview of the TV buttons KD 28DL11U 1 3 5 2 4 Lift up the flap to reveal the TV buttons and front sockets DX51 DL11U book Page 11 Tuesday May 24 2005 9 44 AM ...

Page 12: ...s to increase or decrease the TV volume 4 t Video Input button Press to view pictures from equipment connected to the TV sockets 5 Autotune button Press to repeat the automatic tuning process Overview of the TV buttons KD 32DC11U 1 Open the door on the side of the TV to reveal the TV buttons and front sockets 5 4 3 2 DX51 DL11U book Page 12 Tuesday May 24 2005 9 44 AM ...

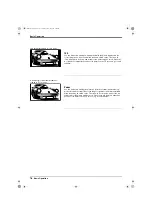
Page 13: ...onnected to the TV sockets 3 2 buttons Press to increase or decrease the TV volume 4 PROG buttons In TV mode Press to view the next or previous channel 5 On Off button Press to switch the TV on or off 3 3 o3 1 2 3 4 5 Overview of the TV buttons KD 28DX51U KD 32DX51U Press gently on the symbol to open the door DX51 DL11U book Page 13 Tuesday May 24 2005 9 44 AM ...

Page 14: ...n If the TV is in digital mode an information banner appears briefly on screen when you change channels Switch to analogue mode a button If the TV is in analogue mode the channel number appears in green lettering when you change channels Change the Screen Mode button Refer to page 15 Watch pictures from equipment connected to the TV s front and rear sockets video input mode t button on the TV or t...

Page 15: ... Satellite TV DVD Smart This mode creates an imitation widescreen effect for conventional 4 3 broadcasts The 4 3 picture is stretched to fill the TV screen eliminating any black areas In Smart mode parts of the top and bottom of the picture may be cut off Press the V or v button to adjust the position of the picture on the TV screen e g to read subtitles 4 3 Use this mode for watching conventional...

Page 16: ...en e g to read subtitles Zoom Use this mode for watching cinemascopic letter box format broadcasts e g movies in letter box format Due to the range of cinemascopic formats available black areas may be visible on the TV screen In Zoom mode parts of the top and bottom of the picture may be cut off Press the V or v button to adjust the position of the picture on the TV screen e g to read subtitles Ci...

Page 17: ...text channel a Digital text from digital channels depending on availability of service This form of digital text is accessed the same way as analogue text b Digital text from a dedicated digital text channel depending on availability of service Some broadcasters provide a separate channel for accessing their digital text service To Press Load digital text button Move around the screen V v B or b b...

Page 18: ...ttom of the text page Press the corresponding Coloured button on the remote control to access the page 1 Select an analogue channel that provides a text service 2 Press the button to access the text service 3 To Press Select a page Numbered buttons Press the PROG buttons to display the previous or next page Superimpose the text over the TV picture mix mode button Press again to exit the text servi...

Page 19: ...urite list refer to page 21 All Categories Contains all available channels News Contains all news channels 1 With the EPG on screen press the BLUE button 2 Press the V v B and b button to highlight the required category The category name is displayed alongside 3 Press the OK button The EPG now only shows current programmes from the category selected 1 With the EPG on screen press the V v B and b b...

Page 20: ...er The Timer pop up menu also has a Timer list option that only appears when a programme has been set to record display The Timer list option allows you to view a list of all programmes that have been set to record display and to delete any programmes 1 With the EPG on screen press the YELLOW button to display the Timer menu 2 Press the V or v button to highlight Timer list Press the OK button to ...

Page 21: ...vious GREEN button next View brief details on current programmes button while highlighting a channel Press again to cancel View a channel OK button while highlighting a channel 3 Press the button to return to normal TV operation 1 With the TV in digital mode press the button to display the Favourite list Press the BLUE button to display the Favourite Set up menu Channels that are stored in the Fav...

Page 22: ... settings With the Mode option highlighted press the b button to adjust Press the V or v button to select the required mode Press the OK button to confirm Contrast Brightness Colour Sharpness Hue These options allow you to adjust the contrast brightness contrast sharpness and hue Sharpness is not adjustable in digital mode Hue is only available when viewing an NTSC colour signal e g USA video tape...

Page 23: ...tail Adjustment menu see below With the Detail Adjustment option highlighted press the OK button to display the Detail Adjustment menu Dolby Virtual This option simulates the full effects of Dolby Pro Logic Surround sound without the need for additional speakers With the Dolby Virtual option highlighted press the b button to adjust Press the V or v button to select On or Off Press the OK button to...

Page 24: ...new position for your channel Press the OK button Your chosen channel has now moved to the new position Repeat to move other channels if required Programme Labels only available in analogue mode Names for channels are usually taken automatically from text services if available This name will be displayed briefly on screen when the channel is selected This option allows you to assign a name of your...

Page 25: ...umbered buttons to enter the channel number of the broadcast you want or your VCR channel number Once you have stored a channel press the B button to highlight Channel 4 Press the v button to highlight Label This option allows you to assign a name of your choice up to 5 letters or number The name is displayed briefly on screen when the channel is selected Press the b button to highlight the settin...

Page 26: ...A TV Outputs an analogue broadcast D TV Outputs an digital broadcast AV1 Outputs signals from equipment connected to the i1 socket AV3 Outputs signals from equipment connected to the t3 socket YC3 Outputs signals from equipment connected to the r3 socket AUTO Outputs whatever is being viewed on the TV screen RGB Centring only available when the TV is receiving a RGB signal When viewing a RGB signa...

Page 27: ...omes active Press the v or V button to set the age limit desired or set to None for unrestricted viewing Press the OK button to confirm Press the B button to return to the Digital Settings menu PIN Code This option allows you to set a PIN code for the first time or to change a current PIN code With the PIN Code option highlighted press the OK button to display the PIN setting screen If you have pr...

Page 28: ...or new channels that have been launched by broadcasters With the Digital Auto Tuning option highlighted press the OK button to display the Autotune prompt Press the OK button to start the auto tuning process When an on screen message informs you that the auto tuning process has finished press the B button to return to the Digital Tuning menu Programme List Edit This option allows you to remove any...

Page 29: ...a VCR Use to connect to the RF IN socket on your VCR If you are not connecting a VCR Use the supplied RF lead to connect to the socket labelled ANALOGUE 6 MODEM MODEM socket For future use only 7 ANALOGUE Aerial socket Analogue If you are connecting a VCR Use to connect to the RF OUT socket on your VCR If you are not connecting a VCR Use the supplied RF lead to connect to the socket labelled 8 PCM...

Page 30: ...as camcorders PlayStation2 2 o3 AV3 Audio Input Use to connect equipment such as camcorders PlayStation2 3 i Headphone socket Use to connect headphones Overview of the front sockets KD 28DL11U 1 2 3 Lift up the flap to reveal the TV buttons and front sockets DX51 DL11U book Page 30 Tuesday May 24 2005 9 44 AM ...

Page 31: ...ers PlayStation2 2 o3 AV3 Audio Input Use to connect equipment such as camcorders PlayStation2 3 i Headphone socket Use to connect headphones Overview of the front sockets KD 32DC11U Open the door on the side of the TV to reveal the TV buttons and front sockets 3 1 2 DX51 DL11U book Page 31 Tuesday May 24 2005 9 44 AM ...

Page 32: ...ut Use to connect equipment such as camcorders PlayStation2 4 o3 AV3 Audio Input Use to connect equipment such as camcorders PlayStation2 z To avoid picture distortion do not connect equipment to the r3 and t3 sockets at the same time Overview of the front sockets KD 28DX51U KD 32DX51U 3 3 o3 1 2 3 4 Press gently on the symbol to open the door DX51 DL11U book Page 32 Tuesday May 24 2005 9 44 AM ...

Page 33: ...ode press the Numbered buttons to directly select the video channel If you wish to move your video channel refer to the Programme Sorting on page 24 If you did not insert a pre recorded tape and press PLAY during the autotune process as instructed on page 7 You will need to manually tune in the VCR signal ideally to analogue channel 0 Insert a pre recorded tape into the VCR and press the PLAY butt...

Page 34: ... x 588 mm Weight KD 28DL11 Approx 43kg KD 28DX51 Approx 44kg KD 32DC11 Approx 61kg KD 32DX51 Approx 61kg Rear Terminals i1 21 pin Euro connector CENELEC standard including audio video input RGB input TV audio video output i2 r 21 pin Euro connector CENELEC standard including audio video input S VIDEO input selectable audio video output DIGITAL RF In Digital ANALOGUE RF In Analogue RF Out Audio out...

Page 35: ...ription only channel Channel not being transmitted Channel used only for data no picture or sound Subscribe to the pay per view service Contact the broadcaster for transmission details Standby indicator flashing Fault irregular flashing Digital programme set for Timer Record regular flash Do not open the cabinet refer to qualified personnel Contact your nearest Service Centre For more information ...

Page 36: ...ubtitles Language 27 Setting 27 Supplied accessories 6 Switching on the TV 8 11 12 13 System Information 28 T Table of contents 3 Text analogue 18 digital 17 Timer digital cancelling 20 digital setting manually 20 pop up list 19 Sleep 24 Timer REC 19 Troubleshooting 35 TV buttons overview 11 12 13 TV menu system 22 TV Speakers 23 Tuning automatic 8 manual analogue channels 25 manual digital channe...

Page 37: ...37 DX51 DL11U book Page 37 Tuesday May 24 2005 9 44 AM ...

Page 38: ...38 DX51 DL11U book Page 38 Tuesday May 24 2005 9 44 AM ...

Page 39: ...KD 28DX51E SU 28XL1 KD 32DX51E SU 32XL1 For KD 28DX51U KD 32DX51U only DX51 DL11U book Page 39 Tuesday May 24 2005 9 44 AM ...

Page 40: ... Printed in UK Recyclable Printed on 100 recycled paper KD 28DL11U KD 28DX51U KD 32DC11U KD 32DX51U KD 28DL11U KD 28DX51U KD 32DX51U KD 32DC11U 2 318 615 12 231861512 DX51 DL11U book Page 40 Tuesday May 24 2005 9 44 AM ...

Reviews: