background image

User guide

Xperia XZ1 Compact

G8441

Summary of Contents for Xperia XZ1 Compact G8441

Page 1: ...User guide Xperia XZ1 Compact G8441 ...

Page 2: ...ocation services 14 Learning the basics 16 Using the touchscreen 16 Turning the screen on or off 18 Smart backlight control 18 Homescreen 18 Application screen 20 Shortcuts for easy actions 21 Navigating Applications 22 Widgets 23 Shortcuts and folders 24 Background and Themes 25 Taking a screenshot 25 Notifications 26 Icons in the status bar 28 Battery and Maintenance 31 Charging your device 31 B...

Page 3: ... 49 Silence your device with Do not disturb 50 Screen settings 51 Screen Pinning 52 Application settings 52 Resetting Your Applications 53 Language Settings 54 Date and time 54 Enhancing the Sound Output 55 Noise cancellation 55 Multiple User Accounts 56 Typing text 58 On Screen Keyboards 58 Editing text 59 Auto fill 59 Calling 60 Making calls 60 Receiving Calls 61 Smart call handling 62 Forwardin...

Page 4: ...ewing photos and videos 89 Album homescreen menu 90 Sharing and managing photos and videos 91 Hiding photos and videos 92 Connectivity 93 Mirroring the screen of your device wirelessly on a TV 93 Connecting your device to USB accessories 93 NFC Near Field Communication 93 Bluetooth wireless technology 95 Smart Apps and Features That Save You Time 98 Google Feed 98 Using your Device as a Wallet 98 ...

Page 5: ...Support and Legal 105 Support application 105 Restarting Resetting and Repairing 105 Warranty SAR and usage guidelines 106 Legal information 106 5 ...

Page 6: ...ed under Model Limitations to Services and Features Some of the services and features described in this User Guide may not be supported in all countries or regions or by all networks or service providers The GSM International Emergency Number can always be used in all countries regions networks and by all service providers provided that the device is connected to the cellphone network Please conta...

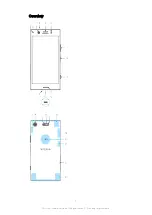
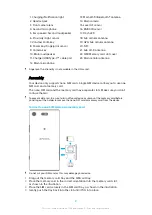
Page 7: ...Overview 7 This is an internet version of this publication Print only for private use ...

Page 8: ...ds Single SIM devices allow you to use one SIM card and a memory card The nano SIM card and the memory card have separate slots Make sure you don t confuse the two To prevent data loss be sure to turn off your device or unmount the memory card before you drag out the holder to remove the nano SIM card or memory card from the device To insert a nano SIM card and a memory card Do not cut your SIM ca...

Page 9: ... moment for your device to start Your SIM card PIN is initially supplied by your service provider but you can change it later from the Settings menu To correct a mistake made while entering your SIM card PIN tap To turn off the device 1 Long press the power key until the Options menu opens 2 In the Options menu tap Power off It may take a while for the device to shut down Why do I need a Google ac...

Page 10: ...y have an account You can also create a Google account using the setup guide when you first start your device or go online later and create an account at https myaccount google com To remove a Google account 1 Find and tap Settings Accounts 2 Select the Google account that you want to remove 3 Tap REMOVE ACCOUNT 4 Tap REMOVE ACCOUNT again to confirm If you remove your Google account any security f...

Page 11: ...efault SIM card lock Lock your SIM cards with a PIN to protect your subscription against misuse The PIN is required every time you restart your device IMEI number Keep a copy of the IMEI number If your device is stolen some network providers can use this number to stop the device from accessing the network in your country or region Backup Back up the content on your device in case your device is d...

Page 12: ...ertain situations for example when connected to a Bluetooth device or carrying it with you The Smart Lock feature is available in most markets countries or regions Go to http www support google com and search smart lock for more information about the Smart Lock feature To enable Smart Lock 1 Set a pattern PIN or password as a screen lock if you have not already done so 2 Find and tap Settings Lock...

Page 13: ... PIN every time you start your device If you enter the PIN incorrectly too many times your SIM card will get blocked You then need to enter your PUK Personal Unblocking Key and a new PIN Your PIN and PUK are supplied by your service provider To set up a SIM card lock 1 Find and tap Settings Lock screen security Advanced SIM card lock 2 Tap the slider beside Lock SIM card to enable 3 Enter the SIM ...

Page 14: ...st be turned on have an internet connection and have the location service activated The Find my device service may not be available in all countries or regions For additional information about Find my device go to https www support google com and search for Find my device If you erased the content on your device using Find my device you must enter the username and password for a Google account in ...

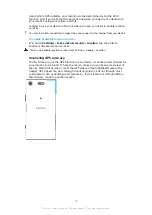
Page 15: ...ion Tap the slider to enable or disable location services You can also enable location services from Settings Google Location Improving GPS accuracy The first time you use the GPS function in your device it can take a few minutes for your location to be found To help the search make sure you have a clear view of the sky Stand still and don t cover the GPS antenna the highlighted area in the image ...

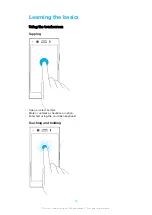
Page 16: ...ng the touchscreen Tapping Open or select an item Mark or unmark a checkbox or option Enter text using the on screen keyboard Touching and holding 16 This is an internet version of this publication Print only for private use ...

Page 17: ...ching in and out Zoom in or out on web pages photos and maps and when you re taking photos or shooting videos Swiping Scroll up or down a list Scroll left or right for example between Homescreen panes Swipe left or right to reveal more options 17 This is an internet version of this publication Print only for private use ...

Page 18: ... and tap Settings Display Sleep 2 Select an option Smart backlight control The smart backlight control keeps the screen on as long as the device is held in your hand Once you put down the device the screen turns off according to your sleep setting To enable or disable the Smart backlight control function 1 Find and tap Settings Display Advanced Smart backlight control 2 Tap the slider to enable or...

Page 19: ...me screen panes You can add new panes to your Home screen up to a maximum of twenty panes and delete panes You can also set the pane that you want to use as the main Home screen pane 19 This is an internet version of this publication Print only for private use ...

Page 20: ...left For more information see Google Feed on page 98 To delete a pane from your Homescreen 1 Touch and hold an empty area on your Homescreen until the device vibrates 2 Flick left or right to browse to the pane that you want to delete then tap in the upper right corner of the pane Homescreen Settings To adjust the grid size of the screen 1 Touch and hold an empty area on your Homescreen until the ...

Page 21: ...location on the Home screen then release it To Move an Application on the Application Screen 1 When the Application screen is open tap 2 Make sure Own order is selected under Sort apps 3 Touch and hold the application until the device vibrates and then drag it to the new location Shortcuts for easy actions You can access shortcuts directly from your app icons to uninstall downloaded apps or reveal...

Page 22: ...cations get closed when you press the Home key to exit while others are paused or continue to run in the background If an application is paused or running in the background you can continue where you left off the next time you open the application Navigating applications overview 1 Clear all Close all the recently used applications 2 Recently used applications window Open a recently used applicati...

Page 23: ...e the two applications that you want to use in split screen mode are open and running in the background 2 Open the application you would like to use in split screen mode then long press The application will be assigned to the first part of the split screen 3 Select the second desired application from the thumbnail list 4 If you want to resize the split screen windows drag the split screen border i...

Page 24: ...a Widget Touch and hold the widget until the device vibrates and then drag it to the new location To Remove a Widget Touch and hold the widget until the device vibrates and then drag it to Remove from home screen Shortcuts and folders Use shortcuts and folders to manage your applications and keep your Home screen tidy Shortcuts and folders overview 1 Access an application using a shortcut 2 Access...

Page 25: ...allpapers add visual effects to your interactions with the touch screen letting the display change dynamically Themes can include a wallpaper a screensaver title bars and a sound scheme that all fit together to create a unique look and feel for your device To change your wallpaper 1 Touch and hold any empty area on your Home screen until the device vibrates 2 Tap Wallpapers 3 To set the same wallp...

Page 26: ...Notifications appear in the following places The status bar The notification panel The lock screen The app icon To open or close the Notification panel 1 To open the Notification panel drag the status bar downward or simply double tap it 2 To close the Notification panel drag or flick the panel upward After opening the Notification panel you can access the Quick Settings panel by dragging the stat...

Page 27: ...tification content Get all notifications on the lock screen When you have this setting turned on keep in mind that all content including the content of incoming emails and chat messages will be visible on your lock screen unless you designate the relevant apps as Hide sensitive content in the Configure notifications settings menu Hide sensitive content You must have a PIN password or pattern set u...

Page 28: ...ow 15 percent To enable or disable the notification light 1 Find and tap Settings Apps notifications Configure notifications 2 Tap the slider beside Use LED light to show incoming notifications to enable or disable the function Icons in the status bar Status icons Signal strength No signal Roaming Sending and downloading LTE data Sending and downloading GPRS data Sending and downloading EDGE data ...

Page 29: ...e or multimedia message Ongoing call Missed call Call on hold Call forwarding is turned on New voicemail message New email message Downloading data Uploading data Mobile data is disabled Perform a basic setup of your device System updates are available Downloading system updates Install the downloaded system updates STAMINA mode is activated Ultra STAMINA mode is activated Battery Care is activate...

Page 30: ...list is for reference purposes only and changes may be made without notice To block an application from sending notifications 1 Find and tap Settings Apps notifications 2 Select the desired application then tap Notifications 3 Tap the Show notifications switch to block application notifications 30 This is an internet version of this publication Print only for private use ...

Page 31: ...the charging During this time the screen may remain completely dark not showing the charging icon It can take up to 4 hours for a completely drained battery to be fully charged Your device has an embedded rechargeable battery that can only be replaced by an authorized Sony repair center Never try to open or take apart the device yourself Doing so can cause damage and void your warranty A wall sock...

Page 32: ...d features You can also use Battery Care to increase the battery s lifetime Background power saving features are activated by default to help you further reduce battery consumption and additional power saving modes are available to help you reduce battery consumption when necessary Power saving features lower the priority of certain non essential device functions If you do not want an application ...

Page 33: ...at are not optimized 3 To add or remove applications from this exemption list tap APPS and select or de select an application from the list to edit its exception settings 4 The list of applications that are exempt will get updated according to your settings You can also configure Power saving exceptions from Settings Apps notifications Advanced Special app access Power saving feature STAMINA mode ...

Page 34: ...ns after enabling the function again Updating your device You should update the software on your device to get the latest functionality enhancements and bug fixes in order to ensure optimal performance When a software update is available appears in the status bar You can also check for new updates manually The easiest way to install a software update is to do it wirelessly from your device However...

Page 35: ...tes for applications 1 Find and tap Settings System Advanced Software update 2 Tap then tap Settings Auto update apps 3 Select the preferred option Updating your device using Xperia Companion To update your device using a computer 1 Using a USB Type C cable connect your device to the computer 2 Make sure that the screen of your device is unlocked and that the USB connection mode on the device is s...

Page 36: ...r device or transfer files Your computer will detect your device once you tap ALLOW With Xperia Companion you can access the file system of your device If you do not have Xperia Companion installed you are requested to install it when you connect your device to the computer Always use a USB cable intended for your specific Xperia model and make sure it is completely dry USB Preferences USB control...

Page 37: ...denly shut down you should consider the following Always try to keep at least 500 MB of free internal storage available Close running applications that you are not using Clear the cache memory for all applications Uninstall downloaded applications that you don t use Transfer photos videos and music from the internal memory to the memory card If your device can t read content on the memory card you...

Page 38: ... its internal memory may be impossible to recover It is recommended to use the Xperia Companion software to make backups which save your data safely to an external device This method is especially recommended if you are updating your device software to a newer Android version The Xperia Backup Restore application is recommended for backing up data before you do a factory data reset With this appli...

Page 39: ...o the computer Backing Up Data With the Google Backup Restore Application Using the Google Backup restore application you can back up data to a Google server You can also turn on the automatic restore function to restore application data and settings when you reinstall an application With this application you can back up the following types of data Applications Bookmarks Wi Fi networks Other setti...

Page 40: ...you trust You can view the permissions granted to a downloaded application by tapping the application under Settings Apps notifications Downloading applications from other sources When your device is set to allow downloads from sources other than Google Play you can download applications directly from other websites by following the relevant download instructions Installing applications of unknown...

Page 41: ...f this causes connection problems try excluding some applications and services from being paused or deactivate STAMINA mode temporarily If you are sharing a device with multiple users only the owner that is the primary user can download internet and messaging settings from the Settings menu but the downloaded settings are applicable to all users To download internet and MMS settings 1 Find and tap...

Page 42: ...s before Wi Fi is enabled To connect to a Wi Fi network 1 Find and tap Settings Network internet Wi Fi 2 Tap the slider to turn on Wi Fi All available Wi Fi networks are displayed 3 Tap a Wi Fi network to connect to it For secured networks enter the relevant password is displayed in the status bar once you are connected The list of available Wi Fi networks refreshes automatically If you cannot con...

Page 43: ...s Tap the Turn on Wi Fi automatically switch to enable or disable To enable or disable Wi Fi network notifications 1 Ensure Wi Fi is turned on for your device 2 Find and tap Settings Network internet Wi Fi 3 Tap Wi Fi preferences 4 Tap the Open network notification slider to enable or disable To view detailed information about a connected Wi Fi network 1 Find and tap Settings Network internet Wi F...

Page 44: ...table hotspot 1 Make sure that both devices have the NFC function turned on and that both screens are active 2 Find and tap Settings Network internet Hotspot tethering 3 Tap One touch portable hotspot Hold the devices together so that the NFC detection areas of each device touch then tap CONNECT This function only works with devices that also support NFC Wi Fi tethering To share your mobile data c...

Page 45: ...l applications For data transferred over your cellular data connection you can also set data usage warnings and limits to avoid additional charges If you are using a device that has multiple users only the owner that is the primary user can adjust data usage settings Adjusting data usage settings can help you keep greater control over data usage but cannot guarantee the prevention of additional ch...

Page 46: ...lect from the following network mode combinations One WCDMA network One GSM network One WCDMA and one GSM network One LTE one WCDMA and one GSM network Your device automatically switches between cellphone networks depending on which cellphone networks are available where you are You can also manually set your device to use a particular cellphone network mode for example WCDMA or GSM Different stat...

Page 47: ... find your information in the Email Calendar and Contacts applications Fingerprint functionality is not available in the United States If you have set up a Microsoft Exchange ActiveSync EAS account on your Xperia device the EAS security settings may limit the lockscreen type to only a PIN or password This occurs when your network administrator specifies a lock screen type for all EAS accounts for ...

Page 48: ...unt 1 Find and tap Settings Accounts 2 Select the EAS account that you want to remove 3 Tap Remove account 4 Tap Remove account again to confirm 48 This is an internet version of this publication Print only for private use ...

Page 49: ...status bar downward using two fingers 2 Tap Volume vibration and sound The volume and vibration can be changed either by using the volume keys or by changing a setting Sounds and tones can only be changed from a setting App settings can override the selected volume vibration and sound settings Volume and vibration You can change the ring media alarm and call volumes Additionally you can set your d...

Page 50: ...ns on page 26 To enable or disable other sounds and tones 1 Find and tap Settings Sound Advanced 2 Tap the sliders to enable or disable the different sounds and tones Silence your device with Do not disturb Activate Do not disturb to mute sounds and limit vibrations and visual indications for situations in which you do not want to be disturbed for example at night Setting options Notifications Exc...

Page 51: ...ing you want to change 3 Use the sliders checkboxes or additional menus to adjust Brightness Adjust the brightness level with the slider You can also enable Adaptive brightness to automatically optimize brightness based on surrounding light White balance Select a preset setting you want You can also use the sliders to adjust the white balance if you select Custom To revert to the default setting s...

Page 52: ...data you should set up your device to request a screen lock PIN password or pattern before someone can unpin the screen To enable or disable screen pinning 1 Find and tap Settings Lock screen security Advanced Screen pinning 2 Tap the slider to enable or disable the function A pattern PIN or password is not mandatory for screen pinning to work To pin a screen 1 Ensure screen pinning is activated o...

Page 53: ...sable automatic updates or enable automatic updates only over Wi Fi connection You have to disable the automatic update feature both in the Play Store app and the What s New app where available to avoid the automatic updating of apps To enable or disable automatic updates for all applications in the Play Store 1 Find and tap 2 Tap then tap Settings Auto update apps 3 Select the preferred option To...

Page 54: ...ing is not available for every application or service Language Settings You can select a default language for your device and change it again at a later time You can also change the writing language for text input To change the language 1 Find and tap Settings System Languages input Languages 2 To change the language drag and drop the desired language to the top of the list If the desired language...

Page 55: ...o confirm The manual adjustment of sound output settings has no effect on voice communication applications For example there is no change in the voice call sound quality To turn on the Surround sound feature 1 Find and tap Settings Sound Audio settings Sound effects Surround sound VPT 2 Flick left or right to select a setting then tap to confirm To minimize volume differences using the Dynamic nor...

Page 56: ... to use for a while The user who sets up the device for the first time becomes the owner of the device Only the owner can manage the accounts of other users Apart from the owner account there are two different types of accounts Regular User This account type is suitable for someone who regularly uses your device Guest User Enable the guest account option for someone who just wants to use your devi...

Page 57: ...ount 2 Find and tap Settings System Advanced Multiple users 3 Find and tap Remove guest 4 Tap Remove You can also clear the guest session from the status bar on any screen as long as you are logged in to the guest account Just drag the status bar downwards using two fingers and tap then tap Remove guest Switching between Multiple User Accounts To switch between multiple user accounts 1 To view the...

Page 58: ...information about SwiftKey go to https swiftkey com To display the on screen keyboard to enter text Tap a text entry field To use the on screen keyboard in landscape orientation When the on screen keyboard is displayed turn the device sideways You may need to adjust the settings in some applications to enable landscape orientation To enter text character by character 1 To enter a character visible...

Page 59: ...e selected text Cut Copy Paste Share Select all The Paste option only appears when you have text saved on the clipboard To Select Text 1 Double tap a word to highlight it 2 You can drag the tabs on both sides of the highlighted word to select more text To Edit Text 1 Double tap a word to make the application bar appear 2 Select the text you want to edit and then use the application bar to make you...

Page 60: ...display the dialpad 3 Enter the phone number and tap To make a call using smart dial 1 Find and tap 2 If the call log appears tap to display the dialpad 3 Use the dialpad to enter letters or numbers that correspond to the contact you want to call As you enter each letter or number a list of possible matches appears 4 Tap the contact that you want to call To make an international call 1 Find and ta...

Page 61: ...nswering the call you can go to the main phone application screen by tapping the heads up notification window Using this method you get more options to manage the call For example you can decide to reject the call with a message To reject a call when the screen is inactive When a call comes in swipe down To reject a call when the screen is active When a call comes in in the heads up notification t...

Page 62: ... handling function Once activated you can handle calls in the following way Answer bring the device to your ear Reject shake the device Ringer off place the device face down To enable or disable Smart call handling 1 Find and tap 2 Tap Settings Calls 3 Tap Smart call handling 4 Tap the switch underneath to enable or disable the function Forwarding Calls You can direct calls to a different recipien...

Page 63: ...p 2 Tap Settings Block numbers Add a number 3 Enter the phone number you want to block then tap BLOCK Calls and texts from this number are blocked To unblock a blocked number 1 Find and tap 2 Tap Settings Block numbers 3 Tap next to the phone number you want to unblock then tap UNBLOCK Calls and texts from this number are no longer blocked 63 This is an internet version of this publication Print o...

Page 64: ...u add a plus sign and the country code before a contact s phone number you do not have to edit the number again when you make calls from abroad To edit a contact 1 Find and tap 2 Tap the contact that you want to edit then tap 3 Edit the desired information 4 When you are done tap Save Some synchronization services do not allow you to edit contact details To add or remove a contact picture 1 Find a...

Page 65: ... your contacts 4 Type a Label name then tap OK To delete a group label 1 Find and tap 2 Tap then tap the label you want to delete 3 Tap then tap Delete label Transferring contacts There are several ways to transfer contacts to your new device You can sync contacts from an online account or import contacts directly from another device If you sync the contacts in your old device with an online accou...

Page 66: ...isible 2 When you are notified of an incoming file to your device drag the status bar downward and tap the notification to accept the file transfer 3 Tap Accept to start the file transfer 4 Drag the status bar downward When the transfer is complete tap the notification 5 Tap the received file and select where to store your contacts To import contacts from a SIM card 1 Find and tap 2 Tap then tap S...

Page 67: ...ap Settings Export to SD card or internal storage vcf file 3 Tap Show internal storage 4 Tap then tap your device s model number beside 5 Select a destination folder or simply tap Save 67 This is an internet version of this publication Print only for private use ...

Page 68: ...g on the provider and the language you use The maximum size of a multimedia message which includes the size of added media files is also provider dependent Contact your service provider for more information Messaging overview 1 Go back to the list of conversations 2 Call the message sender 3 View more options 4 Sent and received messages 5 Send a completed message 6 Add attachments 68 This is an i...

Page 69: ... Tap the conversation containing the desired message 3 Touch and hold the desired message then tap 4 Select a recent contact from the list or tap New message and enter the recipient s name or phone number then select from the suggestions that appear If the recipient is not listed as a contact enter the recipient s number manually 5 Edit the message if necessary then tap To save a file contained in...

Page 70: ...se the video chat application find and tap Setting Up Email Use the email application on your device to send and receive email messages through your email accounts You can have one or several email accounts at the same time including corporate Microsoft Exchange ActiveSync accounts To set up an email account 1 Find and tap 2 Follow the instructions that appear on the screen to complete the setup F...

Page 71: ...at http support sonymobile com global en xperia companion The Music application may not support all music file formats Listening to music Use the Music application to listen to your favorite music Music player overview 1 Minimize the full screen player 2 Search all songs saved to your device 3 View the play queue 4 View menu options 5 Album art if available 6 Add or remove a song as a favorite 7 E...

Page 72: ...ve the necessary rights for the content you wish to use To find song related information online While a song is playing in the Music application tap the album art in the music player screen and then tap More about this Online resources related to the song can include videos on YouTube song lyrics and artist information on Wikipedia To edit music information and download album art 1 While a song is...

Page 73: ...me screen The Music application keeps running in the background To open the Music application when it is playing in the background While a song is playing in the background drag the status bar downward and tap the Music notification Alternatively find and tap 73 This is an internet version of this publication Print only for private use ...

Page 74: ...o the capturing mode last selected 13 Color and brightness 14 Select an aspect ratio 15 Flash settings 16 Self timer Basic camera tips Make sure the lens is clean A fingerprint or a little dirt can diminish photo quality Use the self timer when you need extra time to prepare or to avoid blurred photos Check your device s memory status often High resolution photos and videos consume more memory Rea...

Page 75: ... setting or drag the list to view the available settings Available settings depend on the capturing mode selected To view share or edit photos and videos 1 When using the camera tap the thumbnail to open a photo or video 2 Swipe left or right to view your photos and videos 3 Tap the screen to edit a photo or video Your photos and videos are stored in the Album application See Viewing photos and vi...

Page 76: ...he zoom When using the camera pinch in or out on the camera screen or use the volume key to zoom If you zoom in three or more times this can affect image quality Instead take the photo without zoom then crop it To take a photo When using the camera press the camera key or tap the shutter button to take a photo To record a video 1 When using the camera swipe the screen to select 2 Press the camera ...

Page 77: ...ht conditions Look for light with direction and color that gives a scene shape and depth This type of light occurs just before sunrise and at sunset Natural light from a window is also good For higher quality photos in low light you need to keep the camera steady You can place the camera on a solid surface and use the self timer Even if light conditions are poor try to take photos with and without...

Page 78: ... the shutter speed 1 When using the camera tap Mode 2 Tap SS and drag the slider to adjust the shutter speed 3 Close the settings menu The setting is saved 4 Press the camera key or tap the shutter button to take the photo This setting is only available in Manual mode for the main camera ISO ISO determines how sensitive your camera is to light A low ISO number means lower sensitivity and a high IS...

Page 79: ...ce automatically Cloudy Adjust the color balance for a cloudy sky Daylight Adjust the color balance for sunny outdoor conditions Fluorescent Adjust the color balance for fluorescent lighting Incandescent Adjust the color balance for warm lighting conditions like under light bulbs Optimizing exposure Exposure metering measures the amount of light that strikes an object to optimize exposure Exposure...

Page 80: ...sed for example to change the focus to a person who is at the side of a group photo You can also tap the screen to focus on a specific area or set a specific focus distance These options are only available for the main camera and depend on the capturing mode selected To set the focus distance 1 When using the main camera tap Mode 2 Tap 3 Drag the slider to adjust the focus distance 4 Close the set...

Page 81: ...fie 2 Tap to activate the front camera 3 Tap if you want to use the self timer 4 Press the camera key or tap the shutter button to take a selfie Turn on the Soft skin effect to soften skin tones when taking selfies To take a super wide angle selfie 1 When using the camera select a photo or video capturing mode for your selfie 2 Tap to activate the front camera 3 Tap to activate the super wide angl...

Page 82: ...freeze motion To predict a photo 1 When using the main camera tap 2 Tap Predictive Capture Auto 3 Close the settings menu The setting is saved 4 Press the camera key or tap the shutter button to take a photo 5 Tap the thumbnail to view the result Two to four photos are saved depending on the movement of the object Predictive Capture can also detect unexpected smiles 6 Tap SELECT THE BEST to save o...

Page 83: ...t 5 Select Intelligent active to compensate for all camera movement or Standard to compensate only for high frequency camera movement 6 Close the settings menu The setting is saved 7 Press the camera key or tap the shutter button to record a video Using camera apps Use camera apps to boost creativity and modify your photos and videos and share with friends You can create virtual scenes panoramic p...

Page 84: ...utter button to start recording and take a photo The recording stops automatically Slow motion videos Good lighting conditions are essential when you record slow motion videos Add powerful effects to your videos with Slow motion and Super slow motion video modes The Slow motion effect is added after a video is recorded at normal speed while Super slow motion can be recorded in two ways You can eit...

Page 85: ... lower resolution can be suitable for everyday use Check the memory status from time to time When the memory is full you can transfer photos and videos to another storage device to free up memory See Managing files using a computer on page 36 Choose whether to store photos and videos on your device s internal storage or on an SD card using the Data storage option in the camera settings menu To cha...

Page 86: ...e the width is the first number Main camera 4K 3840 2160 16 9 4K format with 16 9 aspect ratio With 4K you can record videos in four times the resolution of Full HD Full HD 30 fps 1920 1080 16 9 Full HD format with 30 fps and 16 9 aspect ratio Full HD 60 fps 1920 1080 16 9 Full HD format with 60 fps and 16 9 aspect ratio HD 1280 720 16 9 HD format with 16 9 aspect ratio VGA 640 480 4 3 VGA Video G...

Page 87: ...e middle of the frame you can make your photos and videos more interesting To activate or deactivate the grid lines 1 When using the camera tap 2 Drag the list to view more settings 3 Tap the Grid lines slider to enable or disable The setting is saved Photo preview settings You can choose to preview photos as soon as you take them To activate or deactivate previewing 1 When using the camera tap 2 ...

Page 88: ...aved Volume key settings Zoom Use the volume key to zoom in or out Volume The volume key is deactivated for the camera Shutter Use the volume key as a shutter button for photos and videos Sound When Sound is activated the camera makes a sound when you take a photo or when you start or stop a video recording Additionally when you use the self timer the countdown is indicated by a series of beeps To...

Page 89: ...oto or video to view it 8 Scroll up or down to view content To view photos and videos 1 Find and tap Album 2 Tap a photo or video that you want to view If prompted tap 3 Flick left to view the next photo or video Flick right to view the previous photo or video The Album application may not support all file formats You can set the screen to rotate automatically when your device is turned sideways T...

Page 90: ... controls 2 Tap To Fast Forward and Rewind a Video 1 When a video is playing tap the screen to display the controls 2 Drag the progress bar marker left to rewind or right to fast forward To Adjust the Sound Volume of a Video Press the volume key up or down Album homescreen menu From the Album homescreen menu you can browse your photo albums including photos and videos taken using special effects F...

Page 91: ... and videos to a computer or external storage device See Managing files using a computer on page 36 You might not be able to copy send or transfer copyright protected items Some items may not send if the file size is too large To Share a Photo or Video 1 In Album find and tap the photo or video you want to share 2 Tap the screen to display the toolbars then tap 3 Tap the application you want to us...

Page 92: ...Album homescreen they can only be viewed from the Hidden folder To Hide a Photo or Video 1 In Album find and tap the photo or video you want to hide 2 Tap the screen to display the toolbars then tap 3 Tap Hide OK To View Your Hidden Photos and Videos 1 In Album tap then tap Hidden 2 Tap a photo or video to view it 3 Flick left to view the next photo or video Flick right to view the previous photo ...

Page 93: ... the notification in the status bar of your device Drag the status bar downwards and tap Disconnect then tap OK Connecting your device to USB accessories You can use a USB Type C host adapter to connect your device to USB accessories such as USB mass storage devices analog headphones game controllers USB keyboards and USB mice If the USB accessory has a USB Type C connector a USB Type C host adapt...

Page 94: ...on is saved on the receiving device and displayed on its screen To share a music file with another device using NFC 1 Make sure that both your device and the receiving device have the NFC function turned on and that both screens are active and unlocked 2 To open the Music application find and tap 3 Select a music category and browse to the track you want to share 4 Tap the track to play it You can...

Page 95: ...ing NFC Tags Your device can scan various kinds of NFC tags to receive additional information such as a web address For example it can scan embedded tags on a poster on a billboard advertisement or beside a product in a retail store To Scan an NFC Tag 1 Make sure your device has the NFC function turned on and the screen is active and unlocked 2 Place your device over the tag so the NFC detection a...

Page 96: ...e next time you connect to a previously paired Bluetooth device Some Bluetooth devices for example most Bluetooth headsets require you to both pair and connect with the other device You can pair your device with several Bluetooth devices but you can only connect to one Bluetooth profile at the same time To pair your device with another Bluetooth device 1 Make sure that the device you want to pair ...

Page 97: ... on the receiving device To receive items using Bluetooth 1 Ensure the Bluetooth function is on and is visible to other Bluetooth devices 2 The sending device now starts sending data to your device 3 If prompted enter the same passcode on both devices or confirm the suggested passcode 4 When you are notified of an incoming file to your device drag the status bar downward and tap the notification t...

Page 98: ...e reserved Using your Device as a Wallet You can use your device to pay for goods without reaching for your real wallet and manage all payment services in one place When making a payment remember to turn on the NFC function before you touch your device to a card reader For more information about NFC see NFC Near Field Communication on page 93 Mobile payment services may not be available in all reg...

Page 99: ...on for a more accurate experience To activate Abroad actions 1 Find and tap Settings Xperia Assist Xperia Actions 2 Tap Abroad 3 Tap and mark the checkboxes as desired 4 Tap SAVE 5 Tap the sliders to enable or disable the functions To activate Commute actions 1 Find and tap Settings Xperia Assist Xperia Actions 2 Tap Commute 3 Tap the time interval Select the time interval you want to edit or tap ...

Page 100: ...in the status bar 1 Select a view type and the calendars you want to view 2 Access an overview of the current month 3 Return to the current date 4 Access other options 5 Scroll up or down to browse the calendar 6 Add a calendar entry To Learn More about Calendar When the Calendar application is open tap then find and tap Help feedback Clock You can set one or several alarms and use any sound saved...

Page 101: ...ap SNOOZE To turn off an alarm when it sounds Drag the slider to turn off the alarm or tap Dismiss if the screen is active To turn off a snoozed alarm you can drag down the status bar to open the Notification panel and then tap Dismiss To edit an existing alarm 1 Find and tap Clock then tap for the alarm that you want to edit 2 Tap Edit time and select the desired values then tap OK 3 Tap MORE SET...

Page 102: ...ap the slider for Volume increase 3 Tap Save To set a recurring alarm 1 Find and tap Clock then tap for the alarm that you want to edit 2 Tap the Repeat checkbox 3 Mark the relevant days as desired To select the alarm type for an alarm 1 Find and tap Clock then tap for the alarm that you want to edit 2 Tap MORE SETTINGS Alarm type then select an option 3 Tap Save To set the side keys behavior 1 Fi...

Page 103: ...size by tapping the scale Display Size You can use the Display size setting to increase or decrease all elements on your screen not just text To set display size 1 Find and tap Settings Accessibility 2 Tap Display size and then set the desired display size by tapping the scale Color correction The Color correction setting adjusts how colors are displayed on the screen for users who are color blind...

Page 104: ...th the left and right audio channels simultaneously when playing audio Using Mono instead of Stereo playback is most useful for users with certain types of hearing loss or for safety reasons for example when you need to listen to your surroundings To enable or disable Mono audio 1 Find and tap Settings Accessibility 2 Tap the slider beside Mono audio to enable or disable this function Switch Acces...

Page 105: ...turn on or you want to reset your device s software you can use Xperia Companion to repair your device For more information on using Xperia Companion see Xperia Companion on page 35 If you are sharing a device with multiple users you may need to log in as the owner that is the primary user to reset your device to its original factory settings To Restart Your Device Your device may fail to restart ...

Page 106: ...nd password Depending on your security settings you may need to enter them in order to restart the device after a software repair 1 Ensure Xperia Companion is installed on your PC or Mac 2 Open the Xperia Companion software on the computer and click Software repair on the main screen 3 Follow the instructions that appear on the screen to reinstall the software and complete the repair Warranty SAR ...

Page 107: ...non commercial use of a consumer for i encoding video in compliance with the MPEG 4 visual standard MPEG 4 video or the AVC standard AVC video and or ii decoding MPEG 4 or AVC video that was encoded by a consumer engaged in a personal and non commercial activity and or was obtained from a video provider licensed by MPEG LA to provide MPEG 4 and or AVC video No license is granted or shall be implie...

Reviews: